2016 FORD F150 ABS
[x] Cancel search: ABSPage 151 of 505

WARNINGS
Install the head restraint properly to
help minimize the risk of neck injury
in the event of a crash.
Note:
Adjust the seatback to an upright
driving position before adjusting the head
restraint. Adjust the head restraint so that
the top of it is level with the top of your head
and as far forward as possible. Make sure
that you remain comfortable. If you are
extremely tall, adjust the head restraint to
its highest position.
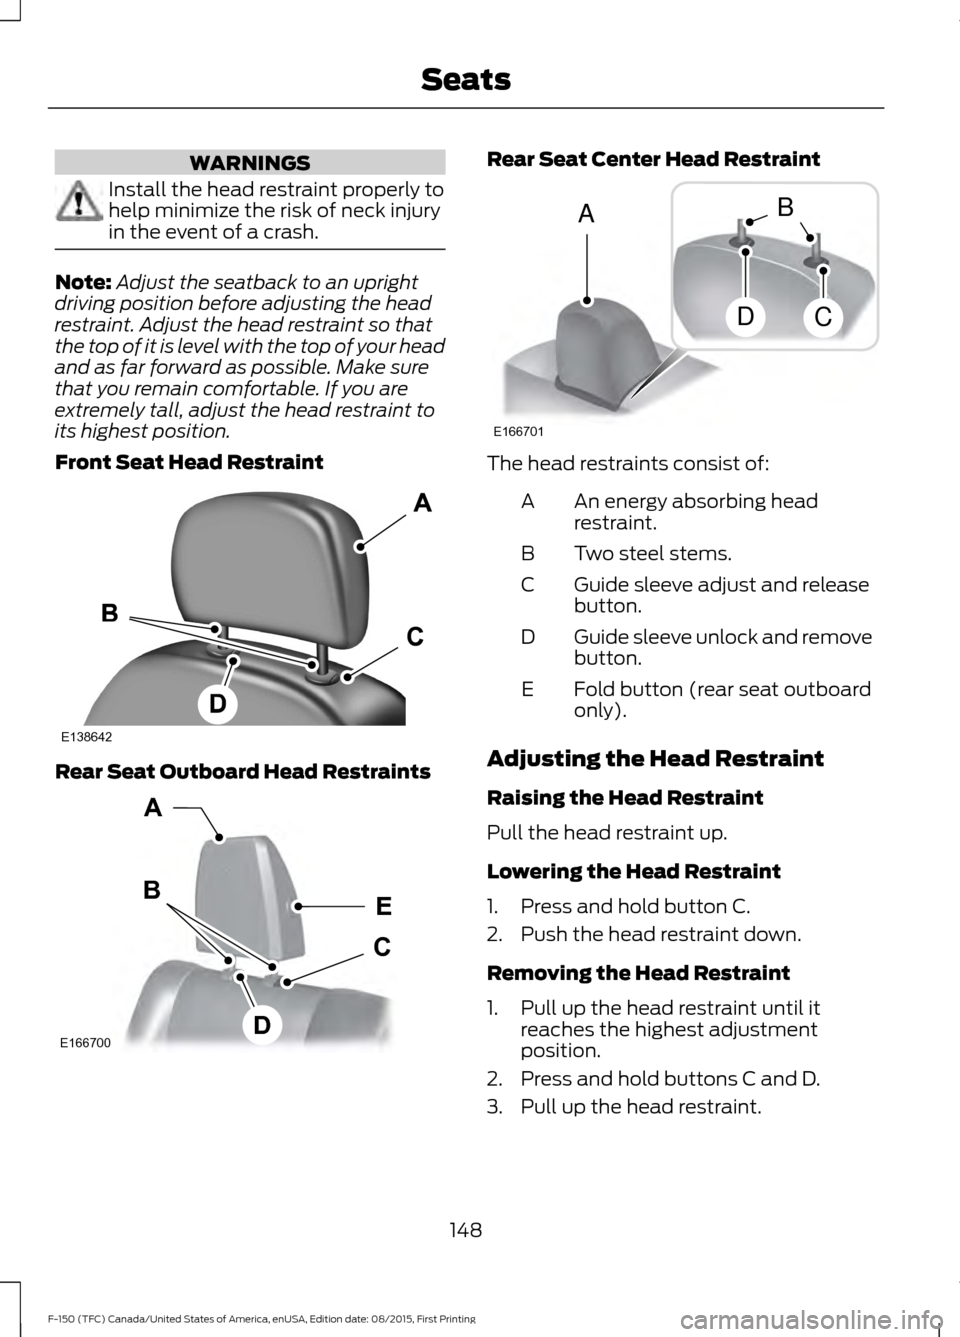
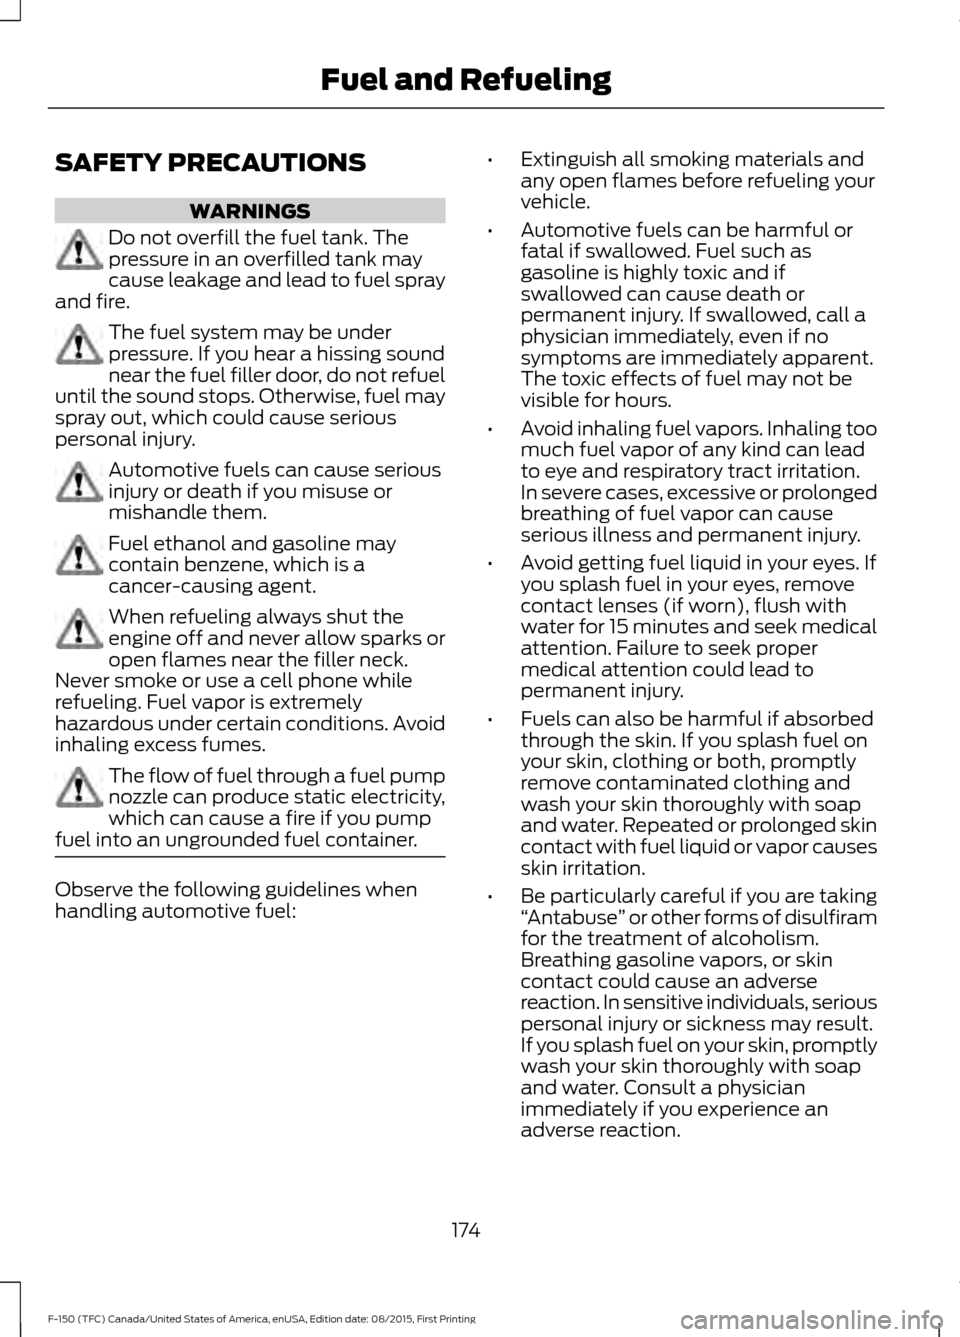
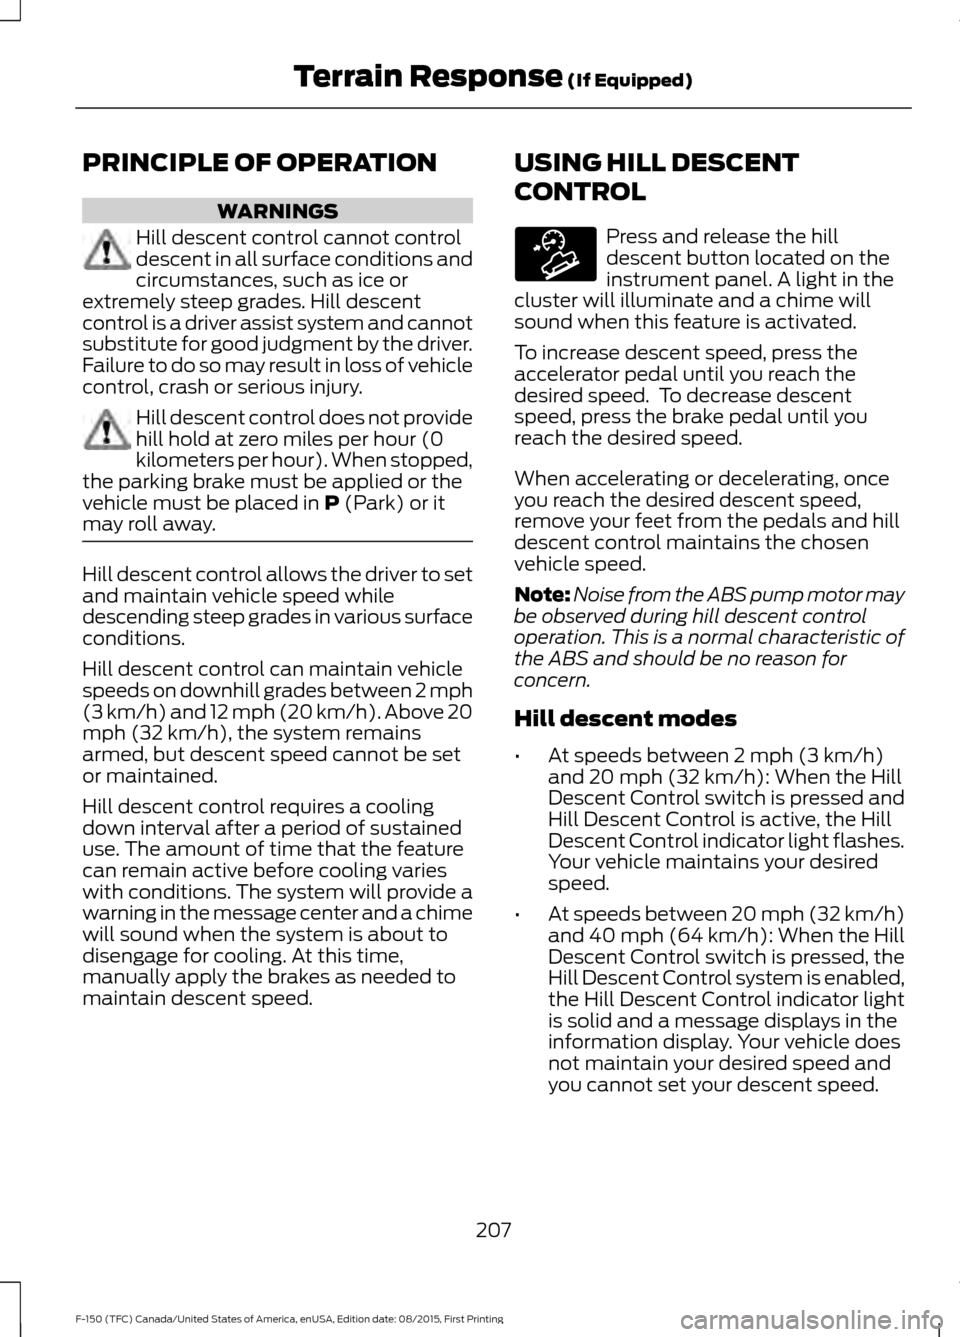
Front Seat Head Restraint Rear Seat Outboard Head Restraints Rear Seat Center Head Restraint
The head restraints consist of:
An energy absorbing head
restraint.
A
Two steel stems.
B
Guide sleeve adjust and release
button.
C
Guide sleeve unlock and remove
button.
D
Fold button (rear seat outboard
only).
E
Adjusting the Head Restraint
Raising the Head Restraint
Pull the head restraint up.
Lowering the Head Restraint
1. Press and hold button C.
2. Push the head restraint down.
Removing the Head Restraint
1. Pull up the head restraint until it reaches the highest adjustment
position.
2. Press and hold buttons C and D.
3. Pull up the head restraint.
148
F-150 (TFC) Canada/United States of America, enUSA, Edition date: 08/2015, First Printing SeatsE138642 E166700
E
D
C
B
A E166701
A
DC
B
Page 177 of 505

SAFETY PRECAUTIONS
WARNINGS
Do not overfill the fuel tank. The
pressure in an overfilled tank may
cause leakage and lead to fuel spray
and fire. The fuel system may be under
pressure. If you hear a hissing sound
near the fuel filler door, do not refuel
until the sound stops. Otherwise, fuel may
spray out, which could cause serious
personal injury. Automotive fuels can cause serious
injury or death if you misuse or
mishandle them.
Fuel ethanol and gasoline may
contain benzene, which is a
cancer-causing agent.
When refueling always shut the
engine off and never allow sparks or
open flames near the filler neck.
Never smoke or use a cell phone while
refueling. Fuel vapor is extremely
hazardous under certain conditions. Avoid
inhaling excess fumes. The flow of fuel through a fuel pump
nozzle can produce static electricity,
which can cause a fire if you pump
fuel into an ungrounded fuel container. Observe the following guidelines when
handling automotive fuel: •
Extinguish all smoking materials and
any open flames before refueling your
vehicle.
• Automotive fuels can be harmful or
fatal if swallowed. Fuel such as
gasoline is highly toxic and if
swallowed can cause death or
permanent injury. If swallowed, call a
physician immediately, even if no
symptoms are immediately apparent.
The toxic effects of fuel may not be
visible for hours.
• Avoid inhaling fuel vapors. Inhaling too
much fuel vapor of any kind can lead
to eye and respiratory tract irritation.
In severe cases, excessive or prolonged
breathing of fuel vapor can cause
serious illness and permanent injury.
• Avoid getting fuel liquid in your eyes. If
you splash fuel in your eyes, remove
contact lenses (if worn), flush with
water for 15 minutes and seek medical
attention. Failure to seek proper
medical attention could lead to
permanent injury.
• Fuels can also be harmful if absorbed
through the skin. If you splash fuel on
your skin, clothing or both, promptly
remove contaminated clothing and
wash your skin thoroughly with soap
and water. Repeated or prolonged skin
contact with fuel liquid or vapor causes
skin irritation.
• Be particularly careful if you are taking
“Antabuse ” or other forms of disulfiram
for the treatment of alcoholism.
Breathing gasoline vapors, or skin
contact could cause an adverse
reaction. In sensitive individuals, serious
personal injury or sickness may result.
If you splash fuel on your skin, promptly
wash your skin thoroughly with soap
and water. Consult a physician
immediately if you experience an
adverse reaction.
174
F-150 (TFC) Canada/United States of America, enUSA, Edition date: 08/2015, First Printing Fuel and Refueling
Page 210 of 505

PRINCIPLE OF OPERATION
WARNINGS
Hill descent control cannot control
descent in all surface conditions and
circumstances, such as ice or
extremely steep grades. Hill descent
control is a driver assist system and cannot
substitute for good judgment by the driver.
Failure to do so may result in loss of vehicle
control, crash or serious injury. Hill descent control does not provide
hill hold at zero miles per hour (0
kilometers per hour). When stopped,
the parking brake must be applied or the
vehicle must be placed in P (Park) or it
may roll away. Hill descent control allows the driver to set
and maintain vehicle speed while
descending steep grades in various surface
conditions.
Hill descent control can maintain vehicle
speeds on downhill grades between 2 mph
(3 km/h) and 12 mph (20 km/h). Above 20
mph (32 km/h), the system remains
armed, but descent speed cannot be set
or maintained.
Hill descent control requires a cooling
down interval after a period of sustained
use. The amount of time that the feature
can remain active before cooling varies
with conditions. The system will provide a
warning in the message center and a chime
will sound when the system is about to
disengage for cooling. At this time,
manually apply the brakes as needed to
maintain descent speed. USING HILL DESCENT
CONTROL Press and release the hill
descent button located on the
instrument panel. A light in the
cluster will illuminate and a chime will
sound when this feature is activated.
To increase descent speed, press the
accelerator pedal until you reach the
desired speed. To decrease descent
speed, press the brake pedal until you
reach the desired speed.
When accelerating or decelerating, once
you reach the desired descent speed,
remove your feet from the pedals and hill
descent control maintains the chosen
vehicle speed.
Note: Noise from the ABS pump motor may
be observed during hill descent control
operation. This is a normal characteristic of
the ABS and should be no reason for
concern.
Hill descent modes
• At speeds between
2 mph (3 km/h)
and 20 mph (32 km/h): When the Hill
Descent Control switch is pressed and
Hill Descent Control is active, the Hill
Descent Control indicator light flashes.
Your vehicle maintains your desired
speed.
• At speeds between
20 mph (32 km/h)
and 40 mph (64 km/h): When the Hill
Descent Control switch is pressed, the
Hill Descent Control system is enabled,
the Hill Descent Control indicator light
is solid and a message displays in the
information display. Your vehicle does
not maintain your desired speed and
you cannot set your descent speed.
207
F-150 (TFC) Canada/United States of America, enUSA, Edition date: 08/2015, First Printing Terrain Response
(If Equipped)E163957
Page 212 of 505

PARKING AID (If Equipped)
WARNINGS
To help avoid personal injury, please
read and understand the limitations
of the system as contained in this
section. Sensing is only an aid for some
(generally large and fixed) objects when
moving in reverse on a flat surface at
parking speeds. Certain objects with
surfaces that absorb ultrasonic waves,
traffic control systems, fluorescent lamps,
inclement weather, air brakes, and external
motors and fans may also affect the
function of the sensing system; this may
include reduced performance or a false
activation. To help avoid personal injury, always
use caution when in reverse (R) and
when using the sensing system.
This system is not designed to
prevent contact with small or moving
objects. The system is designed to
provide a warning to assist the driver in
detecting large stationary objects to avoid
damaging your vehicle. The system may
not detect smaller objects, particularly
those close to the ground. Certain add-on devices such as large
trailer hitches, bike or surfboard racks
and any device that may block the
normal detection zone of the system, may
create false beeps. Note:
Keep the sensors, located on the
bumper or fascia, free from snow, ice and
large accumulations of dirt. If the sensors
are covered, the system ’s accuracy can be
affected. Do not clean the sensors with
sharp objects.
Note: If your vehicle sustains damage to
the bumper or fascia, leaving it misaligned
or bent, the sensing zone may be altered
causing inaccurate measurement of
obstacles or false alarms. Note:
If your vehicle is equipped with
MyKey ™, it is possible to prevent turning
the sensing system off. See MyKey ™
(page
57).
Note: If your vehicle is equipped with a
trailer tow package and a trailer is
connected to your vehicle, the rear sensing
system will be disabled and will not allow
you to switch the system on through the
information display. When you shift your
vehicle into reverse (R), a message appears
in the information display stating that a
trailer is connected and the rear sensing
system is disabled. If equipped, the center
stack rear sensing system display will not
be present.
The sensing system warns the driver of
obstacles within a certain range of the
bumper area. The system turns on
automatically when you switch on the
ignition.
When receiving a detection warning, the
radio volume reduces to a predetermined
level. After the warning goes away, the
radio volume returns to the previous level.
You can switch the system off through the
information display menu or from the
pop-up message that appears once the
transmission is shifted into reverse (R).
If a fault is present in the system, a warning
message appears in the information
display and will not allow you to switch the
faulted system on.
Rear Sensing System
The rear sensors are only active when the
transmission is in reverse (R). As your
vehicle moves closer to the obstacle, the
rate of the audible warning increases.
When the obstacle is less than
12 in
(30 cm) away, the warning sounds
209
F-150 (TFC) Canada/United States of America, enUSA, Edition date: 08/2015, First Printing Parking Aids
Page 214 of 505

The system may not function correctly if
something passes between the front
bumper and the parking space (a
pedestrian or cyclist) or if the edge of the
neighboring parked vehicle is high off the
ground (for example, a bus, tow truck or
flatbed truck).
Note:
The sensors may not detect objects
in heavy rain, snow or other conditions that
cause disruptive reflections.
Note: Keep the sensors, located on the
bumper or fascia, free from snow, ice and
large accumulations of dirt. Covered sensors
can affect the system's accuracy. Do not
clean the sensors with sharp objects.
Note: The sensors may not detect objects
with surfaces that absorb ultrasonic waves.
Do not use the system if:
• You have attached a foreign object
(bike rack or trailer) to the front or rear
of your vehicle or close to the sensors.
• You have attached an overhanging
object (surfboard) to the roof. •
A foreign object damages or obstructs
the sensors.
• The correct tire size is not in use on your
vehicle (for example, a mini-spare tire).
Using Active Park Assist Press the button located on the
center console near the gearshift
lever.
The touchscreen displays a message and
a corresponding graphic to indicate it is
searching for a parking space. Use the
direction indicator to indicate which side
of your vehicle you want the system to
search.
Note: The system automatically searches
on the passenger side. You can use the
direction indicator to toggle between the
driver and passenger side.
Note: You can also activate the Active Park
Assist system after you have already driven
partially or completely past a parking space.
To do so, press the Active Park button and
the system will inform you if you have
recently passed a suitable parking space. When the system finds a suitable space,
the touchscreen displays a message and
a tone sounds. Stop your vehicle and
follow the instructions on the touchscreen.
If your vehicle is moving very slowly, you
may need to pull forward a short distance
before the system is ready to park.
Note:
You must observe that the selected
space remains clear of obstructions at all
times in the maneuver.
211
F-150 (TFC) Canada/United States of America, enUSA, Edition date: 08/2015, First Printing Parking AidsE146186 A
E130107
Page 234 of 505

Troubleshooting
Why is the feature not available (line markings are gray) when I can see the lane markings
on the road?
Vehicle speed is outside the operational range of the feature
Sun is shining directly into the camera lens
Quick intentional lane change
Staying too close to the lane marking
Driving at high speeds in curves
Previous feature activation happened within the last one second
Ambiguous lane markings (mainly in construction zones)
Rapid transition from light to dark or vice versa
Sudden offset in lane markings
ABS or AdvanceTrac activation
Camera blockage due to dirt, grime, fog, frost or water on the windshield
Driving too close to the vehicle in front of you
Transitioning between no lane markings to lane markings or vice versa
Standing water on the road
Faint lane markings (partial yellow lane markings on concrete roads)
Lane width too narrow or too wide
Camera not calibrated after a windshield replacement
Driving on tight roads or on uneven roads
Vehicle accessories such as snow plows Why does the vehicle not come back into the middle of the lane always, as expected, in
the Aid or Aid + Alert mode?
High cross winds
Large road crown
Rough roads, grooves, shoulder drop-offs
231
F-150 (TFC) Canada/United States of America, enUSA, Edition date: 08/2015, First Printing Driving Aids
Page 280 of 505

•
Only use recovery straps that have a
minimum breaking strength two to
three times the gross vehicle weight of
the stuck vehicle.
• Make sure the recovery strap is in good
condition and free of visible cuts, tears
or damage.
• Use a damper device such as a tarp,
heavy blanket or piece of carpet
draped over the recovery strap to help
absorb the energy in the event the
strap breaks.
• Make sure the stuck vehicle is not
loaded heavier than its gross vehicle
weight rating specified on the
certification label.
• Always align the tow vehicle and stuck
vehicle in a straight line (within 10
degrees).
• Keep bystanders to the sides of the
vehicle, at a distance of at least twice
the length of the recovery strap. This
helps avoid injury from the hazard of a
recovery hook or strap breaking, or a
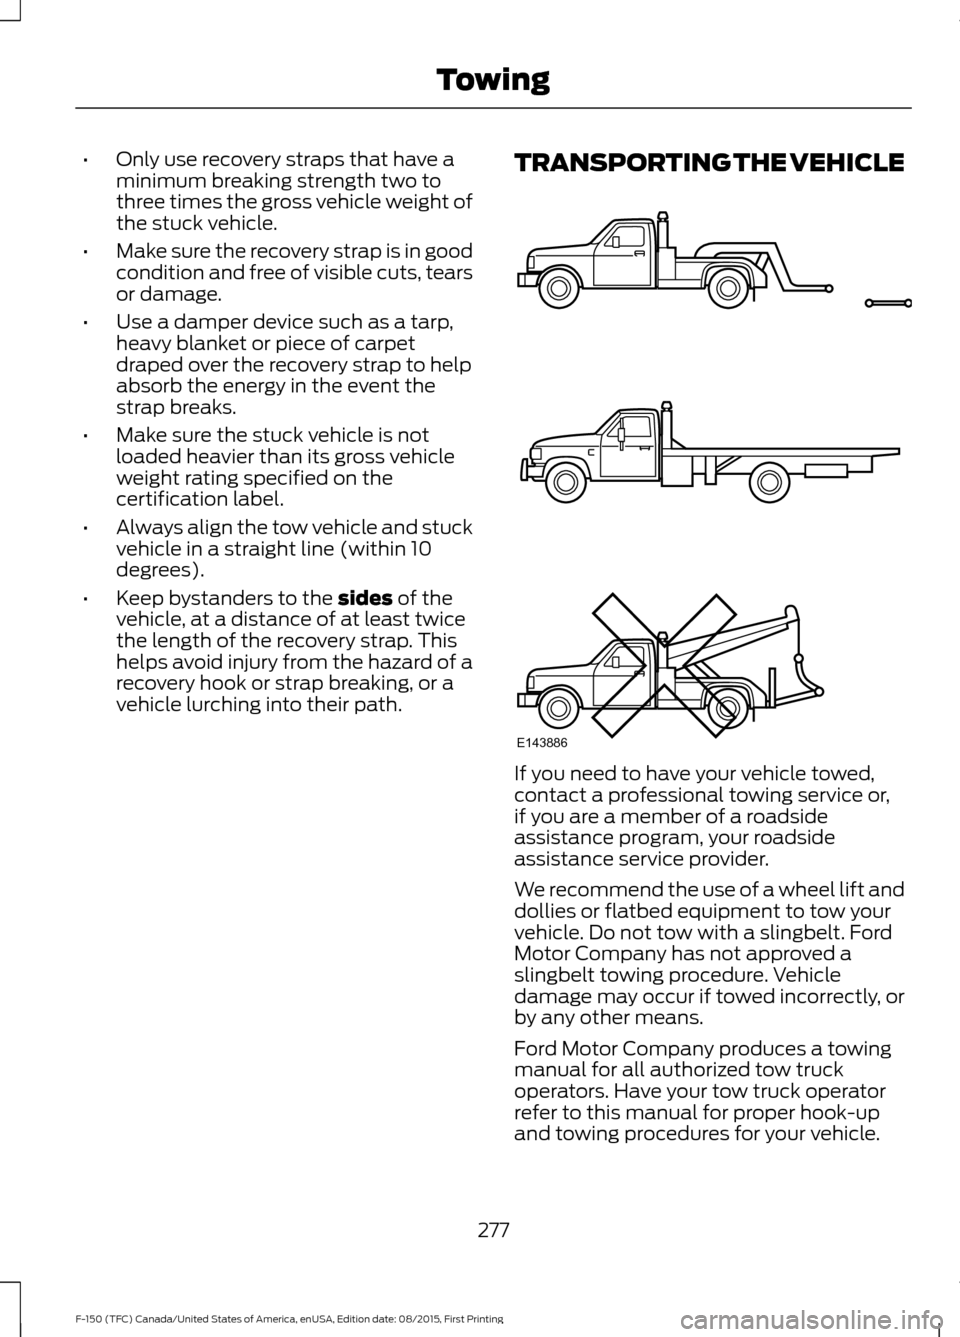
vehicle lurching into their path. TRANSPORTING THE VEHICLE
If you need to have your vehicle towed,
contact a professional towing service or,
if you are a member of a roadside
assistance program, your roadside
assistance service provider.
We recommend the use of a wheel lift and
dollies or flatbed equipment to tow your
vehicle. Do not tow with a slingbelt. Ford
Motor Company has not approved a
slingbelt towing procedure. Vehicle
damage may occur if towed incorrectly, or
by any other means.
Ford Motor Company produces a towing
manual for all authorized tow truck
operators. Have your tow truck operator
refer to this manual for proper hook-up
and towing procedures for your vehicle.
277
F-150 (TFC) Canada/United States of America, enUSA, Edition date: 08/2015, First Printing TowingE143886
Page 306 of 505

Protected components
Fuse amp rating
Fuse or relay number
Not used.
—
106
Anti-lock brakes.
10A**
107
Not used.
—
108
Powertrain control module.
10A**
109
4x4 run/start.
10A**
110
Adaptive cruise control.
Transmission pump run-start.
10A**
111
Not used.
—
112
Blind spot information system.
7.5A**
113
Rear view camera.
Front view camera.
Voltage quality module.
Electric fan 2 relay.
—
114
Not used.
—
115
Not used.
—
116
*Cartridge fuses
**Mini fuses
Passenger Compartment Fuse
Panel
The fuse panel is in the right-hand side of
the passenger footwell behind a trim panel.
To remove the trim panel, pull it toward
you and swing it away from the side. To
reinstall it, line up the tabs with the grooves
on the panel, and then push it shut. To remove the fuse panel cover, press in
the tabs on both sides of the cover, and
then pull it off.
To reinstall the fuse panel cover, place the
top part of the cover on the fuse panel and
push the bottom part until it latches.
Gently pull on the cover to make sure it has
latched properly.
303
F-150 (TFC) Canada/United States of America, enUSA, Edition date: 08/2015, First Printing Fuses