2016 FORD F SERIES MOTORHOME AND COMMERCIAL CHASSIS jump cable
[x] Cancel search: jump cablePage 58 of 154

WARNINGS
Keep batteries out of reach ofchildren. Batteries contain sulfuricacid. Avoid contact with skin, eyes orclothing. Shield your eyes when workingnear the battery to protect against possiblesplashing of acid solution. In case of acidcontact with skin or eyes, flushimmediately with water for a minimum of15 minutes and get prompt medicalattention. If acid is swallowed, call aphysician immediately.
Use only adequately sized cableswith insulated clamps.
Preparing Your Vehicle
Do not attempt to push-start yourautomatic transmission vehicle.
Note:Attempting to push-start a vehiclewith an automatic transmission may causetransmission damage.
Note:Use only a 12-volt supply to start yourvehicle.
Note:Do not disconnect the battery of thedisabled vehicle as this could damage thevehicle electrical system.
Park the booster vehicle close to the hoodof the disabled vehicle, making sure thetwo vehicles do not touch.
Connecting the Jumper Cables
WARNINGS
Do not attach the cables to fuel lines,engine rocker covers, the intakemanifold or electrical componentsas grounding points. Stay clear of movingparts. To avoid reverse polarityconnections, make sure that you correctlyidentify the positive (+) and negative (-)terminals on both the disabled and boostervehicles before connecting the cables.
WARNINGS
Do not attach the end of the positivecable to the studs or L-shaped eyeletlocated above the positive (+)terminal of your vehicle’s battery. Highcurrent may flow through and causedamage to the fuses.
Do not connect the end of thesecond cable to the negative (-)terminal of the battery to be jumped.A spark may cause an explosion of thegases that surround the battery.
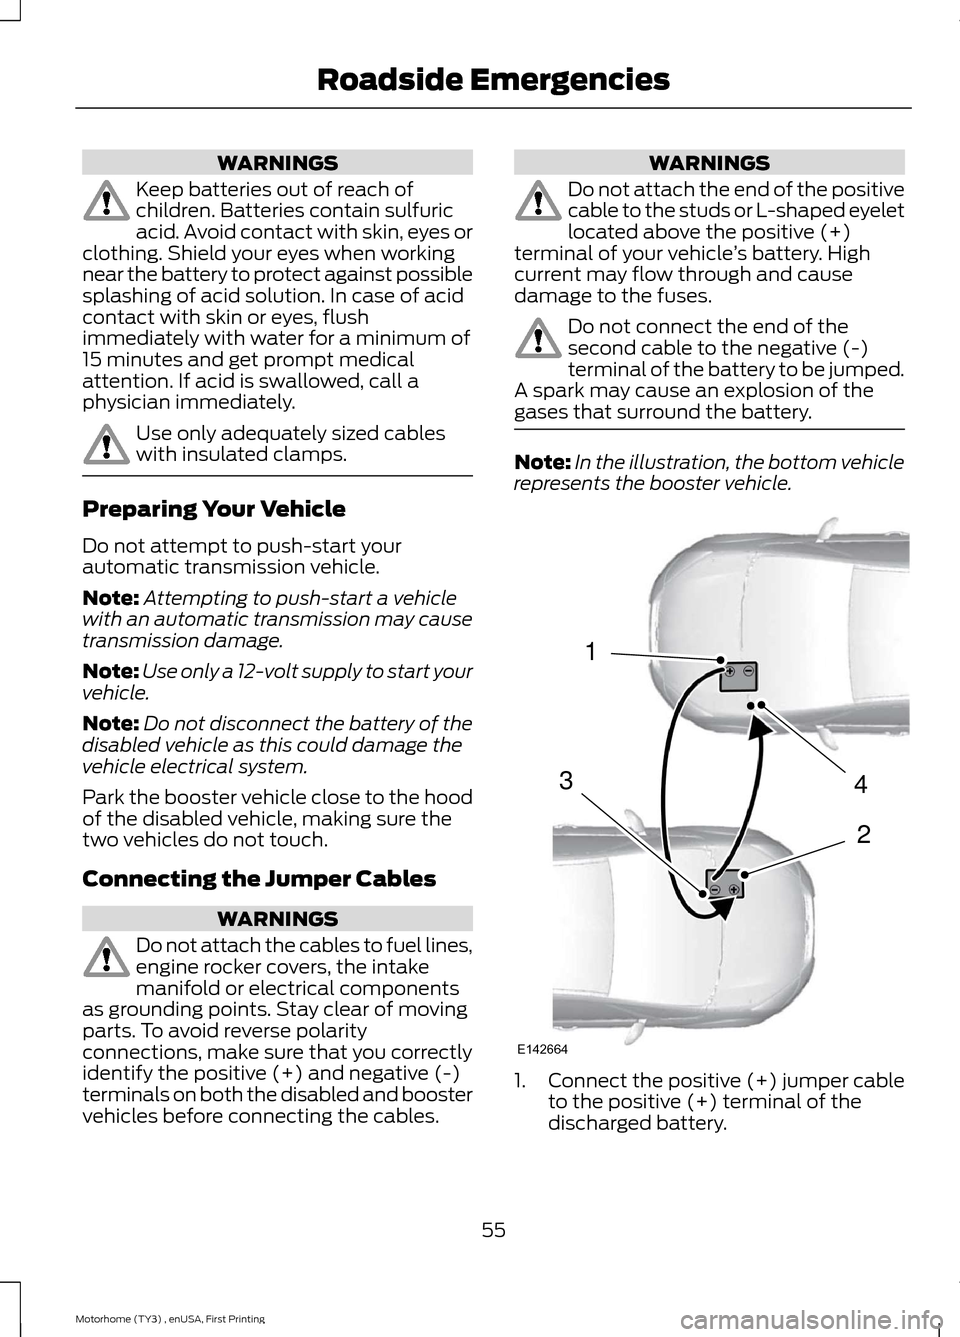
Note:In the illustration, the bottom vehiclerepresents the booster vehicle.
1.Connect the positive (+) jumper cableto the positive (+) terminal of thedischarged battery.
55Motorhome (TY3) , enUSA, First PrintingRoadside Emergencies4213E142664
Page 59 of 154

2.Connect the other end of the positive(+) cable to the positive (+) terminalof the booster vehicle battery.
3.Connect the negative (-) cable to thenegative (-) terminal of the boostervehicle battery.
4.Make the final connection of thenegative (-) cable to an exposed metalpart of the stalled vehicle's engine,away from the battery and the fuelinjection system, or connect thenegative (-) cable to a groundconnection point if available.
Jump Starting
1.Start the engine of the booster vehicleand rev the engine moderately, or pressthe accelerator gently to keep yourengine speed between 2000 and 3000RPM, as shown in your tachometer.
2.Start the engine of the disabled vehicle.
3.Once the disabled vehicle has beenstarted, run both vehicle engines for anadditional three minutes beforedisconnecting the jumper cables.
Removing the Jumper Cables
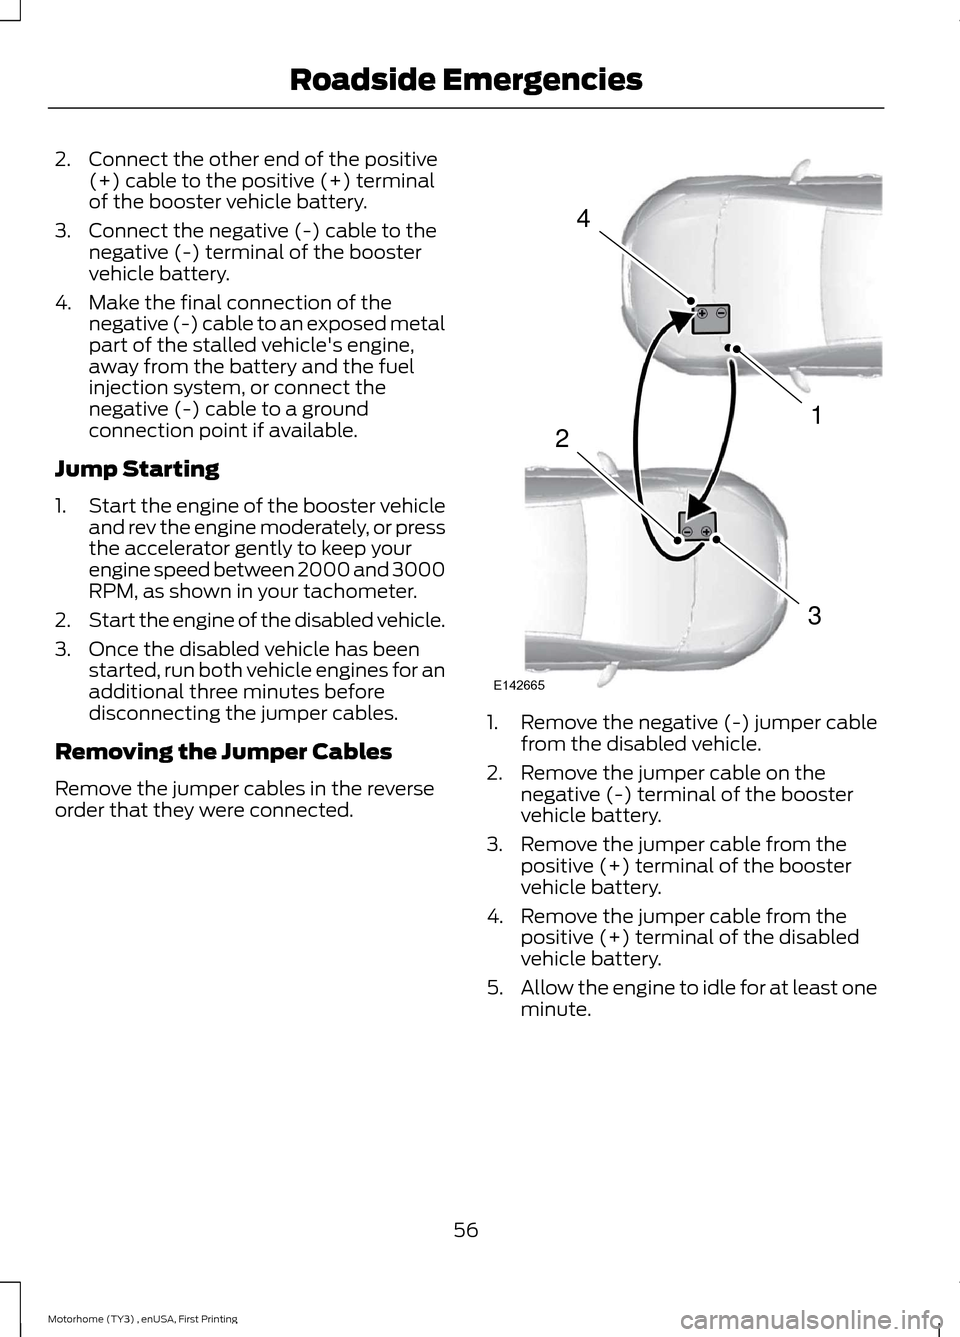
Remove the jumper cables in the reverseorder that they were connected.
1.Remove the negative (-) jumper cablefrom the disabled vehicle.
2.Remove the jumper cable on thenegative (-) terminal of the boostervehicle battery.
3.Remove the jumper cable from thepositive (+) terminal of the boostervehicle battery.
4.Remove the jumper cable from thepositive (+) terminal of the disabledvehicle battery.
5.Allow the engine to idle for at least oneminute.
56Motorhome (TY3) , enUSA, First PrintingRoadside Emergencies4132E142665
Page 152 of 154

J
Jump Starting the Vehicle...........................54Connecting the Jumper Cables.......................55Jump Starting........................................................56Preparing Your Vehicle.......................................55Removing the Jumper Cables.........................56
L
Lighting Control................................................11Headlamp Flasher..................................................11High Beams..............................................................11Lighting.................................................................11Load Carrying..................................................38Load Limit.........................................................38Vehicle Loading - with and without aTrailer...................................................................38Lug NutsSee: Changing a Road Wheel.........................114
M
Maintenance.....................................................81General Information.............................................81Message CenterSee: Information Displays..................................18Mobile Communications Equipment.........7Motorcraft Parts.............................................118
N
Normal Scheduled Maintenance.............131
O
Oil Change Indicator Reset.........................83Resetting the Oil Life MonitoringSystem................................................................83Oil CheckSee: Engine Oil Check.........................................83Ordering Additional Owner'sLiterature.........................................................61Obtaining a French Owner’s Manual.............61
P
Parking Brake...................................................36
Perchlorate..........................................................5Power Steering Fluid Check.......................90Steering linkage lubrication points.................91Protecting the Environment.........................8
R
Recommended Towing Weights..............45Reduced Engine Performance...................51Refueling............................................................27Fuel Filler Cap.........................................................27Replacement PartsRecommendation.........................................6Collision Repairs......................................................6Scheduled Maintenance and MechanicalRepairs...................................................................6Warranty on Replacement Parts......................6Reporting Safety Defects (CanadaOnly)................................................................62Reporting Safety Defects (U.S.Only).................................................................61Roadside Assistance.....................................53Vehicles Sold in Canada: Getting RoadsideAssistance..........................................................53Vehicles Sold in Canada: Using RoadsideAssistance..........................................................53Vehicles Sold in the United States: GettingRoadside Assistance......................................53Vehicles Sold in the United States: UsingRoadside Assistance......................................53Roadside Emergencies................................53Running-InSee: Breaking-In.....................................................51Running Out of Fuel......................................26
S
Safety Precautions........................................25Scheduled Maintenance Record............135Scheduled Maintenance............................128Snow ChainsSee: Using Snow Chains...................................113Special Notices.................................................6New Vehicle Limited Warranty..........................6On-board Diagnostics (OBD-II)........................6Special Instructions...............................................6
149Motorhome (TY3) , enUSA, First PrintingIndex