2016 FORD F SERIES MOTORHOME AND COMMERCIAL CHASSIS brake
[x] Cancel search: brakePage 24 of 154
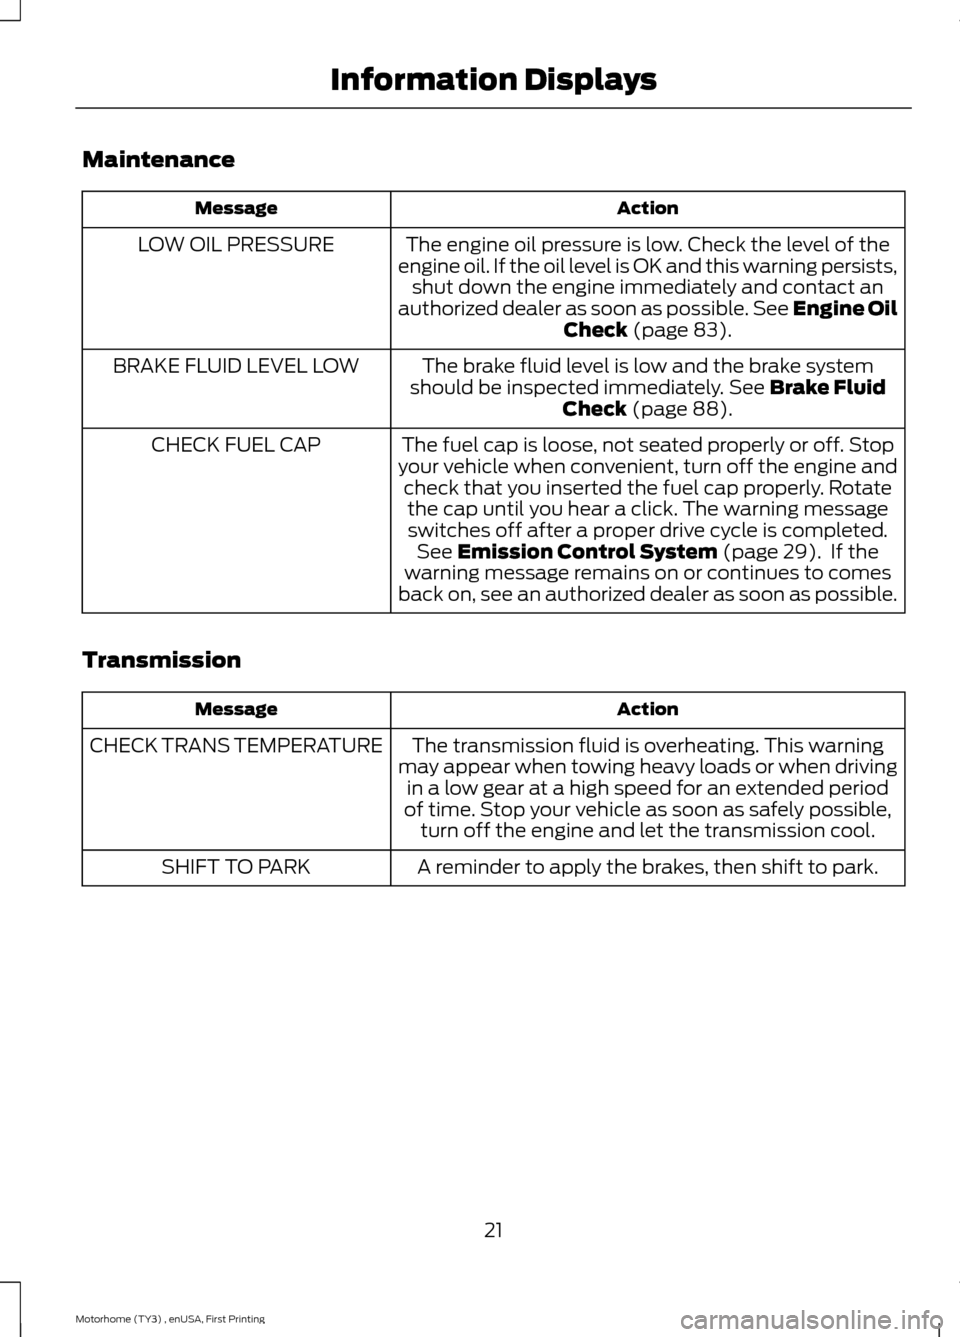
Maintenance
ActionMessage
The engine oil pressure is low. Check the level of theengine oil. If the oil level is OK and this warning persists,shut down the engine immediately and contact anauthorized dealer as soon as possible. See Engine OilCheck (page 83).
LOW OIL PRESSURE
The brake fluid level is low and the brake systemshould be inspected immediately. See Brake FluidCheck (page 88).
BRAKE FLUID LEVEL LOW
The fuel cap is loose, not seated properly or off. Stopyour vehicle when convenient, turn off the engine andcheck that you inserted the fuel cap properly. Rotatethe cap until you hear a click. The warning messageswitches off after a proper drive cycle is completed.See Emission Control System (page 29). If thewarning message remains on or continues to comesback on, see an authorized dealer as soon as possible.
CHECK FUEL CAP
Transmission
ActionMessage
The transmission fluid is overheating. This warningmay appear when towing heavy loads or when drivingin a low gear at a high speed for an extended periodof time. Stop your vehicle as soon as safely possible,turn off the engine and let the transmission cool.
CHECK TRANS TEMPERATURE
A reminder to apply the brakes, then shift to park.SHIFT TO PARK
21Motorhome (TY3) , enUSA, First PrintingInformation Displays
Page 26 of 154
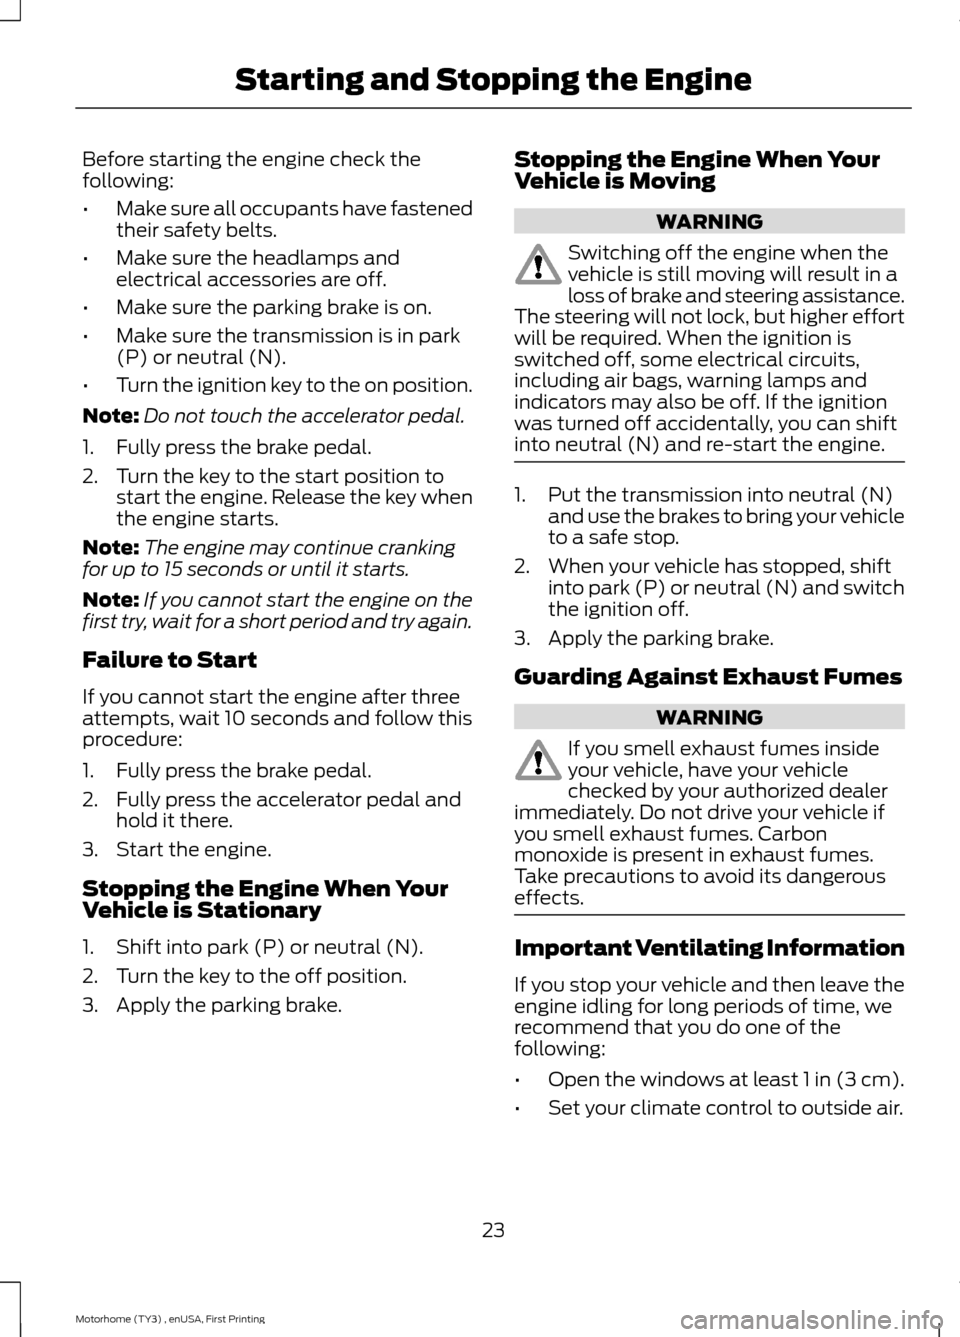
Before starting the engine check thefollowing:
•Make sure all occupants have fastenedtheir safety belts.
•Make sure the headlamps andelectrical accessories are off.
•Make sure the parking brake is on.
•Make sure the transmission is in park(P) or neutral (N).
•Turn the ignition key to the on position.
Note:Do not touch the accelerator pedal.
1.Fully press the brake pedal.
2.Turn the key to the start position tostart the engine. Release the key whenthe engine starts.
Note:The engine may continue crankingfor up to 15 seconds or until it starts.
Note:If you cannot start the engine on thefirst try, wait for a short period and try again.
Failure to Start
If you cannot start the engine after threeattempts, wait 10 seconds and follow thisprocedure:
1.Fully press the brake pedal.
2.Fully press the accelerator pedal andhold it there.
3.Start the engine.
Stopping the Engine When YourVehicle is Stationary
1.Shift into park (P) or neutral (N).
2.Turn the key to the off position.
3.Apply the parking brake.
Stopping the Engine When YourVehicle is Moving
WARNING
Switching off the engine when thevehicle is still moving will result in aloss of brake and steering assistance.The steering will not lock, but higher effortwill be required. When the ignition isswitched off, some electrical circuits,including air bags, warning lamps andindicators may also be off. If the ignitionwas turned off accidentally, you can shiftinto neutral (N) and re-start the engine.
1.Put the transmission into neutral (N)and use the brakes to bring your vehicleto a safe stop.
2.When your vehicle has stopped, shiftinto park (P) or neutral (N) and switchthe ignition off.
3.Apply the parking brake.
Guarding Against Exhaust Fumes
WARNING
If you smell exhaust fumes insideyour vehicle, have your vehiclechecked by your authorized dealerimmediately. Do not drive your vehicle ifyou smell exhaust fumes. Carbonmonoxide is present in exhaust fumes.Take precautions to avoid its dangerouseffects.
Important Ventilating Information
If you stop your vehicle and then leave theengine idling for long periods of time, werecommend that you do one of thefollowing:
•Open the windows at least 1 in (3 cm).
•Set your climate control to outside air.
23Motorhome (TY3) , enUSA, First PrintingStarting and Stopping the Engine
Page 35 of 154
AUTOMATIC TRANSMISSION
WARNINGS
Always set the parking brake fullyand latch the gearshift in park (P).Turn the ignition to the off positionand remove the key whenever you leaveyour vehicle.
Do not apply the brake pedal andaccelerator pedal simultaneously.Applying both pedals simultaneouslyfor more than three seconds will limitengine rpm, which may result in difficultymaintaining speed in traffic and could leadto serious injury.
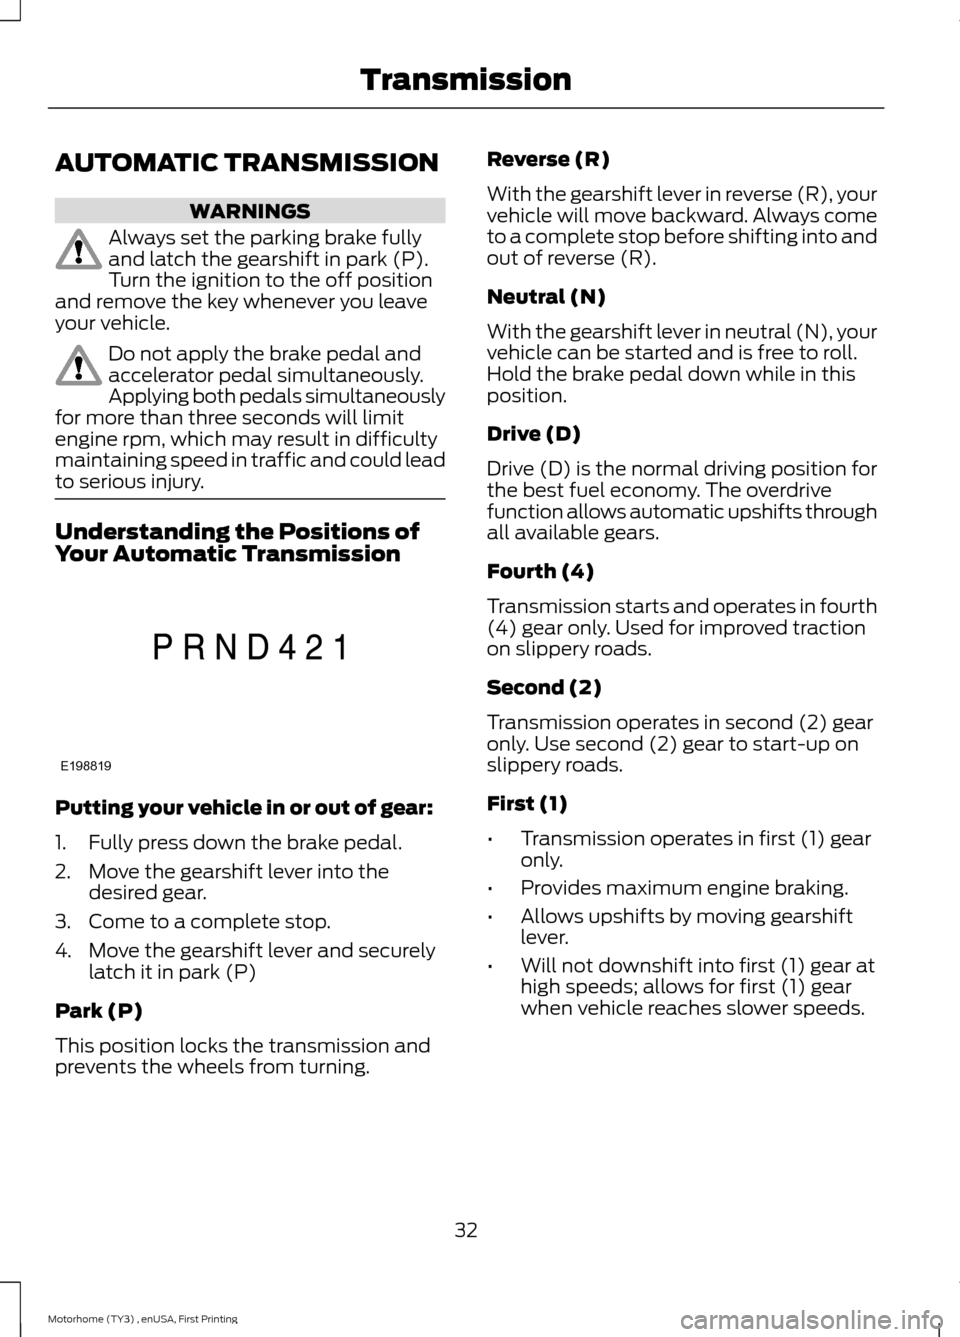
Understanding the Positions ofYour Automatic Transmission
Putting your vehicle in or out of gear:
1.Fully press down the brake pedal.
2.Move the gearshift lever into thedesired gear.
3.Come to a complete stop.
4.Move the gearshift lever and securelylatch it in park (P)
Park (P)
This position locks the transmission andprevents the wheels from turning.
Reverse (R)
With the gearshift lever in reverse (R), yourvehicle will move backward. Always cometo a complete stop before shifting into andout of reverse (R).
Neutral (N)
With the gearshift lever in neutral (N), yourvehicle can be started and is free to roll.Hold the brake pedal down while in thisposition.
Drive (D)
Drive (D) is the normal driving position forthe best fuel economy. The overdrivefunction allows automatic upshifts throughall available gears.
Fourth (4)
Transmission starts and operates in fourth(4) gear only. Used for improved tractionon slippery roads.
Second (2)
Transmission operates in second (2) gearonly. Use second (2) gear to start-up onslippery roads.
First (1)
•Transmission operates in first (1) gearonly.
•Provides maximum engine braking.
•Allows upshifts by moving gearshiftlever.
•Will not downshift into first (1) gear athigh speeds; allows for first (1) gearwhen vehicle reaches slower speeds.
32Motorhome (TY3) , enUSA, First PrintingTransmissionE198819
Page 36 of 154
Tow/Haul Mode
WARNING
Do not use the tow/haul featurewhen driving in icy or slipperyconditions as the increased enginebraking can cause the wheels to slide andyour vehicle to swing around with thepossible loss of vehicle control.
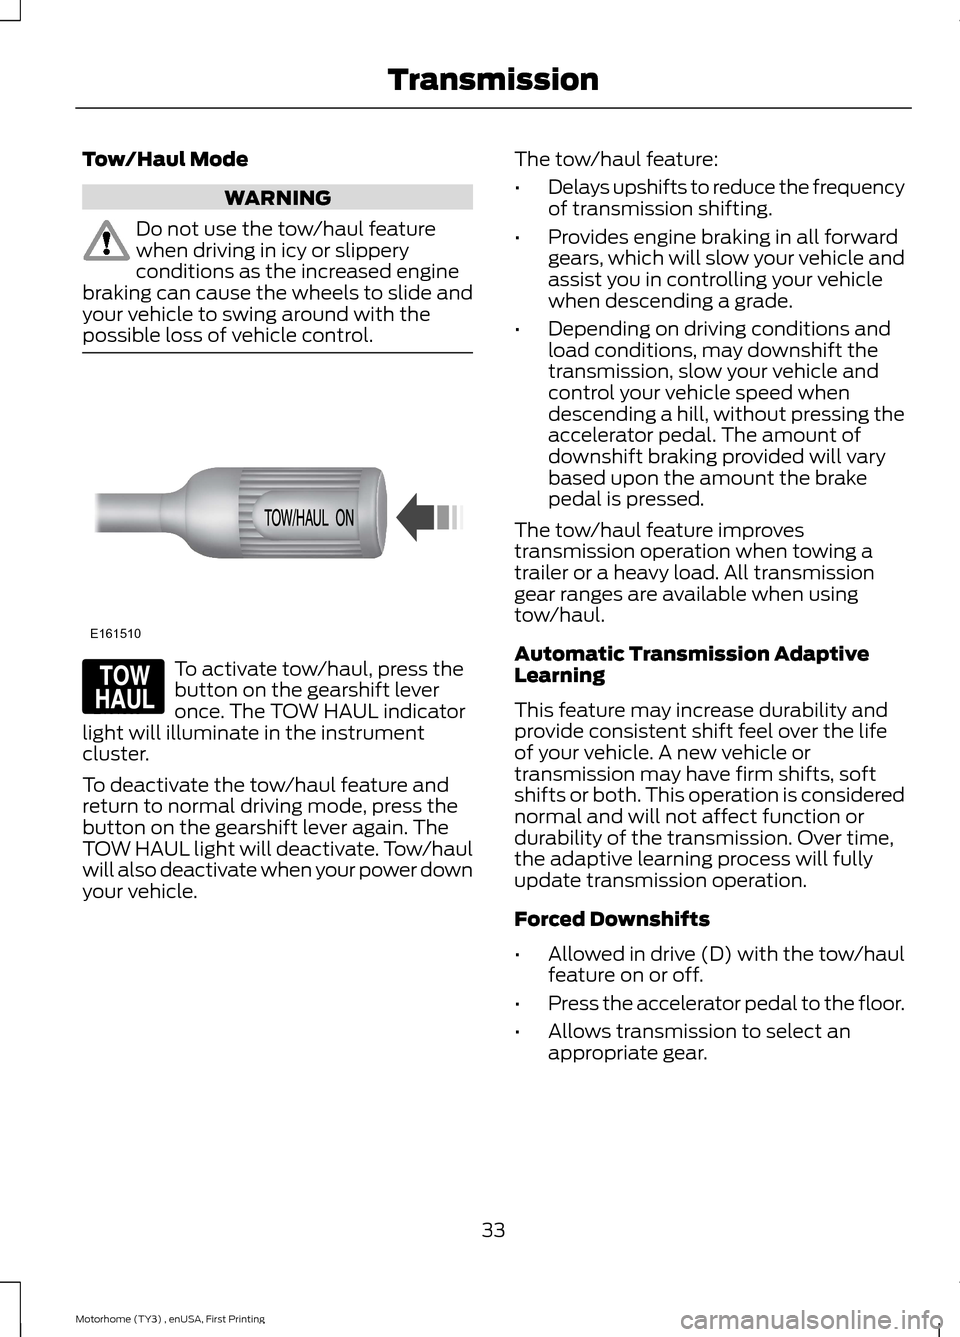
To activate tow/haul, press thebutton on the gearshift leveronce. The TOW HAUL indicatorlight will illuminate in the instrumentcluster.
To deactivate the tow/haul feature andreturn to normal driving mode, press thebutton on the gearshift lever again. TheTOW HAUL light will deactivate. Tow/haulwill also deactivate when your power downyour vehicle.
The tow/haul feature:
•Delays upshifts to reduce the frequencyof transmission shifting.
•Provides engine braking in all forwardgears, which will slow your vehicle andassist you in controlling your vehiclewhen descending a grade.
•Depending on driving conditions andload conditions, may downshift thetransmission, slow your vehicle andcontrol your vehicle speed whendescending a hill, without pressing theaccelerator pedal. The amount ofdownshift braking provided will varybased upon the amount the brakepedal is pressed.
The tow/haul feature improvestransmission operation when towing atrailer or a heavy load. All transmissiongear ranges are available when usingtow/haul.
Automatic Transmission AdaptiveLearning
This feature may increase durability andprovide consistent shift feel over the lifeof your vehicle. A new vehicle ortransmission may have firm shifts, softshifts or both. This operation is considerednormal and will not affect function ordurability of the transmission. Over time,the adaptive learning process will fullyupdate transmission operation.
Forced Downshifts
•Allowed in drive (D) with the tow/haulfeature on or off.
•Press the accelerator pedal to the floor.
•Allows transmission to select anappropriate gear.
33Motorhome (TY3) , enUSA, First PrintingTransmissionE161510 E161509
Page 37 of 154
Brake-Shift Interlock
WARNINGS
Do not drive your vehicle until youverify that the brake lamps areworking.
If your brake lamps are not workingproperly or if you have disconnectedthe vehicle battery cables, thevehicle brake lamps and hazard flashersmay not properly warn traffic of a vehiclebreakdown or approaching danger, whichcan increase the risk of serious injury ordeath. To minimize the risk of serious injuryor death, be aware of your surroundings,use other hazard signaling devices ifavailable, and move the vehicle to a safelocation away from traffic as soon aspossible.
When doing this procedure, you willbe taking the vehicle out of parkwhich means the vehicle can rollfreely. To avoid unwanted vehiclemovement, always fully set the parkingbrake prior to doing this procedure. Usewheel chocks if appropriate.
If the parking brake is fully released,but the brake warning lamp remainsilluminated, the brakes may not beworking properly. See your authorizeddealer.
Your vehicle is equipped with a brake-shiftinterlock feature that prevents moving thegearshift lever from park (P) when theignition is in the on position and the brakepedal is not pressed.
If you cannot move the gearshift lever outof park (P) position with the ignition in theon position and the brake pedal pressed,a malfunction may have occurred. It ispossible that a fuse has blown or yourvehicle’s brake lamps are not operatingproperly. See Fuse Specification Chart(page 63).
If the fuse is not blown and the brakelamps are working properly, the followingprocedure will allow you to move thegearshift lever from park (P):
1.Apply the parking brake. Turn key tothe lock position, and then remove thekey.
2.Disconnect the negative (black)battery cable from the battery.
3.Insert the key and turn to the offposition. Shift the transmission toneutral (N).
4.Reconnect the negative (black) batterycable to the battery.
5.Start the vehicle.
Note:See your authorized dealer as soonas possible if this procedure is used.
If Your Vehicle Gets Stuck In Mudor Snow
Note:Do not rock your vehicle if the engineis not at normal operating temperature ordamage to the transmission may occur.
Note:Do not rock your vehicle for morethan a minute or damage to thetransmission and tires may occur, or theengine may overheat.
If your vehicle gets stuck in mud or snow,you may rock it out by shifting betweenforward and reverse gears, stoppingbetween shifts in a steady pattern. Presslightly on the accelerator in each gear.
34Motorhome (TY3) , enUSA, First PrintingTransmission
Page 38 of 154
GENERAL INFORMATION
Note:Occasional brake noise is normal. Ifa metal-to-metal, continuous grinding orcontinuous squeal sound is present, thebrake linings may be worn-out and shouldbe inspected by an authorized dealer. If thevehicle has continuous vibration or shudderin the steering wheel while braking, thevehicle should be inspected by anauthorized dealer.
Note:Brake dust may accumulate on thewheels, even under normal drivingconditions. Some dust is inevitable as thebrakes wear and does not contribute tobrake noise. See Cleaning the AlloyWheels (page 95).
See the Instrument Clusterchapter for information on thebrake system warning light.
Wet brakes result in reduced brakingefficiency. Gently press the brake pedal afew times when driving from a car wash orstanding water to dry the brakes.
Brake Over Accelerator
In the event the accelerator pedalbecomes stuck or entrapped, apply steadyand firm pressure to the brake pedal toslow the vehicle and reduce engine power.If you experience this condition, apply thebrakes and bring your vehicle to a safestop. Turn the engine off, shift thetransmission into park (P), apply theparking brake, and then inspect theaccelerator pedal for any interferences. Ifnone are found and the condition persists,have your vehicle towed to the nearestauthorized dealer.
Hydraulic brake booster system(Hydroboost or Hydromax)
The Hydroboost and Hydromax systemsreceive fluid pressure from the powersteering pump to provide power assistduring braking.
The Hydromax booster receives backuppressure from the reserve system electricpump whenever the fluid in the powersteering system is not flowing. When theengine is off, the pump will turn on if thebrake pedal is applied, or if the ignition isturned to the on position.
The sound of the pump operating may beheard by the driver, but this is a normalcharacteristic of the system.
The reserve system provides reducedbraking power, so the vehicle should beoperated under these conditions withcaution, and only to seek service repair andremove the vehicle from the roadway.
Note:For Hydromax-equipped vehiclesoperating under normal conditions, the noiseof the fluid flowing through the booster maybe heard whenever the brake is applied. Thiscondition is normal. Vehicle service is notrequired.
If braking performance or pedal responsebecomes very poor, even when the pedalis strongly pressed, it may indicate thepresence of air in the hydraulic system orleakage of fluid. Stop the vehicle safely assoon as possible and seek serviceimmediately.
HINTS ON DRIVING WITH
ANTI-LOCK BRAKES
Note:When the system is operating, thebrake pedal will pulse and may travelfurther. Maintain pressure on the brakepedal. You may also hear a noise from thesystem. This is normal.
35Motorhome (TY3) , enUSA, First PrintingBrakesE144522
Page 39 of 154
The anti-lock braking system will noteliminate the risks when:
•You drive too closely to the vehicle infront of you.
•Your vehicle is hydroplaning.
•You take corners too fast.
•The road surface is poor.
PARKING BRAKE
WARNING
Always set the parking brake fullyand make sure the transmissionselector lever is placed in park (P).Failure to set the parking brake and engagepark could result in vehicle roll-away,property damage or bodily injury. Turn theignition to the lock position and removethe key whenever you leave your vehicle.
Apply the parking brake whenever yourvehicle is parked.
•For vehicles equipped with a footoperated parking brake, press the pedaldownward to set the parking brake.
•For vehicle equipped with a handoperated parking brake, pull theparking brake lever up to set theparking brake.
The brake warning lamp in theinstrument cluster illuminateswhen the ignition is turned onand the parking brake is applied.
The parking brake is not recommended tostop a moving vehicle. However, if thenormal brakes fail, the parking brake canbe used to stop your vehicle in anemergency. Your vehicle's stoppingdistance will increase greatly and thehandling of your vehicle will be adverselyaffected.
To release the parking brake:
•For vehicles equipped with a footoperated parking brake, pull theparking brake release lever.
•For vehicles equipped with a handoperated parking brake, push theparking brake lever down.
36Motorhome (TY3) , enUSA, First PrintingBrakesE144522
Page 40 of 154
PRINCIPLE OF OPERATION
Cruise control lets you maintain a setspeed without keeping your foot on theaccelerator pedal. You can use cruisecontrol when your vehicle speed is greaterthan 20 mph (30 km/h).
USING CRUISE CONTROL
WARNINGS
Do not use cruise control on windingroads, in heavy traffic or when theroad surface is slippery. This couldresult in loss of vehicle control, seriousinjury or death.
When you are going downhill, yourvehicle speed may increase abovethe set speed. The system will notapply the brakes. Change down a gear toassist the system in maintaining the setspeed. Failure to do so could result in lossof vehicle control, serious injury or death.
Note:Cruise control will disengage if thevehicle speed decreases more than 10 mph(16 km/h) below the set speed while drivinguphill.
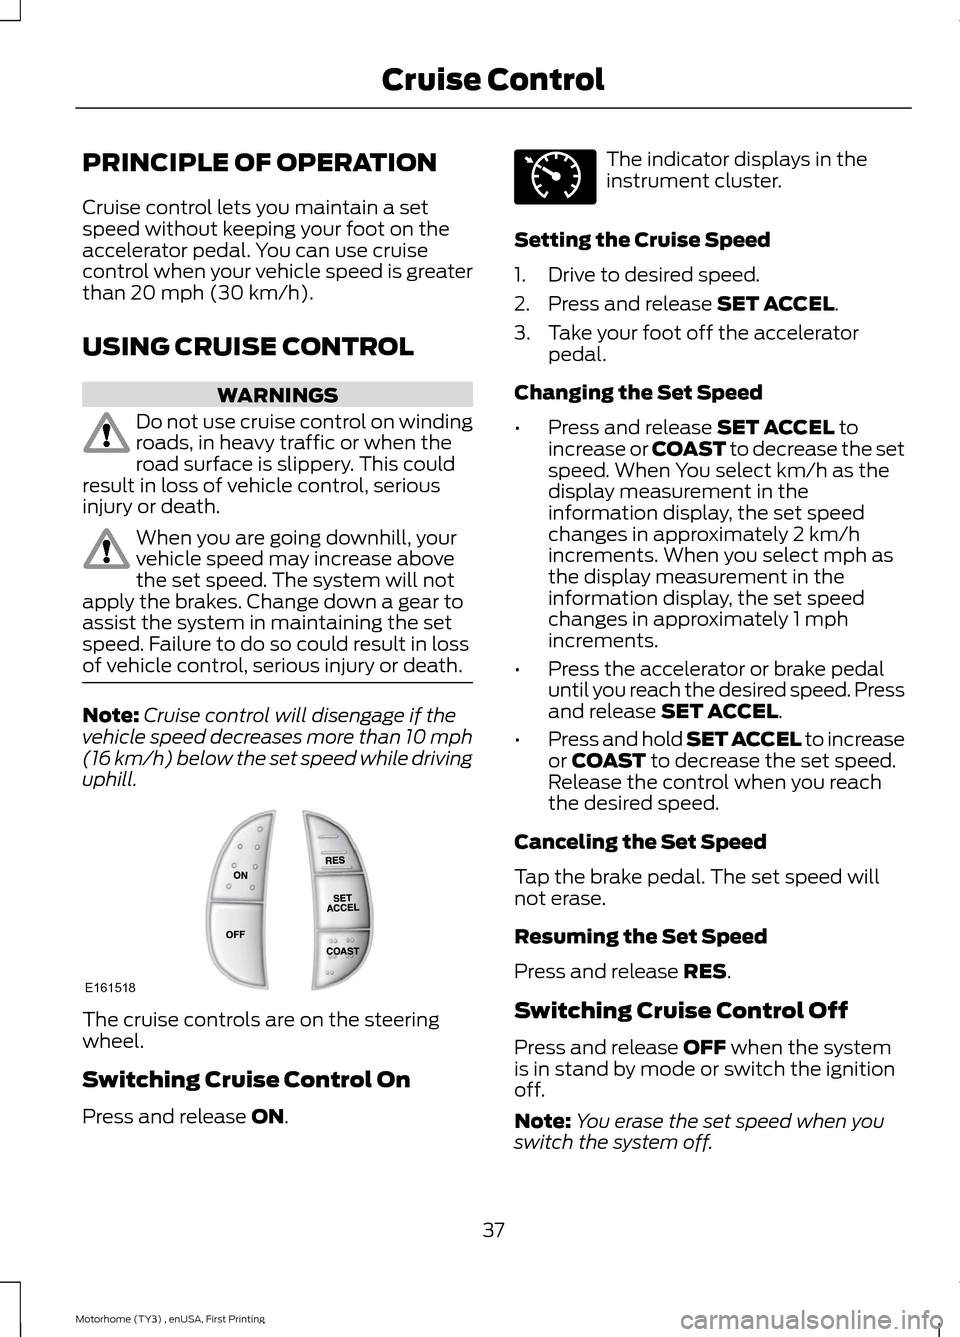
The cruise controls are on the steeringwheel.
Switching Cruise Control On
Press and release ON.
The indicator displays in theinstrument cluster.
Setting the Cruise Speed
1.Drive to desired speed.
2.Press and release SET ACCEL.
3.Take your foot off the acceleratorpedal.
Changing the Set Speed
•Press and release SET ACCEL toincrease or COAST to decrease the setspeed. When You select km/h as thedisplay measurement in theinformation display, the set speedchanges in approximately 2 km/hincrements. When you select mph asthe display measurement in theinformation display, the set speedchanges in approximately 1 mphincrements.
•Press the accelerator or brake pedaluntil you reach the desired speed. Pressand release SET ACCEL.
•Press and hold SET ACCEL to increaseor COAST to decrease the set speed.Release the control when you reachthe desired speed.
Canceling the Set Speed
Tap the brake pedal. The set speed willnot erase.
Resuming the Set Speed
Press and release RES.
Switching Cruise Control Off
Press and release OFF when the systemis in stand by mode or switch the ignitionoff.
Note:You erase the set speed when youswitch the system off.
37Motorhome (TY3) , enUSA, First PrintingCruise ControlE161518 E71340