2016 FORD EXPLORER display
[x] Cancel search: displayPage 169 of 541
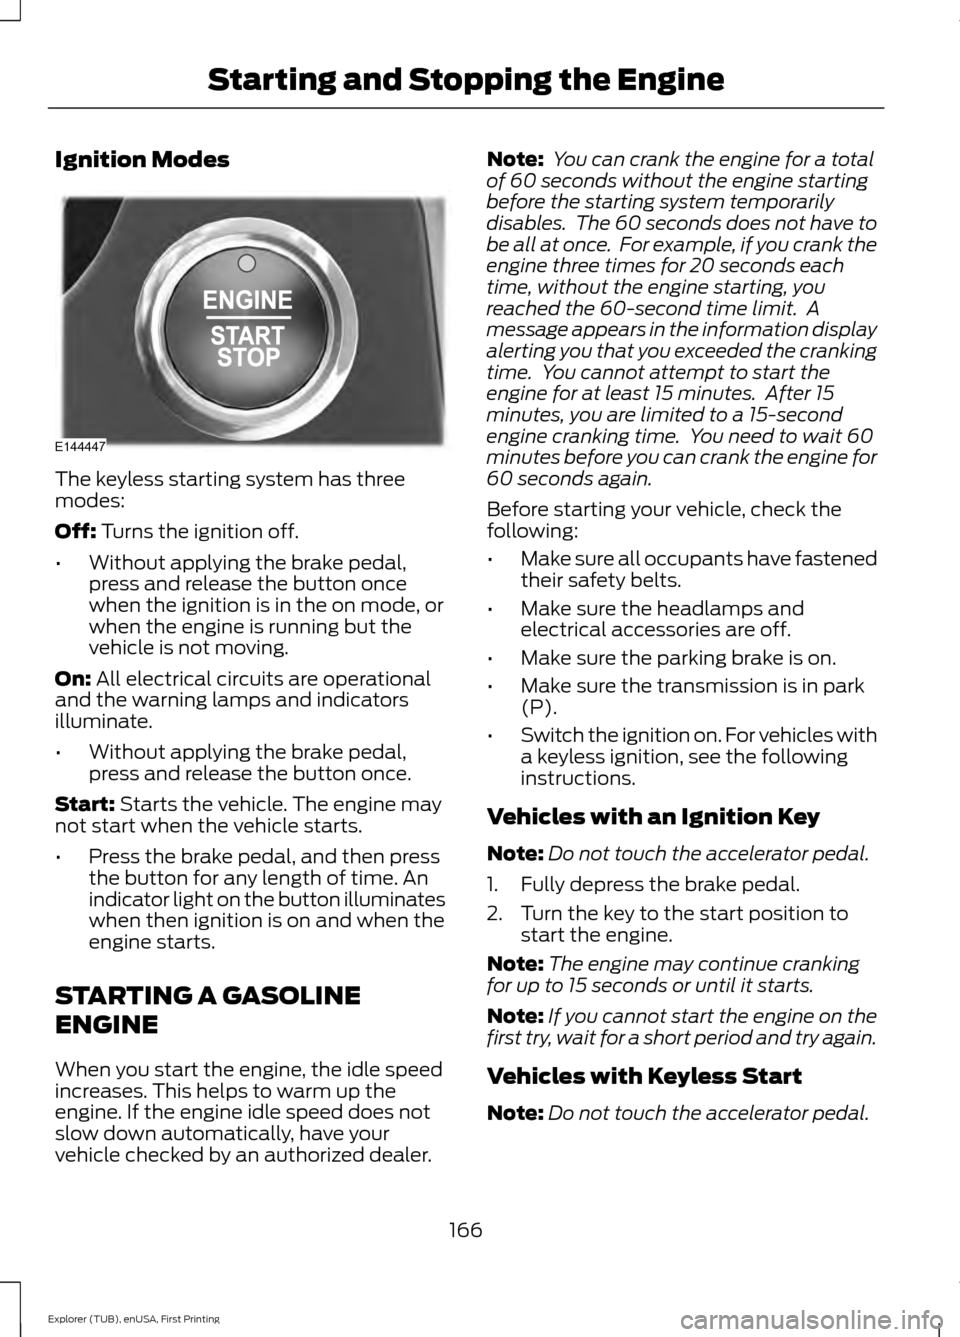
Ignition Modes
The keyless starting system has three
modes:
Off: Turns the ignition off.
• Without applying the brake pedal,
press and release the button once
when the ignition is in the on mode, or
when the engine is running but the
vehicle is not moving.
On:
All electrical circuits are operational
and the warning lamps and indicators
illuminate.
• Without applying the brake pedal,
press and release the button once.
Start:
Starts the vehicle. The engine may
not start when the vehicle starts.
• Press the brake pedal, and then press
the button for any length of time. An
indicator light on the button illuminates
when then ignition is on and when the
engine starts.
STARTING A GASOLINE
ENGINE
When you start the engine, the idle speed
increases. This helps to warm up the
engine. If the engine idle speed does not
slow down automatically, have your
vehicle checked by an authorized dealer. Note:
You can crank the engine for a total
of 60 seconds without the engine starting
before the starting system temporarily
disables. The 60 seconds does not have to
be all at once. For example, if you crank the
engine three times for 20 seconds each
time, without the engine starting, you
reached the 60-second time limit. A
message appears in the information display
alerting you that you exceeded the cranking
time. You cannot attempt to start the
engine for at least 15 minutes. After 15
minutes, you are limited to a 15-second
engine cranking time. You need to wait 60
minutes before you can crank the engine for
60 seconds again.
Before starting your vehicle, check the
following:
• Make sure all occupants have fastened
their safety belts.
• Make sure the headlamps and
electrical accessories are off.
• Make sure the parking brake is on.
• Make sure the transmission is in park
(P).
• Switch the ignition on. For vehicles with
a keyless ignition, see the following
instructions.
Vehicles with an Ignition Key
Note: Do not touch the accelerator pedal.
1. Fully depress the brake pedal.
2. Turn the key to the start position to start the engine.
Note: The engine may continue cranking
for up to 15 seconds or until it starts.
Note: If you cannot start the engine on the
first try, wait for a short period and try again.
Vehicles with Keyless Start
Note: Do not touch the accelerator pedal.
166
Explorer (TUB), enUSA, First Printing Starting and Stopping the EngineE144447
Page 171 of 541
Automatic Engine Shutdown
For vehicles with a keyless ignition, this
feature automatically shuts down the
engine if it has been idling for an extended
period. The ignition also turns off in order
to save battery power. Before your vehicle
shuts down, a message appears in the
information display showing a timer
counting down from 30 seconds. If you do
not intervene within 30 seconds, your
vehicle shuts down. Another message
appears in the information display to
inform you that your vehicle has shut down
to save fuel. Start your vehicle as you
normally do.
Automatic Engine Shutdown Override
Note:
You cannot permanently switch off
the automatic shutdown feature. When you
switch it off temporarily, it turns on at the
next ignition cycle.
You can stop the shutdown, or reset the
timer, at any point before the 30-second
countdown has expired by doing any of the
following:
• You can reset the timer by interacting
with your vehicle, for example pressing
the brake or accelerator pedal.
• You can temporarily switch off the
shutdown feature any time the ignition
is on using the information display. See
Information Displays (page 101). The
feature only remains off for the current
ignition cycle.
• During the 30-second countdown, the
system prompts you to press OK or
RESET to temporarily switch the
feature off for the current ignition cycle
only.
Stopping the Engine When Your
Vehicle is Stationary
Vehicles with an Ignition Key
1. Shift into park (P). 2. Switch the ignition off.
3. Apply the parking brake.
Vehicles with Keyless Start
1. Shift into park (P).
2. Press the push button ignition switch.
3. Apply the parking brake.
Note:
The ignition, all electrical circuits and
all warning lamps and indicators will be
turned off.
Note: If the engine is idling for 30 minutes,
the ignition and engine automatically shut
down.
Stopping the Engine When Your
Vehicle is Moving WARNING
Switching off the engine when the
vehicle is still moving will result in a
loss of brake and steering assistance.
The steering will not lock, but higher effort
will be required. When the ignition is
switched off, some electrical circuits,
including air bags, warning lamps and
indicators may also be off. If the ignition
was turned off accidentally, you can shift
into neutral (N) and re-start the engine. Vehicles with an Ignition Key
1.
Shift into neutral and use the brakes to
bring your vehicle to a safe stop.
2. When your vehicle has stopped, shift into park (P) and switch the ignition
off.
3. Apply the parking brake.
Vehicles with Keyless Start
1. Shift into neutral and use the brakes to
bring your vehicle to a safe stop.
2. When your vehicle has stopped, shift into park (P).
168
Explorer (TUB), enUSA, First Printing Starting and Stopping the Engine
Page 185 of 541
Upshifts when accelerating (recom-
mended for best fuel economy)
Shift from:15 mph (24 km/h)
1 - 2
25 mph (40 km/h)
2 - 3
40 mph (64 km/h)
3 - 4
45 mph (72 km/h)
4 - 5
50 mph (80 km/h)
5 - 6
The instrument cluster will display the
selected gear that you are currently in and
a shift indicator arrow to assist in
optimizing shifting.
SelectShift will automatically make some
shifts for you in the event that your engine
speed is running at too high, or too low an
RPM.
Note: Engine damage may occur if
excessive engine revving is held without
shifting.
Brake-Shift Interlock WARNINGS
Do not drive your vehicle until you
verify that the brake lamps are
working.
When doing this procedure, you will
be taking the vehicle out of park
which means the vehicle can roll
freely. To avoid unwanted vehicle
movement, always fully set the parking
brake prior to doing this procedure. Use
wheel chocks if appropriate. If the parking brake is fully released,
but the brake warning lamp remains
illuminated, the brakes may not be
working properly. See your authorized
dealer. Use the brake shift interlock lever to move
the gearshift lever from the park position
in the event of an electrical malfunction or
if your vehicle has a dead battery.
Apply the parking brake and turn the
ignition off before performing this
procedure.
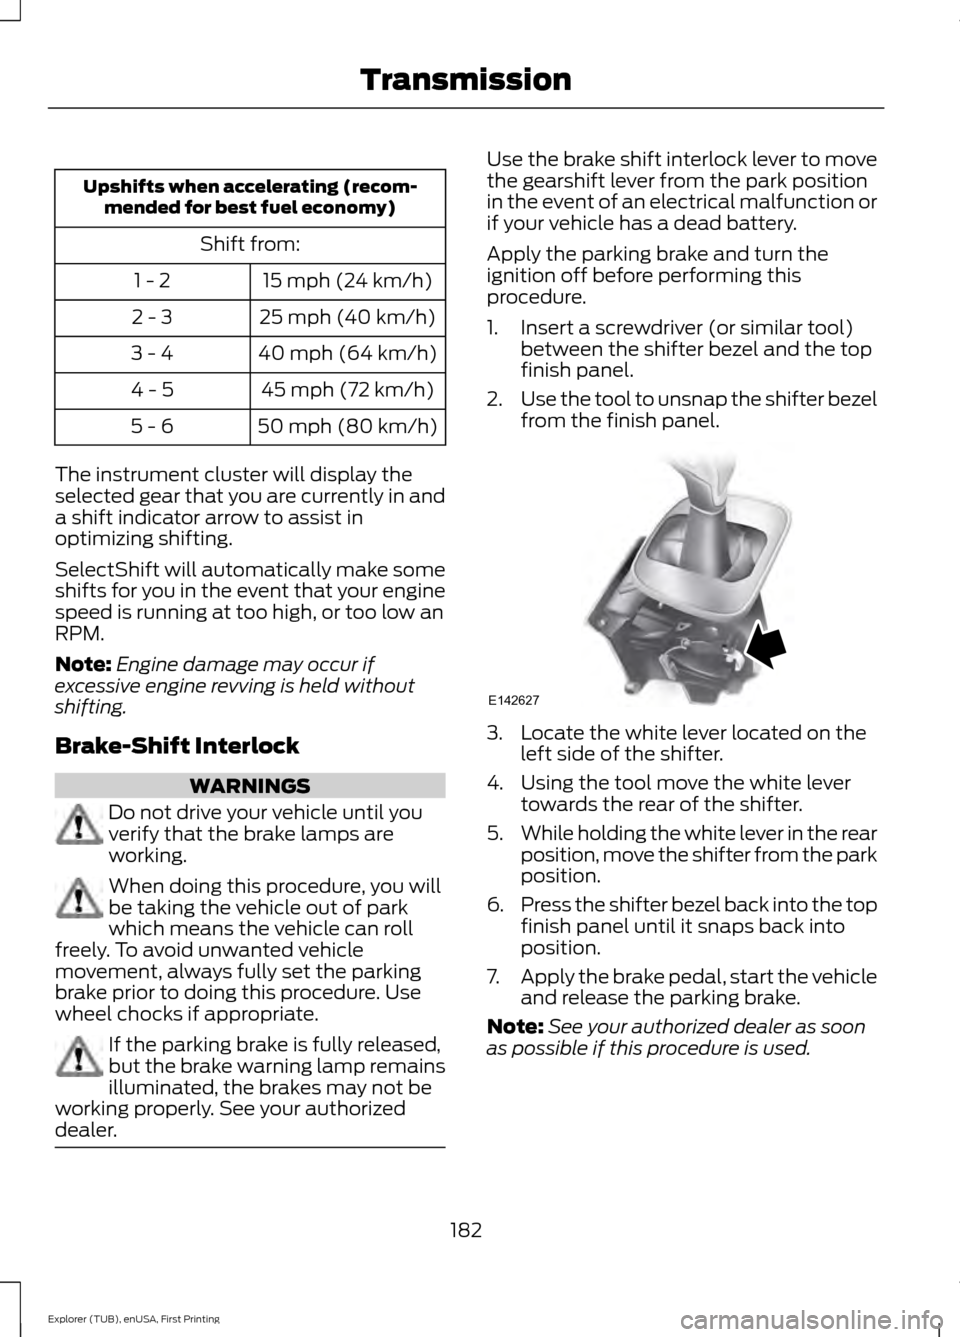
1. Insert a screwdriver (or similar tool)
between the shifter bezel and the top
finish panel.
2. Use the tool to unsnap the shifter bezel
from the finish panel. 3. Locate the white lever located on the
left side of the shifter.
4. Using the tool move the white lever towards the rear of the shifter.
5. While holding the white lever in the rear
position, move the shifter from the park
position.
6. Press the shifter bezel back into the top
finish panel until it snaps back into
position.
7. Apply the brake pedal, start the vehicle
and release the parking brake.
Note: See your authorized dealer as soon
as possible if this procedure is used.
182
Explorer (TUB), enUSA, First Printing TransmissionE142627
Page 187 of 541

PRINCIPLE OF OPERATION
This system is a proactive system. It has
the ability to anticipate wheel slip and
transfer torque to the rear wheels before
slip occurs. Even when wheel slip is not
present, the system is continuously making
adjustments to the torque distribution, in
an attempt to improve straight line and
cornering behavior, both on and off road.
The system automatically turns on every
time you switch the ignition on.
All components of the system are sealed
and do not require maintenance.
USING FOUR-WHEEL DRIVE
WARNING
Vehicles with a higher center of
gravity such as utility and four-wheel
drive vehicles handle differently than
vehicles with a lower center of gravity.
Utility and four-wheel drive vehicles are
not designed for cornering at speeds as
high as passenger cars any more than
low-slung sports cars are designed to
perform satisfactorily under off-road
conditions. Avoid sharp turns, excessive
speed and abrupt maneuvers in these
vehicles. Failure to drive cautiously could
result in an increased risk of loss of vehicle
control, vehicle rollover, personal injury and
death. The intelligent 4WD system continuously
monitors vehicle conditions and
automatically adjusts the power
distribution between the front and rear
wheels. It combines transparent
all-surface operation with highly capable
four-wheel drive. The 4WD system is always active and
requires no driver input. It is capable of
handling all road conditions, including
street and highway driving as well as
off-road and winter driving. The driver can
optimize more 4WD control by moving the
terrain management switch for the correct
terrain. See Using Terrain Response
(page 195).
Note: A warning message will be displayed
in the information display when an 4WD
system fault is present
See Information
Messages (page 115). An 4WD system fault
will cause the 4WD system to default to
front-wheel drive only mode. When this
warning message is displayed, have your
vehicle serviced at an authorized dealer
Note: A warning message will be displayed
in the information display if the 4WD system
has overheated
See Information
Messages (page 115). This condition may
occur if the vehicle was operated in extreme
conditions with excessive wheel slip, such
as deep sand. To resume normal 4WD
function as soon as possible, stop the
vehicle in a safe location and stop the
engine for at least 10 minutes. After the
engine has been restarted and the 4WD
system has adequately cooled, the warning
message will turn off and normal 4WD
function will return.
Do not use a spare tire of a different size
other than the tire provided. If the
mini-spare tire is installed, the 4WD system
may disable automatically and enter
front-wheel drive only mode to protect
driveline components. This condition will
be indicated by a warning in the
information display
See Information
Messages (page 115). If there is a warning
message in the information display from
using the spare tire, this indicator should
turn off after reinstalling the repaired or
replaced normal road tire and cycling the
ignition off and on. It is recommended to
184
Explorer (TUB), enUSA, First Printing Four-Wheel Drive
(If Equipped)
Page 194 of 541
2. If the sensors detect that your vehicle
is on a slope, the system activates
automatically.
3. When you remove your foot from the brake pedal, your vehicle remains on
the slope without rolling away for
about two to three seconds. This hold
time automatically extends if you are
in the process of driving off.
4. Drive off in the normal manner. The system releases the brakes
automatically.
Note: When you remove your foot from the
brake pedal and press the pedal again when
the system is active, you will experience
significantly reduced brake pedal travel. This
is normal.
Switching the System On and Off
Vehicles with Manual Transmission
You can switch this feature on or off in the
information display. The system
remembers the last setting when you start
your vehicle.
Vehicles with Automatic Transmission
You cannot turn the system on or off.
When you switch the ignition on, the
system automatically turns on.
191
Explorer (TUB), enUSA, First Printing Brakes
Page 195 of 541
PRINCIPLE OF OPERATION
The traction control system helps avoid
drive wheel spin and loss of traction.
If your vehicle begins to slide, the system
applies the brakes to individual wheels
and, when needed, reduces engine power
at the same time. If the wheels spin when
accelerating on slippery or loose surfaces,
the system reduces engine power in order
to increase traction.
USING TRACTION CONTROL
WARNING
The stability and traction control
light illuminates steadily if the
system detects a failure. Make sure
you did not manually disable the traction
control system using the information
display controls or the switch. If the
stability control and traction control light
is still illuminating steadily, have the
system serviced by an authorized dealer
immediately. Operating your vehicle with
the traction control disabled could lead to
an increased risk of loss of vehicle control,
vehicle rollover, personal injury and death. The system automatically turns on each
time you switch the ignition on.
If your vehicle is stuck in mud or snow,
switching traction control off may be
beneficial as this allows the wheels to spin.
Note:
When you switch traction control off,
stability control remains fully active.
Switching the System Off
When you switch the system off or on, a
message appears in the information
display showing system status.
You can switch the system off by either
using the information display controls or
the switch. Using the Information Display
Controls
You can switch this feature off or on in the
information display. See General
Information (page 101).
Using a Switch
(If Equipped)
The switch for the stability control system
and traction control system is on the
instrument panel.
Use the switch to turn the system off or
on.
System Indicator Lights and
Messages The stability and traction control
light temporarily illuminates on
engine start-up and flashes
when a driving condition activates either
of the systems. The stability and traction control
off light temporarily illuminates
on engine start-up and stays on:
• When you switch the traction control
system off.
• If a problem occurs in either of the
systems.
192
Explorer (TUB), enUSA, First Printing Traction ControlE138639
Page 198 of 541
USING TERRAIN RESPONSE
The terrain management system optimizes
drivability and comfort as well as
maximizing traction while operating on
different types of terrain.
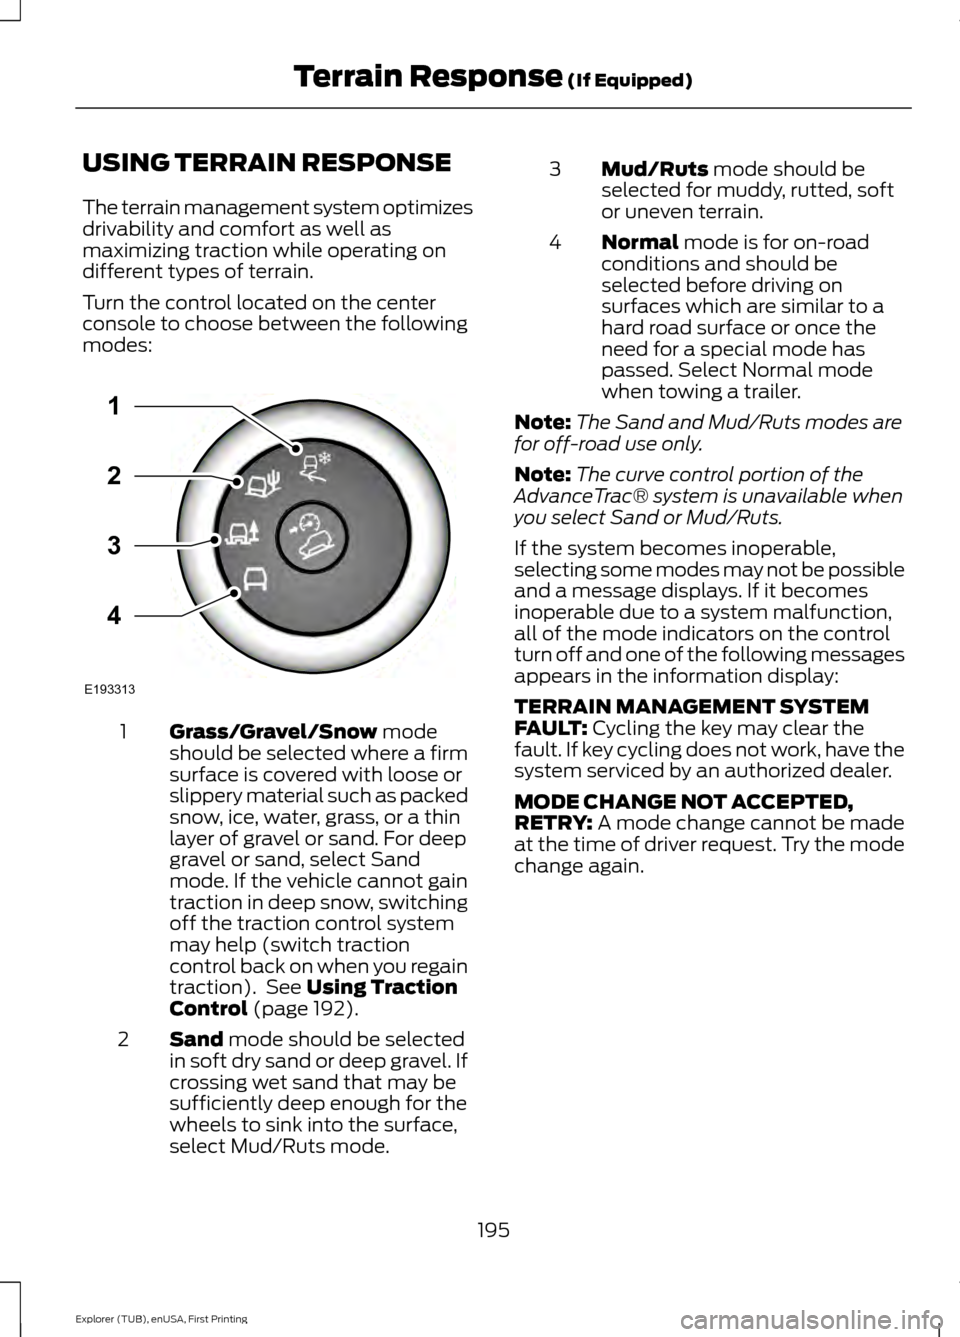
Turn the control located on the center
console to choose between the following
modes:
Grass/Gravel/Snow mode
should be selected where a firm
surface is covered with loose or
slippery material such as packed
snow, ice, water, grass, or a thin
layer of gravel or sand. For deep
1
gravel or sand, select Sand
mode. If the vehicle cannot gain
traction in deep snow, switching
off the traction control system
may help (switch traction
control back on when you regain
traction). See
Using Traction
Control (page 192).
Sand
mode should be selected
in soft dry sand or deep gravel. If
crossing wet sand that may be
sufficiently deep enough for the
wheels to sink into the surface,
select Mud/Ruts mode.
2 Mud/Ruts
mode should be
selected for muddy, rutted, soft
or uneven terrain.
3
Normal
mode is for on-road
conditions and should be
selected before driving on
surfaces which are similar to a
hard road surface or once the
need for a special mode has
passed. Select Normal mode
when towing a trailer.
4
Note: The Sand and Mud/Ruts modes are
for off-road use only.
Note: The curve control portion of the
AdvanceTrac® system is unavailable when
you select Sand or Mud/Ruts.
If the system becomes inoperable,
selecting some modes may not be possible
and a message displays. If it becomes
inoperable due to a system malfunction,
all of the mode indicators on the control
turn off and one of the following messages
appears in the information display:
TERRAIN MANAGEMENT SYSTEM
FAULT:
Cycling the key may clear the
fault. If key cycling does not work, have the
system serviced by an authorized dealer.
MODE CHANGE NOT ACCEPTED,
RETRY:
A mode change cannot be made
at the time of driver request. Try the mode
change again.
195
Explorer (TUB), enUSA, First Printing Terrain Response
(If Equipped)E193313
3
2
1
4
Page 199 of 541
USING HILL DESCENT
CONTROL
Principle of operation
WARNINGS
Hill descent control cannot control
descent in all surface conditions and
circumstances, such as ice or
extremely steep grades. Hill descent
control is a driver assist system and cannot
substitute for good judgment by the driver.
Failure to do so may result in loss of vehicle
control, crash or serious injury. Hill descent control does not provide
hill hold at zero miles per hour (0
kilometers per hour). When stopped,
the parking brake must be applied or the
vehicle must be placed in P (Park) or it
may roll away. Hill descent control allows the driver to set
and maintain vehicle speed while
descending steep grades in various surface
conditions.
Hill descent control can maintain vehicle
speeds on downhill grades between 3 mph
(5 km/h)
and 20 mph (32 km/h). Above
20 mph (32 km/h), the system remains
armed, but descent speed cannot be set
or maintained.
Hill descent control requires a cooling
down interval after a period of sustained
use. The amount of time that the feature
can remain active before cooling varies
with conditions. The system provides a
warning in the message center and a chime
sounds when the system is about to
disengage for cooling. At this time,
manually apply the brakes as needed to
maintain descent speed. Using hill descent control Press and release the hill
descent button located in the
center of the terrain
management control. A light in the control
illuminates and a chime sounds when this
feature activates.
To increase descent speed, press the
accelerator pedal until you reach the
desired speed. To decrease descent speed,
press the brake pedal until you reach the
desired speed.
Whether accelerating or decelerating, once
you reach the desired descent speed,
remove your feet from the pedals and hill
descent control maintains the chosen
vehicle speed.
Note: You may observe noise from the ABS
pump motor during hill descent control
operation. This is a normal characteristic of
the ABS and should be no reason for
concern.
Hill descent modes
• At speeds below
20 mph (32 km/h):
When you press the Hill Descent
Control and Hill Descent Control
activates, HILL DESCENT CONTROL
ACTIVE
appears in the message
center for several seconds.
• At speeds below
20 mph (32 km/h):
When you press the Hill Descent
Control switch and conditions are not
correct for hill descent activation, the
Hill Descent Control system enables,
the light on the button is solid and HILL
DESCENT CONTROL READY
displays in the message center for
several seconds.
196
Explorer (TUB), enUSA, First Printing Terrain Response
(If Equipped)