2016 FORD EXPLORER instrument cluster
[x] Cancel search: instrument clusterPage 193 of 541
PARKING BRAKE
WARNING
Always set the parking brake fully
and make sure the transmission is
locked in park (P). Failure to set the
parking brake and engage park could result
in vehicle roll-away, property damage or
bodily injury. To set the parking brake, press the parking
brake pedal down to its fullest extent. The
brake warning lamp in the instrument
cluster will illuminate and remains
illuminated until the parking brake is
released.
To release the parking brake, press the
parking brake pedal down again.
If you are parking your vehicle on a grade
or with a trailer, press and hold the brake
pedal down, then set the parking brake.
There may be a little vehicle movement as
the parking brake sets to hold the vehicle's
weight. This is normal and should be no
reason for concern. If needed, press and
hold the service brake pedal down, then
try reapplying the parking brake. Chock the
wheels if required. If the parking brake
cannot hold the weight of the vehicle, the
parking brake may need to be serviced or
the vehicle may be overloaded.
HILL START ASSIST
WARNINGS
The system does not replace the
parking brake. When you leave your
vehicle, always apply the parking
brake. Failure to leave your vehicle securely
parked may lead to a crash or injury. See
Parking Brake (page 190). WARNINGS
You must remain in your vehicle
when the system turns on. At all
times, you are responsible for
controlling your vehicle, supervising the
system and intervening, if required. Failure
to take care may result in the loss of
control of your vehicle, serious personal
injury or death. The system will turn off if a
malfunction is apparent or if you rev
the engine excessively. Failure to
take care may result in the loss of control
of your vehicle, serious personal injury or
death. The system makes it easier to pull away
when your vehicle is on a slope without the
need to use the parking brake.
When the system is active, your vehicle
remains stationary on the slope for two to
three seconds after you release the brake
pedal. This allows time to move your foot
from the brake to the accelerator pedal.
The system releases the brakes
automatically once the engine has
developed sufficient drive to prevent your
vehicle from rolling down the slope. This
is an advantage when pulling away on a
slope, for example from a car park ramp,
traffic lights or when reversing uphill into
a parking space.
Note:
The system only functions when you
bring your vehicle to a complete standstill
in an uphill gear (for example, drive when
facing uphill or reverse when facing
downhill).
Note: There is no warning light to indicate
the system is either on or off.
Using Hill Start Assist
1. Press the brake pedal to bring your vehicle to a complete standstill. Keep
the brake pedal pressed.
190
Explorer (TUB), enUSA, First Printing Brakes
Page 216 of 541
PRINCIPLE OF OPERATION
Cruise control lets you maintain a set
speed without keeping your foot on the
accelerator pedal. You can use cruise
control when your vehicle speed is greater
than 20 mph (30 km/h).
USING CRUISE CONTROL WARNINGS
Do not use cruise control on winding
roads, in heavy traffic or when the
road surface is slippery. This could
result in loss of vehicle control, serious
injury or death. When you are going downhill, your
vehicle speed may increase above
the set speed. The system will not
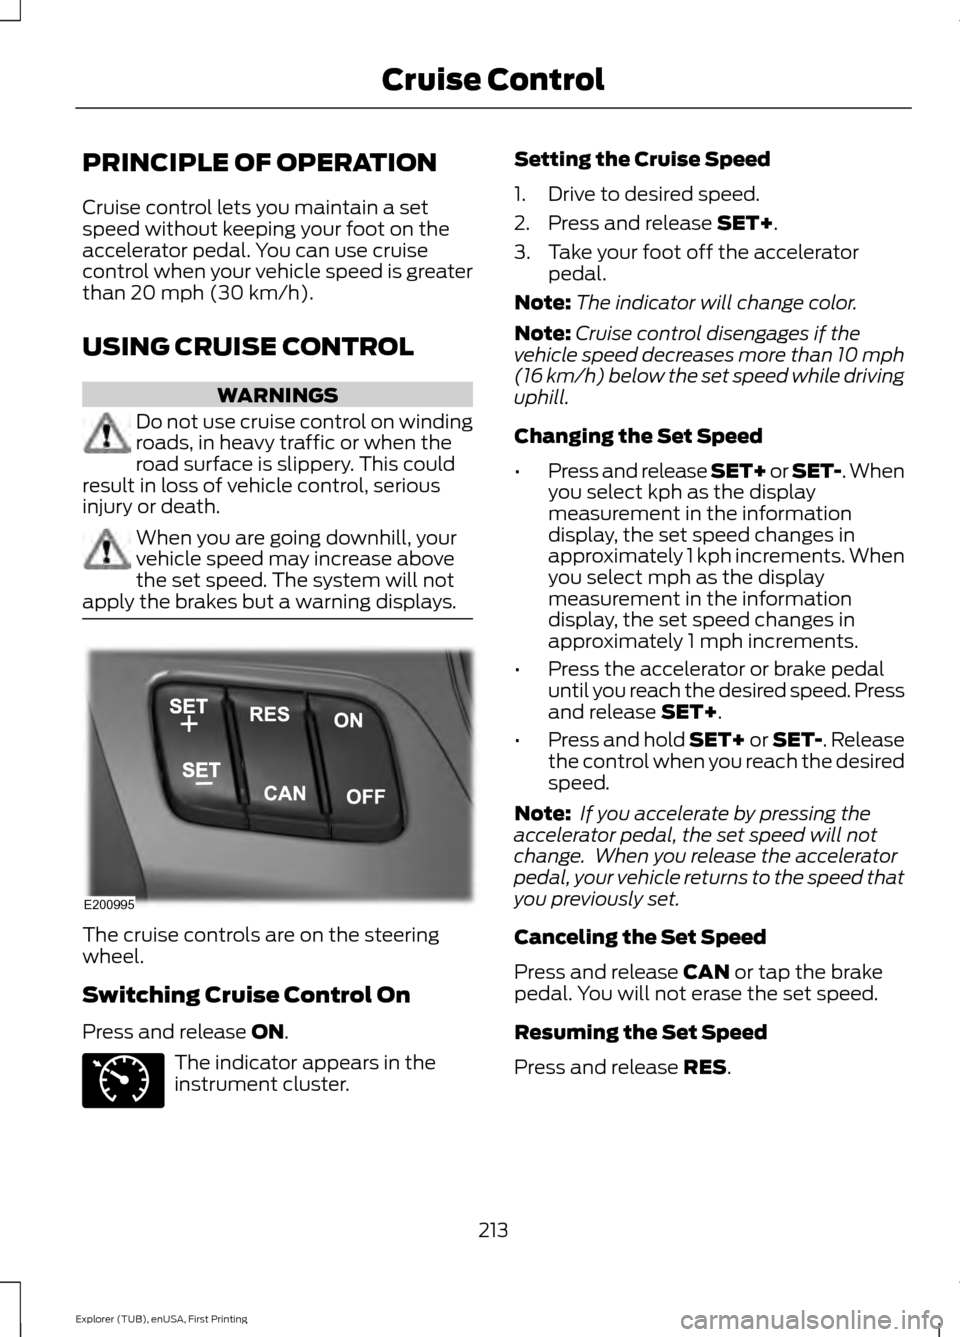
apply the brakes but a warning displays. The cruise controls are on the steering
wheel.
Switching Cruise Control On
Press and release
ON.
The indicator appears in the
instrument cluster. Setting the Cruise Speed
1. Drive to desired speed.
2. Press and release
SET+.
3. Take your foot off the accelerator pedal.
Note: The indicator will change color.
Note: Cruise control disengages if the
vehicle speed decreases more than 10 mph
(16 km/h) below the set speed while driving
uphill.
Changing the Set Speed
• Press and release SET+ or SET-. When
you select kph as the display
measurement in the information
display, the set speed changes in
approximately 1 kph increments. When
you select mph as the display
measurement in the information
display, the set speed changes in
approximately 1 mph increments.
• Press the accelerator or brake pedal
until you reach the desired speed. Press
and release
SET+.
• Press and hold SET+ or SET-. Release
the control when you reach the desired
speed.
Note: If you accelerate by pressing the
accelerator pedal, the set speed will not
change. When you release the accelerator
pedal, your vehicle returns to the speed that
you previously set.
Canceling the Set Speed
Press and release
CAN or tap the brake
pedal. You will not erase the set speed.
Resuming the Set Speed
Press and release
RES.
213
Explorer (TUB), enUSA, First Printing Cruise ControlE200995 E71340
Page 217 of 541
Switching Cruise Control Off
Press and release OFF when the system
is in stand by mode or switch the ignition
off.
Note: You erase the set speed when you
switch the system off.
USING ADAPTIVE CRUISE
CONTROL
(If Equipped) WARNINGS
Always pay close attention to
changing road conditions when using
adaptive cruise control. The system
does not replace attentive driving. Failing
to pay attention to the road may result in
a crash, serious injury or death. Adaptive cruise control is not a crash
warning or avoidance system.
Adaptive cruise control does not
detect stationary or slow moving
vehicles below
6 mph (10 km/h).
Adaptive cruise control does not
detect pedestrians or objects in the
road.
Adaptive cruise control does not
detect oncoming vehicles in the
same lane.
Do not use adaptive cruise control
on winding roads, in heavy traffic or
when the road surface is slippery.
This could result in loss of vehicle control,
serious injury or death. Do not use adaptive cruise control
when towing a trailer that has trailer
brakes. The auto-brake component
of the adaptive cruise control system does
not operate the trailer brakes. Using
adaptive cruise control when towing a
trailer that has trailer brakes may result in
the loss of vehicle control, which could
result in serious injury. WARNINGS
Do not use tire sizes other than those
recommended because this can
affect the normal operation of the
system. Failing to do so may result in a loss
of vehicle control, which could result in
serious injury. The system adjusts your vehicle speed to
maintain the set gap between you and the
vehicle in front of you in the same lane.
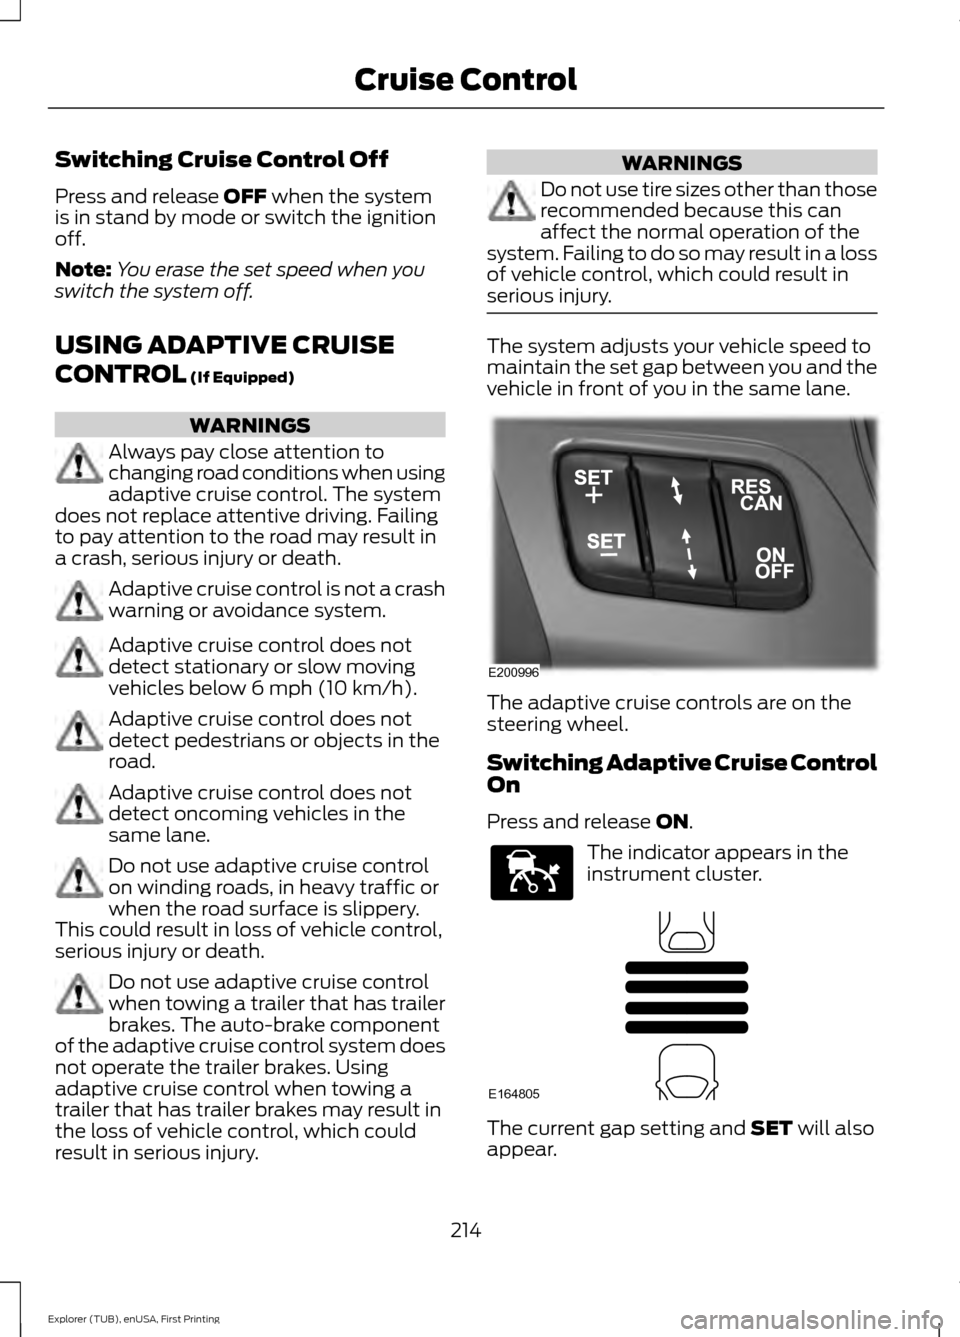
The adaptive cruise controls are on the
steering wheel.
Switching Adaptive Cruise Control
On
Press and release
ON.
The indicator appears in the
instrument cluster.
The current gap setting and
SET will also
appear.
214
Explorer (TUB), enUSA, First Printing Cruise ControlE200996 E144529 E164805
Page 218 of 541

Setting the Adaptive Cruise Speed
1. Drive to desired speed.
2. Press and release SET+.
3. A green indicator light, current gap setting and your desired set speed
appear in the instrument cluster.
4. Take your foot off the accelerator pedal. 5. A vehicle graphic illuminates if there is
a vehicle detected in front of you.
Note: When adaptive cruise control is
active, the speedometer may vary slightly
from the set speed displayed in the
information display.
Following a Vehicle WARNINGS
When following a vehicle, your
vehicle does not decelerate
automatically to a stop, nor does
your vehicle always decelerate quickly
enough to avoid a crash without driver
intervention. Always apply the brakes when
necessary. Failing to do so may result in a
crash, serious injury or death. Adaptive cruise control only warns
of vehicles detected by the radar
sensor. In some cases there may be
no warning or a delayed warning. You
should always apply the brakes when
necessary. Failure to do so may result in a
crash, serious injury or death. Note:
The brakes may emit noise when
applied by the system.
When a vehicle ahead of you enters the
same lane or a slower vehicle is ahead in
the same lane, the vehicle speed adjusts
to maintain a preset gap distance.
A vehicle graphic illuminates in the
instrument cluster.
Your vehicle will maintain a consistant gap
from the vehicle ahead until:
• The vehicle in front of you accelerates
to a speed above the set speed.
• The vehicle in front of you moves out
of the lane you are in.
• Your vehicle speed falls below
12 mph
(20 km/h).
• You set a new gap distance.
The system applies the brakes to slow your
vehicle to maintain a safe gap distance
from the vehicle in front. The brake lamps
automatically turn on when the system
applies the brakes. The maximum braking
which the system applies is limited. You
can override the system by applying the
brakes.
If the system determines that its maximum
braking level will not be sufficient, an
audible warning sounds while the system
continues to brake. A red warning bar
displays on the windshield and you must
take immediate action.
Note: When you are following a vehicle and
you switch on a direction indicator, adaptive
cruise control may provide a small
temporary acceleration to help you pass.
Setting the Gap Distance
You can decrease or increase the gap
between your vehicle and the vehicle in
front of you by pressing the gap control.
You can select four gap settings.
Note: It is your responsibility to select a gap
appropriate to the driving conditions.
215
Explorer (TUB), enUSA, First Printing Cruise ControlE164805
Page 224 of 541

WARNINGS
Large contrasts in lighting can limit
sensor performance.
The system will not operate if the
sensor cannot track the road lane
markings.
The vehicle should be taken to an
authorized dealer for inspection if
damage occurs in the immediate
area surrounding the sensor. Note:
The system works above 40 mph
(64 km/h).
Note: The system works as long as the
camera can detect one lane marking.
Note: The system may not function if the
camera is blocked or there is damage to the
windshield.
Note: When Aid mode is on and the system
detects no steering activity for a short
period, the system will alert you to put your
hands on the steering wheel. The system
may detect a light grip or touch on the
steering wheel as hands off driving.
The system notifies you to stay in your lane
through the steering system and the
instrument cluster display when the front
camera detects an unintentional drift out
of your lane is likely to occur. The system
automatically detects and tracks the road
lane markings using a camera mounted
behind the interior rear view mirror.
Switching the System On and Off
Note: The system on or off setting is stored
until it is manually changed, unless a MyKey
is detected. If the system detects a MyKey
it defaults to on and the mode is set to Alert.
Note: If a MyKey is detected, pressing the
button will not affect the on or off status of
the system. Press the button located on the
left steering wheel stalk to
switch the system on or off.
System Settings
The system has optional setting menus
available. To view or adjust the settings,
See General Information (page 101). The
system stores the last-known selection for
each of these settings. You do not need to
readjust your settings each time you turn
on the system.
Mode: This setting allows you to select
which of the system features you can
enable. Alert only – Provides a steering wheel
vibration when the system detects an
unintended lane departure.
221
Explorer (TUB), enUSA, First Printing Driving AidsE144813 E165515 E165516
Page 276 of 541

Protected components
Fuse amp rating
Fuse or relay number
Instrument cluster.
7.5A 2
13
Smart data link.
Steering column control module.
Not used.
—
14
Smart datalink connector power.
10A 2
15
Heads up display.
Not used.
—
16
Electronic finish panel.
5A 2
17
Push button start switch.
5A 2
18
Ignition switch.
Key inhibit.
Transmission control switch (tow haul).
7.5A 2
19
Not used.
—
20
Terrain management switch.
5A 2
21
Heads up display.
Humidity sensor.
Occupant classification sensor.
5A 2
22
Delayed accessory power.
10A 1
23
Power windows.
Moonroof.
Folding mirror relay.
DC inverter.
Window/moonroof switch illumination.
Central lock relay.
20A 1
24
Left-hand front smart window motor.
30A 1
25
Door zone module.
Right-hand front smart window motor.
30A 1
26
Door zone module.
Moonroof.
30A 1
27
Sony amplifier - 10 channel.
20A 1
28
Sony amplifier - 14 channel.
30A 1
29
273
Explorer (TUB), enUSA, First Printing Fuses
Page 285 of 541
1. Remove the filler cap.
2. If the engine oil level is not within the
normal range, add engine oil that
meets Ford specifications. See
Capacities and Specifications (page
334).
3. Remove the engine oil filler cap and use a funnel to pour the engine oil into
the opening.
4. Wipe off any spilled oil.
5. Replace the filler cap. Turn it until you feel a strong resistance.
OIL CHANGE INDICATOR
RESET
Use the information display controls on
the steering wheel to reset the oil change
indicator.
From the main menu scroll to: Action and description
Message
Press the right arrow button,
then from this menu scroll
to the following message.
Settings
Press the right arrow button,
then from this menu scroll
to the following message.
Vehicle
Press the right arrow button,
then from this menu scroll
to the following message.
Oil Life
Press and hold the
OK
button until the instrument
cluster displays the
following message.
Hold OK to
Reset
Reset Successful
When the oil change indic-
ator resets the instrument
cluster displays 100%.
Remaining Life Action and description
Message
{00}%
If the instrument cluster
displays one of the following
messages, repeat the
process.
Not Reset
Reset Cancelled
ENGINE COOLANT CHECK WARNINGS
Do not add engine coolant when the
engine is hot. Steam and scalding
liquids released from a hot cooling
system can burn you badly. Also, spilling
coolant on hot engine parts can burn you. Do not put engine coolant in the
windshield washer fluid container. If
sprayed on the windshield, engine
coolant could make it difficult to see
through the windshield. To reduce the risk of personal injury,
make sure the engine is cool before
unscrewing the coolant pressure
relief cap. The cooling system is under
pressure. Steam and hot liquid can come
out forcefully when you loosen the cap
slightly. Do not add coolant further than the
MAX mark.
Checking the Engine Coolant
When the engine is cold, check the
concentration and level of the engine
coolant at the intervals listed in the
scheduled maintenance information.
See
Scheduled Maintenance (page 486).
282
Explorer (TUB), enUSA, First Printing Maintenance
Page 306 of 541
CLEANING THE INSTRUMENT
PANEL AND INSTRUMENT
CLUSTER LENS
WARNING
Do not use chemical solvents or
strong detergents when cleaning the
steering wheel or instrument panel
to avoid contamination of the airbag
system. Note:
Follow the same procedure as
cleaning leather seats for cleaning leather
instrument panels and leather interior trim
surfaces. See Cleaning Leather Seats
(page 303).
Clean the instrument panel and cluster
lens with a clean, damp and soft cloth,
then use a clean, dry and soft cloth to dry
these areas.
• Avoid cleaners or polishes that increase
the gloss of the upper portion of the
instrument panel. The dull finish in this
area helps protect you from
undesirable windshield reflection.
• Do not use any household cleaning
products or glass cleaners as these
may damage the finish of the
instrument panel, interior trim and
cluster lens.
• Wash or wipe your hands clean if you
have been in contact with certain
products such as insect repellent and
suntan lotion to avoid possible damage
to the interior painted surfaces.
• Do not allow air fresheners and hand
sanitizers to spill onto interior surfaces.
If a spill occurs, wipe off immediately.
Your warranty may not cover these
damages.
If a staining liquid like coffee or juice has
been spilled on the instrument panel or on
interior trim surfaces: 1. Wipe up spilled liquid using a clean,
soft cloth as quickly as possible.
2. Use Motorcraft Premium Leather and Vinyl Cleaner or a commercially
available leather cleaning product for
automotive interiors. Test any cleaner
or stain remover on an inconspicuous
area.
3. Alternatively, wipe the surface with a clean, soft cloth and a mild soap and
water solution. Dry the area with a
clean, soft cloth.
4. If necessary, apply more soap and water solution or cleaning product to
a clean, soft cloth and press it onto the
soiled area. Allow this to set at room
temperature for 30 minutes.
5. Remove the soaked cloth, then with a clean, damp cloth, use a rubbing
motion for 60 seconds on the soiled
area.
6. Dry the area with a clean, soft cloth.
CLEANING LEATHER SEATS
(If
Equipped)
Note: Follow the same procedure as
cleaning leather seats for cleaning leather
instrument panels and leather interior trim
surfaces.
For routine cleaning, wipe the surface with
a soft, damp cloth and a mild soap and
water solution. Dry the area with a clean,
soft cloth.
For cleaning and removing stains such as
dye transfer, use Motorcraft Premium
Leather and Vinyl Cleaner or a
commercially available leather cleaning
product for automotive interiors.
Note: Test any cleaner or stain remover on
an inconspicuous area.
303
Explorer (TUB), enUSA, First Printing Vehicle Care