2016 FORD EXPLORER change time
[x] Cancel search: change timePage 99 of 541

Engine Coolant Temperature
Gauge
Shows the temperature of the engine
coolant. At normal operating temperature,
the needle will remain in the center section.
If the needle enters the red section, the
engine is overheating. Stop the engine,
switch the ignition off and determine the
cause once the engine has cooled down.
Note:
Do not restart the engine until the
cause of the overheating has been resolved. WARNING
Never remove the coolant reservoir
cap while the engine is running or hot.
Fuel Gauge
Note:
The fuel gauge may vary slightly
when your vehicle is moving or on a gradient.
Switch the ignition on. The fuel gauge will
indicate approximately how much fuel is
left in the fuel tank. The arrow adjacent to
the fuel pump symbol indicates on which
side of your vehicle the fuel filler door is
located.
The needle should move toward F when
you refuel your vehicle. If the needle points
to E after adding fuel, this indicates your
vehicle needs service soon.
After refueling some variability in needle
position is normal:
• It may take a short time for the needle
to reach full after leaving the gas
station. This is normal and depends
upon the slope of pavement at the gas
station.
• The fuel amount dispensed into the
tank is a little less or more than the
gauge indicated. This is normal and
depends upon the slope of pavement
at the gas station. •
If the gas station nozzle shuts off
before the tank is full, try a different
gas pump nozzle.
• There is a small reserve left in the tank
when the fuel gauge reaches empty.
Low Fuel Reminder
A low fuel reminder triggers when the
distance to empty reaches 75 miles (120
km), 50 miles (80 km), 25 miles (40 km),
10 miles (20 km) and 0 miles (0 km) .
Variations:
Note: The low fuel warning and
distance-to-empty warning can appear at
different fuel gauge positions depending on
fuel economy conditions. This variation is
normal.
WARNING LAMPS AND
INDICATORS
The following warning lamps and
indicators alert you to a vehicle condition
that may become serious. Some lamps
illuminate when you start your vehicle to
make sure they work. If any lamps remain
on after starting your vehicle, refer to the
respective system warning lamp for further
information.
Note: Some warning indicators appear in
the information display and function the
same as a warning lamp, but do not display
when you start your vehicle.
Adaptive Cruise Control (If Equipped) The speed control system
indicator light changes color to
indicate what mode the system
is in. See Using Adaptive Cruise Control
(page
214).
96
Explorer (TUB), enUSA, First Printing Instrument ClusterE144524
Page 130 of 541
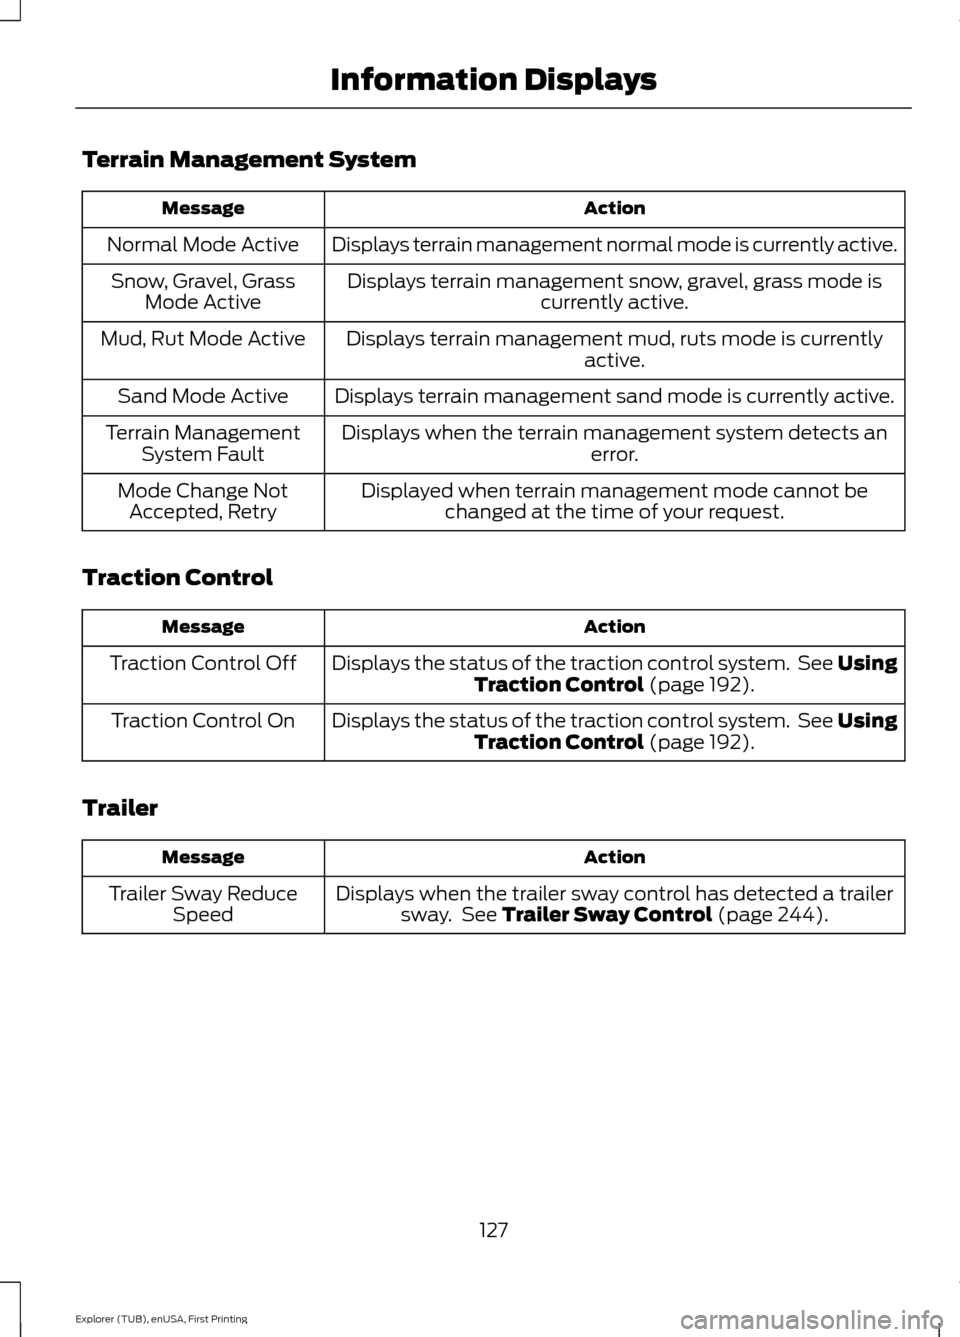
Terrain Management System
Action
Message
Displays terrain management normal mode is currently active.
Normal Mode Active
Displays terrain management snow, gravel, grass mode iscurrently active.
Snow, Gravel, Grass
Mode Active
Displays terrain management mud, ruts mode is currently active.
Mud, Rut Mode Active
Displays terrain management sand mode is currently active.
Sand Mode Active
Displays when the terrain management system detects an error.
Terrain Management
System Fault
Displayed when terrain management mode cannot bechanged at the time of your request.
Mode Change Not
Accepted, Retry
Traction Control Action
Message
Displays the status of the traction control system. See UsingTraction Control (page 192).
Traction Control Off
Displays the status of the traction control system. See UsingTraction Control
(page 192).
Traction Control On
Trailer Action
Message
Displays when the trailer sway control has detected a trailersway. See
Trailer Sway Control (page 244).
Trailer Sway Reduce
Speed
127
Explorer (TUB), enUSA, First Printing Information Displays
Page 162 of 541
Gate Operator / Canadian
Programming
Canadian radio-frequency laws require
transmitter signals to
“time-out” (or quit)
after several seconds of transmission –
which may not be long enough for
HomeLink to pick up the signal during
programming. Similar to this Canadian law,
some U.S. gate operators are designed to
“time-out” in the same manner.
Note: If programming a garage door opener
or gate operator, it is advised to unplug the
device during the “cycling” process to
prevent possible overheating.
1. Press and hold the HomeLink button while you press and release, every two
seconds, your hand-held transmitter
until the HomeLink indicator light
changes from a slow to a rapidly
blinking light.
2. Release both the HomeLink and hand-held transmitter buttons.
3. Continue programing HomeLink. See In-Vehicle Programming
.
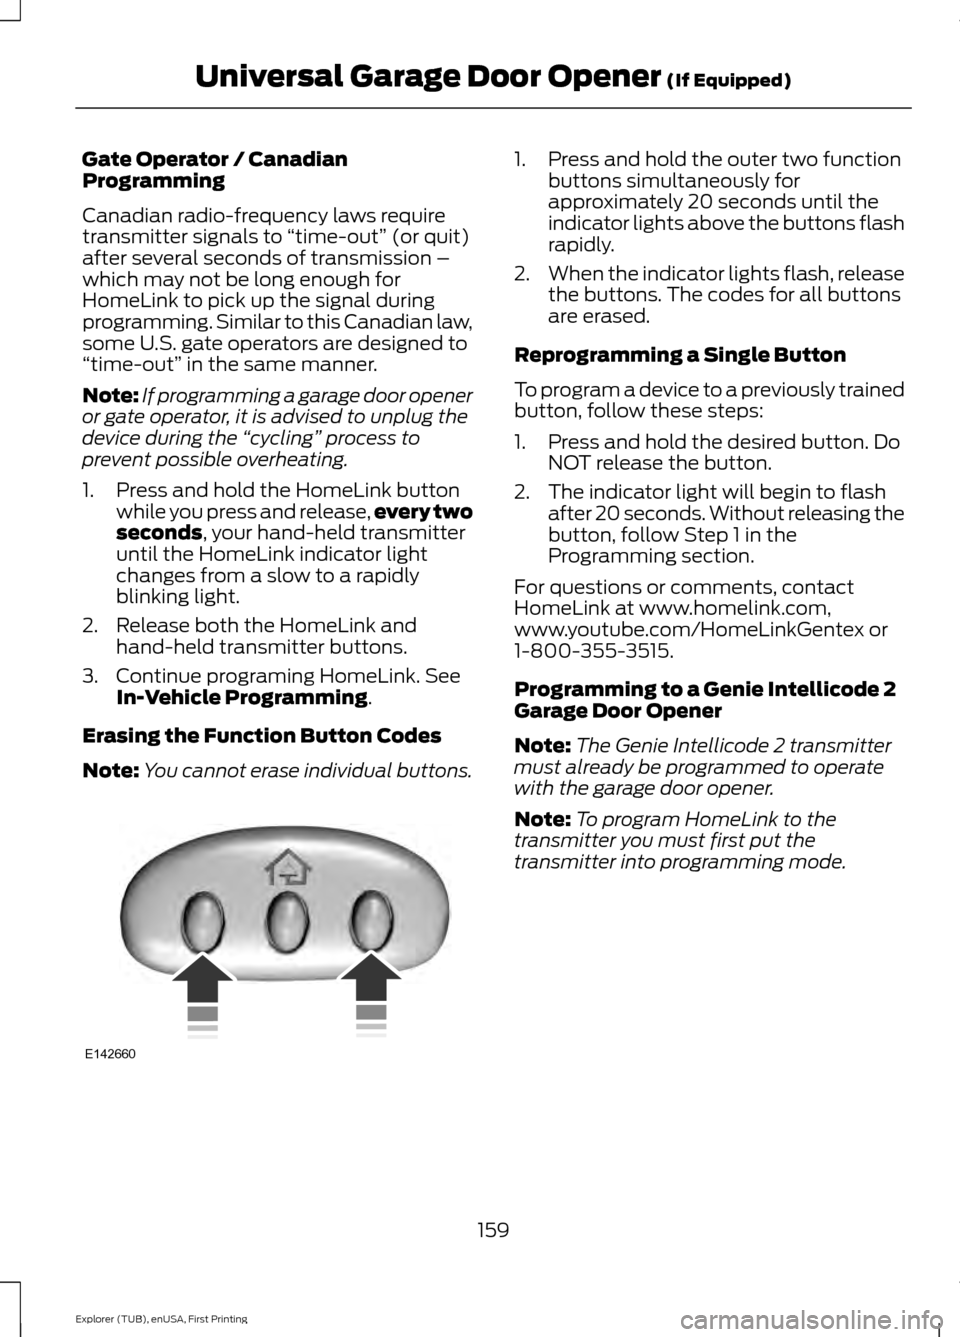
Erasing the Function Button Codes
Note: You cannot erase individual buttons. 1. Press and hold the outer two function
buttons simultaneously for
approximately 20 seconds until the
indicator lights above the buttons flash
rapidly.
2. When the indicator lights flash, release
the buttons. The codes for all buttons
are erased.
Reprogramming a Single Button
To program a device to a previously trained
button, follow these steps:
1. Press and hold the desired button. Do NOT release the button.
2. The indicator light will begin to flash after 20 seconds. Without releasing the
button, follow Step 1 in the
Programming section.
For questions or comments, contact
HomeLink at www.homelink.com,
www.youtube.com/HomeLinkGentex or
1-800-355-3515.
Programming to a Genie Intellicode 2
Garage Door Opener
Note: The Genie Intellicode 2 transmitter
must already be programmed to operate
with the garage door opener.
Note: To program HomeLink to the
transmitter you must first put the
transmitter into programming mode.
159
Explorer (TUB), enUSA, First Printing Universal Garage Door Opener
(If Equipped)E142660
Page 163 of 541
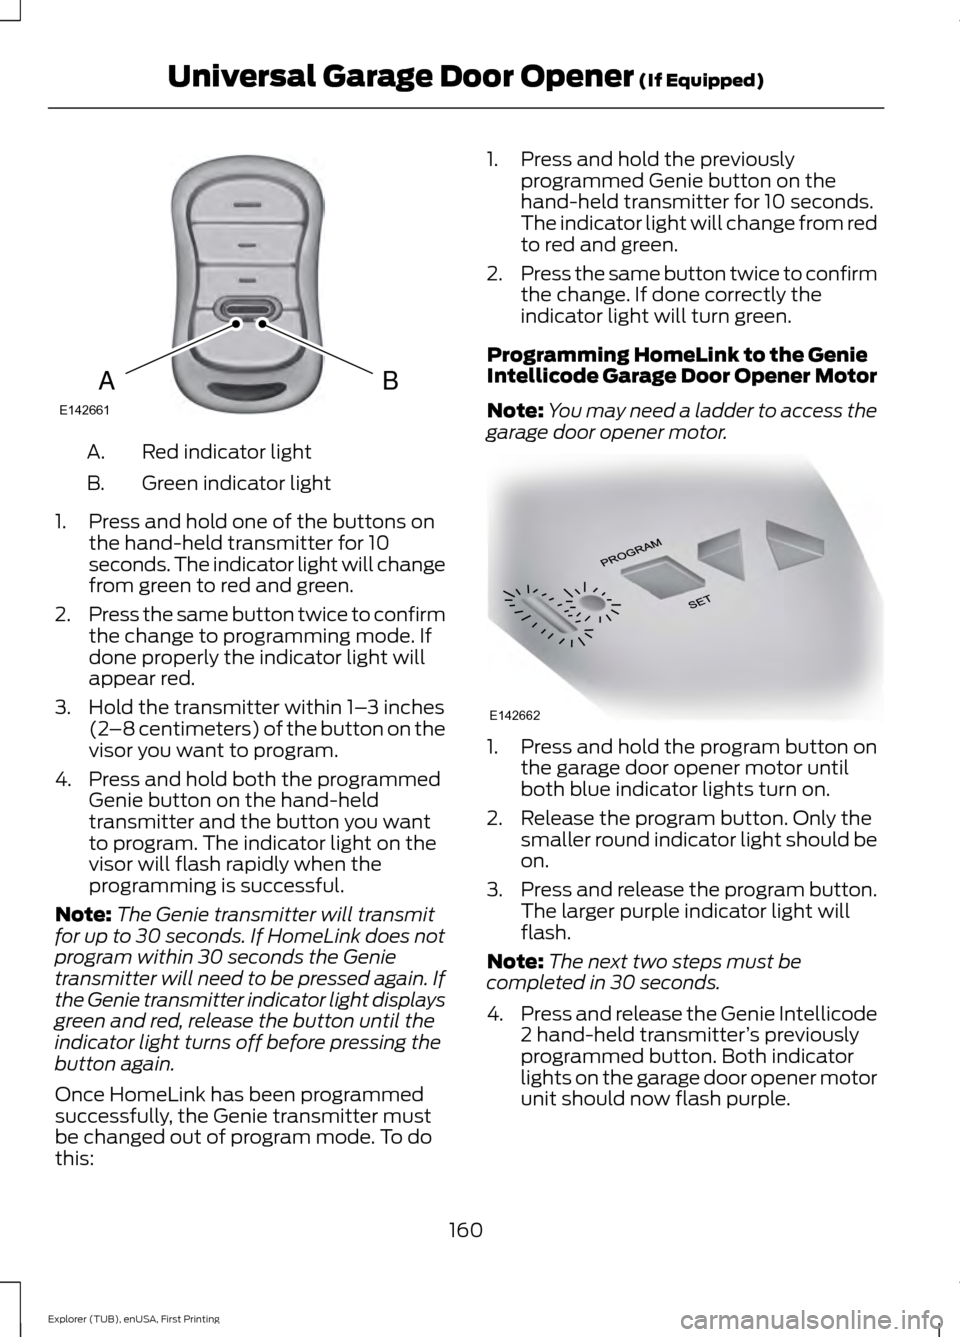
Red indicator light
A.
Green indicator light
B.
1. Press and hold one of the buttons on the hand-held transmitter for 10
seconds. The indicator light will change
from green to red and green.
2. Press the same button twice to confirm
the change to programming mode. If
done properly the indicator light will
appear red.
3. Hold the transmitter within 1– 3 inches
(2 –8 centimeters) of the button on the
visor you want to program.
4. Press and hold both the programmed Genie button on the hand-held
transmitter and the button you want
to program. The indicator light on the
visor will flash rapidly when the
programming is successful.
Note: The Genie transmitter will transmit
for up to 30 seconds. If HomeLink does not
program within 30 seconds the Genie
transmitter will need to be pressed again. If
the Genie transmitter indicator light displays
green and red, release the button until the
indicator light turns off before pressing the
button again.
Once HomeLink has been programmed
successfully, the Genie transmitter must
be changed out of program mode. To do
this: 1. Press and hold the previously
programmed Genie button on the
hand-held transmitter for 10 seconds.
The indicator light will change from red
to red and green.
2. Press the same button twice to confirm
the change. If done correctly the
indicator light will turn green.
Programming HomeLink to the Genie
Intellicode Garage Door Opener Motor
Note: You may need a ladder to access the
garage door opener motor. 1. Press and hold the program button on
the garage door opener motor until
both blue indicator lights turn on.
2. Release the program button. Only the smaller round indicator light should be
on.
3. Press and release the program button.
The larger purple indicator light will
flash.
Note: The next two steps must be
completed in 30 seconds.
4. Press and release the Genie Intellicode
2 hand-held transmitter ’s previously
programmed button. Both indicator
lights on the garage door opener motor
unit should now flash purple.
160
Explorer (TUB), enUSA, First Printing Universal Garage Door Opener (If Equipped)BAE142661 E142662
Page 164 of 541
5. Press and hold the previously
programmed button on the visor for 2
seconds. Repeat this step up to 3 times
until the garage door moves.
Programming is now complete.
Clearing a HomeLink Device
To erase programming from the three
HomeLink buttons press and hold the two
outer HomeLink buttons until the indicator
light begins to flash. The indicator light will
begin flashing in 10 to 20 seconds, at which
time both buttons should be released.
Programming has now been erased, and
the indicator light should blink slowly to
indicate the device is in train mode when
any of the three HomeLink buttons are
pressed.
FCC and RSS-210 Industry Canada
Compliance
This device complies with Part 15 of the
FCC Rules and with RSS-210 of Industry
Canada. Operation is subject to the
following two conditions: (1) this device
may not cause harmful interference, and
(2) this device must accept any
interference received, including
interference that may cause undesired
operation.
Changes or modifications to your device
not expressly approved by the party
responsible for compliance can void the
user ’s authority to operate the equipment.
161
Explorer (TUB), enUSA, First Printing Universal Garage Door Opener (If Equipped)
Page 181 of 541

Illumination of the service engine soon
indicator, charging system warning light or
the temperature warning light, fluid leaks,
strange odors, smoke or loss of engine
power could indicate that the emission
control system is not working properly.
An improperly operating or damaged
exhaust system may allow exhaust to
enter the vehicle. Have a damaged or
improperly operating exhaust system
inspected and repaired immediately.
Do not make any unauthorized changes to
your vehicle or engine. By law, vehicle
owners and anyone who manufactures,
repairs, services, sells, leases, trades
vehicles, or supervises a fleet of vehicles
are not permitted to intentionally remove
an emission control device or prevent it
from working. Information about your
vehicle
’s emission system is on the Vehicle
Emission Control Information Decal
located on or near the engine. This decal
also lists engine displacement
Please consult your warranty information
for complete details.
On-Board Diagnostics (OBD-II)
Your vehicle has a computer known as the
on-board diagnostics system (OBD-II) that
monitors the engine ’s emission control
system. The system protects the
environment by making sure that your
vehicle continues to meet government
emission standards. The OBD-II system
also assists a service technician in properly
servicing your vehicle. When the service engine soon
indicator illuminates, the OBD-II
system has detected a
malfunction. Temporary malfunctions may
cause the service engine soon indicator to
illuminate.
Examples of temporary malfunctions are: •
the vehicle has run out of fuel —the
engine may misfire or run poorly
• poor fuel quality or water in the
fuel —the engine may misfire or run
poorly
• the fuel fill inlet may not have closed
properly. See Refueling (page 174).
• driving through deep water —the
electrical system may be wet.
You can correct these temporary
malfunctions by filling the fuel tank with
good quality fuel, properly closing the fuel
fill inlet or letting the electrical system dry
out. After three driving cycles without these
or any other temporary malfunctions
present, the service engine soon indicator
should stay off the next time you start the
engine. A driving cycle consists of a cold
engine startup followed by mixed
city/highway driving. No additional vehicle
service is required.
If the service engine soon indicator remains
on, have your vehicle serviced at the first
available opportunity. Although some
malfunctions detected by the OBD-II may
not have symptoms that are apparent,
continued driving with the service engine
soon indicator on can result in increased
emissions, lower fuel economy, reduced
engine and transmission smoothness, and
lead to more costly repairs.
Readiness for
Inspection/Maintenance (I/M)
Testing
Some state/provincial and local
governments may have
Inspection/Maintenance (I/M) programs
to inspect the emission control equipment
on your vehicle. Failure to pass this
inspection could prevent you from getting
a vehicle registration.
178
Explorer (TUB), enUSA, First Printing Fuel and Refueling
Page 188 of 541
reinstall the repaired or replaced road tire
as soon as possible. Major dissimilar tire
sizes between the front and rear axles
could cause the 4WD system to stop
functioning and default to front-wheel
drive or damage the 4WD system.
How Your Vehicle Differs From
Other Vehicles
Truck and utility vehicles can differ from
some other vehicles. Your vehicle may be
higher to allow it to travel over rough
terrain without getting hung up or
damaging underbody components.
The differences that make your vehicle so
versatile also make it handle differently
than an ordinary passenger car.
Maintain steering wheel control at all
times, especially in rough terrain. Since
sudden changes in terrain can result in
abrupt steering wheel motion, make sure
you grip the steering wheel from the
outside. Do not grip the spokes.
Drive cautiously to avoid vehicle damage
from concealed objects such as rocks and
stumps.
You should either know the terrain or
examine maps of the area before driving.
Map out your route before driving in the
area. To maintain steering and braking
control of your vehicle, you must have all
four wheels on the ground and they must
be rolling, not sliding or spinning.
Driving In Special Conditions With
Four-Wheel Drive (4WD)
Note:
4WD vehicles are equipped for driving
on sand, snow, mud and rough roads and
have operating characteristics that are
somewhat different from conventional
vehicles, both on and off the highway. Basic operating principles in special
conditions
•
Drive slower in strong crosswinds which
can affect the normal steering
characteristics of your vehicle.
• Be extremely careful when driving on
pavement made slippery by loose sand,
water, gravel, snow or ice.
If Your Vehicle Goes Off the Edge of the
Pavement
• If your vehicle goes off the edge of the
pavement, slow down, but avoid severe
brake application, ease the vehicle
back onto the pavement only after
reducing your speed. Do not turn the
steering wheel too sharply while
returning to the road surface.
• It may be safer to stay on the apron or
shoulder of the road and slow down
gradually before returning to the
pavement. You may lose control if you
do not slow down or if you turn the
steering wheel too sharply or abruptly.
• It often may be less risky to strike small
objects, such as highway reflectors,
with minor damage to your vehicle
rather than attempt a sudden return to
the pavement which could cause the
vehicle to slide sideways out of control
or rollover. Remember, your safety and
the safety of others should be your
primary concern.
If Your Vehicle Gets Stuck WARNINGS
Always set the parking brake fully
and make sure the transmission is in
P (Park). Turn the ignition to the lock
position or turn the vehicle off using the
start/stop button and remove the key
whenever you leave your vehicle.
185
Explorer (TUB), enUSA, First Printing Four-Wheel Drive (If Equipped)
Page 196 of 541
PRINCIPLE OF OPERATION
WARNINGS
Vehicle modifications involving
braking system, aftermarket roof
racks, suspension, steering system,
tire construction and wheel and tire size
may change the handling characteristics
of your vehicle and may adversely affect
the performance of the electronic stability
control system. In addition, installing any
stereo loudspeakers may interfere with
and adversely affect the electronic stability
control system. Install any aftermarket
stereo loudspeaker as far as possible from
the front center console, the tunnel, and
the front seats in order to minimize the risk
of interfering with the electronic stability
control sensors. Reducing the
effectiveness of the electronic stability
control system could lead to an increased
risk of loss of vehicle control, vehicle
rollover, personal injury and death. Remember that even advanced
technology cannot defy the laws of
physics. It’
s always possible to lose
control of a vehicle due to inappropriate
driver input for the conditions. Aggressive
driving on any road condition can cause
you to lose control of your vehicle
increasing the risk of personal injury or
property damage. Activation of the
electronic stability control system is an
indication that at least some of the tires
have exceeded their ability to grip the road;
this could reduce the operator ’s ability to
control the vehicle potentially resulting in
a loss of vehicle control, vehicle rollover,
personal injury and death. If your electronic
stability control system activates, SLOW
DOWN. The system automatically turns on each
time you switch the ignition on. If a driving condition activates either the
stability control or the traction control
system you may experience the following
conditions:
•
The stability and traction control light
flashes.
• Your vehicle slows down.
• Reduced engine power.
• A vibration in the brake pedal.
• The brake pedal is stiffer than usual.
• If the driving condition is severe and
your foot is not on the brake, the brake
pedal may move as the systems
applies higher brake forces.
The stability control system has several
features built into it to help you maintain
control of your vehicle:
Electronic Stability Control
The system enhances your vehicle ’s ability
to prevent skids or lateral slides by
applying brakes to one or more of the
wheels individually and, if necessary,
reducing engine power.
Roll Stability Control
The system enhances your vehicle ’s ability
to prevent rollovers by detecting your
vehicle ’s roll motion and the rate at which
it changes by applying the brakes to one
or more wheels individually.
Curve Control
The system enhances your vehicle ’s ability
to follow the road when cornering severely
or avoiding objects in the roadway. Curve
Control operates by reducing engine power
and, if necessary, applying brakes to one
or more of the wheels individually.
193
Explorer (TUB), enUSA, First Printing Stability Control