2016 FORD EXPEDITION ECO mode
[x] Cancel search: ECO modePage 120 of 421
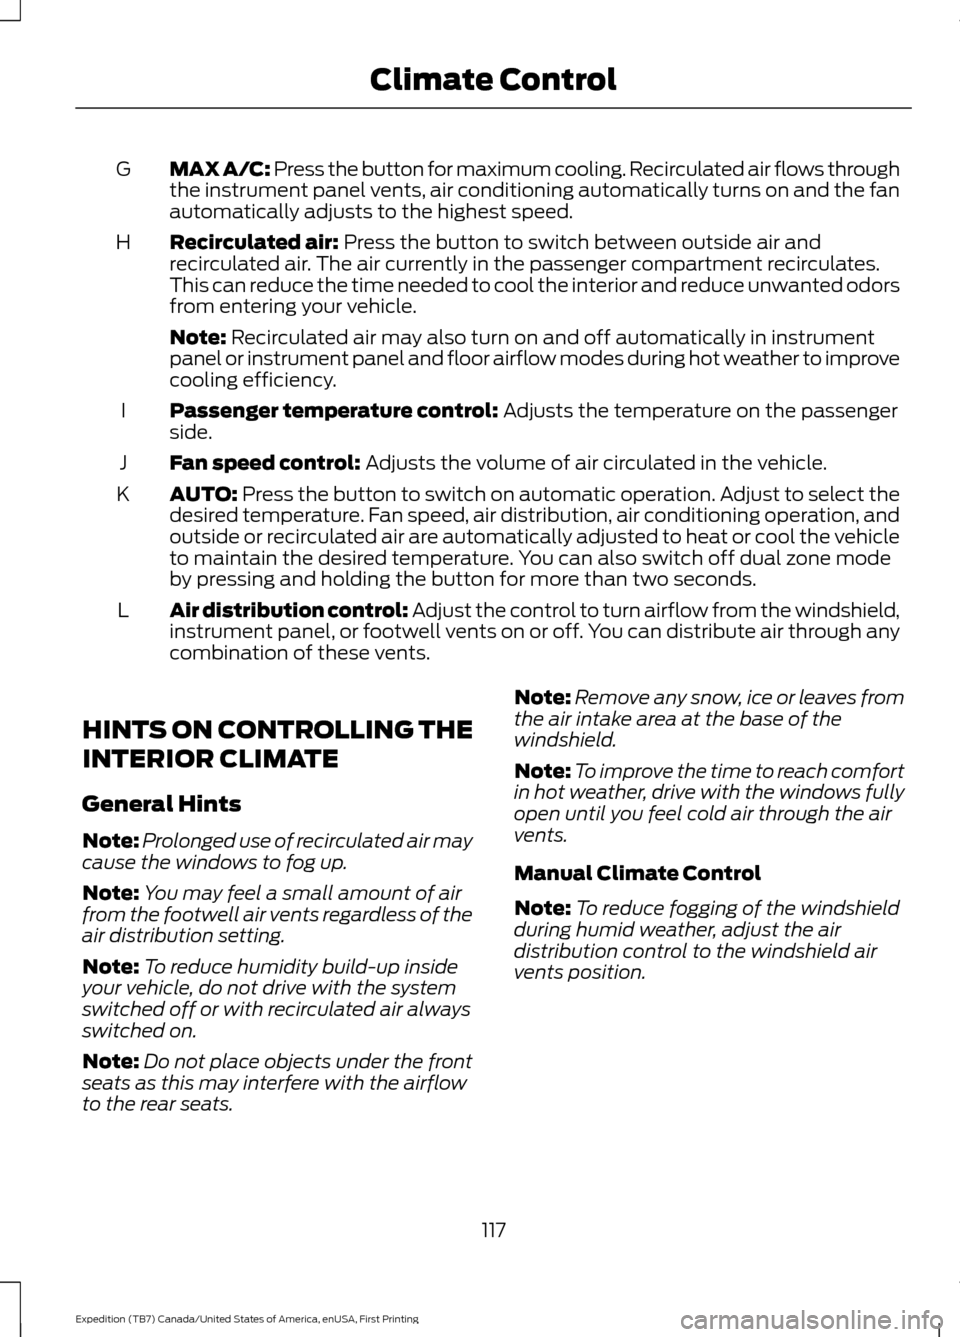
MAX A/C: Press the button for maximum cooling. Recirculated air flows through
the instrument panel vents, air conditioning automatically turns on and the fan
automatically adjusts to the highest speed.
G
Recirculated air: Press the button to switch between outside air and
recirculated air. The air currently in the passenger compartment recirculates.
This can reduce the time needed to cool the interior and reduce unwanted odors
from entering your vehicle.
H
Note:
Recirculated air may also turn on and off automatically in instrument
panel or instrument panel and floor airflow modes during hot weather to improve
cooling efficiency.
Passenger temperature control:
Adjusts the temperature on the passenger
side.
I
Fan speed control:
Adjusts the volume of air circulated in the vehicle.
J
AUTO:
Press the button to switch on automatic operation. Adjust to select the
desired temperature. Fan speed, air distribution, air conditioning operation, and
outside or recirculated air are automatically adjusted to heat or cool the vehicle
to maintain the desired temperature. You can also switch off dual zone mode
by pressing and holding the button for more than two seconds.
K
Air distribution control: Adjust the control to turn airflow from the windshield,
instrument panel, or footwell vents on or off. You can distribute air through any
combination of these vents.
L
HINTS ON CONTROLLING THE
INTERIOR CLIMATE
General Hints
Note: Prolonged use of recirculated air may
cause the windows to fog up.
Note: You may feel a small amount of air
from the footwell air vents regardless of the
air distribution setting.
Note: To reduce humidity build-up inside
your vehicle, do not drive with the system
switched off or with recirculated air always
switched on.
Note: Do not place objects under the front
seats as this may interfere with the airflow
to the rear seats. Note:
Remove any snow, ice or leaves from
the air intake area at the base of the
windshield.
Note: To improve the time to reach comfort
in hot weather, drive with the windows fully
open until you feel cold air through the air
vents.
Manual Climate Control
Note: To reduce fogging of the windshield
during humid weather, adjust the air
distribution control to the windshield air
vents position.
117
Expedition (TB7) Canada/United States of America, enUSA, First Printing Climate Control
Page 131 of 421
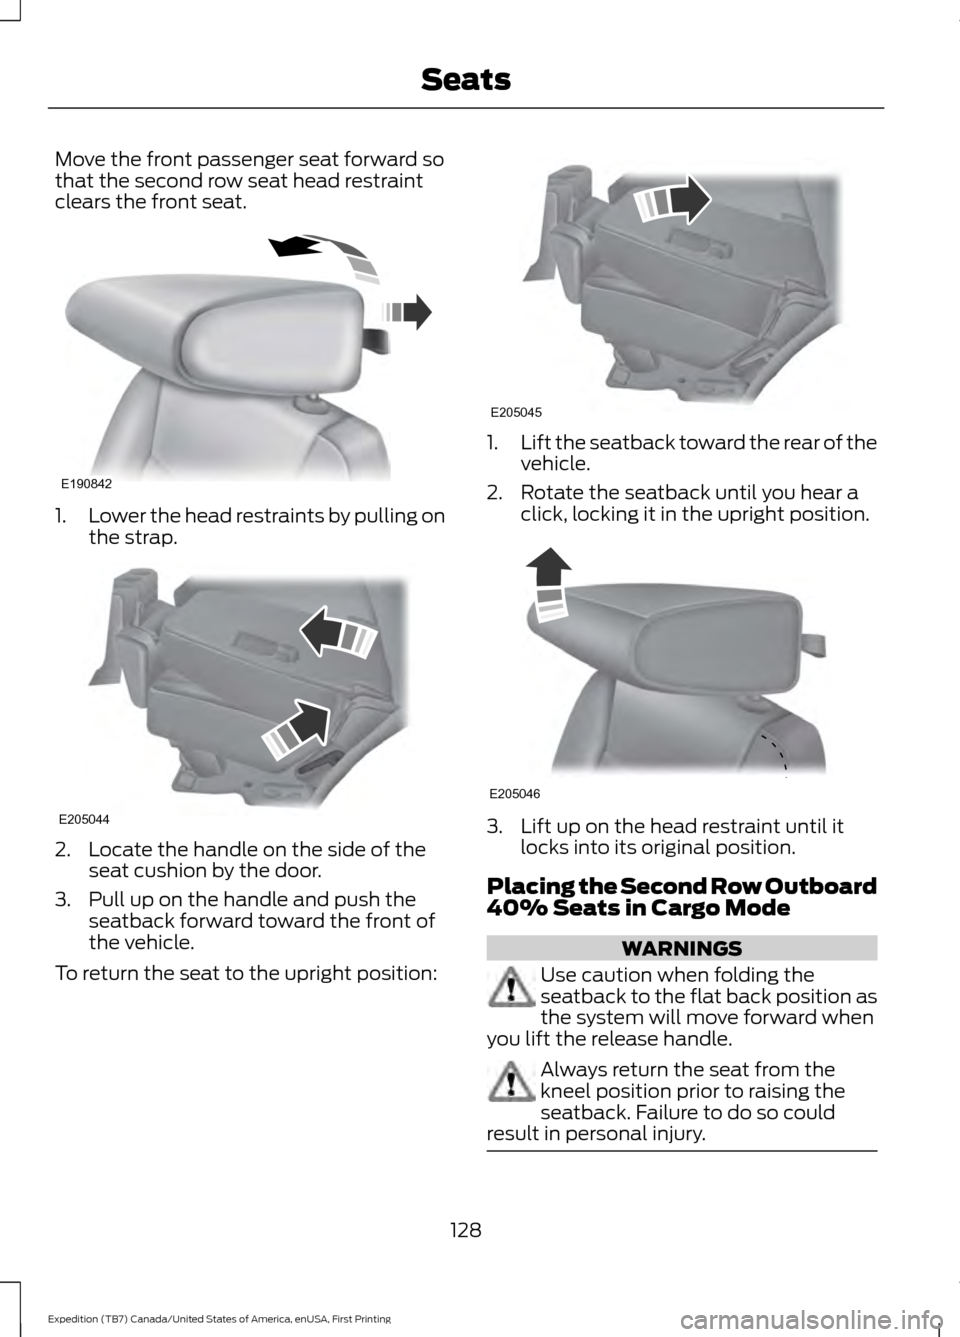
Move the front passenger seat forward so
that the second row seat head restraint
clears the front seat.
1.
Lower the head restraints by pulling on
the strap. 2. Locate the handle on the side of the
seat cushion by the door.
3. Pull up on the handle and push the seatback forward toward the front of
the vehicle.
To return the seat to the upright position: 1.
Lift the seatback toward the rear of the
vehicle.
2. Rotate the seatback until you hear a click, locking it in the upright position. 3. Lift up on the head restraint until it
locks into its original position.
Placing the Second Row Outboard
40% Seats in Cargo Mode WARNINGS
Use caution when folding the
seatback to the flat back position as
the system will move forward when
you lift the release handle. Always return the seat from the
kneel position prior to raising the
seatback. Failure to do so could
result in personal injury. 128
Expedition (TB7) Canada/United States of America, enUSA, First Printing SeatsE190842 E205044 E205045 E205046
Page 132 of 421
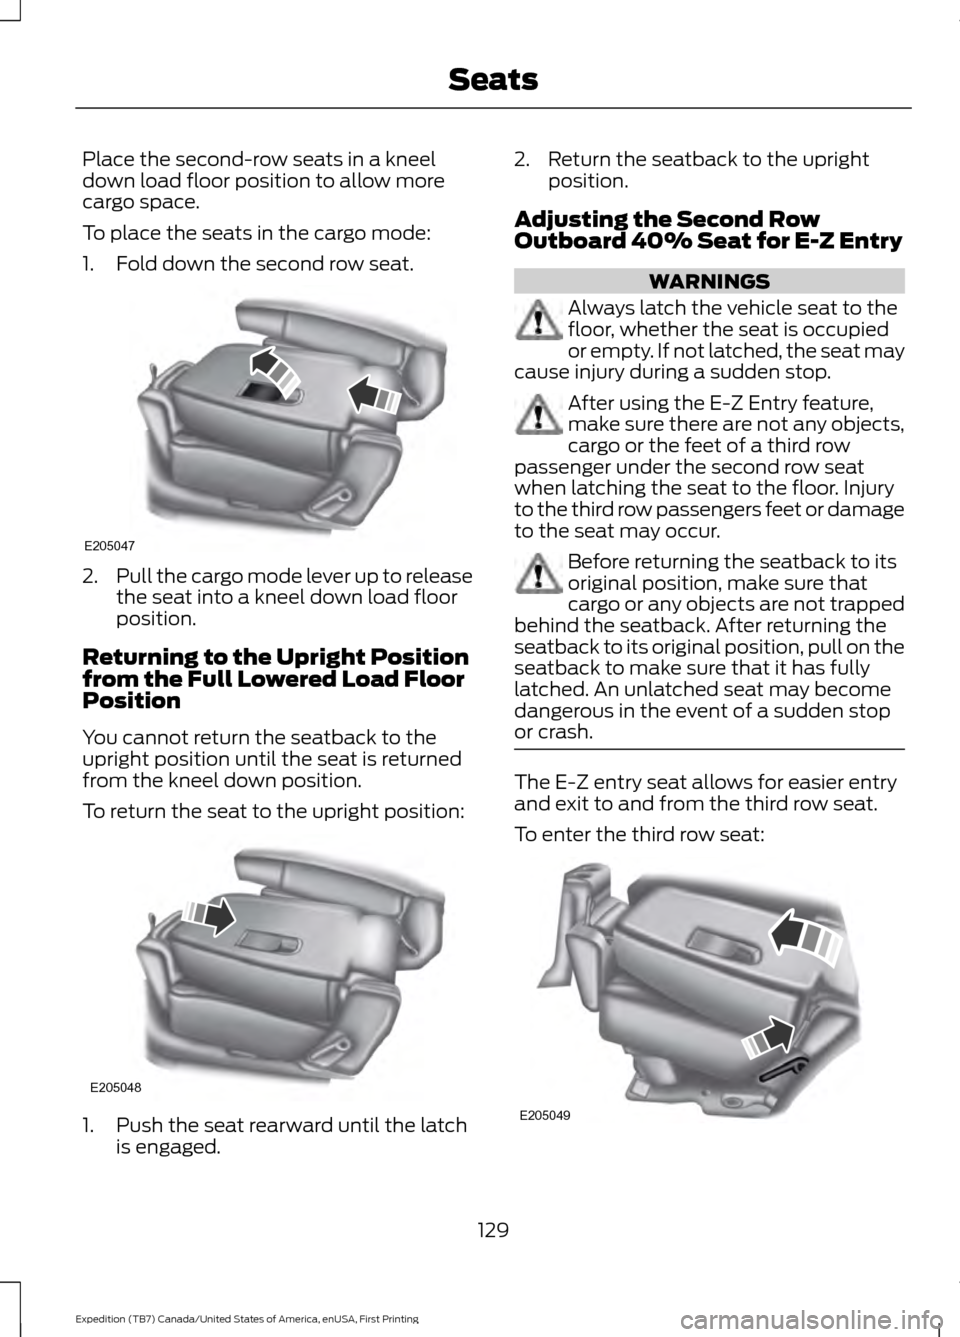
Place the second-row seats in a kneel
down load floor position to allow more
cargo space.
To place the seats in the cargo mode:
1. Fold down the second row seat.
2.
Pull the cargo mode lever up to release
the seat into a kneel down load floor
position.
Returning to the Upright Position
from the Full Lowered Load Floor
Position
You cannot return the seatback to the
upright position until the seat is returned
from the kneel down position.
To return the seat to the upright position: 1. Push the seat rearward until the latch
is engaged. 2. Return the seatback to the upright
position.
Adjusting the Second Row
Outboard 40% Seat for E-Z Entry WARNINGS
Always latch the vehicle seat to the
floor, whether the seat is occupied
or empty. If not latched, the seat may
cause injury during a sudden stop. After using the E-Z Entry feature,
make sure there are not any objects,
cargo or the feet of a third row
passenger under the second row seat
when latching the seat to the floor. Injury
to the third row passengers feet or damage
to the seat may occur. Before returning the seatback to its
original position, make sure that
cargo or any objects are not trapped
behind the seatback. After returning the
seatback to its original position, pull on the
seatback to make sure that it has fully
latched. An unlatched seat may become
dangerous in the event of a sudden stop
or crash. The E-Z entry seat allows for easier entry
and exit to and from the third row seat.
To enter the third row seat:
129
Expedition (TB7) Canada/United States of America, enUSA, First Printing SeatsE205047 E205048 E205049
Page 142 of 421

Gate Operator / Canadian
Programming
Canadian radio-frequency laws require
transmitter signals to
“time-out” (or quit)
after several seconds of transmission –
which may not be long enough for
HomeLink to pick up the signal during
programming. Similar to this Canadian law,
some U.S. gate operators are designed to
“time-out” in the same manner.
Note: If programming a garage door opener
or gate operator, it is advised to unplug the
device during the “cycling” process to
prevent possible overheating.
1. Press and hold the HomeLink button while you press and release, every two
seconds, your hand-held transmitter
until the HomeLink indicator light
changes from a slow to a rapidly
blinking light.
2. Release both the HomeLink and hand-held transmitter buttons.
3. Continue programing HomeLink. See In-Vehicle Programming
.
Erasing the Function Button Codes
Note: You cannot erase individual buttons. 1. Press and hold the outer two function
buttons simultaneously for
approximately 20 seconds until the
indicator lights above the buttons flash
rapidly.
2. When the indicator lights flash, release
the buttons. The codes for all buttons
are erased.
Reprogramming a Single Button
To program a device to a previously trained
button, follow these steps:
1. Press and hold the desired button. Do NOT release the button.
2. The indicator light will begin to flash after 20 seconds. Without releasing the
button, follow Step 1 in the
Programming section.
For questions or comments, contact
HomeLink at www.homelink.com,
www.youtube.com/HomeLinkGentex or
1-800-355-3515.
Programming to a Genie Intellicode 2
Garage Door Opener
Note: The Genie Intellicode 2 transmitter
must already be programmed to operate
with the garage door opener.
Note: To program HomeLink to the
transmitter you must first put the
transmitter into programming mode.
139
Expedition (TB7) Canada/United States of America, enUSA, First Printing Universal Garage Door Opener
(If Equipped)E142660
Page 143 of 421
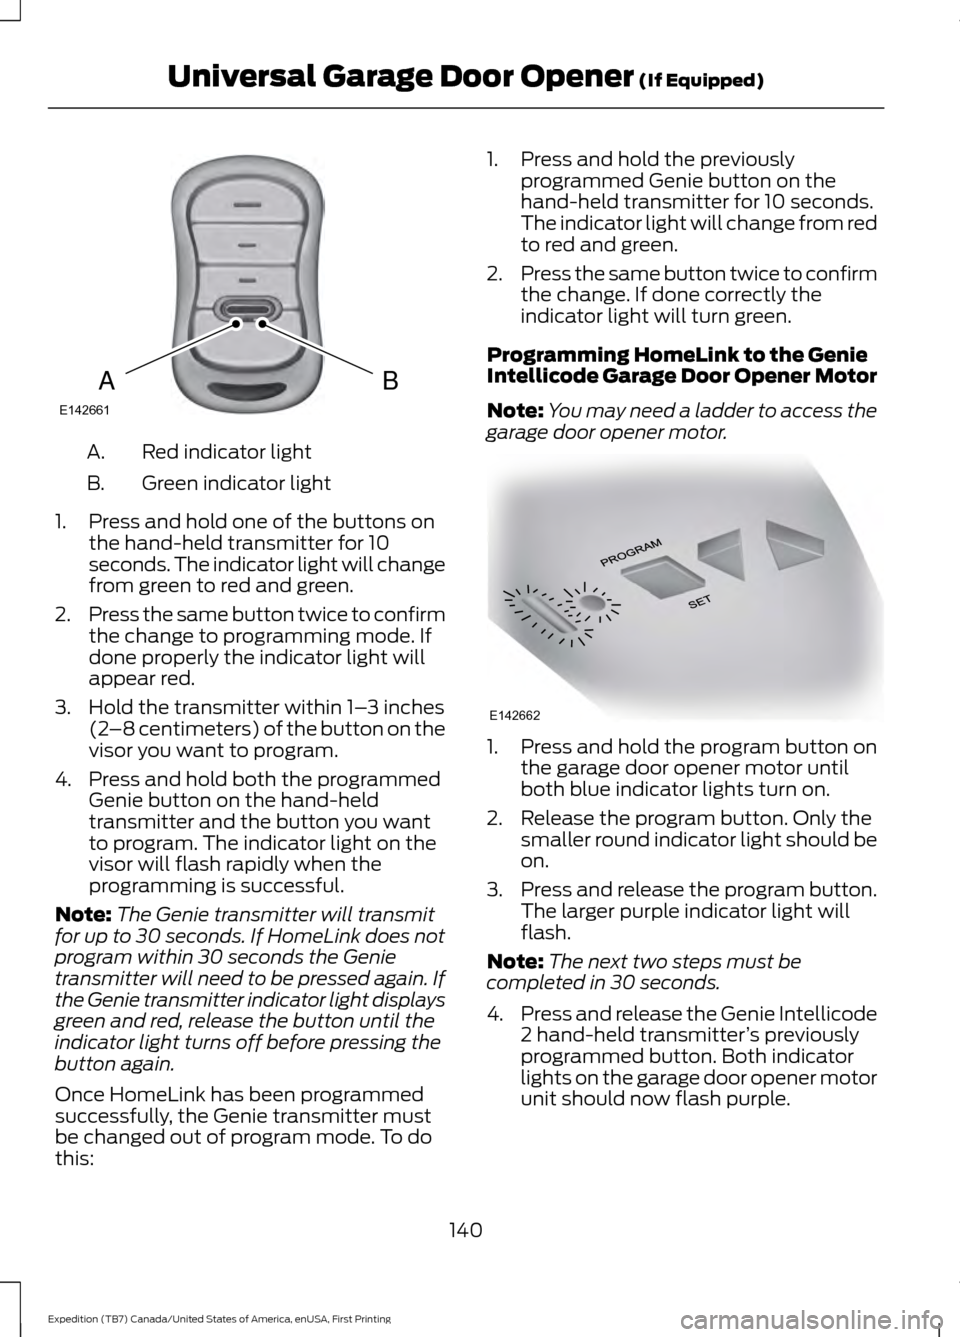
Red indicator light
A.
Green indicator light
B.
1. Press and hold one of the buttons on the hand-held transmitter for 10
seconds. The indicator light will change
from green to red and green.
2. Press the same button twice to confirm
the change to programming mode. If
done properly the indicator light will
appear red.
3. Hold the transmitter within 1– 3 inches
(2 –8 centimeters) of the button on the
visor you want to program.
4. Press and hold both the programmed Genie button on the hand-held
transmitter and the button you want
to program. The indicator light on the
visor will flash rapidly when the
programming is successful.
Note: The Genie transmitter will transmit
for up to 30 seconds. If HomeLink does not
program within 30 seconds the Genie
transmitter will need to be pressed again. If
the Genie transmitter indicator light displays
green and red, release the button until the
indicator light turns off before pressing the
button again.
Once HomeLink has been programmed
successfully, the Genie transmitter must
be changed out of program mode. To do
this: 1. Press and hold the previously
programmed Genie button on the
hand-held transmitter for 10 seconds.
The indicator light will change from red
to red and green.
2. Press the same button twice to confirm
the change. If done correctly the
indicator light will turn green.
Programming HomeLink to the Genie
Intellicode Garage Door Opener Motor
Note: You may need a ladder to access the
garage door opener motor. 1. Press and hold the program button on
the garage door opener motor until
both blue indicator lights turn on.
2. Release the program button. Only the smaller round indicator light should be
on.
3. Press and release the program button.
The larger purple indicator light will
flash.
Note: The next two steps must be
completed in 30 seconds.
4. Press and release the Genie Intellicode
2 hand-held transmitter ’s previously
programmed button. Both indicator
lights on the garage door opener motor
unit should now flash purple.
140
Expedition (TB7) Canada/United States of America, enUSA, First Printing Universal Garage Door Opener (If Equipped)BAE142661 E142662
Page 144 of 421
5. Press and hold the previously
programmed button on the visor for 2
seconds. Repeat this step up to 3 times
until the garage door moves.
Programming is now complete.
Clearing a HomeLink Device
To erase programming from the three
HomeLink buttons press and hold the two
outer HomeLink buttons until the indicator
light begins to flash. The indicator light will
begin flashing in 10 to 20 seconds, at which
time both buttons should be released.
Programming has now been erased, and
the indicator light should blink slowly to
indicate the device is in train mode when
any of the three HomeLink buttons are
pressed.
FCC and RSS-210 Industry Canada
Compliance
This device complies with Part 15 of the
FCC Rules and with RSS-210 of Industry
Canada. Operation is subject to the
following two conditions: (1) this device
may not cause harmful interference, and
(2) this device must accept any
interference received, including
interference that may cause undesired
operation.
Changes or modifications to your device
not expressly approved by the party
responsible for compliance can void the
user ’s authority to operate the equipment.
141
Expedition (TB7) Canada/United States of America, enUSA, First Printing Universal Garage Door Opener (If Equipped)
Page 149 of 421

Ignition Modes
The keyless starting system has three
modes:
Off: Turns the ignition off.
• Without applying the brake pedal,
press and release the button once
when the ignition is in the on mode, or
when the engine is running but your
vehicle is not moving.
On:
All electrical circuits are operational
and the warning lamps and indicators
illuminate.
• Without applying the brake pedal,
press and release the button twice.
Start:
Starts the engine.
• Press the brake pedal, and then press
the button for any length of time. An
indicator light on the button illuminates
when then ignition is on and when the
engine starts.
STARTING A GASOLINE
ENGINE
When you start the engine, the idle speed
increases. This helps to warm up the
engine. If the engine idle speed does not
slow down automatically, have your
vehicle checked by an authorized dealer. Note:
You can crank the engine for a total
of 60 seconds without the engine starting
before the starting system temporarily
disables. The 60 seconds does not have to
be all at once. For example, if you crank the
engine three times for 20 seconds each
time, without the engine starting, you
reached the 60-second time limit. A
message appears in the information display
alerting you that you exceeded the cranking
time. You cannot attempt to start the
engine for at least 15 minutes. After 15
minutes, you are limited to a 15-second
engine cranking time. You need to wait 60
minutes before you can crank the engine for
60 seconds again.
Before starting your vehicle, check the
following:
• Make sure all occupants have fastened
their safety belts.
• Make sure the headlamps and
electrical accessories are off.
• Make sure the parking brake is on.
• Make sure the transmission is in park
(P).
• Switch the ignition on. For vehicles with
a keyless ignition, see the following
instructions.
Vehicles with an Ignition Key
Note: Do not touch the accelerator pedal.
1. Fully depress the brake pedal.
2. Turn the key to the start position to start the engine.
Note: The engine may continue cranking
for up to 15 seconds or until it starts.
Note: If you cannot start the engine on the
first try, wait for a short period and try again.
Vehicles with Keyless Start
Note: Do not touch the accelerator pedal.
146
Expedition (TB7) Canada/United States of America, enUSA, First Printing Starting and Stopping the EngineE144447
Page 163 of 421
Second (2)
Transmission operates in second (2) gear
only. Use second (2) gear to start-up on
slippery roads.
First (1)
•
Transmission operates in first (1) gear
only.
• Provides maximum engine braking.
• Allows upshifts by moving gearshift
lever.
• Will not downshift into first (1) gear at
high speeds; allows for first (1) gear
when vehicle reaches slower speeds.
Tow/Haul Mode To activate tow/haul, press the
button on the gearshift lever
once. The TOW HAUL indicator
light will illuminate in the instrument
cluster.
The tow/haul feature:
• Delays upshifts to reduce the frequency
of transmission shifting.
• Provides engine braking in all forward
gears, which will slow your vehicle and
assist you in controlling your vehicle
when descending a grade.
• Depending on driving conditions and
load conditions, may downshift the
transmission, slow your vehicle and
control your vehicle speed when
descending a hill, without pressing the
accelerator pedal. The amount of
downshift braking provided will vary
based upon the amount the brake
pedal is pressed.
The tow/haul feature improves
transmission operation when towing a
trailer or a heavy load. All transmission
gear ranges are available when using
tow/haul. To deactivate the tow/haul feature and
return to normal driving mode, press the
button on the gearshift lever twice. The
TOW HAUL light will deactivate. Tow/haul
will also deactivate when you power down
your vehicle. WARNING
Do not use the tow/haul feature
when driving in icy or slippery
conditions as the increased engine
braking can cause the rear wheels to slide
and your vehicle to swing around with the
possible loss of vehicle control. Forced Downshifts
•
Allowed in drive (D) with the tow/haul
feature on or off.
• Press the accelerator to the floor.
• Allows transmission to select an
appropriate gear.
Automatic Transmission Adaptive
Learning
This feature may increase durability and
provide consistent shift feel over the life
of your vehicle. A new vehicle or
transmission may have firm shifts, soft
shifts or both. This operation is considered
normal and will not affect function or
durability of the transmission. Over time,
the adaptive learning process will fully
update transmission operation.
Understanding your SelectShift
Automatic ™ Transmission (If
Equipped)
Your vehicle is equipped with a SelectShift
Automatic transmission gearshift lever.
The SelectShift Automatic transmission
gives you the ability to change gears up or
down (without a clutch) as desired.
160
Expedition (TB7) Canada/United States of America, enUSA, First Printing TransmissionE161509