2016 FORD EXPEDITION air condition
[x] Cancel search: air conditionPage 118 of 421
Defrost: Select to distribute air through the windshield air vents. Air distribution
to the instrument panel and footwell vents turns off. You can also use this
setting to defrost and clear the windshield of a thin covering of ice.
C
A/C: Press the button to switch the air conditioning on or off. Air conditioning
cools your vehicle using outside air. To improve the time to reach a comfortable
temperature in hot weather, drive with the windows open until you feel cold air
through the air vents.
D
Note: In certain conditions (for example, maximum defrost), the air conditioning
compressor may continue to operate even though the air conditioning is
switched off.
MAX A/C:
Adjust the control for maximum cooling. Recirculated air flows
through the instrument panel vents, air conditioning automatically turns on and
the fan automatically adjusts to the highest speed.
E
Recirculated air:
Press the button to switch between outside air and
recirculated air. The air currently in the passenger compartment recirculates.
This can reduce the time needed to cool the interior and reduce unwanted odors
from entering your vehicle.
F
Note:
Recirculated air may also turn on and off automatically in instrument
panel or instrument panel and floor airflow modes during hot weather to improve
cooling efficiency.
Temperature control:
Controls the temperature of the air circulated in your
vehicle.
G
Note:
To prevent window fogging, you cannot select recirculated air when
maximum defrost is on.
Air distribution control: Adjust the control to turn airflow from the windshield,
instrument panel, or footwell vents on or off. You can distribute air through the
following combinations: windshield, windshield/floor, panel, panel/floor, and
floor.
H
Note:
At least one of these buttons illuminates when the system is on.
Power:
Press the button to switch the system on and off. When the system is
off, it prevents outside air from entering the vehicle.
I
Rear passenger temperature control:
Adjust the temperature to the rear of
the passenger compartment.
J
REAR CTRL:
When illuminated, indicates the rear climate control system is
on.
K
Rear passenger power:
Press the button to switch the system on and off.
L
Rear fan speed control:
Adjust the volume of air circulated to the rear of the
passenger compartment.
M
115
Expedition (TB7) Canada/United States of America, enUSA, First Printing Climate Control
Page 119 of 421
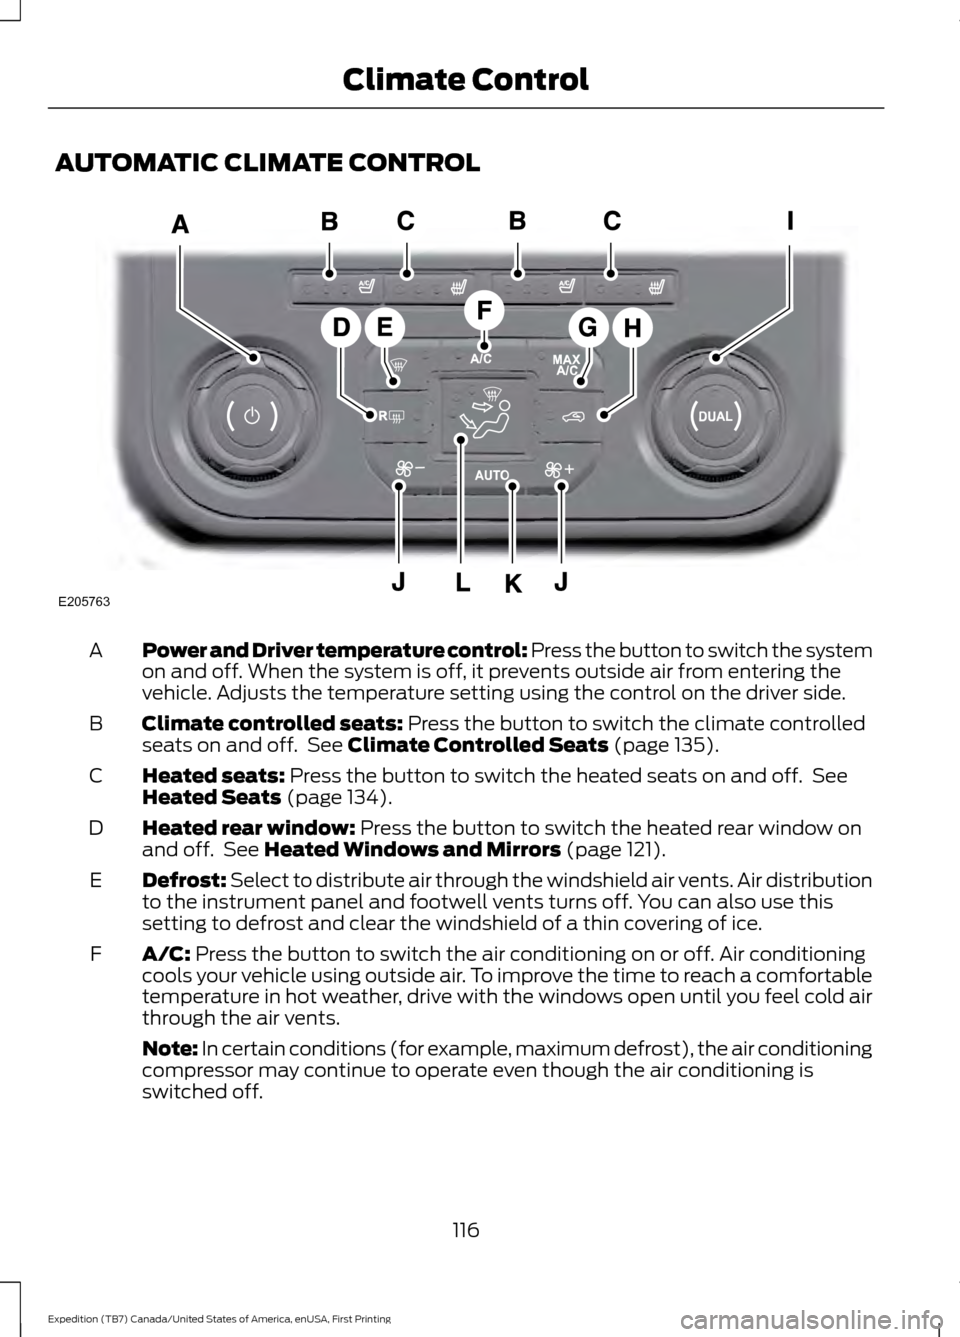
AUTOMATIC CLIMATE CONTROL
Power and Driver temperature control: Press the button to switch the system
on and off. When the system is off, it prevents outside air from entering the
vehicle. Adjusts the temperature setting using the control on the driver side.
A
Climate controlled seats: Press the button to switch the climate controlled
seats on and off. See Climate Controlled Seats (page 135).
B
Heated seats:
Press the button to switch the heated seats on and off. See
Heated Seats (page 134).
C
Heated rear window:
Press the button to switch the heated rear window on
and off. See Heated Windows and Mirrors (page 121).
D
Defrost: Select to distribute air through the windshield air vents. Air distribution
to the instrument panel and footwell vents turns off. You can also use this
setting to defrost and clear the windshield of a thin covering of ice.
E
A/C:
Press the button to switch the air conditioning on or off. Air conditioning
cools your vehicle using outside air. To improve the time to reach a comfortable
temperature in hot weather, drive with the windows open until you feel cold air
through the air vents.
F
Note: In certain conditions (for example, maximum defrost), the air conditioning
compressor may continue to operate even though the air conditioning is
switched off.
116
Expedition (TB7) Canada/United States of America, enUSA, First Printing Climate ControlE205763
Page 120 of 421
MAX A/C: Press the button for maximum cooling. Recirculated air flows through
the instrument panel vents, air conditioning automatically turns on and the fan
automatically adjusts to the highest speed.
G
Recirculated air: Press the button to switch between outside air and
recirculated air. The air currently in the passenger compartment recirculates.
This can reduce the time needed to cool the interior and reduce unwanted odors
from entering your vehicle.
H
Note:
Recirculated air may also turn on and off automatically in instrument
panel or instrument panel and floor airflow modes during hot weather to improve
cooling efficiency.
Passenger temperature control:
Adjusts the temperature on the passenger
side.
I
Fan speed control:
Adjusts the volume of air circulated in the vehicle.
J
AUTO:
Press the button to switch on automatic operation. Adjust to select the
desired temperature. Fan speed, air distribution, air conditioning operation, and
outside or recirculated air are automatically adjusted to heat or cool the vehicle
to maintain the desired temperature. You can also switch off dual zone mode
by pressing and holding the button for more than two seconds.
K
Air distribution control: Adjust the control to turn airflow from the windshield,
instrument panel, or footwell vents on or off. You can distribute air through any
combination of these vents.
L
HINTS ON CONTROLLING THE
INTERIOR CLIMATE
General Hints
Note: Prolonged use of recirculated air may
cause the windows to fog up.
Note: You may feel a small amount of air
from the footwell air vents regardless of the
air distribution setting.
Note: To reduce humidity build-up inside
your vehicle, do not drive with the system
switched off or with recirculated air always
switched on.
Note: Do not place objects under the front
seats as this may interfere with the airflow
to the rear seats. Note:
Remove any snow, ice or leaves from
the air intake area at the base of the
windshield.
Note: To improve the time to reach comfort
in hot weather, drive with the windows fully
open until you feel cold air through the air
vents.
Manual Climate Control
Note: To reduce fogging of the windshield
during humid weather, adjust the air
distribution control to the windshield air
vents position.
117
Expedition (TB7) Canada/United States of America, enUSA, First Printing Climate Control
Page 138 of 421
Press the heated seat symbol to cycle
through the various heat settings and off.
More indicator lights indicate warmer
settings.
The heated seat module resets at every
ignition run cycle. While the ignition is on,
press the high or low heated seat switch
to enable heating mode. When activated,
they will turn off automatically when you
turn the engine off.
CLIMATE CONTROLLED SEATS
(If Equipped)
Heated Seats
WARNING
Persons who are unable to feel pain
to the skin because of advanced age,
chronic illness, diabetes, spinal cord
injury, medication, alcohol use, exhaustion,
or other physical conditions, must exercise
care when using the seat heater. The seat
heater may cause burns even at low
temperatures, especially if used for long
periods of time. Do not place anything on
the seat that insulates against heat, such
as a blanket or cushion, because this may
cause the seat heater to overheat. Do not
puncture the seat with pins, needles, or
other pointed objects because this may
damage the heating element which may
cause the seat heater to overheat. An
overheated seat may cause serious
personal injury. Note:
Do not do the following:
• Place heavy objects on the seat.
• Operate the seat heater if water or any
other liquid spill on the seat. Allow the
seat to dry thoroughly.
The heated seats will only function when
the engine is running. Press the heated seat symbol to cycle
through the various heat settings and off.
More indicator lights indicate warmer
settings.
Cooled Seats
The cooled seats will only function when
the engine is running.
Press the cooled seat symbol to cycle
through the various cooling settings and
off. More indicator lights indicate cooler
settings.
If the engine falls below 350 RPM while
the cooled seats are on, the feature will
turn itself off. You will need to reactivate
it.
Climate Controlled Seat Air Filter
Replacement
The climate controlled seat system
includes air filters. You must replace them
periodically. See Scheduled
Maintenance (page 372).
135
Expedition (TB7) Canada/United States of America, enUSA, First Printing SeatsE146322 E146309
Page 169 of 421
3. Move the 4WD switch to the desired
mode.
The information display will display a
message indicating a 4X4 shift is in
progress. The information display will then
display the system mode selected.
If any of the above shift conditions are not
met, the shift will not occur and the
information display will display information
guiding the driver through the proper range
of shifting procedures.
If SHIFT DELAYED PULL FORWARD is
displayed in the information display,
transfer case gear tooth blockage is
present. To alleviate this condition, place
the transmission in a forward gear, move
the vehicle forward approximately
5 ft
(2 m), and shift the transmission back to
neutral (N) to allow the transfer case to
complete the range shift.
How Your Vehicle Differs From
Other Vehicles WARNING
Vehicles with a higher center of
gravity such as utility and four-wheel
drive vehicles handle differently than
vehicles with a lower center of gravity.
Utility and four-wheel drive vehicles are
not designed for cornering at speeds as
high as passenger cars any more than
low-slung sports cars are designed to
perform satisfactorily under off-road
conditions. Avoid sharp turns, excessive
speed and abrupt maneuvers in these
vehicles. Failure to drive cautiously could
result in an increased risk of loss of vehicle
control, vehicle rollover, personal injury and
death. Truck and utility vehicles can differ from
some other vehicles. Your vehicle may be
higher to allow it to travel over rough
terrain without getting hung up or
damaging underbody components. The differences that make your vehicle so
versatile also make it handle differently
than an ordinary passenger car.
Maintain steering wheel control at all
times, especially in rough terrain. Since
sudden changes in terrain can result in
abrupt steering wheel motion, make sure
you grip the steering wheel from the
outside. Do not grip the spokes.
Drive cautiously to avoid vehicle damage
from concealed objects such as rocks and
stumps.
You should either know the terrain or
examine maps of the area before driving.
Map out your route before driving in the
area. To maintain steering and braking
control of your vehicle, you must have all
four wheels on the ground and they must
be rolling, not sliding or spinning.
Driving Off-Road With Truck and
Utility Vehicles
Note:
On some models, the initial shift from
two-wheel drive to four-wheel drive while
your vehicle is moving can cause some
momentary clunk and ratcheting sounds.
This is the front drivetrain coming up to
speed and the automatic locking hubs
engaging and is not cause for concern.
Note: Your vehicle may be equipped with
a front air dam that can become damaged
(due to reduced ground clearance) when
taking your vehicle off-road. You may
remove this air dam by removing eight bolts.
Four-wheel drive vehicles are specially
equipped for driving on sand, snow, mud
and rough terrain and have operating
characteristics that are somewhat
different from conventional vehicles, both
on and off the road.
166
Expedition (TB7) Canada/United States of America, enUSA, First Printing Four-Wheel Drive
(If Equipped)
Page 173 of 421
Avoid sudden braking. Although a
four-wheel drive vehicle may accelerate
better than a two-wheel drive vehicle in
snow and ice, it will not stop any faster as
braking occurs at all four wheels. Do not
become overconfident as to road
conditions.
Make sure you allow sufficient distance
between you and other vehicles for
stopping. Drive slower than usual and
consider using one of the lower gears. In
emergency stopping situations, apply the
brake steadily. Do not pump the brake
pedal. See Hints on Driving With
Anti-Lock Brakes (page 172).
Maintenance and Modifications
The suspension and steering systems on
your vehicle have been designed and
tested to provide predictable performance
whether loaded or empty. For this reason,
we strongly recommend that you do not
make modifications such as adding or
removing parts (for example, lift kits or
stabilizer bars) or by using replacement
parts not equivalent to the original factory
equipment.
We recommend that you use caution when
your vehicle has either a high load or device
(such as ladders or luggage racks). Any
modifications to your vehicle that raise the
center of gravity may cause your vehicle
to roll over when there is a loss of vehicle
control.
Failure to maintain your vehicle correctly
may void the warranty, increase your repair
cost, reduce vehicle performance and
operational capabilities and adversely
affect you and your passenger's safety. We
recommend you frequently inspect your
vehicle's chassis components when your
vehicle is subject to off road usage.
170
Expedition (TB7) Canada/United States of America, enUSA, First Printing Four-Wheel Drive
(If Equipped)
Page 192 of 421

The Blind Spot Information System
illuminates an amber alert indicator in the
outside mirror on the side of your vehicle
the approaching vehicle is coming from.
When the Blind Spot Information System
is alerting on a vehicle and the
corresponding turn signal is ON, the Blind
Spot Information System alert indicator
flashes as an increased warning level.
The alert indicator dims when the system
detects nighttime darkness.
Note:
The alert indicator flashes in case of
an alert and the turn signal is set to that side
at the same time.
System Sensor Blockage WARNING
To help avoid injuries, NEVER use the
Blind Spot Information System as a
replacement for using the interior
and exterior mirrors or looking over your
shoulder before changing lanes. The Blind
Spot Information System is not a
replacement for careful driving. The system uses radar sensors that are
located behind the bumper fascia on each
side of your vehicle. Any dirt, mud and
snow in front of the sensors and/or driving
in heavy rain can cause system
degradation. Also, other types of
obstructions in front of the sensor can
cause system degradation. This is referred
to as a
‘blocked ’ condition.
Note: Do not apply bumper stickers and/or
repair compound to these areas, this can
cause degraded system performance.
189
Expedition (TB7) Canada/United States of America, enUSA, First Printing Driving AidsE205199
Page 216 of 421
4. Use the gain adjustment (+ and -)
buttons to increase or decrease the
gain setting to the desired starting
point. A gain setting of 6.0 is a good
starting point for heavier loads.
5. In a traffic-free environment, tow the trailer on a dry, level surface at a speed
of 20-25 mph (30-40 km/h) and
squeeze the manual control lever
completely.
6. If the trailer wheels lock up, indicated by squealing tires, reduce the gain
setting. If the trailer wheels turn freely,
increase the gain setting. Repeat Steps
5 and 6 until the gain setting is at a
point just below trailer wheel lock-up.
If towing a heavier trailer, trailer wheel
lock-up may not be attainable even
with the maximum gain setting of 10.
Explanation of Information Display
Warning Messages
Note: An authorized dealer can diagnose
the trailer brake controller to determine
exactly which trailer fault has occurred.
However, your Ford warranty does not cover
this diagnosis if the fault is with the trailer.
A message indicating a trailer brake
module fault may display in response to
faults sensed by the trailer brake controller,
accompanied by a single tone. If this
message appears, contact an authorized
dealer as soon as possible for diagnosis
and repair. The controller may still
function, but performance may be
degraded.
A message indicating a trailer wiring fault
may display when there is a short circuit
on the electric brake output wire. If this
message displays, accompanied by a
single tone, with no trailer connected, the
problem is with your vehicle wiring
between the trailer brake controller and
the 7-pin connector at the bumper. If the
message only displays with a trailer
connected, the problem is with the trailer wiring. Consult your trailer dealer for
assistance. This can be a short to ground
(such as a chaffed wire), short to voltage
(such as a pulled pin on trailer emergency
breakaway battery) or the trailer brakes
may be drawing too much current.
Points to Remember
Note:
Do not attempt removal of the trailer
brake controller without consulting the
Workshop Manual. Damage to the unit may
result.
• Adjust gain setting before using the
trailer brake controller for the first time.
• Adjust gain setting, using the procedure
above, whenever road, weather and
trailer or vehicle loading conditions
change from when the gain was initially
set.
• Only use the manual control lever for
proper adjustment of the gain during
trailer setup. Misuse, such as
application during trailer sway, could
cause instability of trailer or tow
vehicle.
• Avoid towing in adverse weather
conditions. The trailer brake controller
does not provide anti-lock control of
the trailer wheels. Trailer wheels can
lock up on slippery surfaces, resulting
in reduced stability of trailer and tow
vehicle.
• The trailer brake controller is equipped
with a feature that reduces output at
vehicle speeds below 11 mph (18 km/h)
so trailer and vehicle braking is not jerky
or harsh. This feature is only available
when applying the brakes using your
vehicle's brake pedal, not the
controller.
• The controller interacts with the brake
control system and powertrain control
system of your vehicle to provide the
best performance on different road
conditions.
213
Expedition (TB7) Canada/United States of America, enUSA, First Printing Towing