2016 FORD EXPEDITION EL brake light
[x] Cancel search: brake lightPage 272 of 421
REPAIRING MINOR PAINT
DAMAGE
Authorized dealers have touch-up paint tomatch your vehicle’s color. Your vehiclecolor code is printed on a sticker on thefront, left-hand side door jamb. Take yourcolor code to your authorized dealer tomake sure you get the correct color.
Before repairing minor paint damage, usea cleaner such as Motorcraft Bug and TarRemover to remove particles such as birddroppings, tree sap, insect deposits, tarspots, road salt and industrial fallout.
Always read the instructions before usingcleaning products.
CLEANING THE ALLOY
WHEELS
Note:Do not apply a cleaning chemical towarm or hot wheel rims and covers.
Note:Some automatic car washes maycause damage to the finish on your wheelrims and covers.
Note:Industrial-strength or heavy-dutycleaners in combination with brush agitationto remove brake dust and dirt, could wearaway the clear coat finish over a period time.
Note:Do not use hydrofluoric acid-basedor high caustic-based wheel cleaners, steelwool, fuels or strong household detergents.
Note:If you intend parking your vehicle foran extended period after cleaning thewheels with a wheel cleaner, drive yourvehicle for a few minutes before doing so.This will reduce the risk of increasedcorrosion of the brake discs.
Alloy wheels and wheel covers are coatedwith a clear coat paint finish. To maintaintheir condition we recommend that you:
•Clean the wheels weekly usingMotorcraft Wheel and Tire Cleaner.Apply using manufacturer'sinstructions.
•Use a sponge to remove heavydeposits of dirt and brake dustaccumulation.
•Rinse thoroughly with a strong streamof water when you have completed thecleaning process.
•To remove tar and grease, useMotorcraft Bug and Tar Remover.
VEHICLE STORAGE
If you plan on storing your vehicle for 30days or more, read the followingmaintenance recommendations to makesure your vehicle stays in good operatingcondition.
We engineer and test all motor vehiclesand their components for reliable, regulardriving. Under various conditions,long-term storage may lead to degradedengine performance or failure unless youuse specific precautions to preserve enginecomponents.
General
•Store all vehicles in a dry, ventilatedplace.
•Protect from sunlight, if possible.
•If vehicles are stored outside, theyrequire regular maintenance to protectagainst rust and damage.
Body
•Wash your vehicle thoroughly toremove dirt, grease, oil, tar or mud fromexterior surfaces, rear-wheel housingand the underside of front fenders.
•Periodically wash your vehicle if it isstored in exposed locations.
269
Expedition (TB7) Canada/United States of America, enUSA, First Printing
Vehicle Care
Page 273 of 421
•Touch-up exposed or primed metal toprevent rust.
•Cover chrome and stainless steel partswith a thick coat of auto wax to preventdiscoloration. Re-wax as necessarywhen you wash your vehicle.
•Lubricate all hood, door and luggagecompartment hinges and latches witha light grade oil.
•Cover interior trim to prevent fading.
•Keep all rubber parts free from oil andsolvents.
Engine
•Change the engine oil and filter prior tostorage because used engine oilcontains contaminates which maycause engine damage.
•Start the engine every 15 days for aminimum of 15 minutes. Run at fast idlewith the climate controls set to defrostuntil the engine reaches normaloperating temperature.
•With your foot on the brake, shiftthrough all the gears while the engineis running.
•We recommend that you change theengine oil before you use your vehicleagain.
Fuel system
•Fill the fuel tank with high-quality fueluntil the first automatic shutoff of thefuel pump nozzle.
Cooling system
•Protect against freezing temperatures.
•When removing your vehicle fromstorage, check coolant fluid level.Confirm that there are no coolingsystem leaks and that fluid is at therecommended level.
Battery
•Check and recharge as necessary. Keepconnections clean.
•If storing your vehicle for more than 30days without recharging the battery,we recommend that you disconnectthe battery cables to maintain batterycharge for quick starting.
Note:It is necessary to reset memoryfeatures if battery cables are disconnected.
Brakes
•Make sure the brakes and parking brakerelease fully.
Tires
•Maintain recommended air pressure.
Miscellaneous
•Make sure all linkages, cables, leversand pins under your vehicle are coveredwith grease to prevent rust.
•Move vehicles at least 25 ft (7.5 m)every 15 days to lubricate working partsand prevent corrosion.
Removing Vehicle From Storage
When your vehicle is ready to come out ofstorage, do the following:
•Wash your vehicle to remove any dirtor grease film build-up on windowsurfaces.
•Check windshield wipers for anydeterioration.
•Check under the hood for any foreignmaterial that may have collectedduring storage such as mice or squirrelnests.
•Check the exhaust for any foreignmaterial that may have collectedduring storage.
270
Expedition (TB7) Canada/United States of America, enUSA, First Printing
Vehicle Care
Page 286 of 421
Tire Label (affixed to either thedoor hinge pillar, door-latch post,or the door edge that meets thedoor-latch post, next to thedriver's seating position), or TireLabel located on the B-pillar orthe edge of the driver's door.Failure to follow the tire pressurerecommendations can causeuneven treadwear patterns andadversely affect the way yourvehicle handles.
Note:Do not reduce tire pressureto change the ride characteristicsof the vehicle. If you do notmaintain the inflation pressure atthe levels specified by Ford, yourvehicle may experience a conditionknown as shimmy. Shimmy is asevere vibration and oscillation inthe steering wheel after the vehicletravels over a bump or dip in theroad that does not dampen out byitself. Shimmy may result fromsignificant under-inflation of thetires, improper tires (load range,size, or type), or vehiclemodifications such as lift-kits. Inthe event that your vehicleexperiences shimmy, you shouldslowly reduce speed by either liftingoff the accelerator pedal or lightlyapplying the brakes. The shimmywill cease as the vehicle speeddecreases.
Maximum Inflation Pressure isthe tire manufacturer's maximumpermissible pressure and thepressure at which the maximum
load can be carried by the tire. Thispressure is normally higher than
the manufacturer’s recommendedcold inflation pressure which canbe found on the SafetyCompliance Certification Label(affixed to either the door hingepillar, door-latch post, or the dooredge that meets the door-latchpost, next to the driver's seatingposition), or Tire Label located onthe B-pillar or the edge of thedriver's door. The cold inflationpressure should never be set lowerthan the recommended pressureon the Safety ComplianceCertification Label or Tire Label.
When weather temperaturechanges occur, tire inflationpressures also change. A 10°F(6°C) temperature drop cancause a corresponding drop of 1psi (7 kPa) in inflation pressure.Check your tire pressuresfrequently and adjust them to theproper pressure which can befound on the Safety ComplianceCertification Label or Tire Label.
To check the pressure in yourtire(s):
1. Make sure the tires are cool,meaning they are not hot fromdriving even a mile.
283
Expedition (TB7) Canada/United States of America, enUSA, First Printing
Wheels and Tires
Page 299 of 421

11.Set all four tires to the recommendedair pressure as indicated on theSafety Compliance CertificationLabel (affixed to either the door hingepillar, door-latch post, or the dooredge that meets the door-latch post,next to the driver's seating position)or Tire Label located on the B-Pillaror the edge of the driver's door.
CHANGING A ROAD WHEEL
WARNINGS
The use of tire sealant may damageyour tire pressure monitoring systemand should only be used in roadsideemergencies. If you must use a sealant, theFord Tire Mobility Kit sealant should beused. The tire pressure monitoring systemsensor and valve stem on the wheel mustbe replaced by an authorized dealer afteruse of the sealant.
If the tire pressure monitor sensorbecomes damaged, it will no longerfunction. See Tire PressureMonitoring System (page 290).
Note:The tire pressure monitoring systemindicator light will illuminate when the sparetire is in use. To restore the full function ofthe monitoring system, all road wheelsequipped with tire pressure monitoringsensors must be mounted on this vehicle.
If you get a flat tire while driving, do notapply the brake heavily. Instead, graduallydecrease your speed. Hold the steeringwheel firmly and slowly move to a safeplace on the side of the road.
Have a flat serviced by an authorizeddealer in order to prevent damage to thesystem sensors See Tire PressureMonitoring System (page 290). Replacethe spare tire with a road tire as soon aspossible. During repairing or replacing ofthe flat tire, have the authorized dealerinspect the system sensor for damage.
Dissimilar Spare Wheel and TireAssembly Information
WARNING
Failure to follow these guidelinescould result in an increased risk ofloss of vehicle control, injury or death.
If you have a dissimilar spare wheel andtire, then it is intended for temporary useonly. This means that if you need to use it,you should replace it as soon as possiblewith a road wheel and tire assembly thatis the same size and type as the road tiresand wheels that were originally providedby Ford. If the dissimilar spare tire or wheelis damaged, it should be replaced ratherthan repaired.
A dissimilar spare wheel and tire assemblyis defined as a spare wheel and tireassembly that is different in brand, size orappearance from the road tires and wheelsand can be one of three types:
1.T-type mini-spare: This spare tirebegins with the letter T for tire size andmay have Temporary Use Only molded inthe sidewall.
2.Full-size dissimilar spare with labelon wheel: This spare tire has a label onthe wheel that states: THIS WHEEL ANDTIRE ASSEMBLY FOR TEMPORARY USEONLY
296
Expedition (TB7) Canada/United States of America, enUSA, First Printing
Wheels and Tires
Page 302 of 421
Park on a level surface, activate the hazardflashers and set the parking brake. Then,place the transmission in park (P) and turnthe engine off.
Removing the Jack and Tools
Note:Pay close attention to the orientationof the bag, because it will have to bereinstalled after changing the tire.
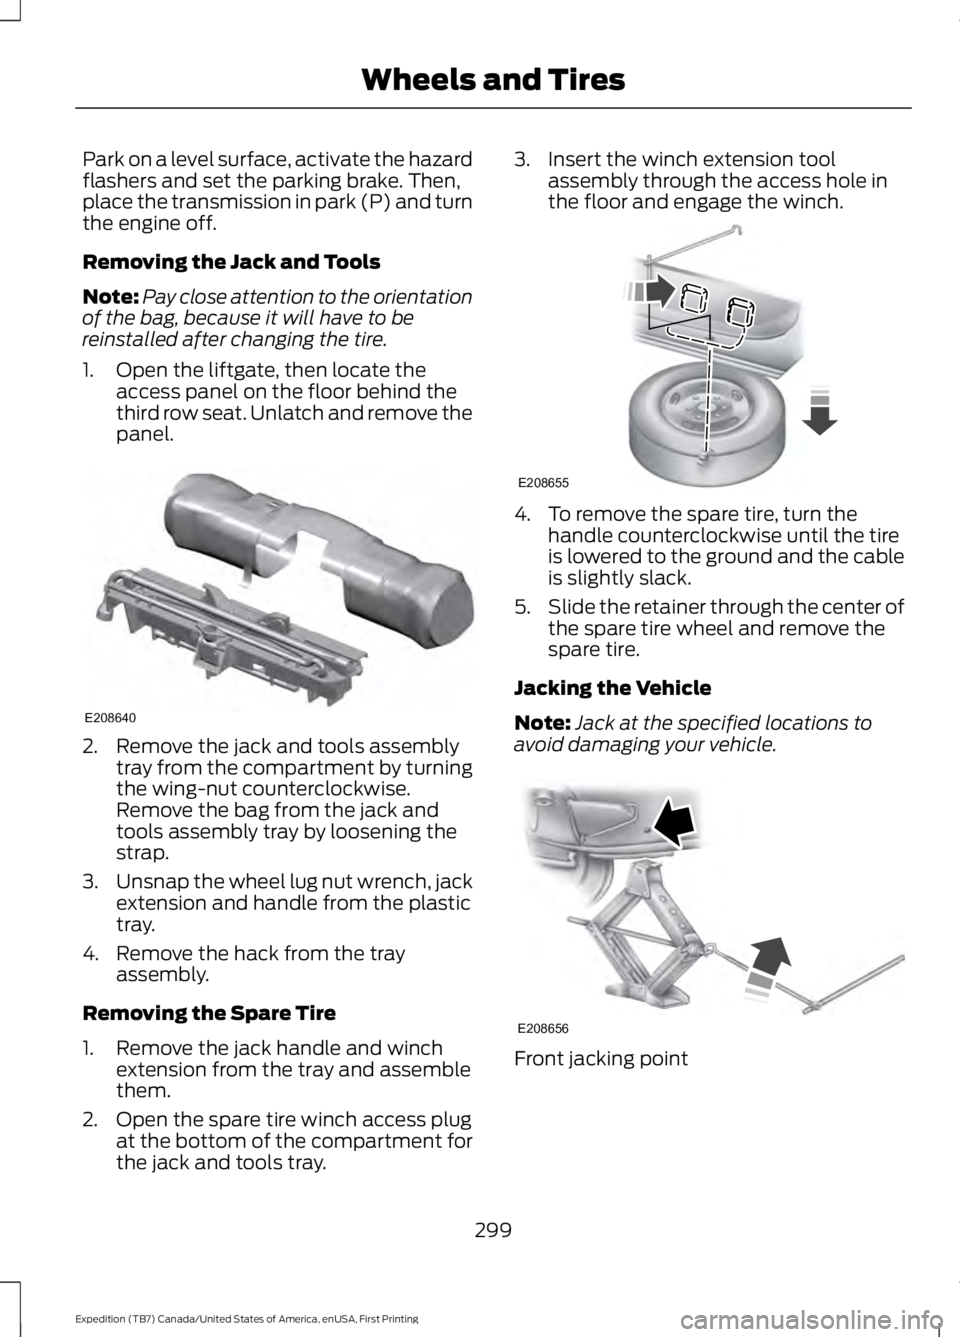
1. Open the liftgate, then locate theaccess panel on the floor behind thethird row seat. Unlatch and remove thepanel.
2. Remove the jack and tools assemblytray from the compartment by turningthe wing-nut counterclockwise.Remove the bag from the jack andtools assembly tray by loosening thestrap.
3.Unsnap the wheel lug nut wrench, jackextension and handle from the plastictray.
4. Remove the hack from the trayassembly.
Removing the Spare Tire
1. Remove the jack handle and winchextension from the tray and assemblethem.
2. Open the spare tire winch access plugat the bottom of the compartment forthe jack and tools tray.
3. Insert the winch extension toolassembly through the access hole inthe floor and engage the winch.
4. To remove the spare tire, turn thehandle counterclockwise until the tireis lowered to the ground and the cableis slightly slack.
5.Slide the retainer through the center ofthe spare tire wheel and remove thespare tire.
Jacking the Vehicle
Note:Jack at the specified locations toavoid damaging your vehicle.
Front jacking point
299
Expedition (TB7) Canada/United States of America, enUSA, First Printing
Wheels and TiresE208640 E208655 E208656
Page 377 of 421
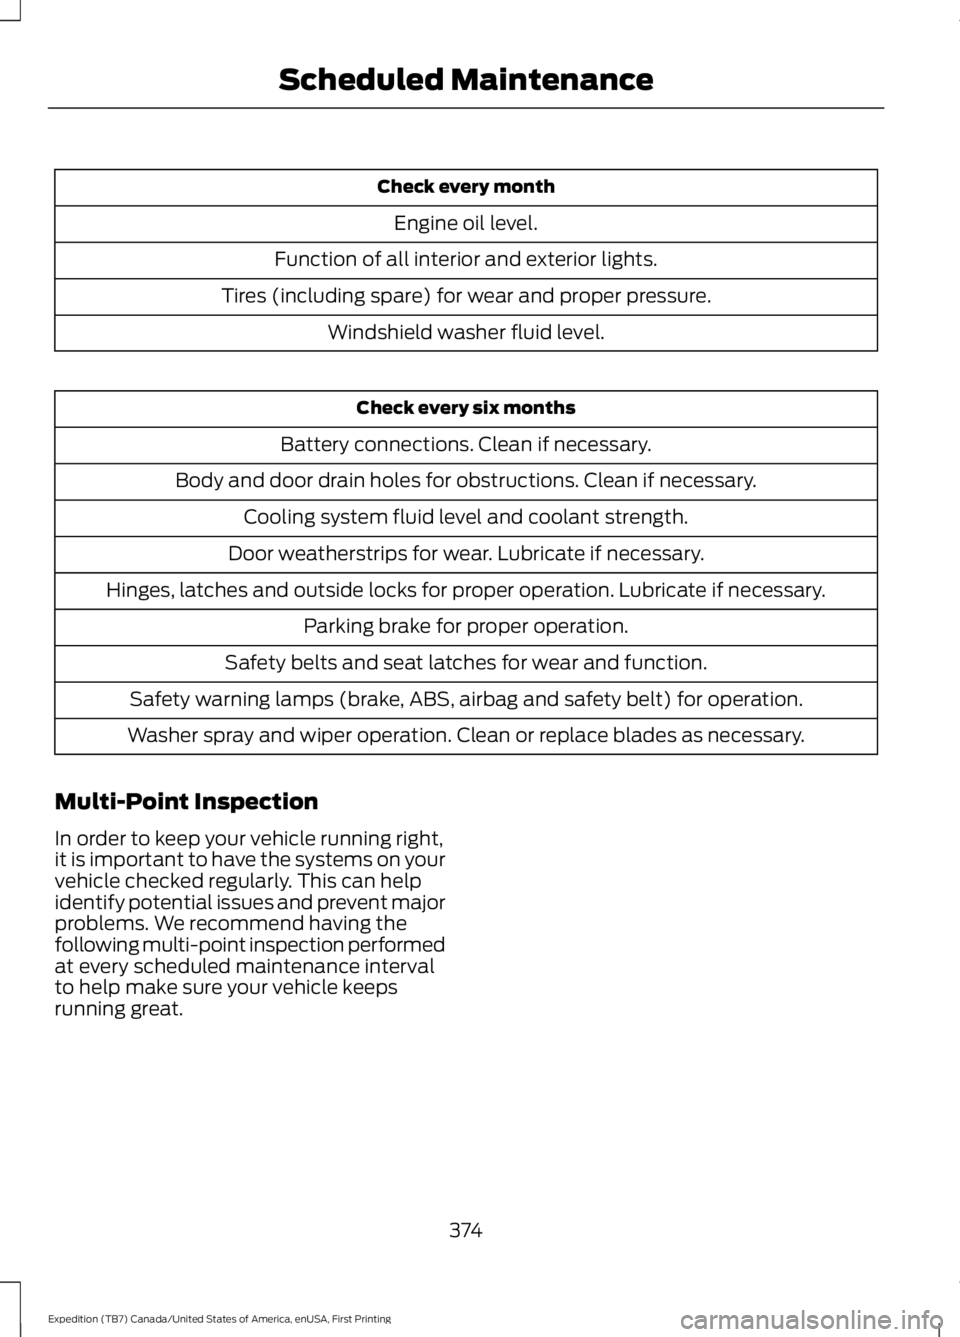
Check every month
Engine oil level.
Function of all interior and exterior lights.
Tires (including spare) for wear and proper pressure.
Windshield washer fluid level.
Check every six months
Battery connections. Clean if necessary.
Body and door drain holes for obstructions. Clean if necessary.
Cooling system fluid level and coolant strength.
Door weatherstrips for wear. Lubricate if necessary.
Hinges, latches and outside locks for proper operation. Lubricate if necessary.
Parking brake for proper operation.
Safety belts and seat latches for wear and function.
Safety warning lamps (brake, ABS, airbag and safety belt) for operation.
Washer spray and wiper operation. Clean or replace blades as necessary.
Multi-Point Inspection
In order to keep your vehicle running right,it is important to have the systems on yourvehicle checked regularly. This can helpidentify potential issues and prevent majorproblems. We recommend having thefollowing multi-point inspection performedat every scheduled maintenance intervalto help make sure your vehicle keepsrunning great.
374
Expedition (TB7) Canada/United States of America, enUSA, First Printing
Scheduled Maintenance
Page 410 of 421
4
4WDSee: Four-Wheel Drive.....................................164
A
A/CSee: Climate Control..........................................113About This Manual...........................................7ABSSee: Brakes............................................................172ABS driving hintsSee: Hints on Driving With Anti-LockBrakes.................................................................172Accessories....................................................368Exterior Style.......................................................368Interior Style........................................................368Lifestyle.................................................................368Peace of Mind.....................................................368AccessoriesSee: Replacement PartsRecommendation.............................................11Adjusting the Headlamps.........................255Horizontal Aim Adjustment...........................256Vertical Aim Adjustment.................................255Adjusting the Pedals......................................71Adjusting the Steering Wheel - VehiclesWith: Column Shift/Manual AdjustableSteering Column.........................................66Adjusting the Steering Wheel - VehiclesWith: Floor Shift/Manual AdjustableSteering Column.........................................66Adjusting the Steering Wheel - VehiclesWith: Power Adjustable SteeringColumn............................................................67Easy Entry and Exit Feature.............................68End of Travel Position........................................68Memory Feature...................................................68Airbag Disposal..............................................40Air ConditioningSee: Climate Control..........................................113Air FilterSee: Changing the Engine Air Filter.............262AlarmSee: Anti-Theft Alarm........................................63Ambient Lighting............................................79
Anti-Theft Alarm............................................63Arming the Alarm.................................................63Disarming the Alarm...........................................63Appendices.....................................................391Audible Warnings and Indicators..............91Direction Indicator Chime..................................91Headlamps On Warning Chime.......................91Key in Ignition Warning Chime.........................91Parking Brake On Warning Chime...................91Audio Control..................................................68Media........................................................................69Seek, Next or Previous.......................................69Type One.................................................................68Type Two.................................................................69Audio System.................................................312General Information...........................................312Audio Unit - Vehicles With: AM/FM/CD/SYNC/Satellite Radio...............................313Audio Unit - Vehicles With: Sony AM/FM/CD............................................................315Rear Seat Audio Controls.................................317Autolamps.........................................................75Windshield Wiper ActivatedHeadlamps.........................................................75Automatic Climate Control.......................116Automatic Transmission...........................159Brake-Shift Interlock.........................................162If Your Vehicle Gets Stuck In Mud orSnow..................................................................163Selector Lever Positions..................................159Understanding your SelectShiftAutomatic™ Transmission........................160Automatic Transmission FluidCheck............................................................250Autowipers........................................................72Auxiliary Power Points................................142110 Volt AC Power Point...................................14212 Volt DC Power Point.....................................142Locations...............................................................142
B
BatterySee: Changing the 12V Battery......................252Blind Spot Information System..............188Switching the System Off and On...............190System Errors......................................................190Using the System...............................................188
407
Expedition (TB7) Canada/United States of America, enUSA, First Printing
Index
Page 411 of 421

Bonnet LockSee: Opening and Closing the Hood..........243Booster Seats..................................................23Types of Booster Seats......................................24Brake Fluid Check.........................................251Brakes................................................................172General Information...........................................172Breaking-In.....................................................220Bulb Specification Chart..........................260
C
California Proposition 65..............................11Capacities and Specifications - 3.5LEcoboost™.................................................307Specifications.....................................................308Capacities and Specifications................303Car WashSee: Cleaning the Exterior..............................264Center Console..............................................144Changing a Bulb...........................................257Central High-mounted Brake LampBulb....................................................................259Fog Lamp Bulb...................................................258Front Direction Indicator Bulb.......................258Headlamp Bulb...................................................257LED Central High-mounted Brake LampBulb....................................................................259LED Direction Indicator and Side MarkerBulbs..................................................................258LED Headlamp Bulb..........................................257LED Rear Lamp, Brake Lamp, Rear DirectionIndicator and Reverse LampBulbs..................................................................259License Plate Lamp Bulb...............................260Rear Lamp, Brake Lamp, Rear DirectionIndicator and Reverse LampBulbs..................................................................259Side Direction Indicator Bulb........................260Side Marker Bulb...............................................258Changing a Fuse...........................................242Fuses.......................................................................242Changing a Road Wheel...........................296Dissimilar Spare Wheel and Tire AssemblyInformation.....................................................296Location of the Spare Tire and Tools.........297Tire Change Procedure....................................298
Changing the 12V Battery.........................252Battery Management System.......................254Changing the Engine Air Filter.................262Changing the Wiper Blades.....................255Checking MyKey System Status..............49Checking the Wiper Blades.....................254Childminder Mirror.........................................82Child Restraint and SeatbeltMaintenance.................................................34Child Restraint Positioning.........................25Child Safety.......................................................15General Information.............................................15Child Safety Locks.........................................26Cleaning Leather Seats..............................267With King Ranch Edition.................................268Without King Ranch Edition...........................267Cleaning Products.......................................264Cleaning the Alloy Wheels.......................269Cleaning the Engine....................................265Cleaning the Exterior..................................264Exterior Chrome Parts.....................................264Exterior Plastic Parts........................................265Stripes or Graphics............................................265Underbody...........................................................265Cleaning the Instrument Panel andInstrument Cluster Lens.........................267Cleaning the Interior...................................266Cleaning the Windows and WiperBlades...........................................................266Clearing All MyKeys.......................................48Climate Control..............................................113Climate Controlled Seats..........................135Cooled Seats........................................................135Coolant CheckSee: Engine Coolant Check............................247Crash Sensors and Airbag Indicator........39Creating a MyKey............................................47Programming/Changing ConfigurableSettings...............................................................47Cross Traffic Alert........................................190False Alerts...........................................................193Switching the System Off and On...............193System Errors.......................................................193System Lights, Messages and AudibleAlerts..................................................................192System Limitations............................................192Using the System...............................................190
408
Expedition (TB7) Canada/United States of America, enUSA, First Printing
Index