2016 FORD EXPEDITION EL spare wheel
[x] Cancel search: spare wheelPage 301 of 421
Tire Change Procedure
WARNINGS
Only use replacement tires andwheels that are the same size, loadindex, speed rating and type (suchas P-metric versus LT-metric or all-seasonversus all-terrain) as those originallyprovided by Ford. The recommended tireand wheel size may be found on either theSafety Compliance Certification Label(affixed to either the door hinge pillar,door-latch post, or the door edge thatmeets the door-latch post, next to thedriver’s seating position) or the Tire Labelwhich is located on the B-Pillar or edge ofthe driver’s door. If this information is notfound on these labels then you shouldcontact your authorized dealer as soon aspossible. Use of any tire or wheel notrecommended by Ford can affect thesafety and performance of your vehicle,which could result in an increased risk ofloss of vehicle control, vehicle rollover,personal injury and death. Additionally theuse of non-recommended tires and wheelscould cause steering, suspension, axle,transfer case or power transfer unit failure.If you have questions regarding tirereplacement, contact your authorizeddealer as soon as possible.
When one of the front wheels is offthe ground, the transmission alonewill not prevent the vehicle frommoving or slipping off the jack.
To help prevent the vehicle frommoving when you change a tire, besure to place the transmission in park(P), set the parking brake and block (inboth directions) the wheel that isdiagonally opposite (other side and end ofthe vehicle) to the tire being changed.
Never get underneath a vehicle thatis supported only by a jack. If thevehicle slips off the jack, you orsomeone else could be seriously injured.
WARNINGS
Do not attempt to change a tire onthe side of the vehicle close tomoving traffic. Pull far enough off theroad to avoid the danger of being hit whenoperating the jack or changing the wheel.
Always use the jack provided asoriginal equipment with your vehicle.If using a jack other than the oneprovided as original equipment with yourvehicle, make sure the jack capacity isadequate for the vehicle weight, includingany vehicle cargo or modifications.
Disable the power running boardsbefore jacking, lifting, or placing anyobject under the vehicle. Never placeyour hand between the power runningboard and the vehicle as extended powerrunning boards will retract when the doorsare closed. Failure to follow theseinstructions may result in personal injury.
Failure to follow these instructionswhen using the spare tire carriercould cause loss of the wheel andtire and lead to personal injury: Only usethe spare tire carrier to stow the tire andwheel combination specified on the TireLabel or Safety Compliance CertificationLabel on the B-Pillar or the edge of thedriver door. Other tire and wheelcombinations could cause the carrier tofail if it does not fit securely or is too heavy.Do not use impact tools or power toolsoperating over 200 RPM, which may causewinch malfunction and prevent a securefit. Override the winch at least three times(there will be an audible click each time)to ensure a tight secure fit of the wheel andtire.
Note:Passengers should not remain in thevehicle when the vehicle is being jacked.
298
Expedition (TB7) Canada/United States of America, enUSA, First Printing
Wheels and Tires
Page 302 of 421
Park on a level surface, activate the hazardflashers and set the parking brake. Then,place the transmission in park (P) and turnthe engine off.
Removing the Jack and Tools
Note:Pay close attention to the orientationof the bag, because it will have to bereinstalled after changing the tire.
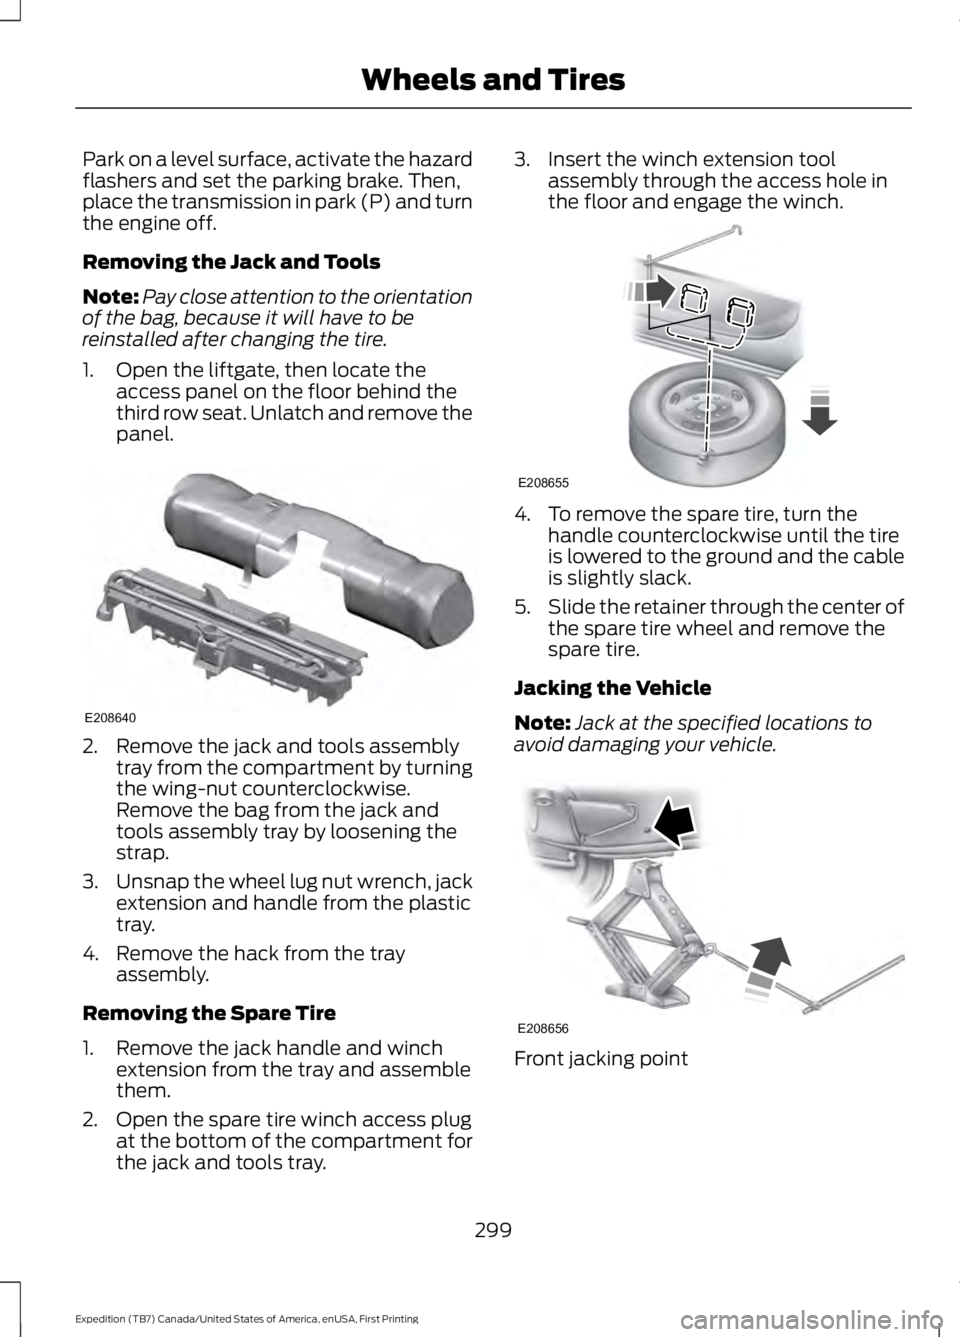
1. Open the liftgate, then locate theaccess panel on the floor behind thethird row seat. Unlatch and remove thepanel.
2. Remove the jack and tools assemblytray from the compartment by turningthe wing-nut counterclockwise.Remove the bag from the jack andtools assembly tray by loosening thestrap.
3.Unsnap the wheel lug nut wrench, jackextension and handle from the plastictray.
4. Remove the hack from the trayassembly.
Removing the Spare Tire
1. Remove the jack handle and winchextension from the tray and assemblethem.
2. Open the spare tire winch access plugat the bottom of the compartment forthe jack and tools tray.
3. Insert the winch extension toolassembly through the access hole inthe floor and engage the winch.
4. To remove the spare tire, turn thehandle counterclockwise until the tireis lowered to the ground and the cableis slightly slack.
5.Slide the retainer through the center ofthe spare tire wheel and remove thespare tire.
Jacking the Vehicle
Note:Jack at the specified locations toavoid damaging your vehicle.
Front jacking point
299
Expedition (TB7) Canada/United States of America, enUSA, First Printing
Wheels and TiresE208640 E208655 E208656
Page 303 of 421
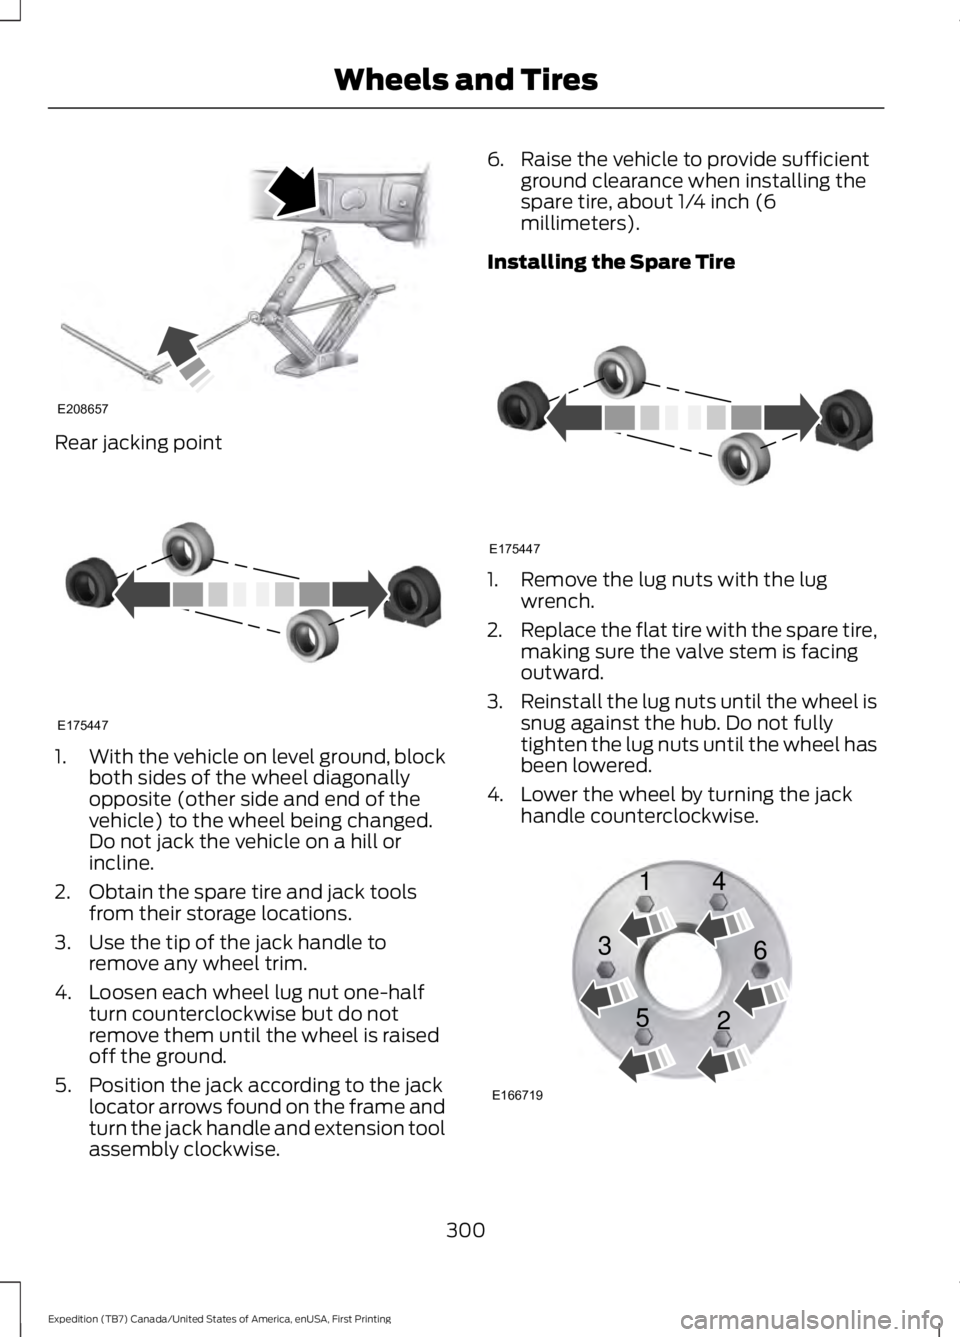
Rear jacking point
1.With the vehicle on level ground, blockboth sides of the wheel diagonallyopposite (other side and end of thevehicle) to the wheel being changed.Do not jack the vehicle on a hill orincline.
2. Obtain the spare tire and jack toolsfrom their storage locations.
3. Use the tip of the jack handle toremove any wheel trim.
4. Loosen each wheel lug nut one-halfturn counterclockwise but do notremove them until the wheel is raisedoff the ground.
5. Position the jack according to the jacklocator arrows found on the frame andturn the jack handle and extension toolassembly clockwise.
6. Raise the vehicle to provide sufficientground clearance when installing thespare tire, about 1/4 inch (6millimeters).
Installing the Spare Tire
1. Remove the lug nuts with the lugwrench.
2.Replace the flat tire with the spare tire,making sure the valve stem is facingoutward.
3.Reinstall the lug nuts until the wheel issnug against the hub. Do not fullytighten the lug nuts until the wheel hasbeen lowered.
4. Lower the wheel by turning the jackhandle counterclockwise.
300
Expedition (TB7) Canada/United States of America, enUSA, First Printing
Wheels and TiresE208657 E175447 E175447 E166719
1
3
5 4
6
2
Page 304 of 421
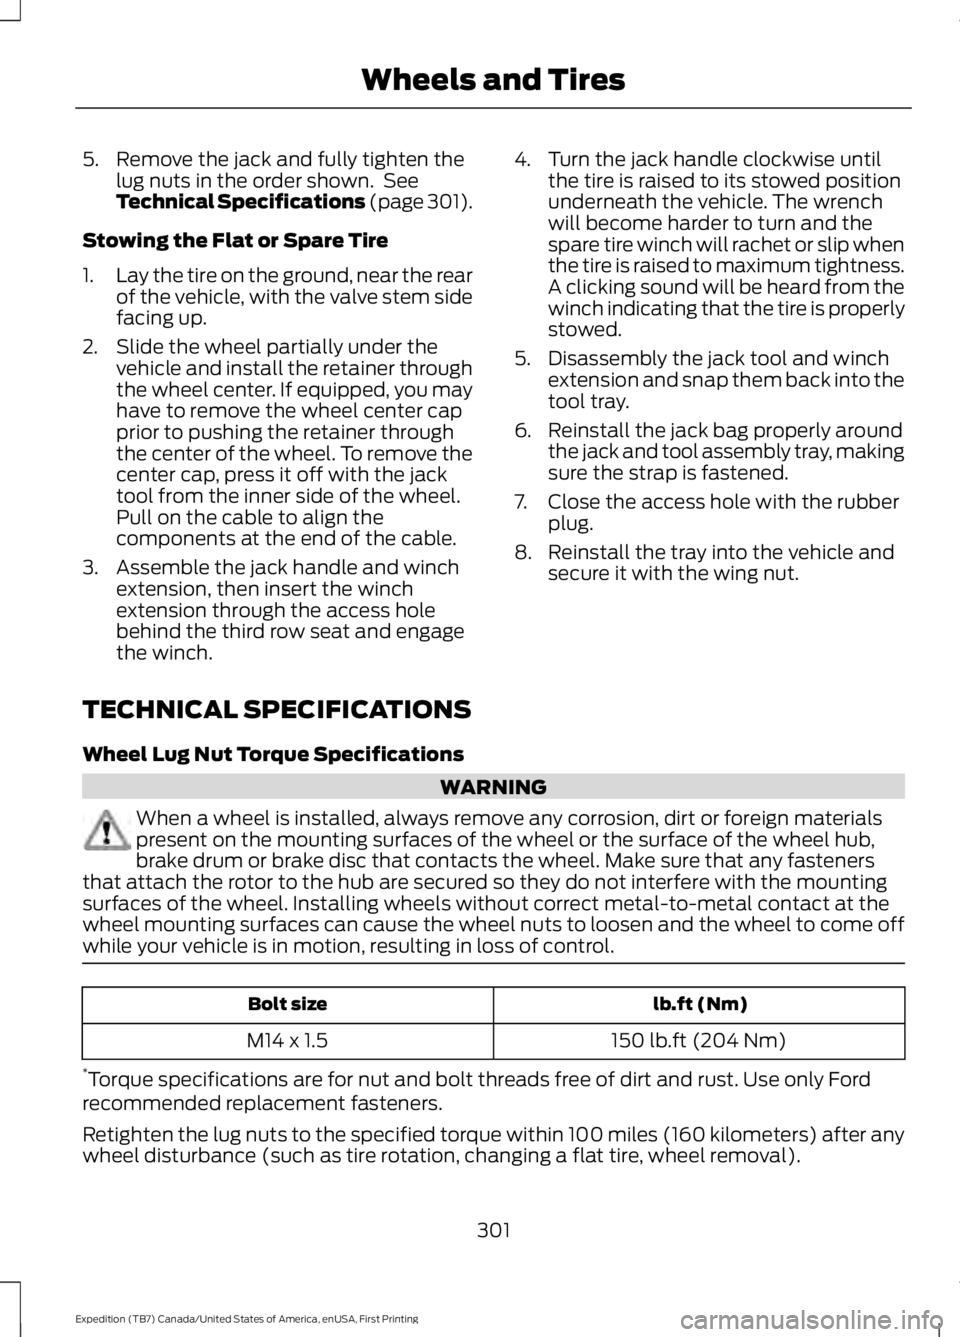
5. Remove the jack and fully tighten thelug nuts in the order shown. SeeTechnical Specifications (page 301).
Stowing the Flat or Spare Tire
1.Lay the tire on the ground, near the rearof the vehicle, with the valve stem sidefacing up.
2. Slide the wheel partially under thevehicle and install the retainer throughthe wheel center. If equipped, you mayhave to remove the wheel center capprior to pushing the retainer throughthe center of the wheel. To remove thecenter cap, press it off with the jacktool from the inner side of the wheel.Pull on the cable to align thecomponents at the end of the cable.
3. Assemble the jack handle and winchextension, then insert the winchextension through the access holebehind the third row seat and engagethe winch.
4. Turn the jack handle clockwise untilthe tire is raised to its stowed positionunderneath the vehicle. The wrenchwill become harder to turn and thespare tire winch will rachet or slip whenthe tire is raised to maximum tightness.A clicking sound will be heard from thewinch indicating that the tire is properlystowed.
5. Disassembly the jack tool and winchextension and snap them back into thetool tray.
6. Reinstall the jack bag properly aroundthe jack and tool assembly tray, makingsure the strap is fastened.
7. Close the access hole with the rubberplug.
8. Reinstall the tray into the vehicle andsecure it with the wing nut.
TECHNICAL SPECIFICATIONS
Wheel Lug Nut Torque Specifications
WARNING
When a wheel is installed, always remove any corrosion, dirt or foreign materialspresent on the mounting surfaces of the wheel or the surface of the wheel hub,brake drum or brake disc that contacts the wheel. Make sure that any fastenersthat attach the rotor to the hub are secured so they do not interfere with the mountingsurfaces of the wheel. Installing wheels without correct metal-to-metal contact at thewheel mounting surfaces can cause the wheel nuts to loosen and the wheel to come offwhile your vehicle is in motion, resulting in loss of control.
lb.ft (Nm)Bolt size
150 lb.ft (204 Nm)M14 x 1.5
*Torque specifications are for nut and bolt threads free of dirt and rust. Use only Fordrecommended replacement fasteners.
Retighten the lug nuts to the specified torque within 100 miles (160 kilometers) after anywheel disturbance (such as tire rotation, changing a flat tire, wheel removal).
301
Expedition (TB7) Canada/United States of America, enUSA, First Printing
Wheels and Tires
Page 411 of 421

Bonnet LockSee: Opening and Closing the Hood..........243Booster Seats..................................................23Types of Booster Seats......................................24Brake Fluid Check.........................................251Brakes................................................................172General Information...........................................172Breaking-In.....................................................220Bulb Specification Chart..........................260
C
California Proposition 65..............................11Capacities and Specifications - 3.5LEcoboost™.................................................307Specifications.....................................................308Capacities and Specifications................303Car WashSee: Cleaning the Exterior..............................264Center Console..............................................144Changing a Bulb...........................................257Central High-mounted Brake LampBulb....................................................................259Fog Lamp Bulb...................................................258Front Direction Indicator Bulb.......................258Headlamp Bulb...................................................257LED Central High-mounted Brake LampBulb....................................................................259LED Direction Indicator and Side MarkerBulbs..................................................................258LED Headlamp Bulb..........................................257LED Rear Lamp, Brake Lamp, Rear DirectionIndicator and Reverse LampBulbs..................................................................259License Plate Lamp Bulb...............................260Rear Lamp, Brake Lamp, Rear DirectionIndicator and Reverse LampBulbs..................................................................259Side Direction Indicator Bulb........................260Side Marker Bulb...............................................258Changing a Fuse...........................................242Fuses.......................................................................242Changing a Road Wheel...........................296Dissimilar Spare Wheel and Tire AssemblyInformation.....................................................296Location of the Spare Tire and Tools.........297Tire Change Procedure....................................298
Changing the 12V Battery.........................252Battery Management System.......................254Changing the Engine Air Filter.................262Changing the Wiper Blades.....................255Checking MyKey System Status..............49Checking the Wiper Blades.....................254Childminder Mirror.........................................82Child Restraint and SeatbeltMaintenance.................................................34Child Restraint Positioning.........................25Child Safety.......................................................15General Information.............................................15Child Safety Locks.........................................26Cleaning Leather Seats..............................267With King Ranch Edition.................................268Without King Ranch Edition...........................267Cleaning Products.......................................264Cleaning the Alloy Wheels.......................269Cleaning the Engine....................................265Cleaning the Exterior..................................264Exterior Chrome Parts.....................................264Exterior Plastic Parts........................................265Stripes or Graphics............................................265Underbody...........................................................265Cleaning the Instrument Panel andInstrument Cluster Lens.........................267Cleaning the Interior...................................266Cleaning the Windows and WiperBlades...........................................................266Clearing All MyKeys.......................................48Climate Control..............................................113Climate Controlled Seats..........................135Cooled Seats........................................................135Coolant CheckSee: Engine Coolant Check............................247Crash Sensors and Airbag Indicator........39Creating a MyKey............................................47Programming/Changing ConfigurableSettings...............................................................47Cross Traffic Alert........................................190False Alerts...........................................................193Switching the System Off and On...............193System Errors.......................................................193System Lights, Messages and AudibleAlerts..................................................................192System Limitations............................................192Using the System...............................................190
408
Expedition (TB7) Canada/United States of America, enUSA, First Printing
Index