2016 FORD EXPEDITION EL change time
[x] Cancel search: change timePage 143 of 421
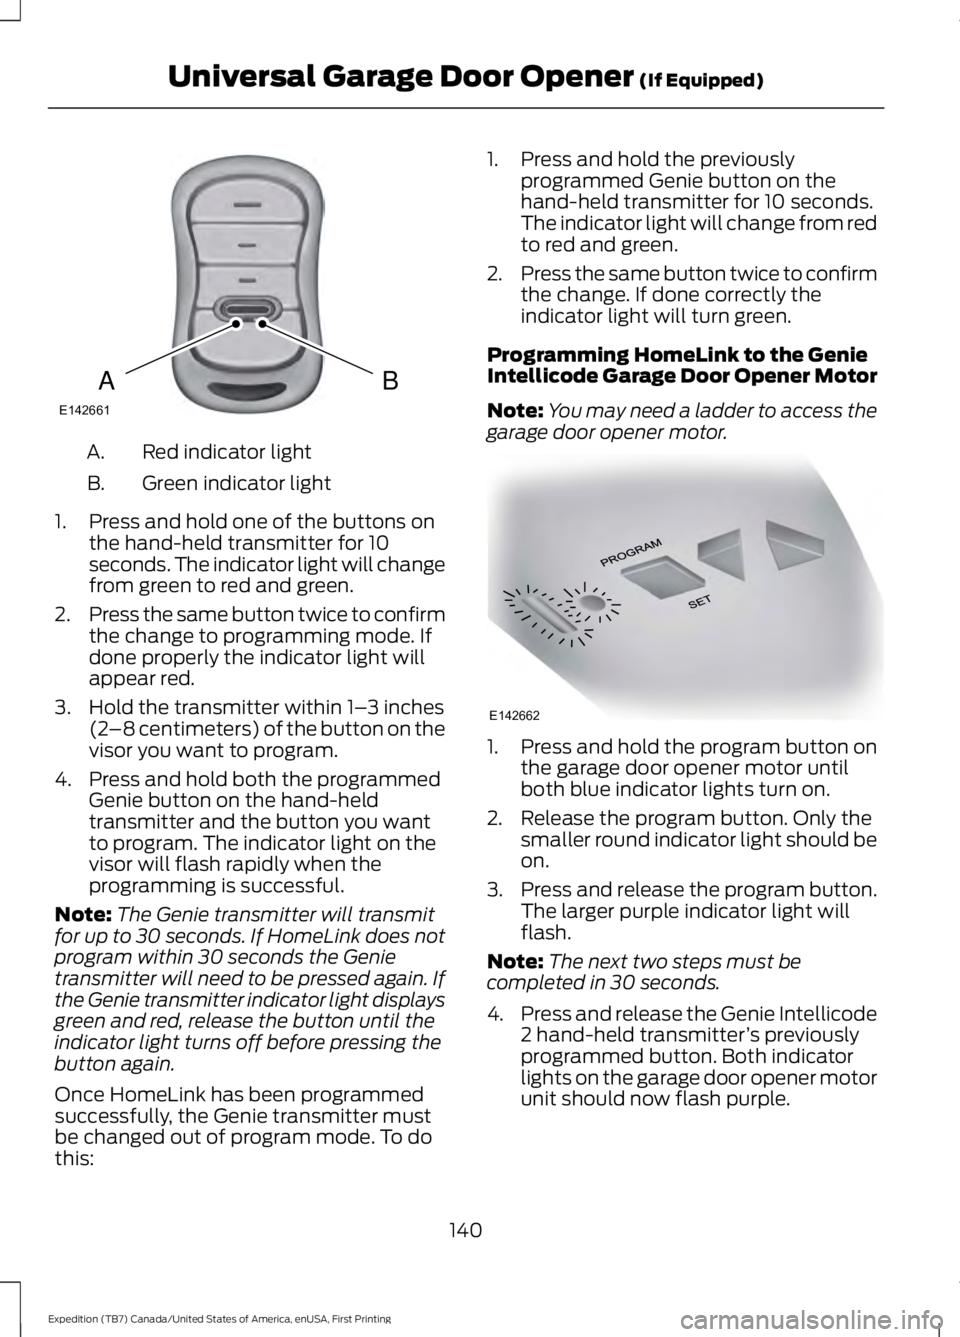
Red indicator lightA.
Green indicator lightB.
1. Press and hold one of the buttons onthe hand-held transmitter for 10seconds. The indicator light will changefrom green to red and green.
2.Press the same button twice to confirmthe change to programming mode. Ifdone properly the indicator light willappear red.
3. Hold the transmitter within 1–3 inches(2–8 centimeters) of the button on thevisor you want to program.
4. Press and hold both the programmedGenie button on the hand-heldtransmitter and the button you wantto program. The indicator light on thevisor will flash rapidly when theprogramming is successful.
Note:The Genie transmitter will transmitfor up to 30 seconds. If HomeLink does notprogram within 30 seconds the Genietransmitter will need to be pressed again. Ifthe Genie transmitter indicator light displaysgreen and red, release the button until theindicator light turns off before pressing thebutton again.
Once HomeLink has been programmedsuccessfully, the Genie transmitter mustbe changed out of program mode. To dothis:
1. Press and hold the previouslyprogrammed Genie button on thehand-held transmitter for 10 seconds.The indicator light will change from redto red and green.
2.Press the same button twice to confirmthe change. If done correctly theindicator light will turn green.
Programming HomeLink to the GenieIntellicode Garage Door Opener Motor
Note:You may need a ladder to access thegarage door opener motor.
1. Press and hold the program button onthe garage door opener motor untilboth blue indicator lights turn on.
2. Release the program button. Only thesmaller round indicator light should beon.
3.Press and release the program button.The larger purple indicator light willflash.
Note:The next two steps must becompleted in 30 seconds.
4.Press and release the Genie Intellicode2 hand-held transmitter’s previouslyprogrammed button. Both indicatorlights on the garage door opener motorunit should now flash purple.
140
Expedition (TB7) Canada/United States of America, enUSA, First Printing
Universal Garage Door Opener (If Equipped)BAE142661 E142662
Page 144 of 421
5. Press and hold the previouslyprogrammed button on the visor for 2seconds. Repeat this step up to 3 timesuntil the garage door moves.
Programming is now complete.
Clearing a HomeLink Device
To erase programming from the threeHomeLink buttons press and hold the twoouter HomeLink buttons until the indicatorlight begins to flash. The indicator light willbegin flashing in 10 to 20 seconds, at whichtime both buttons should be released.Programming has now been erased, andthe indicator light should blink slowly toindicate the device is in train mode whenany of the three HomeLink buttons arepressed.
FCC and RSS-210 Industry CanadaCompliance
This device complies with Part 15 of theFCC Rules and with RSS-210 of IndustryCanada. Operation is subject to thefollowing two conditions: (1) this devicemay not cause harmful interference, and(2) this device must accept anyinterference received, includinginterference that may cause undesiredoperation.
Changes or modifications to your devicenot expressly approved by the partyresponsible for compliance can void theuser’s authority to operate the equipment.
141
Expedition (TB7) Canada/United States of America, enUSA, First Printing
Universal Garage Door Opener (If Equipped)
Page 160 of 421
If you use parts other than Ford, Motorcraftor Ford-authorized parts for maintenancereplacements, or for service ofcomponents affecting emission control,such non-Ford parts should be theequivalent to genuine Ford Motor Companyparts in performance and durability.
Illumination of the service engine soonindicator, charging system warning light orthe temperature warning light, fluid leaks,strange odors, smoke or loss of enginepower could indicate that the emissioncontrol system is not working properly.
An improperly operating or damagedexhaust system may allow exhaust toenter the vehicle. Have a damaged orimproperly operating exhaust systeminspected and repaired immediately.
Do not make any unauthorized changes toyour vehicle or engine. By law, vehicleowners and anyone who manufactures,repairs, services, sells, leases, tradesvehicles, or supervises a fleet of vehiclesare not permitted to intentionally removean emission control device or prevent itfrom working. Information about yourvehicle’s emission system is on the VehicleEmission Control Information Decallocated on or near the engine. This decalalso lists engine displacement
Please consult your warranty informationfor complete details.
On-Board Diagnostics (OBD-II)
Your vehicle has a computer known as theon-board diagnostics system (OBD-II) thatmonitors the engine’s emission controlsystem. The system protects theenvironment by making sure that yourvehicle continues to meet governmentemission standards. The OBD-II systemalso assists a service technician in properlyservicing your vehicle.
When the service engine soonindicator illuminates, the OBD-IIsystem has detected amalfunction. Temporary malfunctions maycause the service engine soon indicator toilluminate.
Examples of temporary malfunctions are:
•the vehicle has run out of fuel—theengine may misfire or run poorly
•poor fuel quality or water in thefuel—the engine may misfire or runpoorly
•the fuel fill inlet may not have closedproperly. See Refueling (page 153).
•driving through deep water—theelectrical system may be wet.
You can correct these temporarymalfunctions by filling the fuel tank withgood quality fuel, properly closing the fuelfill inlet or letting the electrical system dryout. After three driving cycles without theseor any other temporary malfunctionspresent, the service engine soon indicatorshould stay off the next time you start theengine. A driving cycle consists of a coldengine startup followed by mixedcity/highway driving. No additional vehicleservice is required.
If the service engine soon indicator remainson, have your vehicle serviced at the firstavailable opportunity. Although somemalfunctions detected by the OBD-II maynot have symptoms that are apparent,continued driving with the service enginesoon indicator on can result in increasedemissions, lower fuel economy, reducedengine and transmission smoothness, andlead to more costly repairs.
157
Expedition (TB7) Canada/United States of America, enUSA, First Printing
Fuel and Refueling
Page 163 of 421
Second (2)
Transmission operates in second (2) gearonly. Use second (2) gear to start-up onslippery roads.
First (1)
•Transmission operates in first (1) gearonly.
•Provides maximum engine braking.
•Allows upshifts by moving gearshiftlever.
•Will not downshift into first (1) gear athigh speeds; allows for first (1) gearwhen vehicle reaches slower speeds.
Tow/Haul Mode
To activate tow/haul, press thebutton on the gearshift leveronce. The TOW HAUL indicatorlight will illuminate in the instrumentcluster.
The tow/haul feature:
•Delays upshifts to reduce the frequencyof transmission shifting.
•Provides engine braking in all forwardgears, which will slow your vehicle andassist you in controlling your vehiclewhen descending a grade.
•Depending on driving conditions andload conditions, may downshift thetransmission, slow your vehicle andcontrol your vehicle speed whendescending a hill, without pressing theaccelerator pedal. The amount ofdownshift braking provided will varybased upon the amount the brakepedal is pressed.
The tow/haul feature improvestransmission operation when towing atrailer or a heavy load. All transmissiongear ranges are available when usingtow/haul.
To deactivate the tow/haul feature andreturn to normal driving mode, press thebutton on the gearshift lever twice. TheTOW HAUL light will deactivate. Tow/haulwill also deactivate when you power downyour vehicle.
WARNING
Do not use the tow/haul featurewhen driving in icy or slipperyconditions as the increased enginebraking can cause the rear wheels to slideand your vehicle to swing around with thepossible loss of vehicle control.
Forced Downshifts
•Allowed in drive (D) with the tow/haulfeature on or off.
•Press the accelerator to the floor.
•Allows transmission to select anappropriate gear.
Automatic Transmission AdaptiveLearning
This feature may increase durability andprovide consistent shift feel over the lifeof your vehicle. A new vehicle ortransmission may have firm shifts, softshifts or both. This operation is considerednormal and will not affect function ordurability of the transmission. Over time,the adaptive learning process will fullyupdate transmission operation.
Understanding your SelectShiftAutomatic™ Transmission (If
Equipped)
Your vehicle is equipped with a SelectShiftAutomatic transmission gearshift lever.The SelectShift Automatic transmissiongives you the ability to change gears up ordown (without a clutch) as desired.
160
Expedition (TB7) Canada/United States of America, enUSA, First Printing
TransmissionE161509
Page 169 of 421
3. Move the 4WD switch to the desiredmode.
The information display will display amessage indicating a 4X4 shift is inprogress. The information display will thendisplay the system mode selected.
If any of the above shift conditions are notmet, the shift will not occur and theinformation display will display informationguiding the driver through the proper rangeof shifting procedures.
If SHIFT DELAYED PULL FORWARD isdisplayed in the information display,transfer case gear tooth blockage ispresent. To alleviate this condition, placethe transmission in a forward gear, movethe vehicle forward approximately 5 ft(2 m), and shift the transmission back toneutral (N) to allow the transfer case tocomplete the range shift.
How Your Vehicle Differs FromOther Vehicles
WARNING
Vehicles with a higher center ofgravity such as utility and four-wheeldrive vehicles handle differently thanvehicles with a lower center of gravity.Utility and four-wheel drive vehicles arenot designed for cornering at speeds ashigh as passenger cars any more thanlow-slung sports cars are designed toperform satisfactorily under off-roadconditions. Avoid sharp turns, excessivespeed and abrupt maneuvers in thesevehicles. Failure to drive cautiously couldresult in an increased risk of loss of vehiclecontrol, vehicle rollover, personal injury anddeath.
Truck and utility vehicles can differ fromsome other vehicles. Your vehicle may behigher to allow it to travel over roughterrain without getting hung up ordamaging underbody components.
The differences that make your vehicle soversatile also make it handle differentlythan an ordinary passenger car.
Maintain steering wheel control at alltimes, especially in rough terrain. Sincesudden changes in terrain can result inabrupt steering wheel motion, make sureyou grip the steering wheel from theoutside. Do not grip the spokes.
Drive cautiously to avoid vehicle damagefrom concealed objects such as rocks andstumps.
You should either know the terrain orexamine maps of the area before driving.Map out your route before driving in thearea. To maintain steering and brakingcontrol of your vehicle, you must have allfour wheels on the ground and they mustbe rolling, not sliding or spinning.
Driving Off-Road With Truck andUtility Vehicles
Note:On some models, the initial shift fromtwo-wheel drive to four-wheel drive whileyour vehicle is moving can cause somemomentary clunk and ratcheting sounds.This is the front drivetrain coming up tospeed and the automatic locking hubsengaging and is not cause for concern.
Note:Your vehicle may be equipped witha front air dam that can become damaged(due to reduced ground clearance) whentaking your vehicle off-road. You mayremove this air dam by removing eight bolts.
Four-wheel drive vehicles are speciallyequipped for driving on sand, snow, mudand rough terrain and have operatingcharacteristics that are somewhatdifferent from conventional vehicles, bothon and off the road.
166
Expedition (TB7) Canada/United States of America, enUSA, First Printing
Four-Wheel Drive (If Equipped)
Page 179 of 421

PRINCIPLE OF OPERATION
WARNINGS
Vehicle modifications involvingbraking system, aftermarket roofracks, suspension, steering system,tire construction and wheel and tire sizemay change the handling characteristicsof your vehicle and may adversely affectthe performance of the electronic stabilitycontrol system. In addition, installing anystereo loudspeakers may interfere withand adversely affect the electronic stabilitycontrol system. Install any aftermarketstereo loudspeaker as far as possible fromthe front center console, the tunnel, andthe front seats in order to minimize the riskof interfering with the electronic stabilitycontrol sensors. Reducing theeffectiveness of the electronic stabilitycontrol system could lead to an increasedrisk of loss of vehicle control, vehiclerollover, personal injury and death.
Remember that even advancedtechnology cannot defy the laws ofphysics. It’s always possible to losecontrol of a vehicle due to inappropriatedriver input for the conditions. Aggressivedriving on any road condition can causeyou to lose control of your vehicleincreasing the risk of personal injury orproperty damage. Activation of theelectronic stability control system is anindication that at least some of the tireshave exceeded their ability to grip the road;this could reduce the operator’s ability tocontrol the vehicle potentially resulting ina loss of vehicle control, vehicle rollover,personal injury and death. If your electronicstability control system activates, SLOWDOWN.
The system automatically turns on eachtime you switch the ignition on.
If a driving condition activates either thestability control or the traction controlsystem you may experience the followingconditions:
•The stability and traction control lightflashes.
•Your vehicle slows down.
•Reduced engine power.
•A vibration in the brake pedal.
•The brake pedal is stiffer than usual.
•If the driving condition is severe andyour foot is not on the brake, the brakepedal may move as the systemsapplies higher brake forces.
The stability control system has severalfeatures built into it to help you maintaincontrol of your vehicle:
Electronic Stability Control
The system enhances your vehicle’s abilityto prevent skids or lateral slides byapplying brakes to one or more of thewheels individually and, if necessary,reducing engine power.
Roll Stability Control
The system enhances your vehicle’s abilityto prevent rollovers by detecting yourvehicle’s roll motion and the rate at whichit changes by applying the brakes to oneor more wheels individually.
Traction Control
The system enhances your vehicle’s abilityto maintain traction of the wheels bydetecting and controlling wheel spin. SeeUsing Traction Control (page 175).
176
Expedition (TB7) Canada/United States of America, enUSA, First Printing
Stability Control
Page 187 of 421
Note:When towing, the camera only seeswhat you are towing behind your vehicle.This might not provide adequate coverageas it usually provides in normal operationand you might not see some objects. Insome vehicles, the guidelines may disappearonce you engage the trailer tow connector.
The camera may not operate correctlyunder the following conditions:
•Nighttime or dark areas if one or bothreverse lamps are not operating.
•Mud, water or debris obstructs thecamera's view. Clean the lens with asoft, lint-free cloth and non-abrasivecleaner.
•The camera is misaligned due todamage to the rear of your vehicle.
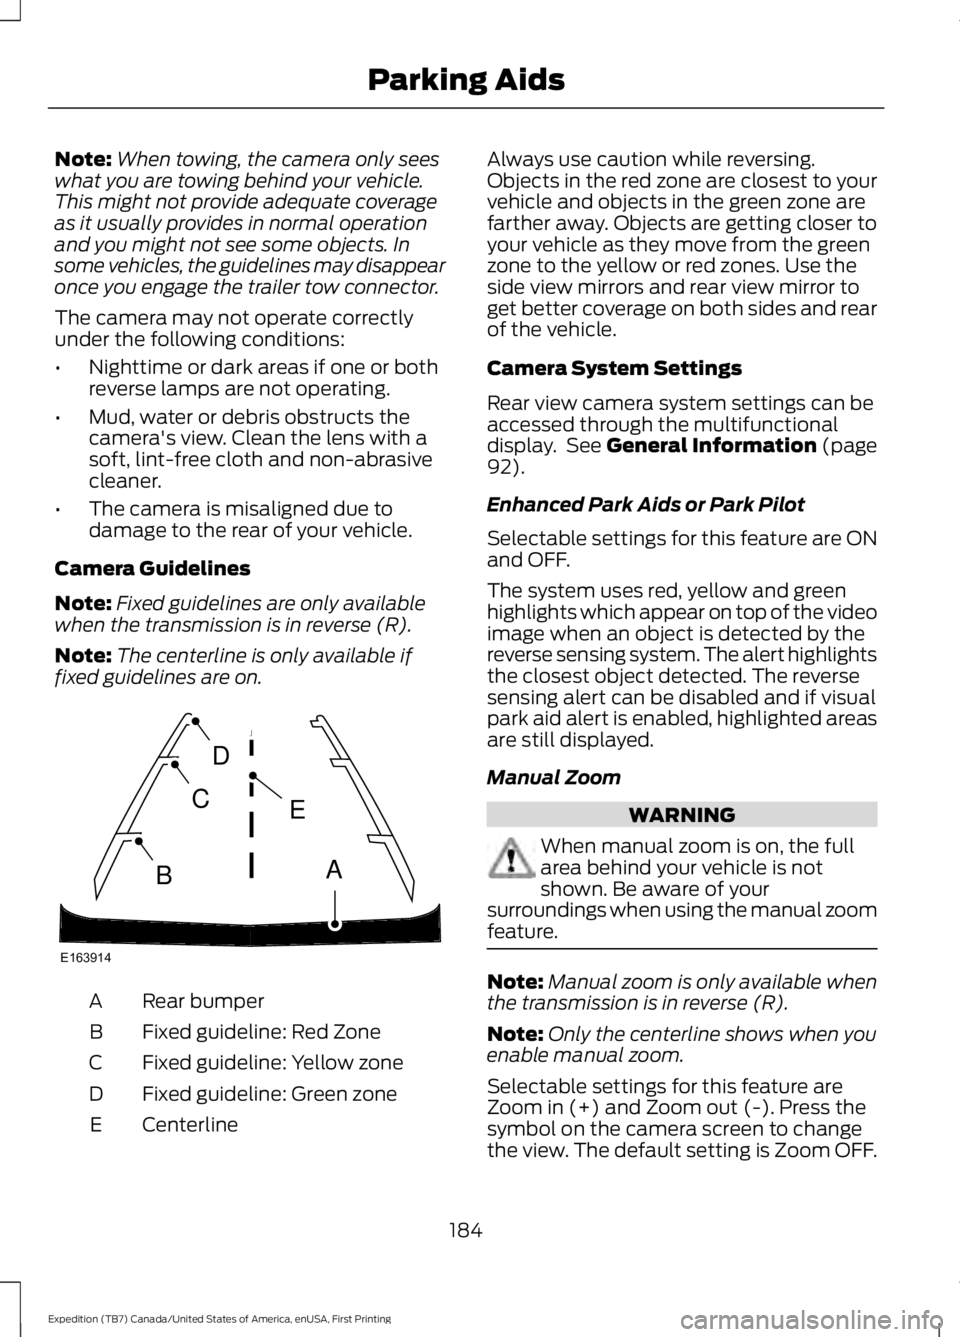
Camera Guidelines
Note:Fixed guidelines are only availablewhen the transmission is in reverse (R).
Note:The centerline is only available iffixed guidelines are on.
Rear bumperA
Fixed guideline: Red ZoneB
Fixed guideline: Yellow zoneC
Fixed guideline: Green zoneD
CenterlineE
Always use caution while reversing.Objects in the red zone are closest to yourvehicle and objects in the green zone arefarther away. Objects are getting closer toyour vehicle as they move from the greenzone to the yellow or red zones. Use theside view mirrors and rear view mirror toget better coverage on both sides and rearof the vehicle.
Camera System Settings
Rear view camera system settings can beaccessed through the multifunctionaldisplay. See General Information (page92).
Enhanced Park Aids or Park Pilot
Selectable settings for this feature are ONand OFF.
The system uses red, yellow and greenhighlights which appear on top of the videoimage when an object is detected by thereverse sensing system. The alert highlightsthe closest object detected. The reversesensing alert can be disabled and if visualpark aid alert is enabled, highlighted areasare still displayed.
Manual Zoom
WARNING
When manual zoom is on, the fullarea behind your vehicle is notshown. Be aware of yoursurroundings when using the manual zoomfeature.
Note:Manual zoom is only available whenthe transmission is in reverse (R).
Note:Only the centerline shows when youenable manual zoom.
Selectable settings for this feature areZoom in (+) and Zoom out (-). Press thesymbol on the camera screen to changethe view. The default setting is Zoom OFF.
184
Expedition (TB7) Canada/United States of America, enUSA, First Printing
Parking AidsE163914
A
E
D
C
B
Page 198 of 421
Modes:
•Comfort – Provides a more relaxeddriving experience, maximizing comfort.Your steering effort decreases and thesuspension movement is more fluid.Comfort mode is ideal when you desireenhanced traveling comfort.
•Normal – Delivers a balancedcombination of comfortable, controlledride and confident handling. This modeprovides an engaging drive experienceand a direct connection to the roadwithout sacrificing any of thecomposure demanded from yourvehicle.
•Sport – Provides a sportier drivingexperience. The suspension stiffens,with an emphasis on handling andcontrol. The engine responds moredirectly to your inputs. Sport mode isideal for use during more spiriteddriving.
Adaptive Steering
You can configure which of the modes areactive from the main menu on theinformation display. See GeneralInformation (page 92).
Modes:
•Normal – Default factory setting.
•Sport – Slightly higher effort requiredfor steering with more road force feltthrough the steering wheel.
Note:The Drive Control has diagnosticchecks that continuously monitor thesystem to ensure proper operation. Certaintypes of system errors will gray out themode selections within the informationdisplay, preventing you from changing stateswhen the gear position is changed. Othertypes of errors will produce a temporarymessage that states a malfunction. If eithercondition persists for multiple key cycles,have your vehicle checked by an authorizeddealer.
SELF-LEVELING SUSPENSION
The self-leveling suspension system isdesigned to improve ride, handling andgeneral vehicle performance during:
•Certain road conditions
•Steering maneuvers
•Braking
•Acceleration
•Towing
This system keeps the rear of your vehicleat a constant level through a hydraulicpump inside each rear shock. Dependingon the payload or road surface conditionsit will take approximately 2 mi (3.2 km) forthe leveling to complete.
If the loaded vehicle is not moved forapproximately 12 hours, the leveling systemmay bleed down to a lower height. Thiscan be especially apparent if a trailer is leftattached to the parked vehicle for longperiods of time. You must drive your vehiclein order to re-level the suspension.
If a self-equalizing hitch is used, yourvehicle should be driven approximately2 mi (3.2 km) with the trailer prior toadjusting (leveling) the hitch.
195
Expedition (TB7) Canada/United States of America, enUSA, First Printing
Driving Aids