2016 FORD EXPEDITION EL buttons
[x] Cancel search: buttonsPage 103 of 421
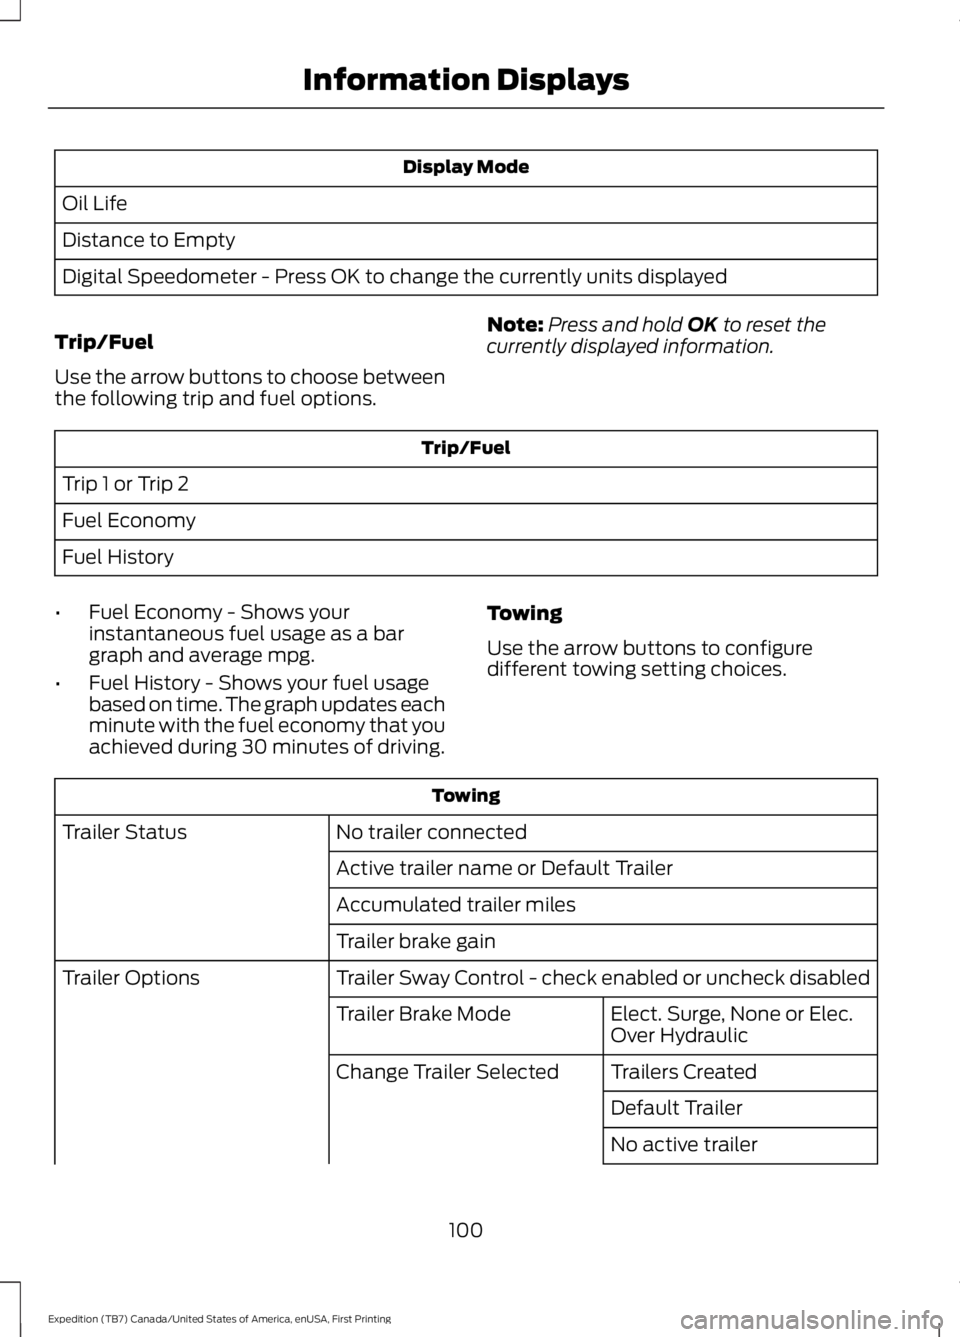
Display Mode
Oil Life
Distance to Empty
Digital Speedometer - Press OK to change the currently units displayed
Trip/Fuel
Use the arrow buttons to choose betweenthe following trip and fuel options.
Note:Press and hold OK to reset thecurrently displayed information.
Trip/Fuel
Trip 1 or Trip 2
Fuel Economy
Fuel History
•Fuel Economy - Shows yourinstantaneous fuel usage as a bargraph and average mpg.
•Fuel History - Shows your fuel usagebased on time. The graph updates eachminute with the fuel economy that youachieved during 30 minutes of driving.
Towing
Use the arrow buttons to configuredifferent towing setting choices.
Towing
No trailer connectedTrailer Status
Active trailer name or Default Trailer
Accumulated trailer miles
Trailer brake gain
Trailer Sway Control - check enabled or uncheck disabledTrailer Options
Elect. Surge, None or Elec.Over HydraulicTrailer Brake Mode
Trailers CreatedChange Trailer Selected
Default Trailer
No active trailer
100
Expedition (TB7) Canada/United States of America, enUSA, First Printing
Information Displays
Page 118 of 421
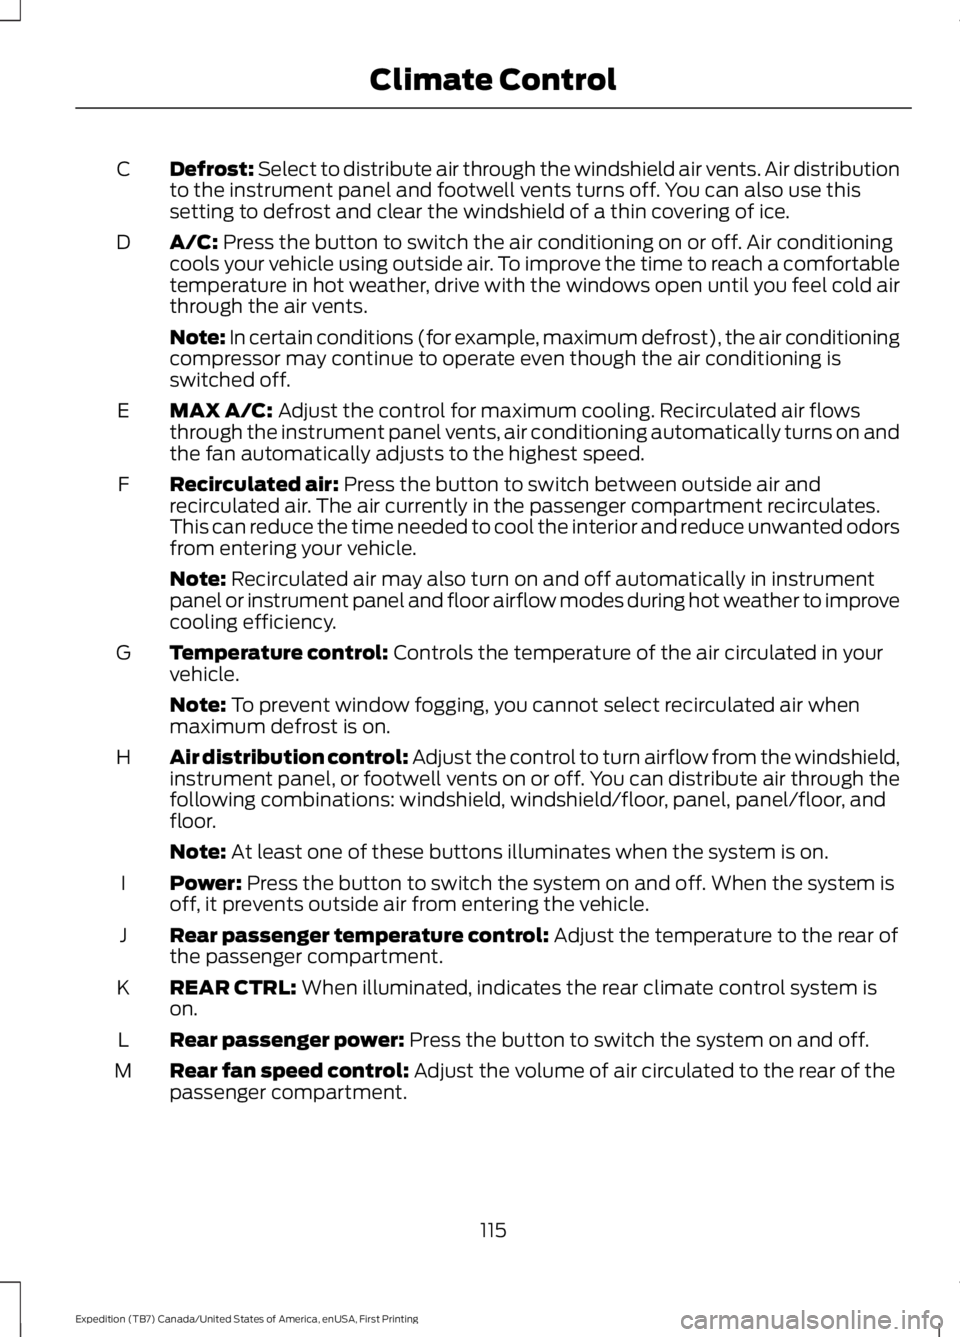
Defrost: Select to distribute air through the windshield air vents. Air distributionto the instrument panel and footwell vents turns off. You can also use thissetting to defrost and clear the windshield of a thin covering of ice.
C
A/C: Press the button to switch the air conditioning on or off. Air conditioningcools your vehicle using outside air. To improve the time to reach a comfortabletemperature in hot weather, drive with the windows open until you feel cold airthrough the air vents.
D
Note: In certain conditions (for example, maximum defrost), the air conditioningcompressor may continue to operate even though the air conditioning isswitched off.
MAX A/C: Adjust the control for maximum cooling. Recirculated air flowsthrough the instrument panel vents, air conditioning automatically turns on andthe fan automatically adjusts to the highest speed.
E
Recirculated air: Press the button to switch between outside air andrecirculated air. The air currently in the passenger compartment recirculates.This can reduce the time needed to cool the interior and reduce unwanted odorsfrom entering your vehicle.
F
Note: Recirculated air may also turn on and off automatically in instrumentpanel or instrument panel and floor airflow modes during hot weather to improvecooling efficiency.
Temperature control: Controls the temperature of the air circulated in yourvehicle.G
Note: To prevent window fogging, you cannot select recirculated air whenmaximum defrost is on.
Air distribution control: Adjust the control to turn airflow from the windshield,instrument panel, or footwell vents on or off. You can distribute air through thefollowing combinations: windshield, windshield/floor, panel, panel/floor, andfloor.
H
Note: At least one of these buttons illuminates when the system is on.
Power: Press the button to switch the system on and off. When the system isoff, it prevents outside air from entering the vehicle.I
Rear passenger temperature control: Adjust the temperature to the rear ofthe passenger compartment.J
REAR CTRL: When illuminated, indicates the rear climate control system ison.K
Rear passenger power: Press the button to switch the system on and off.L
Rear fan speed control: Adjust the volume of air circulated to the rear of thepassenger compartment.M
115
Expedition (TB7) Canada/United States of America, enUSA, First Printing
Climate Control
Page 121 of 421

Automatic Climate Control
Note:Adjusting the settings when yourvehicle interior is extremely hot or cold isnot necessary. The system automaticallyadjusts to heat or cool the cabin to yourselected temperature as quickly as possible.For the system to function efficiently, theinstrument panel and side air vents shouldbe fully open.
Note:If you select AUTO during coldoutside temperatures, the system directsairflow to the windshield and side windowvents. In addition, the fan may run at aslower speed until the engine warms up.
Note:If you select AUTO during hot outsidetemperatures, or when the inside of thevehicle is hot, the system automatically usesrecirculated air to maximize interior cooling.When the interior reaches the selectedtemperature, the system automaticallyswitches to using outside air.
Heating the Interior Quickly
Vehicle with automatic climate controlVehicle with manual climate control
Press the AUTO button.Adjust the fan speed to a high speedsetting.1
Adjust the temperature control to thedesired setting.Adjust the temperature control to thehighest setting.2
Select the footwell air vents using theair distribution buttons.3
Recommended Settings for Heating
Vehicle with automatic climate controlVehicle with manual climate control
Press the AUTO button.Adjust the fan speed to the centersetting.1
Adjust the temperature control to thedesired setting. Use 72°F (22°C) as astarting point, then adjust the setting asnecessary.
Adjust the temperature control to themidway point of the hot settings.2
Select the footwell air vents using theair distribution buttons.3
118
Expedition (TB7) Canada/United States of America, enUSA, First Printing
Climate Control
Page 122 of 421
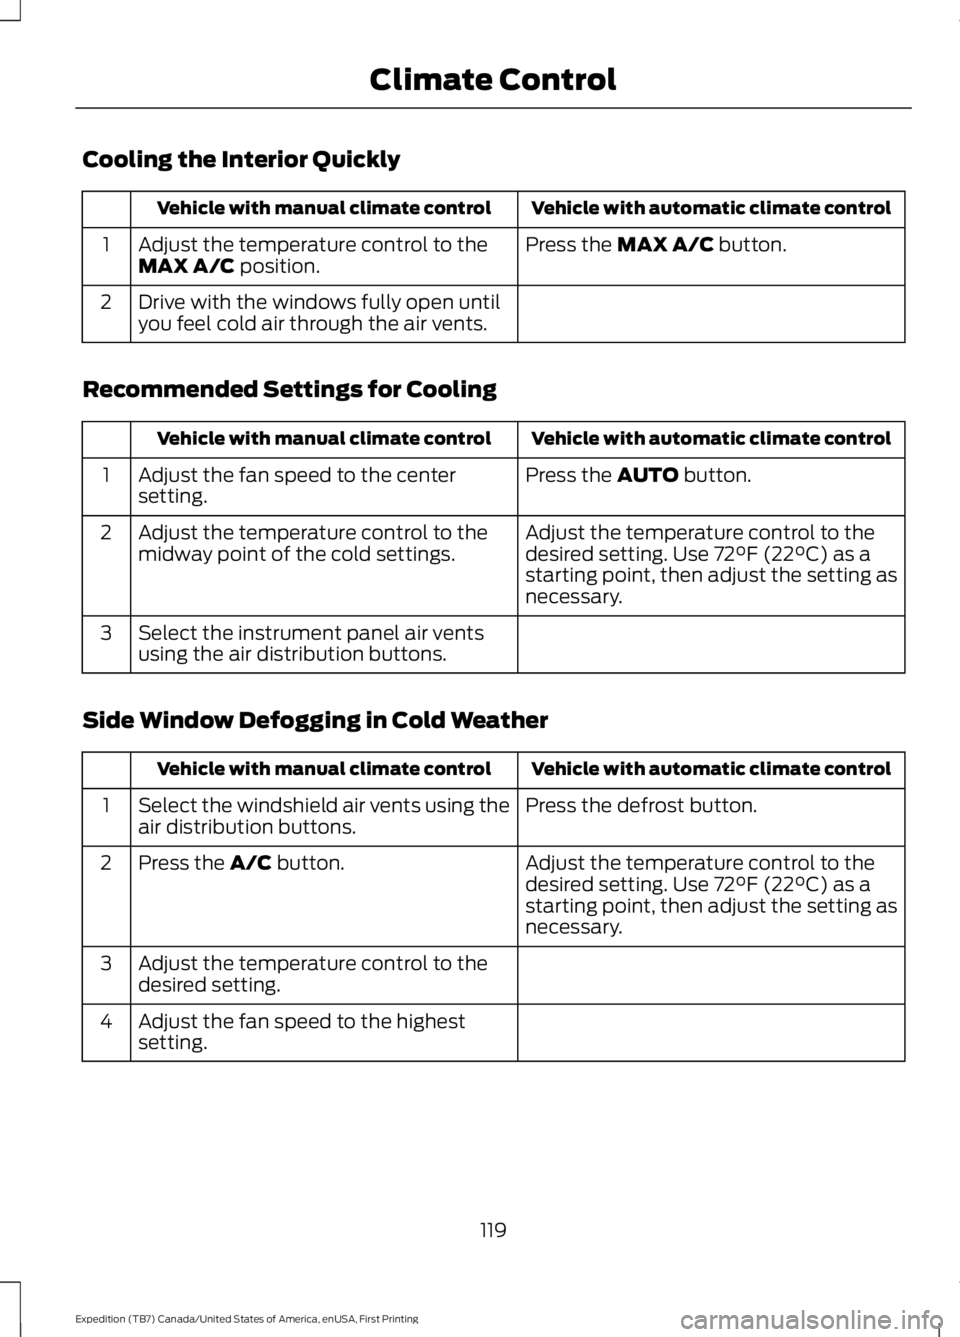
Cooling the Interior Quickly
Vehicle with automatic climate controlVehicle with manual climate control
Press the MAX A/C button.Adjust the temperature control to theMAX A/C position.1
Drive with the windows fully open untilyou feel cold air through the air vents.2
Recommended Settings for Cooling
Vehicle with automatic climate controlVehicle with manual climate control
Press the AUTO button.Adjust the fan speed to the centersetting.1
Adjust the temperature control to thedesired setting. Use 72°F (22°C) as astarting point, then adjust the setting asnecessary.
Adjust the temperature control to themidway point of the cold settings.2
Select the instrument panel air ventsusing the air distribution buttons.3
Side Window Defogging in Cold Weather
Vehicle with automatic climate controlVehicle with manual climate control
Press the defrost button.Select the windshield air vents using theair distribution buttons.1
Adjust the temperature control to thedesired setting. Use 72°F (22°C) as astarting point, then adjust the setting asnecessary.
Press the A/C button.2
Adjust the temperature control to thedesired setting.3
Adjust the fan speed to the highestsetting.4
119
Expedition (TB7) Canada/United States of America, enUSA, First Printing
Climate Control
Page 126 of 421
WARNINGS
Install the head restraint properly tohelp minimize the risk of neck injuryin the event of a crash.
Note:Adjust the seatback to an uprightdriving position before adjusting the headrestraint. Adjust the head restraint so thatthe top of it is level with the top of your headand as far forward as possible. Make surethat you remain comfortable. If you areextremely tall, adjust the head restraint toits highest position.
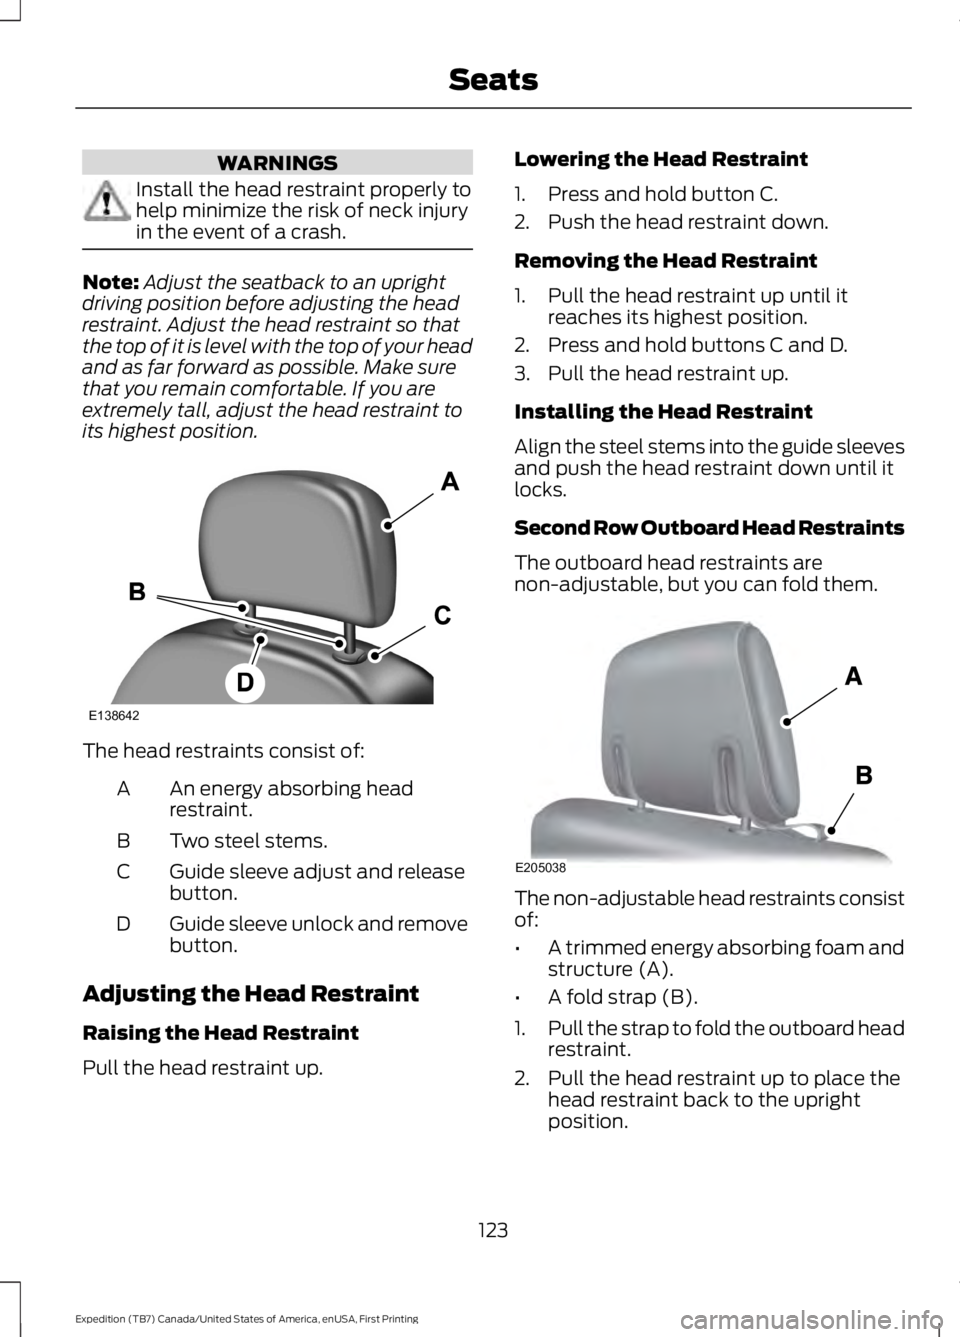
The head restraints consist of:
An energy absorbing headrestraint.A
Two steel stems.B
Guide sleeve adjust and releasebutton.C
Guide sleeve unlock and removebutton.D
Adjusting the Head Restraint
Raising the Head Restraint
Pull the head restraint up.
Lowering the Head Restraint
1. Press and hold button C.
2. Push the head restraint down.
Removing the Head Restraint
1. Pull the head restraint up until itreaches its highest position.
2. Press and hold buttons C and D.
3. Pull the head restraint up.
Installing the Head Restraint
Align the steel stems into the guide sleevesand push the head restraint down until itlocks.
Second Row Outboard Head Restraints
The outboard head restraints arenon-adjustable, but you can fold them.
The non-adjustable head restraints consistof:
•A trimmed energy absorbing foam andstructure (A).
•A fold strap (B).
1.Pull the strap to fold the outboard headrestraint.
2. Pull the head restraint up to place thehead restraint back to the uprightposition.
123
Expedition (TB7) Canada/United States of America, enUSA, First Printing
SeatsE138642 E205038
Page 136 of 421
To return the seatback to its originalposition, lift the seatback until it latchesinto place.
PowerFold™ Third Row Seat (If
Equipped)
Note:The power fold down seats operatefor 10 minutes after you switch the ignitionoff. The transmission must be in park (P)and the liftgate, or liftgate glass must beopen. Similar to the battery saver feature,the power third row seat disables 10 minutesafter you switch the ignition off.
Note:Be sure that the head restraints arefolded down before powering the third rowseat down.
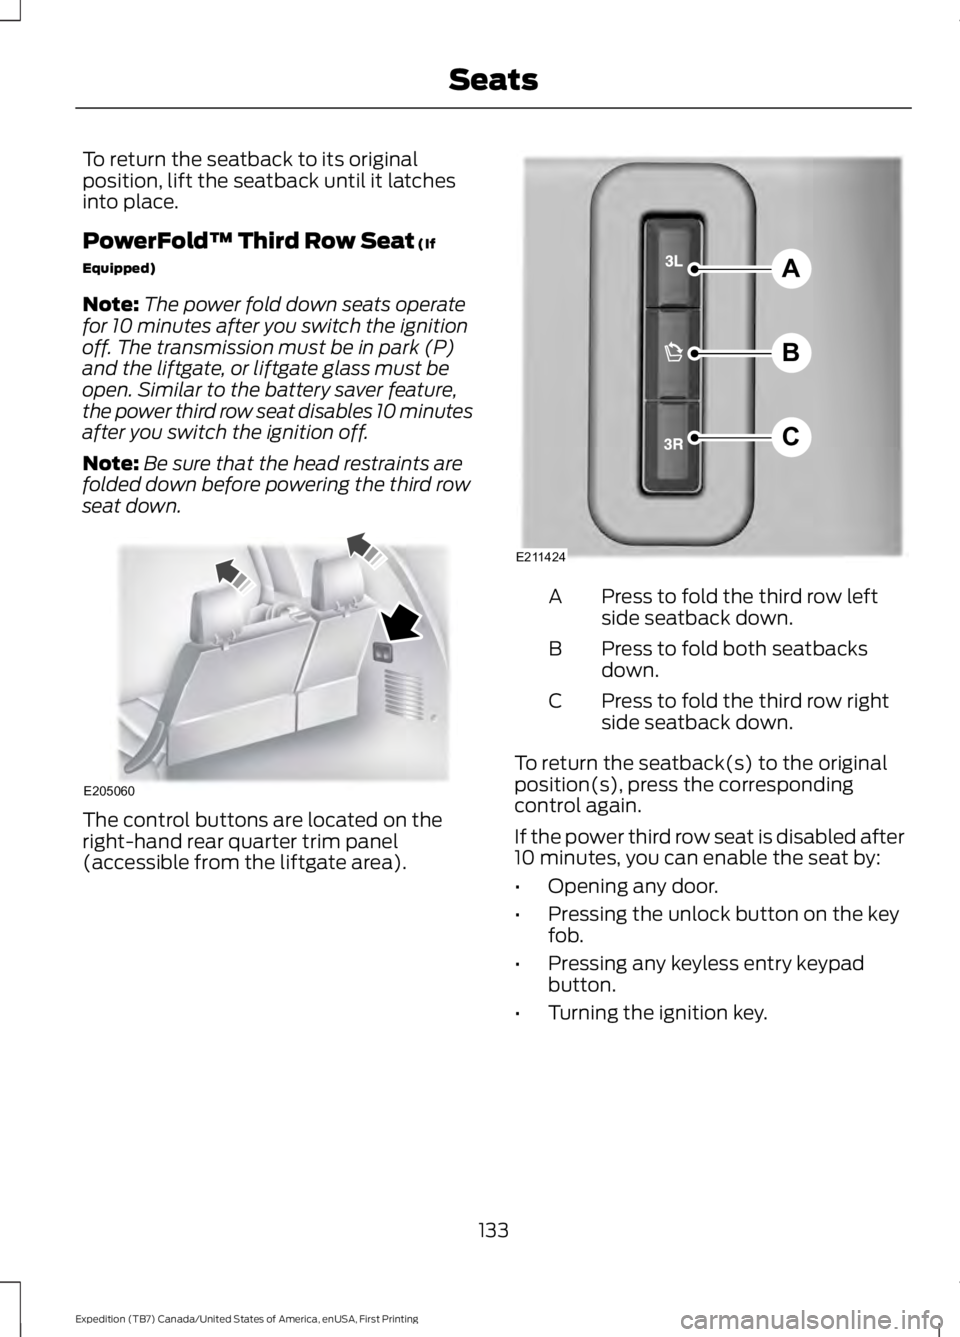
The control buttons are located on theright-hand rear quarter trim panel(accessible from the liftgate area).
Press to fold the third row leftside seatback down.A
Press to fold both seatbacksdown.B
Press to fold the third row rightside seatback down.C
To return the seatback(s) to the originalposition(s), press the correspondingcontrol again.
If the power third row seat is disabled after10 minutes, you can enable the seat by:
•Opening any door.
•Pressing the unlock button on the keyfob.
•Pressing any keyless entry keypadbutton.
•Turning the ignition key.
133
Expedition (TB7) Canada/United States of America, enUSA, First Printing
SeatsE205060 A
B
C
E211424
Page 140 of 421
HomeLink Wireless ControlSystem
WARNINGS
Make sure that the garage door andsecurity device are free fromobstruction when you areprogramming. Do not program the systemwith the vehicle in the garage.
Do not use the system with anygarage door opener that does nothave the safety stop and reversefeature as required by U.S. Federal SafetyStandards (this includes any garage dooropener manufactured before April 1, 1982).A garage door opener which cannot detectan object, signaling the door to stop andreverse, does not meet current federalsafety standards. Using a garage dooropener without these features increasesthe risk of serious injury or death.
Note:Make sure you keep the originalremote control transmitter for use in othervehicles as well as for future systemprogramming.
Note:We recommend that upon the saleor lease termination of your vehicle, youerase the programmed function buttons forsecurity reasons. See Erasing the FunctionButton Codes.
Note:You can program a maximum ofthree devices. To change or replace any ofthe three devices after it has been initiallyprogrammed, you must first erase thecurrent settings. See Erasing the FunctionButton Codes.
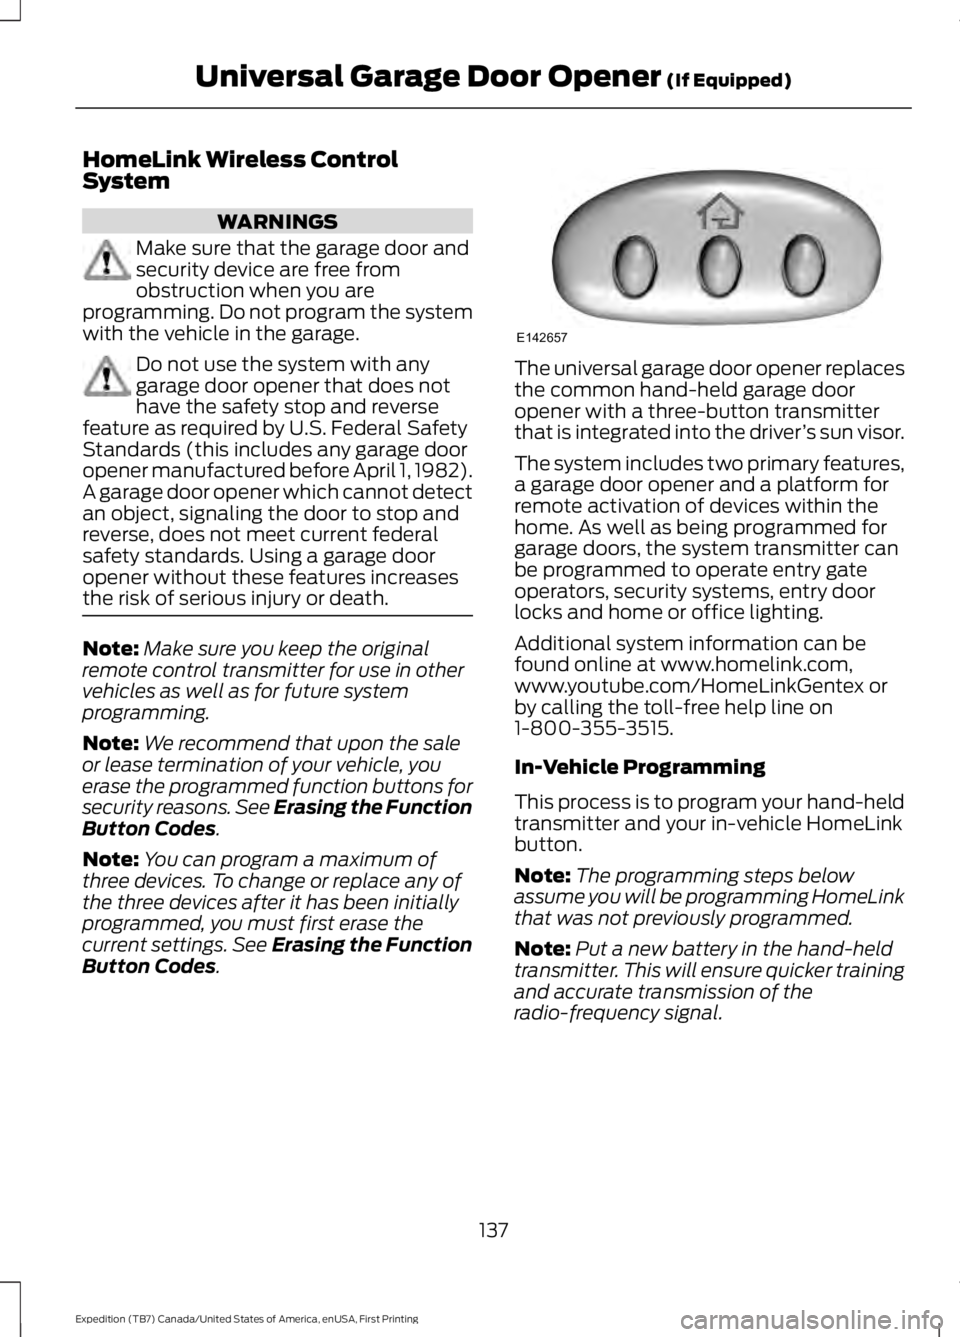
The universal garage door opener replacesthe common hand-held garage dooropener with a three-button transmitterthat is integrated into the driver’s sun visor.
The system includes two primary features,a garage door opener and a platform forremote activation of devices within thehome. As well as being programmed forgarage doors, the system transmitter canbe programmed to operate entry gateoperators, security systems, entry doorlocks and home or office lighting.
Additional system information can befound online at www.homelink.com,www.youtube.com/HomeLinkGentex orby calling the toll-free help line on1-800-355-3515.
In-Vehicle Programming
This process is to program your hand-heldtransmitter and your in-vehicle HomeLinkbutton.
Note:The programming steps belowassume you will be programming HomeLinkthat was not previously programmed.
Note:Put a new battery in the hand-heldtransmitter. This will ensure quicker trainingand accurate transmission of theradio-frequency signal.
137
Expedition (TB7) Canada/United States of America, enUSA, First Printing
Universal Garage Door Opener (If Equipped)E142657
Page 141 of 421
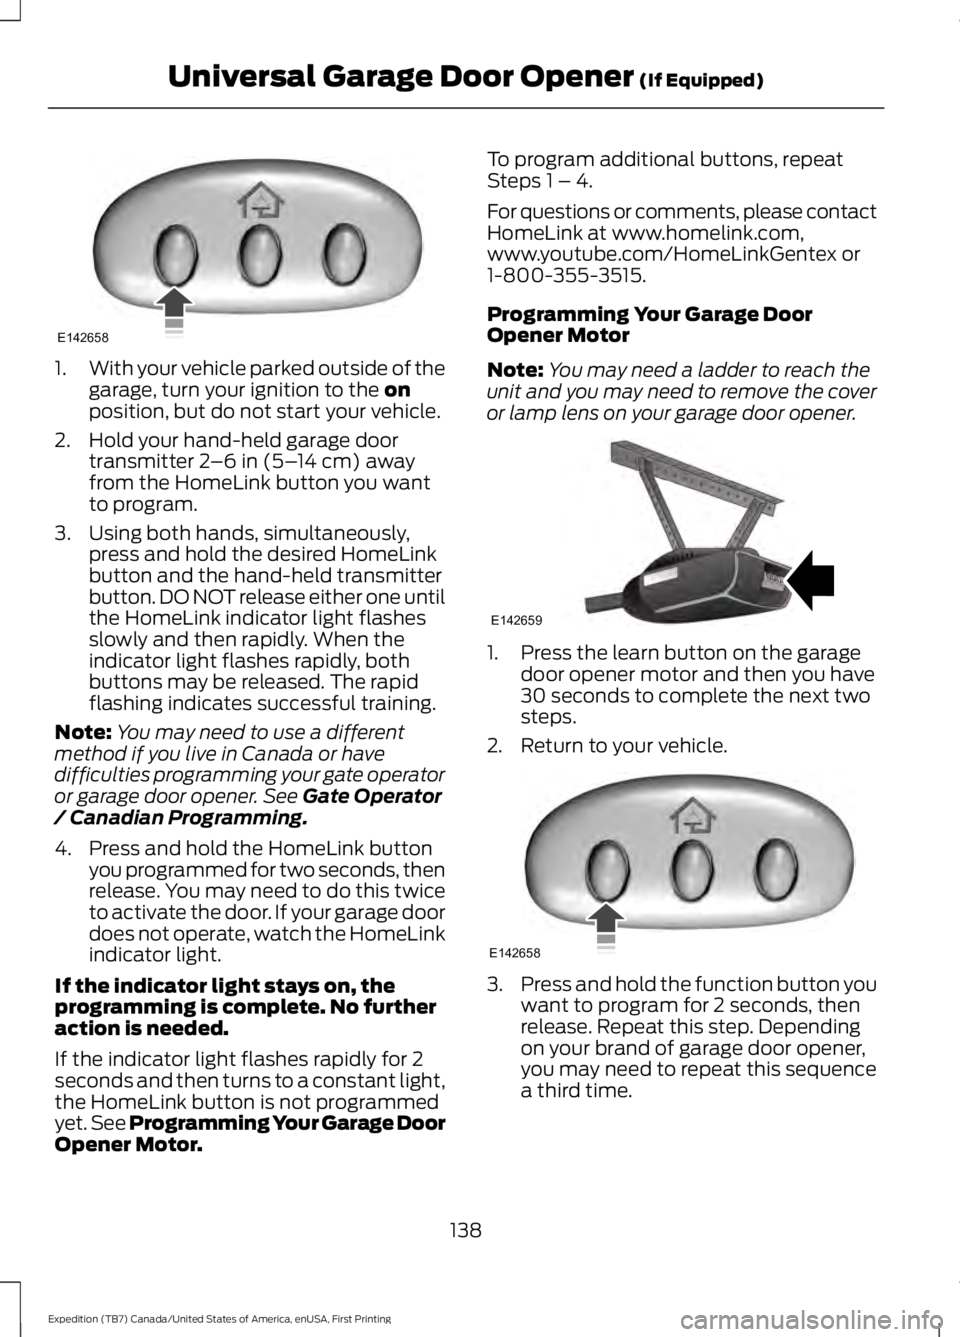
1.With your vehicle parked outside of thegarage, turn your ignition to the onposition, but do not start your vehicle.
2. Hold your hand-held garage doortransmitter 2–6 in (5–14 cm) awayfrom the HomeLink button you wantto program.
3. Using both hands, simultaneously,press and hold the desired HomeLinkbutton and the hand-held transmitterbutton. DO NOT release either one untilthe HomeLink indicator light flashesslowly and then rapidly. When theindicator light flashes rapidly, bothbuttons may be released. The rapidflashing indicates successful training.
Note:You may need to use a differentmethod if you live in Canada or havedifficulties programming your gate operatoror garage door opener. See Gate Operator/ Canadian Programming.
4. Press and hold the HomeLink buttonyou programmed for two seconds, thenrelease. You may need to do this twiceto activate the door. If your garage doordoes not operate, watch the HomeLinkindicator light.
If the indicator light stays on, theprogramming is complete. No furtheraction is needed.
If the indicator light flashes rapidly for 2seconds and then turns to a constant light,the HomeLink button is not programmedyet. See Programming Your Garage DoorOpener Motor.
To program additional buttons, repeatSteps 1 – 4.
For questions or comments, please contactHomeLink at www.homelink.com,www.youtube.com/HomeLinkGentex or1-800-355-3515.
Programming Your Garage DoorOpener Motor
Note:You may need a ladder to reach theunit and you may need to remove the coveror lamp lens on your garage door opener.
1. Press the learn button on the garagedoor opener motor and then you have30 seconds to complete the next twosteps.
2. Return to your vehicle.
3.Press and hold the function button youwant to program for 2 seconds, thenrelease. Repeat this step. Dependingon your brand of garage door opener,you may need to repeat this sequencea third time.
138
Expedition (TB7) Canada/United States of America, enUSA, First Printing
Universal Garage Door Opener (If Equipped)E142658 E142659 E142658