2016 FORD EXPEDITION EL light
[x] Cancel search: lightPage 299 of 421

11.Set all four tires to the recommendedair pressure as indicated on theSafety Compliance CertificationLabel (affixed to either the door hingepillar, door-latch post, or the dooredge that meets the door-latch post,next to the driver's seating position)or Tire Label located on the B-Pillaror the edge of the driver's door.
CHANGING A ROAD WHEEL
WARNINGS
The use of tire sealant may damageyour tire pressure monitoring systemand should only be used in roadsideemergencies. If you must use a sealant, theFord Tire Mobility Kit sealant should beused. The tire pressure monitoring systemsensor and valve stem on the wheel mustbe replaced by an authorized dealer afteruse of the sealant.
If the tire pressure monitor sensorbecomes damaged, it will no longerfunction. See Tire PressureMonitoring System (page 290).
Note:The tire pressure monitoring systemindicator light will illuminate when the sparetire is in use. To restore the full function ofthe monitoring system, all road wheelsequipped with tire pressure monitoringsensors must be mounted on this vehicle.
If you get a flat tire while driving, do notapply the brake heavily. Instead, graduallydecrease your speed. Hold the steeringwheel firmly and slowly move to a safeplace on the side of the road.
Have a flat serviced by an authorizeddealer in order to prevent damage to thesystem sensors See Tire PressureMonitoring System (page 290). Replacethe spare tire with a road tire as soon aspossible. During repairing or replacing ofthe flat tire, have the authorized dealerinspect the system sensor for damage.
Dissimilar Spare Wheel and TireAssembly Information
WARNING
Failure to follow these guidelinescould result in an increased risk ofloss of vehicle control, injury or death.
If you have a dissimilar spare wheel andtire, then it is intended for temporary useonly. This means that if you need to use it,you should replace it as soon as possiblewith a road wheel and tire assembly thatis the same size and type as the road tiresand wheels that were originally providedby Ford. If the dissimilar spare tire or wheelis damaged, it should be replaced ratherthan repaired.
A dissimilar spare wheel and tire assemblyis defined as a spare wheel and tireassembly that is different in brand, size orappearance from the road tires and wheelsand can be one of three types:
1.T-type mini-spare: This spare tirebegins with the letter T for tire size andmay have Temporary Use Only molded inthe sidewall.
2.Full-size dissimilar spare with labelon wheel: This spare tire has a label onthe wheel that states: THIS WHEEL ANDTIRE ASSEMBLY FOR TEMPORARY USEONLY
296
Expedition (TB7) Canada/United States of America, enUSA, First Printing
Wheels and Tires
Page 302 of 421
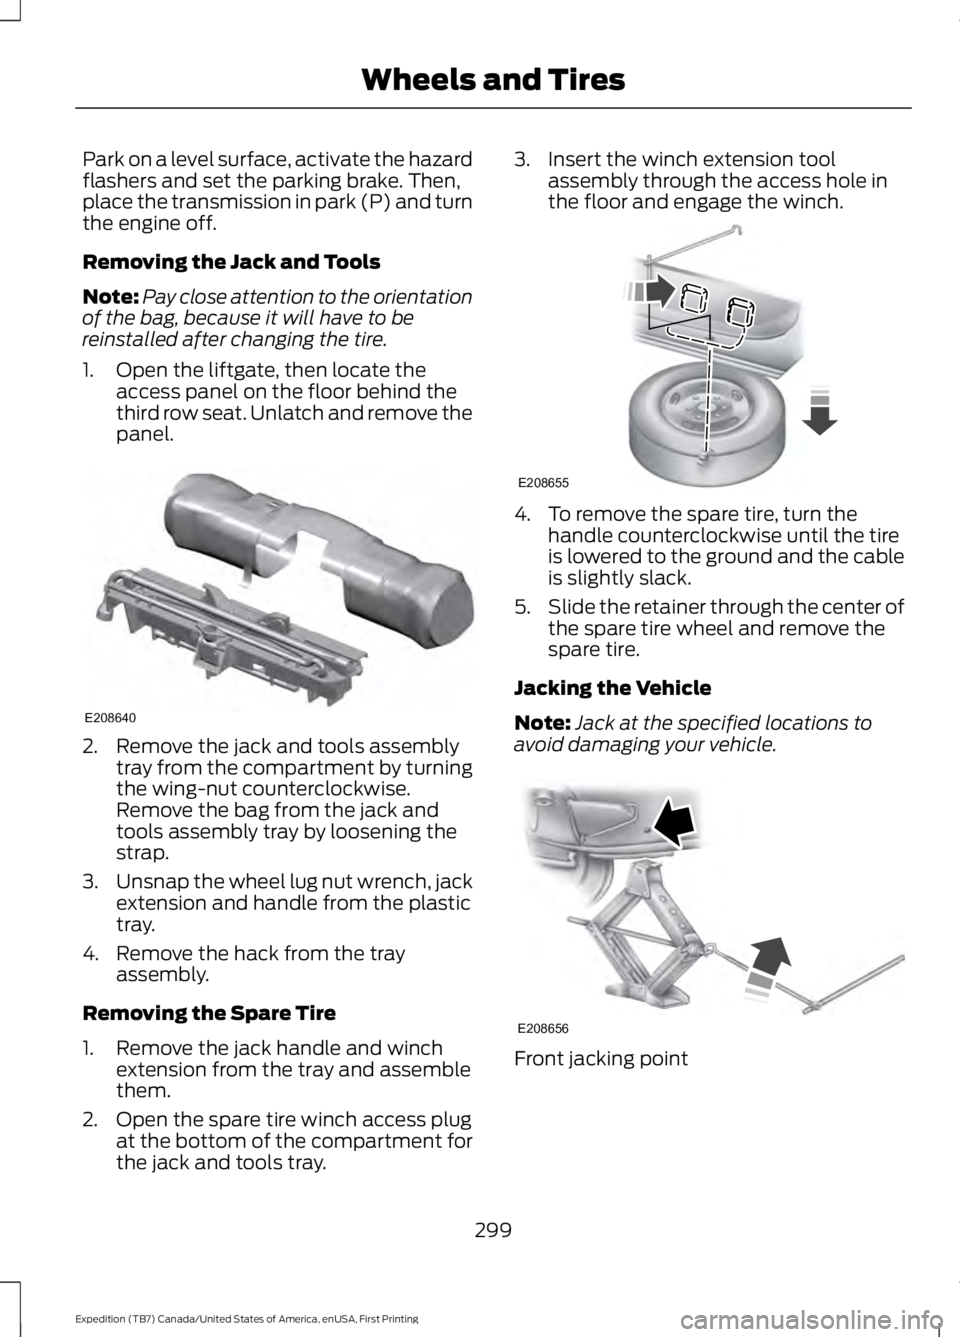
Park on a level surface, activate the hazardflashers and set the parking brake. Then,place the transmission in park (P) and turnthe engine off.
Removing the Jack and Tools
Note:Pay close attention to the orientationof the bag, because it will have to bereinstalled after changing the tire.
1. Open the liftgate, then locate theaccess panel on the floor behind thethird row seat. Unlatch and remove thepanel.
2. Remove the jack and tools assemblytray from the compartment by turningthe wing-nut counterclockwise.Remove the bag from the jack andtools assembly tray by loosening thestrap.
3.Unsnap the wheel lug nut wrench, jackextension and handle from the plastictray.
4. Remove the hack from the trayassembly.
Removing the Spare Tire
1. Remove the jack handle and winchextension from the tray and assemblethem.
2. Open the spare tire winch access plugat the bottom of the compartment forthe jack and tools tray.
3. Insert the winch extension toolassembly through the access hole inthe floor and engage the winch.
4. To remove the spare tire, turn thehandle counterclockwise until the tireis lowered to the ground and the cableis slightly slack.
5.Slide the retainer through the center ofthe spare tire wheel and remove thespare tire.
Jacking the Vehicle
Note:Jack at the specified locations toavoid damaging your vehicle.
Front jacking point
299
Expedition (TB7) Canada/United States of America, enUSA, First Printing
Wheels and TiresE208640 E208655 E208656
Page 315 of 421

GENERAL INFORMATION
Radio Frequencies and ReceptionFactors
AM and FM frequencies are established bythe Federal Communications Commission(FCC) and the Canadian Radio andTelecommunications Commission (CRTC).Those frequencies are:
•AM: 530, 540-1700, 1710 kHz
•FM: 87.9-107.7, 107.9 MHz
Radio Reception Factors
The further you travel from an AM or FM station, theweaker the signal and the weaker the reception.Distance and strength
Hills, mountains, tall buildings, bridges, tunnels, freewayoverpasses, parking garages, dense tree foliage andthunderstorms can interfere with the reception.
Terrain
When you pass a ground-based broadcast repeatingtower, a stronger signal may overtake a weaker one andresult in the audio system muting.
Station overload
CD and CD Player Information
Note:CD units play commercially pressed4.75-inch (12 centimeter) audio compactdiscs only. Due to technical incompatibility,certain recordable and re-recordablecompact discs may not function correctlywhen used in Ford CD players.
Note:Do not insert CDs with homemadepaper (adhesive) labels into the CD playeras the label may peel and cause the CD tobecome jammed. You should use apermanent felt tip marker rather thanadhesive labels on your homemade CDs.Ballpoint pens may damage CDs. Pleasecontact an authorized dealer for furtherinformation.
Note:Do not use any irregularly shapeddiscs or discs with a scratch protection filmattached.
Always handle discs by their edges only.Clean the disc with an approved CDcleaner only. Wipe it from the center of thedisc toward the edge. Do not clean in acircular motion.
Do not expose discs to direct sunlight orheat sources for extended periods.
MP3 and WMA Track and FolderStructure
Audio systems capable of recognizing andplaying MP3 and WMA individual tracksand folder structures work as follows:
•There are two different modes for MP3and WMA disc playback: MP3 andWMA track mode (system default) andMP3 and WMA folder mode.
•MP3 and WMA track mode ignores anyfolder structure on the MP3 and WMAdisc. The player numbers each MP3and WMA track on the disc (noted bythe MP3 or WMA file extension) fromT001 to a maximum of T255. Themaximum number of playable MP3 andWMA files may be less depending onthe structure of the CD and exactmodel of radio present.
312
Expedition (TB7) Canada/United States of America, enUSA, First Printing
Audio System
Page 320 of 421
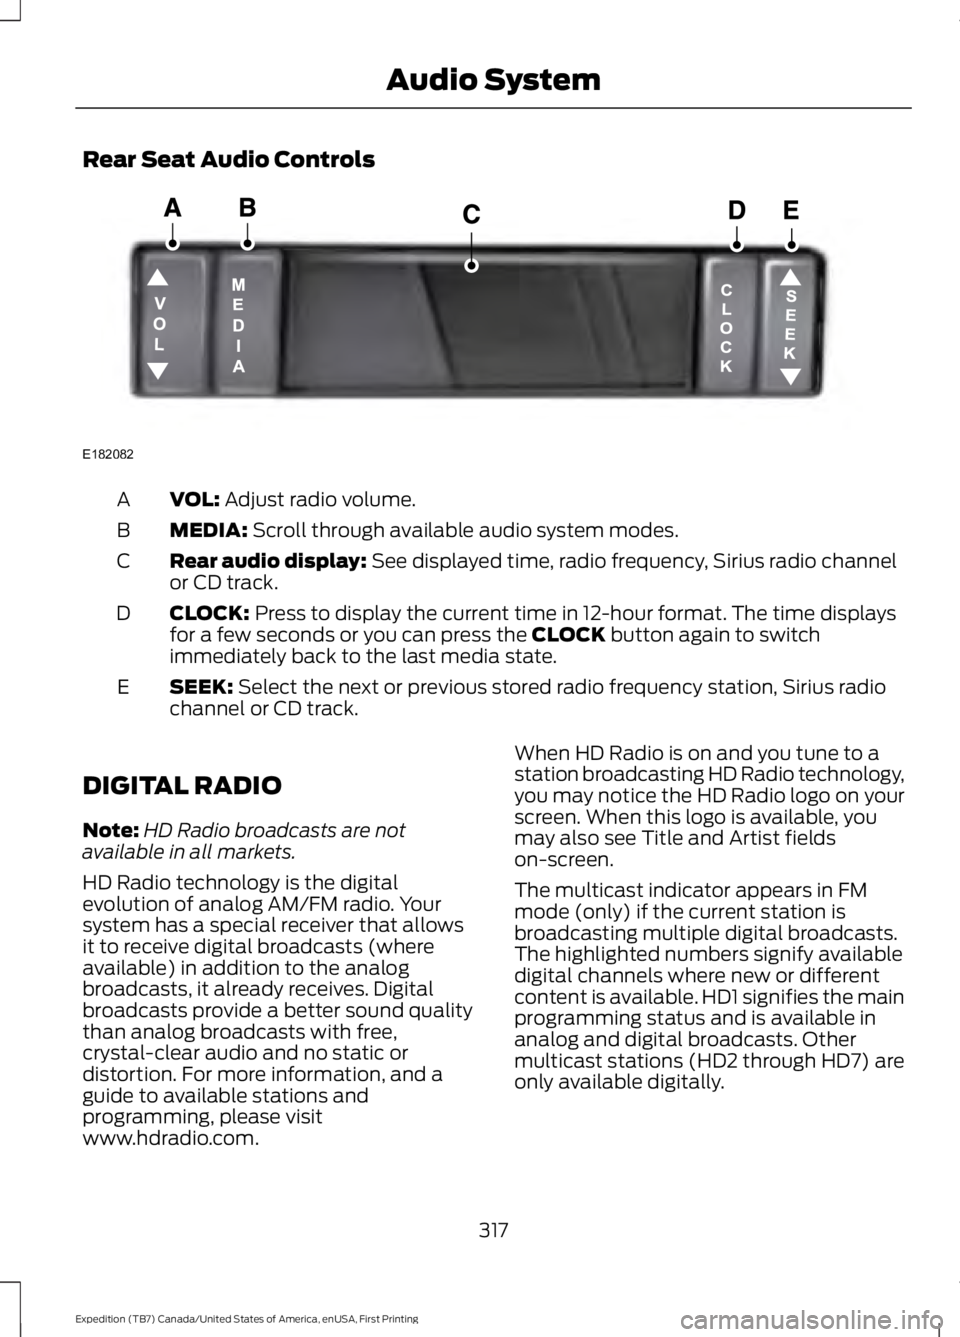
Rear Seat Audio Controls
VOL: Adjust radio volume.A
MEDIA: Scroll through available audio system modes.B
Rear audio display: See displayed time, radio frequency, Sirius radio channelor CD track.C
CLOCK: Press to display the current time in 12-hour format. The time displaysfor a few seconds or you can press the CLOCK button again to switchimmediately back to the last media state.
D
SEEK: Select the next or previous stored radio frequency station, Sirius radiochannel or CD track.E
DIGITAL RADIO
Note:HD Radio broadcasts are notavailable in all markets.
HD Radio technology is the digitalevolution of analog AM/FM radio. Yoursystem has a special receiver that allowsit to receive digital broadcasts (whereavailable) in addition to the analogbroadcasts, it already receives. Digitalbroadcasts provide a better sound qualitythan analog broadcasts with free,crystal-clear audio and no static ordistortion. For more information, and aguide to available stations andprogramming, please visitwww.hdradio.com.
When HD Radio is on and you tune to astation broadcasting HD Radio technology,you may notice the HD Radio logo on yourscreen. When this logo is available, youmay also see Title and Artist fieldson-screen.
The multicast indicator appears in FMmode (only) if the current station isbroadcasting multiple digital broadcasts.The highlighted numbers signify availabledigital channels where new or differentcontent is available. HD1 signifies the mainprogramming status and is available inanalog and digital broadcasts. Othermulticast stations (HD2 through HD7) areonly available digitally.
317
Expedition (TB7) Canada/United States of America, enUSA, First Printing
Audio SystemE182082
Page 321 of 421

When HD Radio broadcasts are active, youcan access the following functions:
•Scan allows you to hear a briefsampling of all available stations. Thisfeature still works when HD Radioreception is on, although it does notscan for HD2-HD7 channels. You maysee the HD logo appear if the stationhas a digital broadcast.
•Memory presets allow you to save anactive channel as a memory preset.Touch and hold a memory preset slotuntil the sound returns. There is a briefmute while the radio saves the station.Sound returns when finished. Whenswitching to an HD2 or HD3 memorypreset, the sound mutes before thedigital audio plays, because the systemhas to reacquire the digital signal.
Note:As with any saved radio station, youcannot access the saved station if yourvehicle is outside the station’s receptionarea.
HD Radio Reception and Station Troubleshooting
Potential reception issues
If you are listening to a multicast station and you are onthe fringe of the reception area, the station may mute dueto weak signal strength.
Reception area
If you are listening to HD1, the system switches back tothe analog broadcast until the digital broadcast is availableagain. However, if you are listening to any of the possibleHD2-HD7 multicast channels, the station mutes and staysmuted unless it is able to connect to the digital signalagain.
When the system first receives a station (aside from HD2-HD7 multicast stations), it first plays the station in theanalog version. Once the receiver verifies the station is anHD Radio station, it shifts to the digital version. Dependingon the station quality, you may hear a slight sound changewhen the station changes from analog to digital. Blendingis the shift from analog to digital sound or digital back toanalog sound.
Station blending
In order to provide the best possibleexperience, use the contact form to reportany station issues found while listening toa station broadcasting with HD Radiotechnology. Independent entities own andoperate each station. These stations areresponsible for ensuring all audio streamsand data fields are accurate.
318
Expedition (TB7) Canada/United States of America, enUSA, First Printing
Audio System
Page 377 of 421
Check every month
Engine oil level.
Function of all interior and exterior lights.
Tires (including spare) for wear and proper pressure.
Windshield washer fluid level.
Check every six months
Battery connections. Clean if necessary.
Body and door drain holes for obstructions. Clean if necessary.
Cooling system fluid level and coolant strength.
Door weatherstrips for wear. Lubricate if necessary.
Hinges, latches and outside locks for proper operation. Lubricate if necessary.
Parking brake for proper operation.
Safety belts and seat latches for wear and function.
Safety warning lamps (brake, ABS, airbag and safety belt) for operation.
Washer spray and wiper operation. Clean or replace blades as necessary.
Multi-Point Inspection
In order to keep your vehicle running right,it is important to have the systems on yourvehicle checked regularly. This can helpidentify potential issues and prevent majorproblems. We recommend having thefollowing multi-point inspection performedat every scheduled maintenance intervalto help make sure your vehicle keepsrunning great.
374
Expedition (TB7) Canada/United States of America, enUSA, First Printing
Scheduled Maintenance
Page 383 of 421
Normal Vehicle Axle Maintenance
Rear axles and power take-off units withsynthetic fluid and light-duty trucksequipped with Ford-design axles arelubricated for life; do not check or changefluid unless a leak is suspected, service isrequired or the assembly has beensubmerged in water. During long periodsof trailer towing with outside temperaturesabove 70°F (21°C) and at wide-openthrottle for long periods above 45 mph(72 km/h), change non-synthetic rear axlefluid every 3,000 mi (4,800 km) or threemonths, whichever comes first. Thisinterval can be waived if the axle is filledwith 75W140 synthetic gear fluid meetingFord specification WSL-M2C192-A, partnumber F1TZ-19580-B, or equivalent. Addfriction modifier XL-3 (EST-M2C118-A) orequivalent for complete refill ofTraction-Lok rear axles.
Axle Maintenance
Change the axle fluid anytime an axle issubmerged in water.
California Fuel Filter Replacement
If you register your vehicle in California, theCalifornia Air Resources Board hasdetermined that the failure to perform thismaintenance item does not nullify theemission warranty or limit recall liabilitybefore the completion of your vehicle'suseful life. Ford Motor Company, however,urges you to have all recommendedmaintenance services performed at thespecified intervals and to record all vehicleservice.
Hot Climate Oil Change Intervals
Vehicles operating in the Middle East,North Africa, Sub-Saharan Africa orlocations with similar climates using anAmerican Petroleum Institute (API)Certified for Gasoline Engines (Certificationmark) oil of SM or SN quality, the normaloil change interval is 3,000 mi (4,800 km).
If the available API SM or SN oils are notavailable, then the oil change interval is1,800 mi (2,900 km).
Engine Air Filter Replacement
The life of the engine air filter is dependenton exposure to dusty and dirty conditions.Vehicles operated in these conditionsrequire frequent inspection andreplacement of the engine air filter.
380
Expedition (TB7) Canada/United States of America, enUSA, First Printing
Scheduled Maintenance
Page 410 of 421
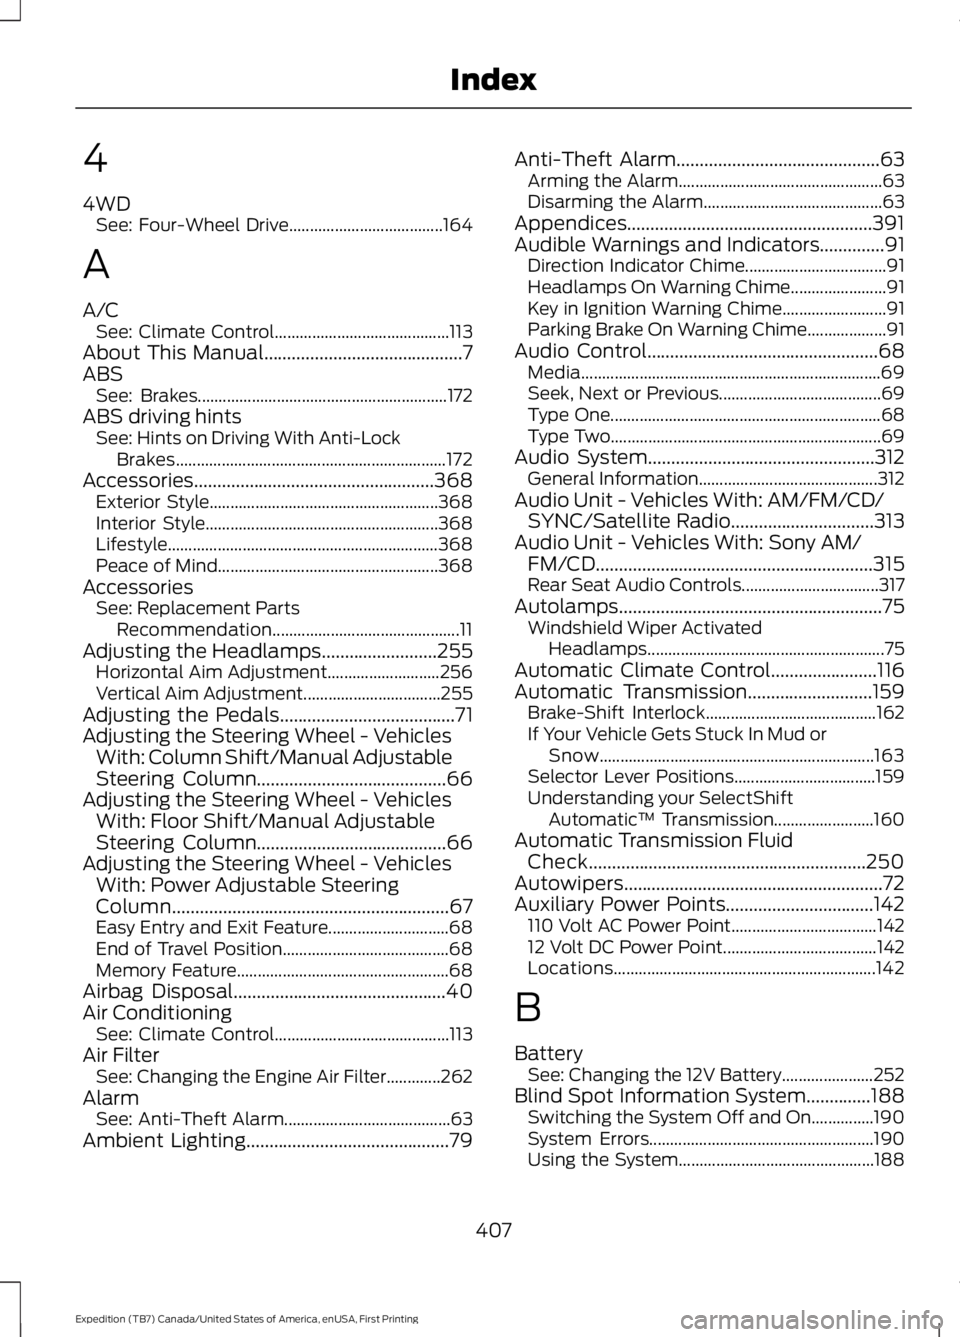
4
4WDSee: Four-Wheel Drive.....................................164
A
A/CSee: Climate Control..........................................113About This Manual...........................................7ABSSee: Brakes............................................................172ABS driving hintsSee: Hints on Driving With Anti-LockBrakes.................................................................172Accessories....................................................368Exterior Style.......................................................368Interior Style........................................................368Lifestyle.................................................................368Peace of Mind.....................................................368AccessoriesSee: Replacement PartsRecommendation.............................................11Adjusting the Headlamps.........................255Horizontal Aim Adjustment...........................256Vertical Aim Adjustment.................................255Adjusting the Pedals......................................71Adjusting the Steering Wheel - VehiclesWith: Column Shift/Manual AdjustableSteering Column.........................................66Adjusting the Steering Wheel - VehiclesWith: Floor Shift/Manual AdjustableSteering Column.........................................66Adjusting the Steering Wheel - VehiclesWith: Power Adjustable SteeringColumn............................................................67Easy Entry and Exit Feature.............................68End of Travel Position........................................68Memory Feature...................................................68Airbag Disposal..............................................40Air ConditioningSee: Climate Control..........................................113Air FilterSee: Changing the Engine Air Filter.............262AlarmSee: Anti-Theft Alarm........................................63Ambient Lighting............................................79
Anti-Theft Alarm............................................63Arming the Alarm.................................................63Disarming the Alarm...........................................63Appendices.....................................................391Audible Warnings and Indicators..............91Direction Indicator Chime..................................91Headlamps On Warning Chime.......................91Key in Ignition Warning Chime.........................91Parking Brake On Warning Chime...................91Audio Control..................................................68Media........................................................................69Seek, Next or Previous.......................................69Type One.................................................................68Type Two.................................................................69Audio System.................................................312General Information...........................................312Audio Unit - Vehicles With: AM/FM/CD/SYNC/Satellite Radio...............................313Audio Unit - Vehicles With: Sony AM/FM/CD............................................................315Rear Seat Audio Controls.................................317Autolamps.........................................................75Windshield Wiper ActivatedHeadlamps.........................................................75Automatic Climate Control.......................116Automatic Transmission...........................159Brake-Shift Interlock.........................................162If Your Vehicle Gets Stuck In Mud orSnow..................................................................163Selector Lever Positions..................................159Understanding your SelectShiftAutomatic™ Transmission........................160Automatic Transmission FluidCheck............................................................250Autowipers........................................................72Auxiliary Power Points................................142110 Volt AC Power Point...................................14212 Volt DC Power Point.....................................142Locations...............................................................142
B
BatterySee: Changing the 12V Battery......................252Blind Spot Information System..............188Switching the System Off and On...............190System Errors......................................................190Using the System...............................................188
407
Expedition (TB7) Canada/United States of America, enUSA, First Printing
Index