2016 FIAT TIPO 5DOORS STATION WAGON tire
[x] Cancel search: tirePage 60 of 240
ACTIVE SAFETY
SYSTEMS
The vehicle has the following active
safety systems:
ABS (Anti-lock Braking System);
DTC (Drag Torque Control);
ESC (Electronic Stability Control);
TC (Traction Control);
PBA (Panic Brake Assist);
HHC (Hill Hold Control);
ERM (Electronic Rollover Mitigation);
TSC (Trailer Sway Control).
For the operation of the systems, see
the following description.
ABS (Anti-lock Braking
System)
This system, which is an integral part of
the braking system, prevents one or
more wheels from locking and slipping
in all road surface conditions,
irrespective of the intensity of the
braking action, ensuring that the vehicle
can be controlled even during
emergency braking and optimising
stopping distances.
The system intervenes during braking
when the wheels are about to lock,
typically in emergency braking or
low-grip conditions, when locking may
be more frequent.
The system also improves control and
stability of the vehicle when braking ona surface where the grip of the left and
right wheels varies, or on corners.
The Electronic Braking Force
Distribution (EBD) system completes
the system allowing the brake force to
be distributed between the front and
rear wheels.
System intervention
The driver can feel that the ABS system
has come into action because the
brake pedal pulsates slightly and the
system gets noisier: this is entirely
normal with the system operating.
33) 34) 35) 36) 36) 38) 39)
DTC (Drag Torque
Control) SYSTEM
The system prevents the drive wheels
from possibly locking, which could
happen, for example, if the accelerator
pedal is released suddenly or in the
case of a sudden downshifting in
conditions of poor grip. In this
conditions, the engine braking effect
could cause the drive wheels to slip,
resulting in a loss of vehicle stability. In
these situations, the DTC system
intervenes, restoring torque to the
engine in order to conserve vehicle
stability and increase vehicle safety.
ESC (Electronic Stability
Control) SYSTEM
The ESC system improves the
directional control and stability of the
car in various driving conditions.
The ESC system corrects the vehicle’s
understeer and oversteer, distributing
the brake force on the wheels
appropriately. The torque supplied by
the engine can also be reduced in order
to maintain control of the vehicle.
The ESC system uses sensors installed
on the vehicle to determine the
trajectory that the driver intends to
follow and compares it with the
vehicle’s effective trajectory. When the
real trajectory deviates from the desired
trajectory, the ESC system intervenes to
counter the vehicle’s understeer or
oversteer.
Oversteer: occurs when the car is
turning more than it should according
to the angle of the steering wheel.
Understeer: occurs when the vehicle
is turning less than it should according
to the angle of the steering wheel.
System intervention
The intervention of the system is
indicated by the flashing of the
warning light on the instrument
panel, to inform the driver that the
vehicle is in critical stability and grip
conditions.
58
SAFETY
Page 68 of 240
each time tyre pressure is modified;
when even only one tyre is changed;
when tyres are rotated/inverted;
when the space-saver wheel is fitted.
Before carrying out the RESET
procedure, inflate the tyres to the rated
pressure values specified in the inflation
pressure table (see "Wheels" paragraph
in the "Technical specifications"
chapter).
If the RESET is not carried out, in all
above cases, the
warning light may
give false indications on one or more
tyres.
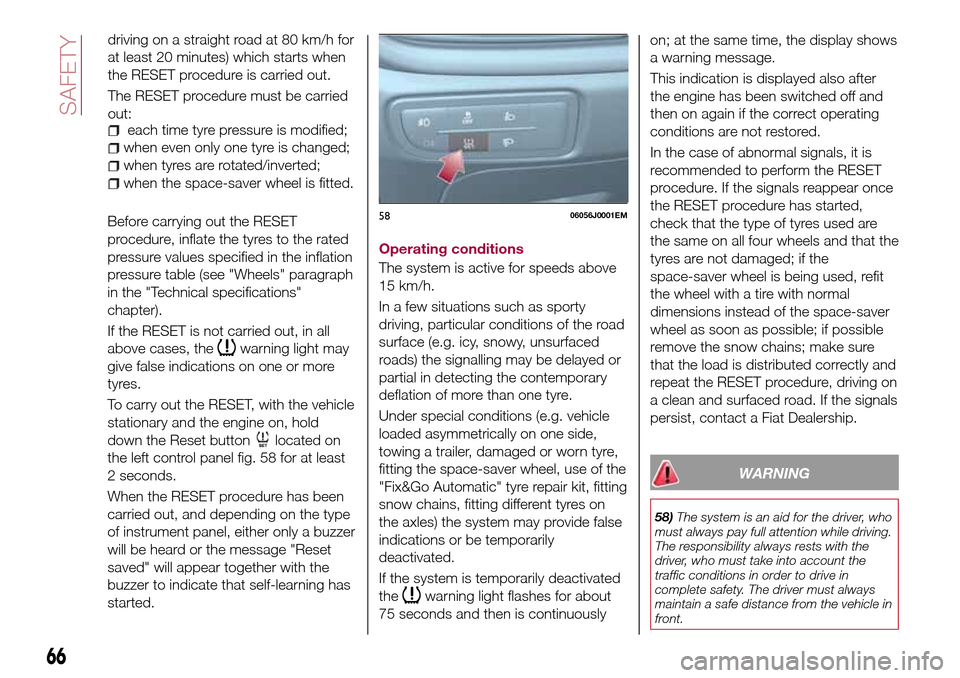
To carry out the RESET, with the vehicle
stationary and the engine on, hold
down the Reset button
located on
the left control panel fig. 58 for at least
2 seconds.
When the RESET procedure has been
carried out, and depending on the type
of instrument panel, either only a buzzer
will be heard or the message "Reset
saved" will appear together with the
buzzer to indicate that self-learning has
started.Operating conditions
The system is active for speeds above
15 km/h.
In a few situations such as sporty
driving, particular conditions of the road
surface (e.g. icy, snowy, unsurfaced
roads) the signalling may be delayed or
partial in detecting the contemporary
deflation of more than one tyre.
Under special conditions (e.g. vehicle
loaded asymmetrically on one side,
towing a trailer, damaged or worn tyre,
fitting the space-saver wheel, use of the
"Fix&Go Automatic" tyre repair kit, fitting
snow chains, fitting different tyres on
the axles) the system may provide false
indications or be temporarily
deactivated.
If the system is temporarily deactivated
the
warning light flashes for about
75 seconds and then is continuouslyon; at the same time, the display shows
a warning message.
This indication is displayed also after
the engine has been switched off and
then on again if the correct operating
conditions are not restored.
In the case of abnormal signals, it is
recommended to perform the RESET
procedure. If the signals reappear once
the RESET procedure has started,
check that the type of tyres used are
the same on all four wheels and that the
tyres are not damaged; if the
space-saver wheel is being used, refit
the wheel with a tire with normal
dimensions instead of the space-saver
wheel as soon as possible; if possible
remove the snow chains; make sure
that the load is distributed correctly and
repeat the RESET procedure, driving on
a clean and surfaced road. If the signals
persist, contact a Fiat Dealership.
WARNING
58)The system is an aid for the driver, who
must always pay full attention while driving.
The responsibility always rests with the
driver, who must take into account the
traffic conditions in order to drive in
complete safety. The driver must always
maintain a safe distance from the vehicle in
front.
5806056J0001EM
66
SAFETY
driving on a straight road at 80 km/h for
at least 20 minutes) which starts when
the RESET procedure is carried out.
The RESET procedure must be carried
out:
Page 72 of 240
SBR (SEAT BELT
REMINDER) SYSTEM
(for versions/markets, where provided)
The SBR system warns the passengers
of the front and rear (where provided)
seats if their seat belt is not fastened.
The system signals unfastened seat
belts with visual warnings (warning
lights on in the instrument panel and
symbols on the display) and an
acoustic signal (see the following
paragraphs).
NOTE To deactivate the acoustic
warning permanently go to a Fiat
Dealership. The acoustic warning can
be reactivated at any time through the
display menu (see the "Display"
paragraph in the "Knowing the
instrument panel" chapter).
Operation of front seat belt warning
light
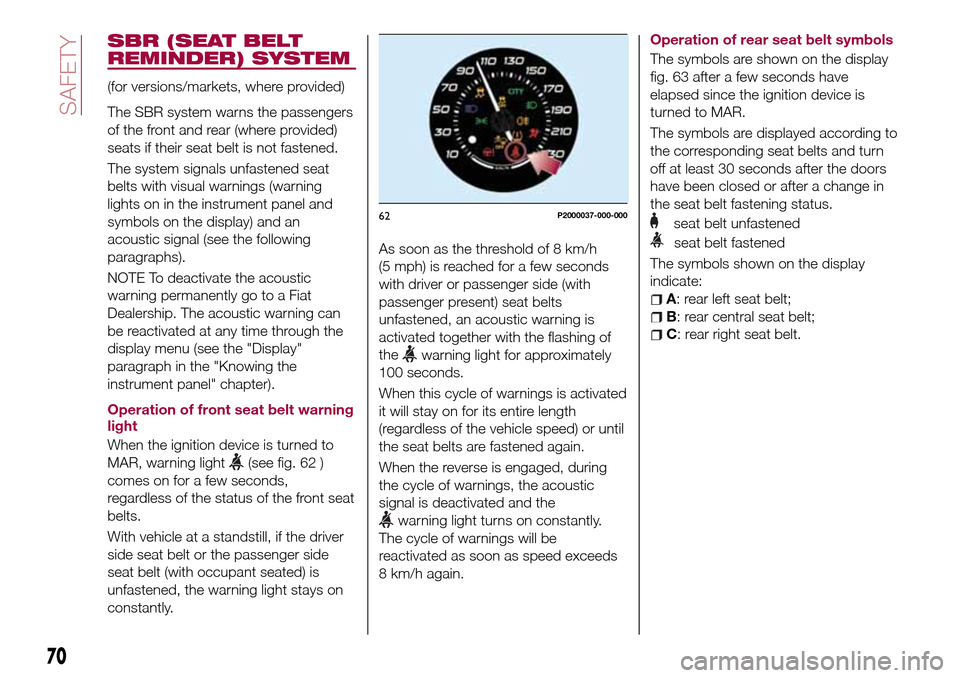
When the ignition device is turned to
MAR, warning light
(see fig. 62 )
comes on for a few seconds,
regardless of the status of the front seat
belts.
With vehicle at a standstill, if the driver
side seat belt or the passenger side
seat belt (with occupant seated) is
unfastened, the warning light stays on
constantly.As soon as the threshold of 8 km/h
(5 mph) is reached for a few seconds
with driver or passenger side (with
passenger present) seat belts
unfastened, an acoustic warning is
activated together with the flashing of
the
warning light for approximately
100 seconds.
When this cycle of warnings is activated
it will stay on for its entire length
(regardless of the vehicle speed) or until
the seat belts are fastened again.
When the reverse is engaged, during
the cycle of warnings, the acoustic
signal is deactivated and the
warning light turns on constantly.
The cycle of warnings will be
reactivated as soon as speed exceeds
8 km/h again.Operation of rear seat belt symbols
The symbols are shown on the display
fig. 63 after a few seconds have
elapsed since the ignition device is
turned to MAR.
The symbols are displayed according to
the corresponding seat belts and turn
off at least 30 seconds after the doors
have been closed or after a change in
the seat belt fastening status.
seat belt unfastened
seat belt fastened
The symbols shown on the display
indicate:
A: rear left seat belt;
B: rear central seat belt;
C: rear right seat belt.
62P2000037-000-000
70
SAFETY
Page 105 of 240
in mph) by pressing the accelerator
pedal. In this situation, the device does
not turn off automatically, but the
device’s functions are limited: it is
therefore recommended to turn it off.
CHANGING SPEED
Increasing speed
After having set the device, the stored
speed can be stored by holding the
SET + button pressed.
Press the SET + button once, the set
speed will increase by 1 km/h (or the
equivalent in mph). Each subsequent
touch of the button will increase the
speed by 1 km/h (or the equivalent
in mph).
Hold the SET + button down, the set
speed will increase in 10 km/h steps (or
the equivalent in mph) until the button is
released. The set speed increase is
shown on the display.
Decreasing speed
After having set the device, the stored
speed can be reduced by holding the
SET –. button down.
Press the SET – button once, the set
speed will decrease by 1 km/h (or the
equivalent in mph). Each subsequent
touch of the button will reduce the
speed by 1 km/h (or the equivalent
in mph).Hold the SET – button down, the set
speed will decrease in 10 km/h steps
(or the equivalent in mph) until the
button is released. The set speed
decrease is shown on the display.
IMPORTANT NOTES
By keeping the accelerator pedal
depressed, the vehicle can continue to
accelerate beyond the set speed. In this
case, press SET + (or SET–)tosetthe
speed to the current speed of the
vehicle.
When the SET – button is pressed to
reduce the speed, the braking system
intervenes automatically if the engine
brake does not slow the vehicle down
sufficiently to reach the set speed.
The device holds the set speed uphill
and downhill; however a slight variation
is entirely normal, particularly on slight
gradients.
Gears can be shifted during operation
of the device to allow to select the gear
suited to the set speed and keep the
device set. The device is cancelled
when you press and hold the clutch
pedal down or putting the gear lever in
the neutral position for more than a
certain time limit.
The device is switched off while driving
if the brakes overheat.
ACCELERATING WHEN
OVERTAKING
When driving with the device active and
following a vehicle, the device provides
additional acceleration to facilitate
overtaking, when travelling over a given
speed and switches on the left direction
indicator (of the right indicator for
right-hand drive versions).
In left-hand traffic, the overtaking assist
function is only active when the
left-hand lane is used for overtaking the
vehicle ahead (the opposite activation
logic is used in right-hand traffic
countries).
The device detects the direction of
traffic automatically when the vehicle
passes from left-hand traffic to
right-hand traffic. In this case, the
overtaking assist function is only active
when the reference vehicle is overtaken
on the right.
The additional acceleration is activated
when the driver uses the right direction
indicator.
In this condition, the device no longer
provides the overtaking assist function
on the left-hand side until it determines
that the vehicle has returned to
left-hand traffic conditions.
103
Page 130 of 240
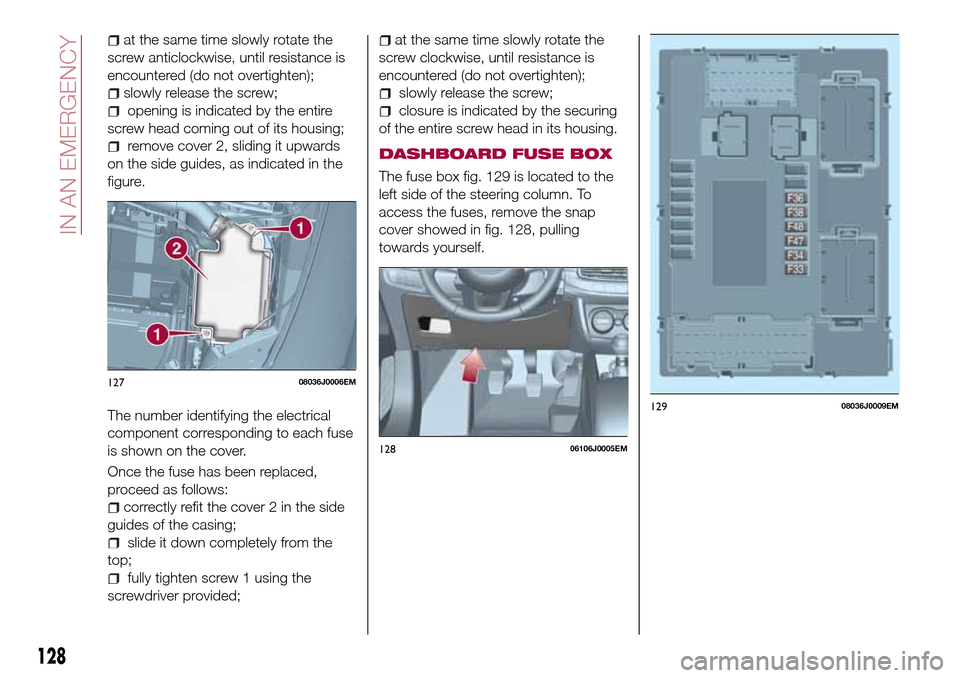
at the same time slowly rotate the
screw anticlockwise, until resistance is
encountered (do not overtighten);
slowly release the screw;
opening is indicated by the entire
screw head coming out of its housing;
remove cover 2, sliding it upwards
on the side guides, as indicated in the
figure.
The number identifying the electrical
component corresponding to each fuse
is shown on the cover.
Once the fuse has been replaced,
proceed as follows:
correctly refit the cover 2 in the side
guides of the casing;
slide it down completely from the
top;
fully tighten screw 1 using the
screwdriver provided;
at the same time slowly rotate the
screw clockwise, until resistance is
encountered (do not overtighten);
slowly release the screw;
closure is indicated by the securing
of the entire screw head in its housing.
DASHBOARD FUSE BOX
The fuse box fig. 129 is located to the
left side of the steering column. To
access the fuses, remove the snap
cover showed in fig. 128, pulling
towards yourself.
12708036J0006EM
12806106J0005EM
12908036J0009EM
128
IN AN EMERGENCY
Page 164 of 240
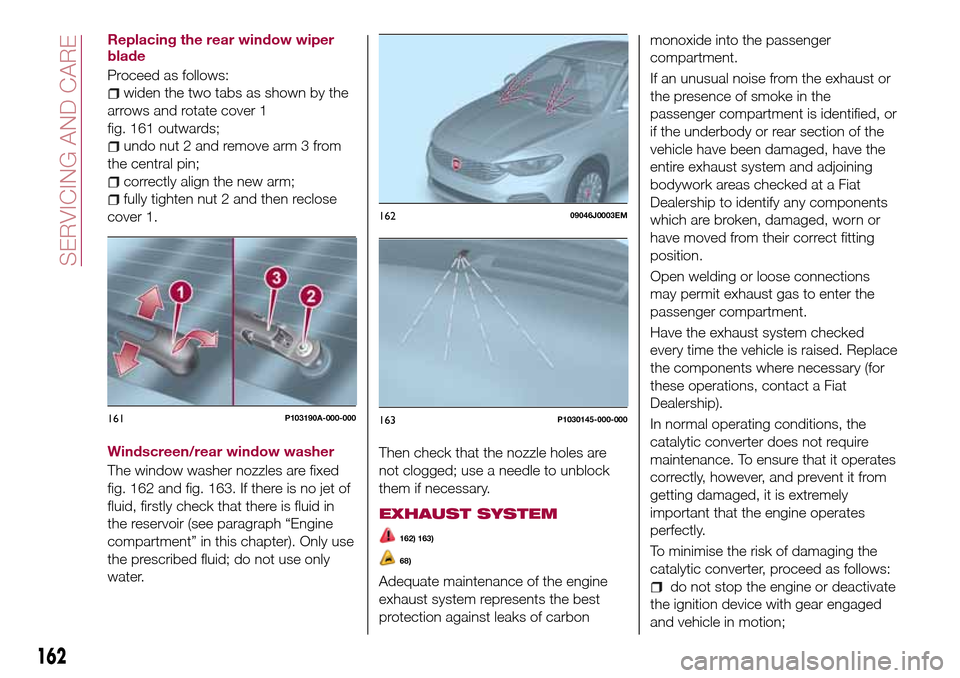
Replacing the rear window wiper
blade
Proceed as follows:
widen the two tabs as shown by the
arrows and rotate cover 1
fig. 161 outwards;
undo nut 2 and remove arm 3 from
the central pin;
correctly align the new arm;
fully tighten nut 2 and then reclose
cover 1.
Windscreen/rear window washer
The window washer nozzles are fixed
fig. 162 and fig. 163. If there is no jet of
fluid, firstly check that there is fluid in
the reservoir (see paragraph “Engine
compartment” in this chapter). Only use
the prescribed fluid; do not use only
water.Then check that the nozzle holes are
not clogged; use a needle to unblock
them if necessary.
EXHAUST SYSTEM
162) 163)
68)
Adequate maintenance of the engine
exhaust system represents the best
protection against leaks of carbonmonoxide into the passenger
compartment.
If an unusual noise from the exhaust or
the presence of smoke in the
passenger compartment is identified, or
if the underbody or rear section of the
vehicle have been damaged, have the
entire exhaust system and adjoining
bodywork areas checked at a Fiat
Dealership to identify any components
which are broken, damaged, worn or
have moved from their correct fitting
position.
Open welding or loose connections
may permit exhaust gas to enter the
passenger compartment.
Have the exhaust system checked
every time the vehicle is raised. Replace
the components where necessary (for
these operations, contact a Fiat
Dealership).
In normal operating conditions, the
catalytic converter does not require
maintenance. To ensure that it operates
correctly, however, and prevent it from
getting damaged, it is extremely
important that the engine operates
perfectly.
To minimise the risk of damaging the
catalytic converter, proceed as follows:do not stop the engine or deactivate
the ignition device with gear engaged
and vehicle in motion;
161P103190A-000-000
16209046J0003EM
163P1030145-000-000
162
SERVICING AND CARE
Page 176 of 240
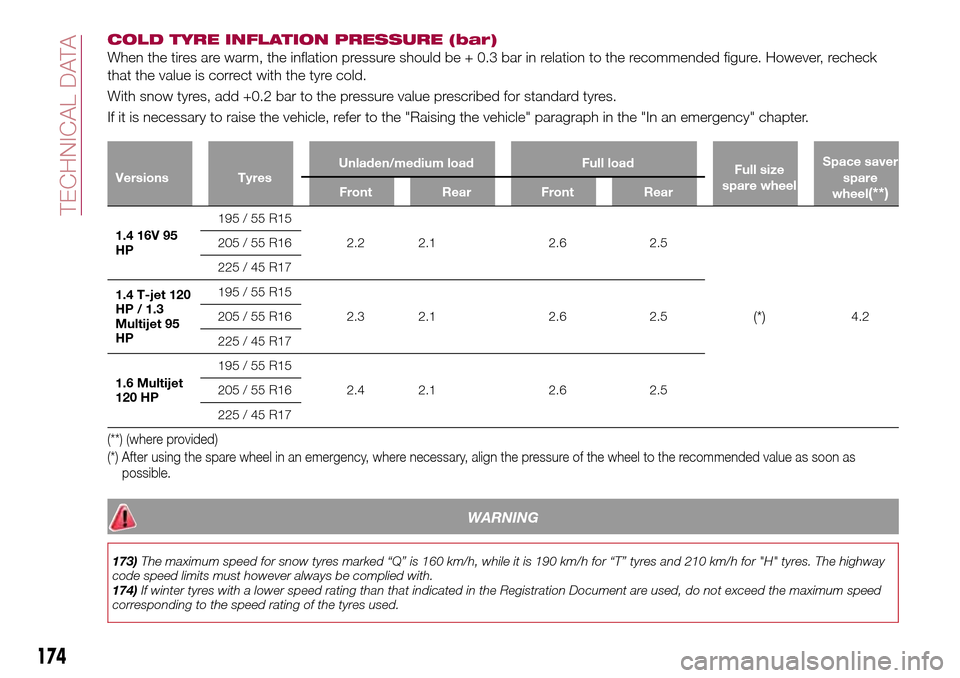
COLD TYRE INFLATION PRESSURE (bar)
When the tires are warm, the inflation pressure should be + 0.3 bar in relation to the recommended figure. However, recheck
that the value is correct with the tyre cold.
With snow tyres, add +0.2 bar to the pressure value prescribed for standard tyres.
If it is necessary to raise the vehicle, refer to the "Raising the vehicle" paragraph in the "In an emergency" chapter.
Versions TyresUnladen/medium load Full load
Full size
spare wheelSpace saver
spare
wheel(**)Front Rear Front Rear
1.4 16V 95
HP195 / 55 R15
2.2 2.1 2.6 2.5
(*)4.2 205 / 55 R16
225 / 45 R17
1.4 T-jet 120
HP / 1.3
Multijet 95
HP195 / 55 R15
2.3 2.1 2.6 2.5 205 / 55 R16
225 / 45 R17
1.6 Multijet
120 HP195 / 55 R15
2.4 2.1 2.6 2.5 205 / 55 R16
225 / 45 R17
(**) (where provided)
(*) After using the spare wheel in an emergency, where necessary, align the pressure of the wheel to the recommended value as soon as
possible.
WARNING
173)The maximum speed for snow tyres marked “Q” is 160 km/h, while it is 190 km/h for “T” tyres and 210 km/h for "H" tyres. The highway
code speed limits must however always be complied with.
174)If winter tyres with a lower speed rating than that indicated in the Registration Document are used, do not exceed the maximum speed
corresponding to the speed rating of the tyres used.
174
TECHNICAL DATA