2016 FIAT TIPO 5DOORS STATION WAGON tailgate
[x] Cancel search: tailgatePage 15 of 240
possible to start the engine, contact a
Fiat Dealership.
Activation of warning light while
driving
If thesymbol is displayed while
driving, this means that the system is
running a self-diagnosis (e.g. due to a
voltage drop).
If the display persists, contact a Fiat
Dealership.
DOORS
LOCKING / UNLOCKING
DOORS FROM THE
INSIDE
Automatic locking in motion
(where provided)
If all doors are closed properly, they will
automatically be locked once the
vehicle has exceeded 20 km/h
("Autoclose" function).
Manual locking/unlocking
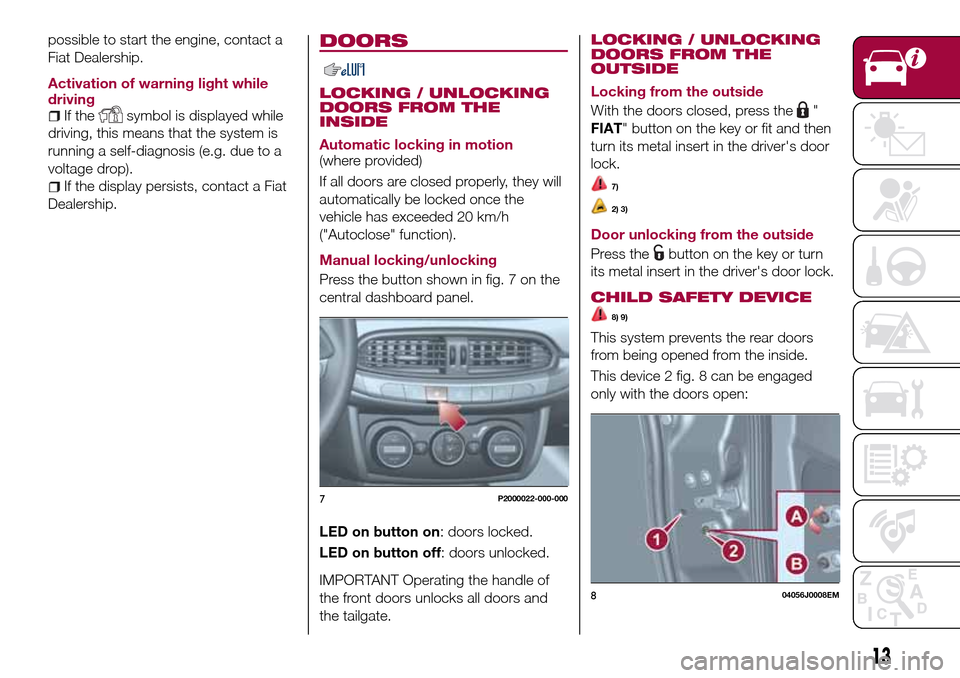
Press the button shown in fig. 7 on the
central dashboard panel.
LED on button on: doors locked.
LED on button off: doors unlocked.
IMPORTANT Operating the handle of
the front doors unlocks all doors and
the tailgate.LOCKING / UNLOCKING
DOORS FROM THE
OUTSIDE
Locking from the outside
With the doors closed, press the
"
FIAT" button on the key or fit and then
turn its metal insert in the driver's door
lock.
7)
2) 3)
Door unlocking from the outside
Press the
button on the key or turn
its metal insert in the driver's door lock.
CHILD SAFETY DEVICE
8) 9)
This system prevents the rear doors
from being opened from the inside.
This device 2 fig. 8 can be engaged
only with the doors open:
7P2000022-000-000
804056J0008EM
13
Page 16 of 240
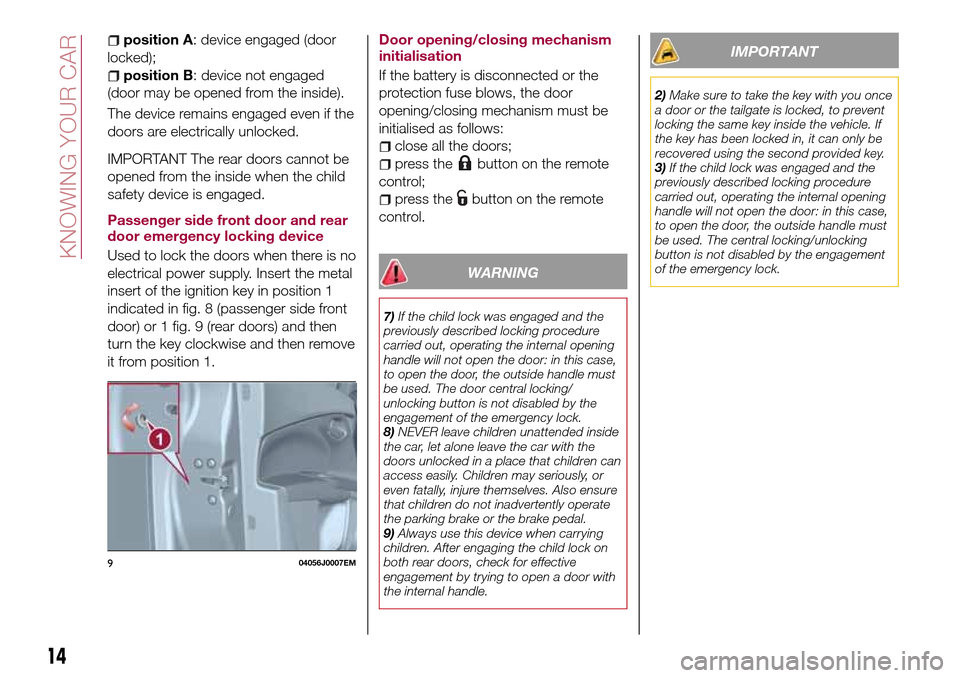
position A: device engaged (door
locked);
position B: device not engaged
(door may be opened from the inside).
The device remains engaged even if the
doors are electrically unlocked.
IMPORTANT The rear doors cannot be
opened from the inside when the child
safety device is engaged.
Passenger side front door and rear
door emergency locking device
Used to lock the doors when there is no
electrical power supply. Insert the metal
insert of the ignition key in position 1
indicated in fig. 8 (passenger side front
door) or 1 fig. 9 (rear doors) and then
turn the key clockwise and then remove
it from position 1.Door opening/closing mechanism
initialisation
If the battery is disconnected or the
protection fuse blows, the door
opening/closing mechanism must be
initialised as follows:
close all the doors;
press thebutton on the remote
control;
press thebutton on the remote
control.
WARNING
7)If the child lock was engaged and the
previously described locking procedure
carried out, operating the internal opening
handle will not open the door: in this case,
to open the door, the outside handle must
be used. The door central locking/
unlocking button is not disabled by the
engagement of the emergency lock.
8)NEVER leave children unattended inside
the car, let alone leave the car with the
doors unlocked in a place that children can
access easily. Children may seriously, or
even fatally, injure themselves. Also ensure
that children do not inadvertently operate
the parking brake or the brake pedal.
9)Always use this device when carrying
children. After engaging the child lock on
both rear doors, check for effective
engagement by trying to open a door with
the internal handle.
IMPORTANT
2)Make sure to take the key with you once
a door or the tailgate is locked, to prevent
locking the same key inside the vehicle. If
the key has been locked in, it can only be
recovered using the second provided key.
3)If the child lock was engaged and the
previously described locking procedure
carried out, operating the internal opening
handle will not open the door: in this case,
to open the door, the outside handle must
be used. The central locking/unlocking
button is not disabled by the engagement
of the emergency lock.
904056J0007EM
14
KNOWING YOUR CAR
Page 19 of 240
Total luggage compartment
extension
Tilting the rear seat backrest completely
forwards allows maximum loading
volume.
NOTE To increase the loading volume,
the rear parcel shelf can be removed,
see the next paragraph.
Removing the rear parcel shelf
To remove the parcel shelf, proceed as
follows:
open the tailgate and unhook the two
side cords (one on each side) from their
supports;
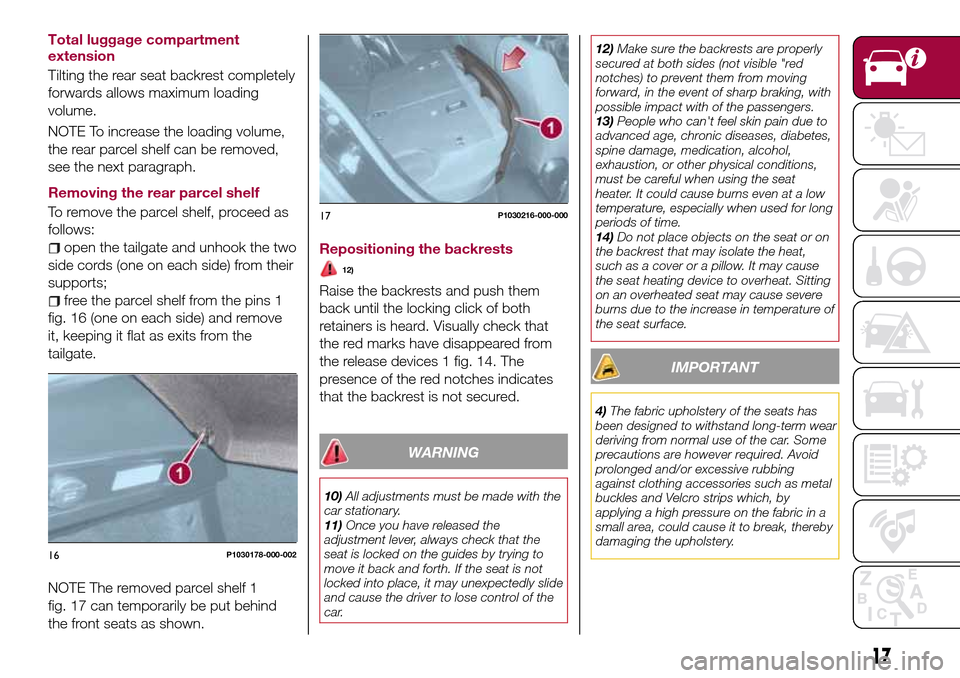
free the parcel shelf from the pins 1
fig. 16 (one on each side) and remove
it, keeping it flat as exits from the
tailgate.
NOTE The removed parcel shelf 1
fig. 17 can temporarily be put behind
the front seats as shown.Repositioning the backrests
12)
Raise the backrests and push them
back until the locking click of both
retainers is heard. Visually check that
the red marks have disappeared from
the release devices 1 fig. 14. The
presence of the red notches indicates
that the backrest is not secured.
WARNING
10)All adjustments must be made with the
car stationary.
11)Once you have released the
adjustment lever, always check that the
seat is locked on the guides by trying to
move it back and forth. If the seat is not
locked into place, it may unexpectedly slide
and cause the driver to lose control of the
car.12)Make sure the backrests are properly
secured at both sides (not visible "red
notches) to prevent them from moving
forward, in the event of sharp braking, with
possible impact with of the passengers.
13)People who can't feel skin pain due to
advanced age, chronic diseases, diabetes,
spine damage, medication, alcohol,
exhaustion, or other physical conditions,
must be careful when using the seat
heater. It could cause burns even at a low
temperature, especially when used for long
periods of time.
14)Do not place objects on the seat or on
the backrest that may isolate the heat,
such as a cover or a pillow. It may cause
the seat heating device to overheat. Sitting
on an overheated seat may cause severe
burns due to the increase in temperature of
the seat surface.
IMPORTANT
4)The fabric upholstery of the seats has
been designed to withstand long-term wear
deriving from normal use of the car. Some
precautions are however required. Avoid
prolonged and/or excessive rubbing
against clothing accessories such as metal
buckles and Velcro strips which, by
applying a high pressure on the fabric in a
small area, could cause it to break, thereby
damaging the upholstery.
16P1030178-000-002
17P1030216-000-000
17
Page 36 of 240
When the CITY function is on, the
steering wheel effort is lighter, making
parking easier: therefore, this function is
particularly useful for driving in city
centres.
To ensure steering uniformity, when the
key is pressed while the steering wheel
is being turned, the change of force will
only be felt when it is turned in the
opposite direction, or the steering
wheel is released.
WARNING
27)It is absolutely forbidden to carry out
any after-market operation involving
steering system or steering column
modifications (e.g. installation of anti-theft
device) that could adversely affect
performance, invalidate the warranty, cause
serious safety problems and also result in
the car not meeting type-approval
requirements.
28)Before performing any maintenance
operations, always stop the engine and
remove the key from the ignition to lock the
steering column (especially when the car
wheels are not touching the ground). If this
is not possible (for example if the key
needs to be turned to MAR or the engine
must be running), remove the main fuse
that protects the electric power steering.
LUGGAGE
COMPARTMENT
IMPORTANT When travelling, do not
put any object on the rear parcel shelf
because they can injure passengers in
the event of an accident or sudden
braking.
OPENING
29)
Tailgate opening
When the central locking system is
unlocked, the tailgate can be opened
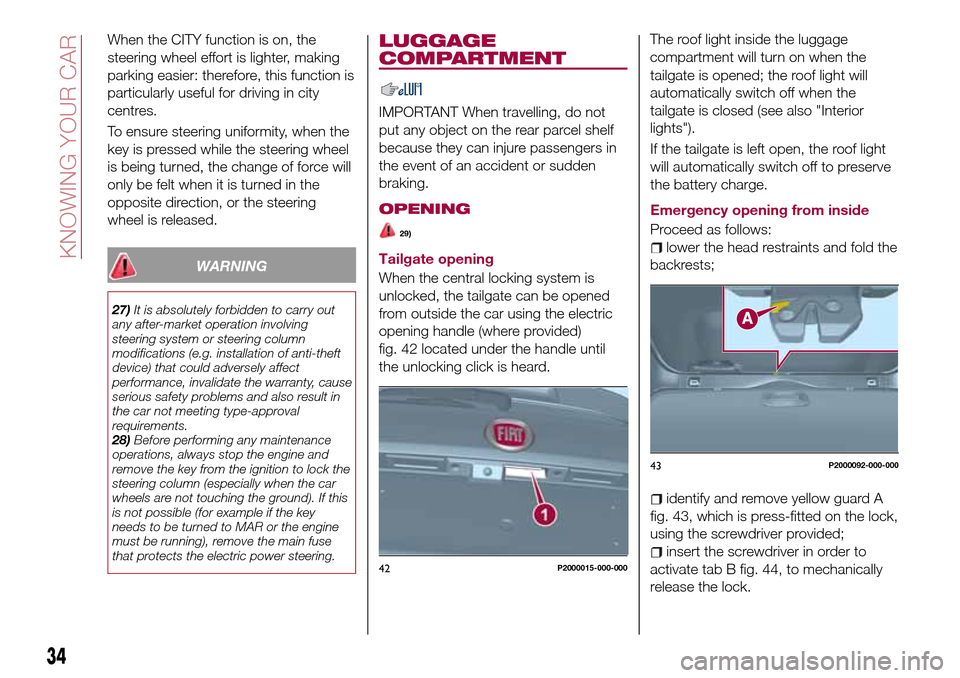
from outside the car using the electric
opening handle (where provided)
fig. 42 located under the handle until
the unlocking click is heard.The roof light inside the luggage
compartment will turn on when the
tailgate is opened; the roof light will
automatically switch off when the
tailgate is closed (see also "Interior
lights").
If the tailgate is left open, the roof light
will automatically switch off to preserve
the battery charge.
Emergency opening from inside
Proceed as follows:lower the head restraints and fold the
backrests;
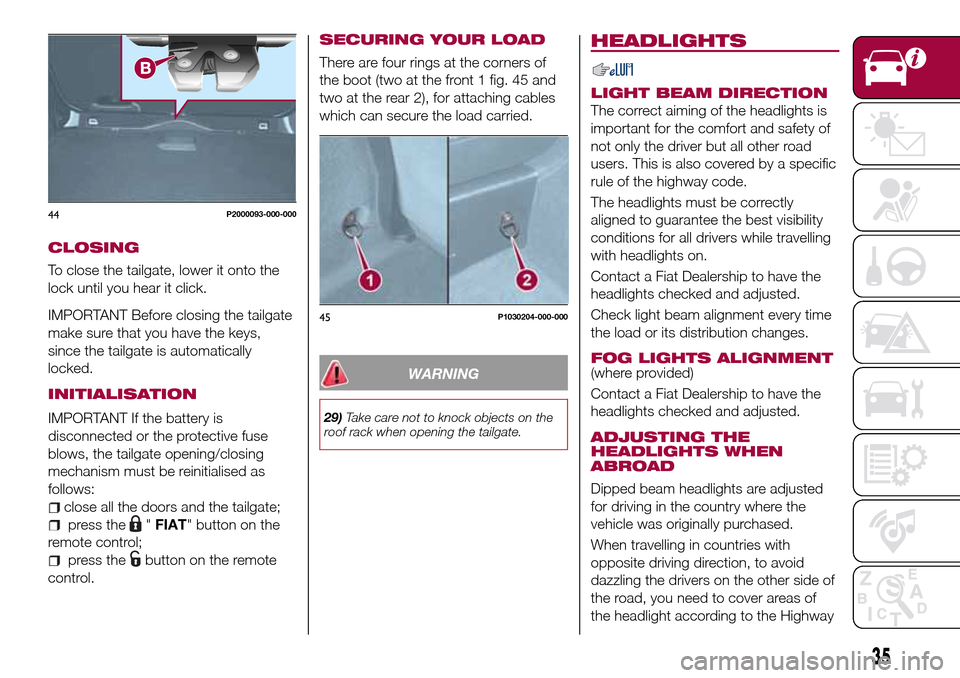
identify and remove yellow guard A
fig. 43, which is press-fitted on the lock,
using the screwdriver provided;
insert the screwdriver in order to
activate tab B fig. 44, to mechanically
release the lock.42P2000015-000-000
43P2000092-000-000
34
KNOWING YOUR CAR
Page 37 of 240
CLOSING
To close the tailgate, lower it onto the
lock until you hear it click.
IMPORTANT Before closing the tailgate
make sure that you have the keys,
since the tailgate is automatically
locked.
INITIALISATION
IMPORTANT If the battery is
disconnected or the protective fuse
blows, the tailgate opening/closing
mechanism must be reinitialised as
follows:
close all the doors and the tailgate;
press the"FIAT" button on the
remote control;
press thebutton on the remote
control.
SECURING YOUR LOAD
There are four rings at the corners of
the boot (two at the front 1 fig. 45 and
two at the rear 2), for attaching cables
which can secure the load carried.
WARNING
29)Take care not to knock objects on the
roof rack when opening the tailgate.
HEADLIGHTS
LIGHT BEAM DIRECTION
The correct aiming of the headlights is
important for the comfort and safety of
not only the driver but all other road
users. This is also covered by a specific
rule of the highway code.
The headlights must be correctly
aligned to guarantee the best visibility
conditions for all drivers while travelling
with headlights on.
Contact a Fiat Dealership to have the
headlights checked and adjusted.
Check light beam alignment every time
the load or its distribution changes.
FOG LIGHTS ALIGNMENT(where provided)
Contact a Fiat Dealership to have the
headlights checked and adjusted.
ADJUSTING THE
HEADLIGHTS WHEN
ABROAD
Dipped beam headlights are adjusted
for driving in the country where the
vehicle was originally purchased.
When travelling in countries with
opposite driving direction, to avoid
dazzling the drivers on the other side of
the road, you need to cover areas of
the headlight according to the Highway
44P2000093-000-000
45P1030204-000-000
35
Page 53 of 240

SYMBOLS ON THE DISPLAY
Symbol What it means
DOOR OPEN
The symbol switches on when one or more doors are not completely shut (for versions/
markets, where provided). An acoustic signal is activated with the doors open and the car
moving. Close the doors properly.
ALTERNATOR FAILURE
If this symbol switches on when the engine is running, this indicates a vehicle recharging
system failure. Contact a Fiat Dealership as soon as possible.
BONNET NOT PROPERLY SHUT
The symbol switches on when the engine bonnet is not properly shut (for versions/markets,
where provided). Close the bonnet properly.
TAILGATE NOT PROPERLY SHUT
The symbol switches on when the tailgate is not properly shut (for versions/markets, where
provided). Close the tailgate correctly.
LOW ENGINE OIL PRESSURE
The symbol switches on in the case of insufficient engine oil pressure.
13)
IMPORTANT Do not use the vehicle until the failure has been solved. The switching on of the
symbol does not show the quantity of oil in the engine: the oil level must be checked manually.
ENGINE OIL PRESSURE SENSOR FAILURE
The symbol switches on constantly together with the message in the display in the case of
engine oil pressure sensor failure.
51
Page 112 of 240
REAR VIEW CAMERA
(where provided)
DESCRIPTION
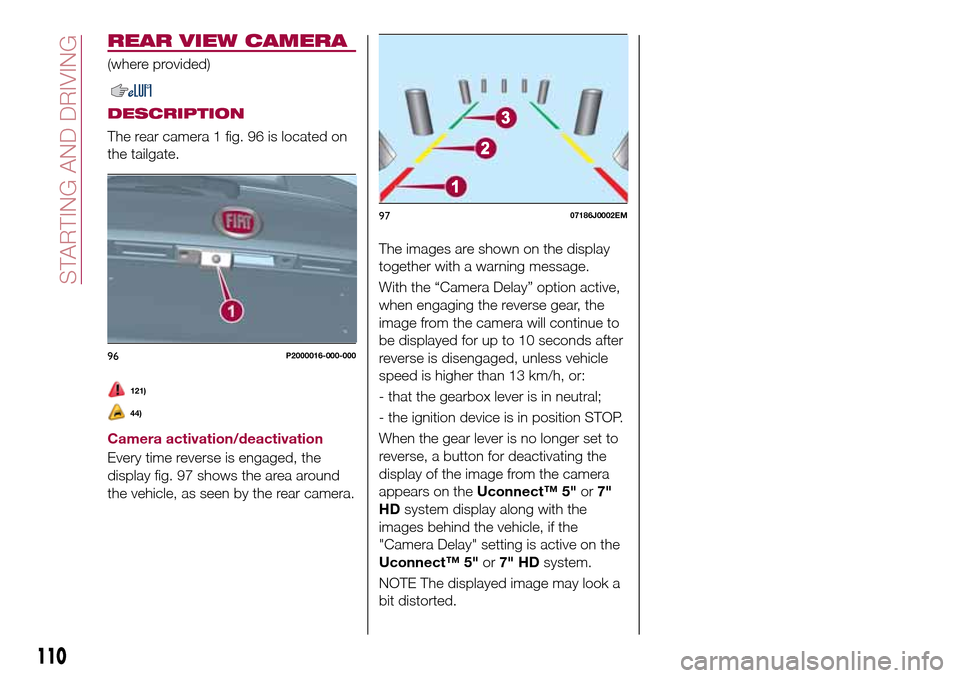
The rear camera 1 fig. 96 is located on
the tailgate.
121)
44)
Camera activation/deactivation
Every time reverse is engaged, the
display fig. 97 shows the area around
the vehicle, as seen by the rear camera.The images are shown on the display
together with a warning message.
With the “Camera Delay” option active,
when engaging the reverse gear, the
image from the camera will continue to
be displayed for up to 10 seconds after
reverse is disengaged, unless vehicle
speed is higher than 13 km/h, or:
- that the gearbox lever is in neutral;
- the ignition device is in position STOP.
When the gear lever is no longer set to
reverse, a button for deactivating the
display of the image from the camera
appears on theUconnect™ 5"or7"
HDsystem display along with the
images behind the vehicle, if the
"Camera Delay" setting is active on the
Uconnect™ 5"or7" HDsystem.
NOTE The displayed image may look a
bit distorted.
96P2000016-000-000
9707186J0002EM
110
STARTING AND DRIVING
Page 126 of 240
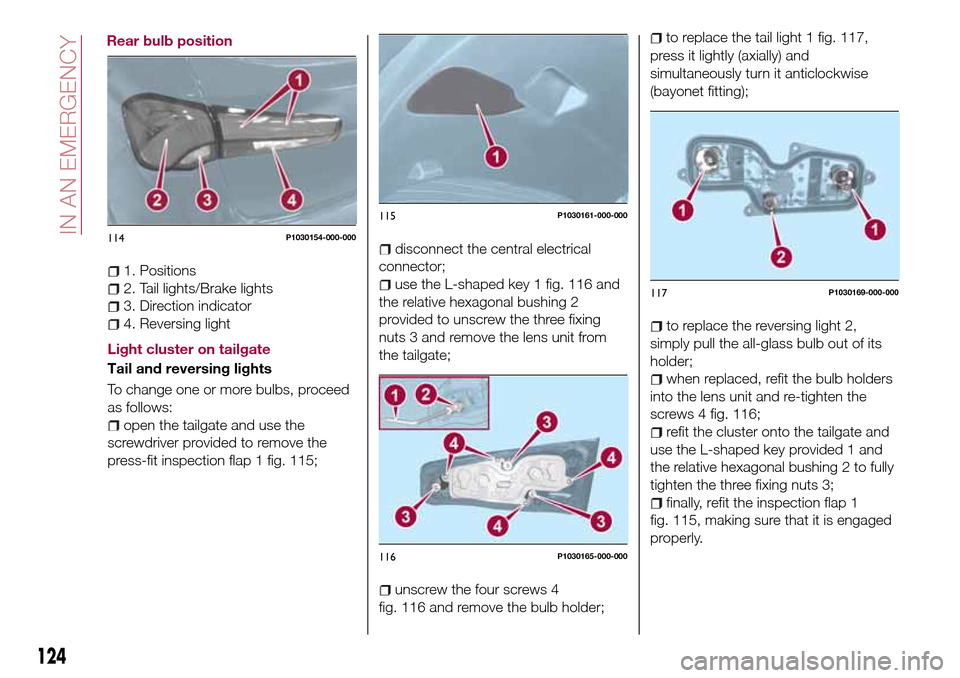
1. Positions
2. Tail lights/Brake lights
3. Direction indicator
4. Reversing light
Light cluster on tailgate
Tail and reversing lights
To change one or more bulbs, proceed
as follows:
open the tailgate and use the
screwdriver provided to remove the
press-fit inspection flap 1 fig. 115;
disconnect the central electrical
connector;
use the L-shaped key 1 fig. 116 and
the relative hexagonal bushing 2
provided to unscrew the three fixing
nuts 3 and remove the lens unit from
the tailgate;
unscrew the four screws 4
fig. 116 and remove the bulb holder;
to replace the tail light 1 fig. 117,
press it lightly (axially) and
simultaneously turn it anticlockwise
(bayonet fitting);
to replace the reversing light 2,
simply pull the all-glass bulb out of its
holder;
when replaced, refit the bulb holders
into the lens unit and re-tighten the
screws 4 fig. 116;
refit the cluster onto the tailgate and
use the L-shaped key provided 1 and
the relative hexagonal bushing 2 to fully
tighten the three fixing nuts 3;
finally, refit the inspection flap 1
fig. 115, making sure that it is engaged
properly.
114P1030154-000-000
115P1030161-000-000
116P1030165-000-000
117P1030169-000-000
124
IN AN EMERGENCY
Rear bulb position