2016 FIAT TIPO 5DOORS STATION WAGON ECO mode
[x] Cancel search: ECO modePage 25 of 240
DIRECTION INDICATORS
Bring the left stalk 1 fig. 27 to the
(stable) position:
upwards: activates the right direction
indicator;
downwards: activates the left direction
indicator.
The
orwarning light respectively
will flash on the instrument panel.
The direction indicators switch off
automatically when the steering wheel
is straightened or when the daytime
running lights (D.R.L.) /parking lights are
activated.
"FOLLOW ME HOME"
DEVICE
Activation
Bring the ignition device to STOP.
Within 2 minutes pull the left stalk in
main beam headlights flashing mode,
each displacement of the stalk will
correspond to an increment of 30
seconds of delay on headlights
switching off up to a maximum of 210
seconds (equal to 7 flashes).
Deactivation
Keep the left stalk in main beam
headlight flashing mode for a few
seconds.
WARNING
19)The daytime running lights are an
alternative to the dipped headlights for
driving during the daytime in countries
where it is compulsory to have lights on
during the day; where it is not compulsory,
the use of daytime running lights is
permitted.
20)Daytime running lights cannot replace
dipped beam headlights when driving at
night or through tunnels. The use of
daytime running lights is governed by the
highway code of the country in which you
are driving. Comply with legal
requirements.
INTERIOR LIGHTS
FRONT CEILING LIGHT
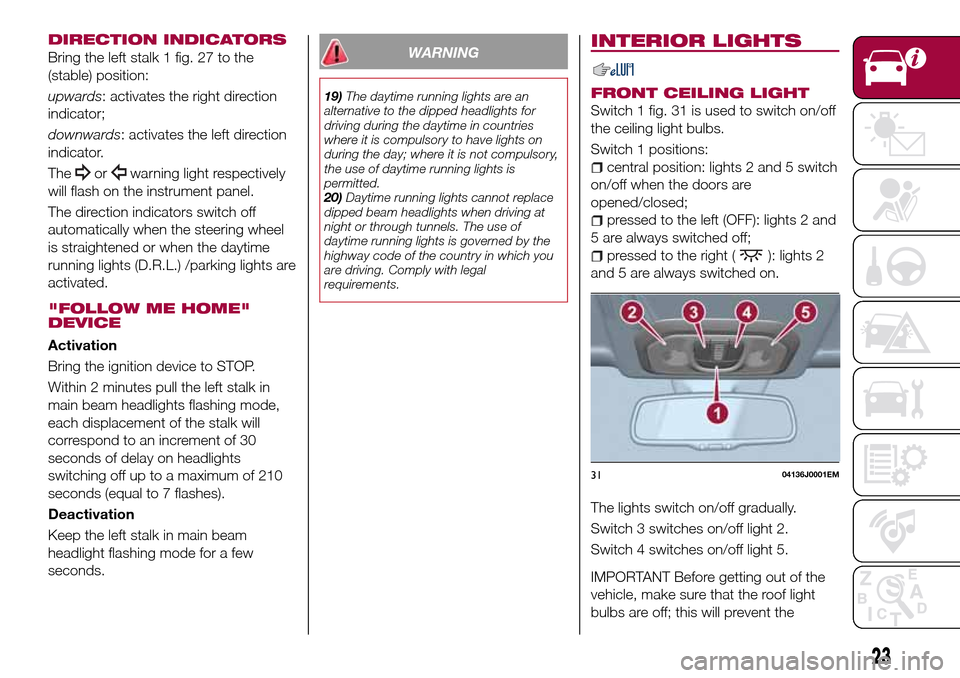
Switch 1 fig. 31 is used to switch on/off
the ceiling light bulbs.
Switch 1 positions:
central position: lights 2 and 5 switch
on/off when the doors are
opened/closed;
pressed to the left (OFF): lights 2 and
5 are always switched off;
pressed to the right (): lights 2
and 5 are always switched on.
The lights switch on/off gradually.
Switch 3 switches on/off light 2.
Switch 4 switches on/off light 5.
IMPORTANT Before getting out of the
vehicle, make sure that the roof light
bulbs are off; this will prevent the
3104136J0001EM
23
Page 26 of 240
battery from being drained once the
doors are closed. In any case, if a light
is left on by mistake, the ceiling light
switches off automatically about 15
minutes after the engine has been
switched off.
Ceiling light timing
On certain versions, to facilitate getting
in/out of the vehicle at night or in
poorly-lit areas, two timed modes have
been provided.
Timing while getting into the car
The ceiling lights switch on according to
the following modes:
for a few seconds when the doors
are unlocked;
for about 3 minutes when one of the
doors is opened;
for a few seconds when the doors
are locked.
Timing is interrupted when the ignition
device is turned to MAR.
Timing while getting out of the car
The roof lights come on when the key is
removed from the ignition within 2
minutes of switching off the engine, on
opening and closing a door with the
removed key.
The timing stops automatically when
the doors are locked.
WINDSCREEN /
REAR WINDOW
WIPERS
The right stalk controls screen
wiper/washer operation.
Operation is only possible with the
ignition device at MAR.
WINDSCREEN WASHER /
WIPER
Operation
21)
5) 6)
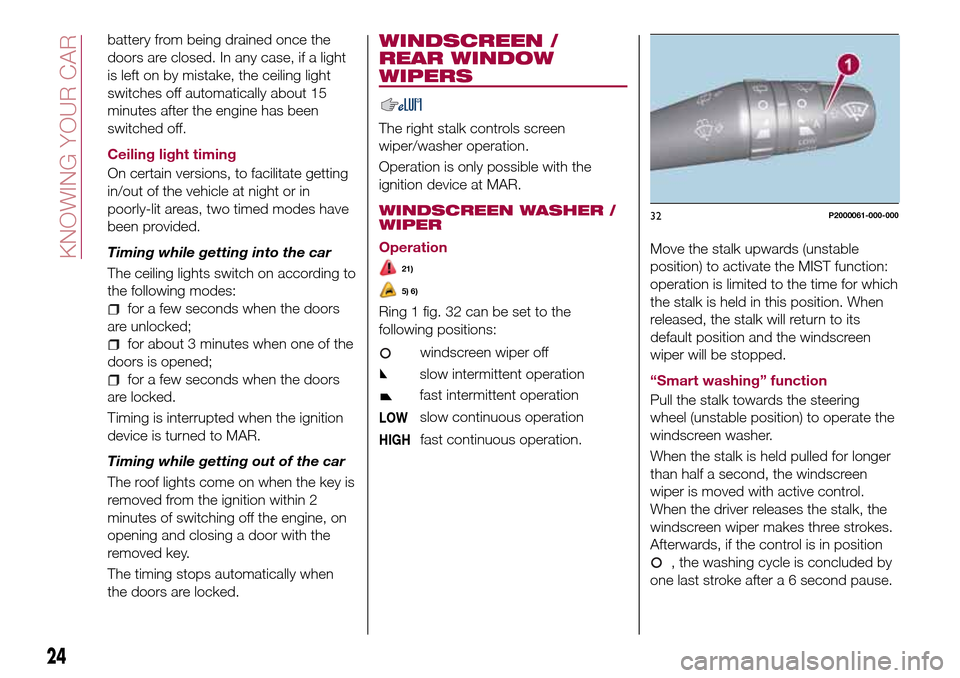
Ring 1 fig. 32 can be set to the
following positions:
windscreen wiper off
slow intermittent operation
fast intermittent operation
LOWslow continuous operation
HIGHfast continuous operation.
Move the stalk upwards (unstable
position) to activate the MIST function:
operation is limited to the time for which
the stalk is held in this position. When
released, the stalk will return to its
default position and the windscreen
wiper will be stopped.
“Smart washing” function
Pull the stalk towards the steering
wheel (unstable position) to operate the
windscreen washer.
When the stalk is held pulled for longer
than half a second, the windscreen
wiper is moved with active control.
When the driver releases the stalk, the
windscreen wiper makes three strokes.
Afterwards, if the control is in position
, the washing cycle is concluded by
one last stroke after a 6 second pause.
32P2000061-000-000
24
KNOWING YOUR CAR
Page 27 of 240

If the position isLOWorHIGH, the
smart washing function is not carried
out.
“Service Position” function
This function makes it possible to
replace the wipers or protect them in
conditions of ice and/or snow.
It can only be activated after turning off
the vehicle.
The Service Position can be explicitly
requested by the driver within two
minutes of turning off the vehicle, when
the wipers have correctly returned to
the parking position.
The driver can enable the function by
turning the ring nut to positionOand
moving the stalk upwards, to the MIST
position, more than three times. The
activations are used to position the
wipers as preferred. The function is
deactivated when the vehicle is turned
on, with a wiping request or when the
vehicle is moving (speed above 5
Km/h).
IMPORTANT Make sure, when turning
on the vehicle, that the windscreen is
free of snow or ice before turning the
ignition key.RAIN SENSOR(where provided)
7) 8)
This is a device located behind the
interior rear view mirrorfig. 33, in
contact with the windscreen and can
measure the amount of rain and,
consequently, manage the automatic
wiping mode of the windscreen in
accordance with the amount of water
on the screen (see the “Automatic
Wiping” paragraph).
REAR WINDOW WIPER /
WASHER
Ring nut 2, shown in fig. 34 can be set
to the following positions:
rear window wiper stopped
intermittent operation
continuous operation, without
pausing between two strokes.
The rear window wiper can be activated
in the following ways:
intermittent with a 2-second pause
between two strokes, when ring nut 2 is
in position
and the windscreen
wiper is not in operation;
synchronous (at half the windscreen
wiper frequency), when ring nut 2 is in
position
and the windscreen
wiper is in operation or when ring nut 2
is in position , reverse gear is
engaged and the windscreen wiper is in
operation;
continuous when ring nut 2 is in
position
.
Push the stalk towards the dashboard
(rocking position) to activate the rear
window washer jet. Keep pushing the
lever to automatically activate both the
rear window washer jet and the rear
window wiper with a single movement.
Releasing the stalk will activate three
3304146J0003EM
34P2000062-000-000
25
Page 43 of 240
is approaching ("coupon"), the word
"Service" will be displayed, followed by
the number of kilometres/miles or days
left, when the ignition device is turned
to MAR. Go to a Fiat Dealership, where
the "Scheduled Servicing Plan"
operations will be performed and the
message will be reset.
Driver Assist
This menu item allows you to view and
change the Adaptive Cruise Control
(ACC) settings on the instrument panel
display.
Audio
This Menu item allows some
information displayed on the
Uconnect™system to be repeated on
the instrument panel display (for further
information see the dedicated chapter).
Phone
(where provided)
This Menu item allows some
information displayed on the
Uconnect™system to be repeated on
the instrument panel display (for further
information see the dedicated chapter).
The information displayed includes the
mobile pairing condition (mobile paired
or not paired), active/incoming/on hold
calls and the management of double
calls (first incoming, second on hold,
etc.).In the phone menu, you can also select
3 sub-menus “SMS reader”, “recent
calls” and “favourite numbers” (available
with theUconnect™7'' HDsystem),
which can be selected with the arrows
or. This menu can also be used
to select and manage the last 10 calls
or the last 10 SMS using the directional
buttons on the steering wheel.
Navigation
(where provided)
This Menu item allows some
information displayed on the
Uconnect™ 5"o7" HDsystem to be
shown on the instrument panel display
(for further information see the
dedicated chapter).
Alerts
This menu item displays information/
failure messages stored by the system.
System Vehicle
This menu item allows you to change
the settings for:
Display;
Units;
Clock & Date;
Safety;
Safety & Assistance;
Lights;
Doors & Locks.Display
By selecting item "Display" you can
access the following settings:
System Display (changing instrument
panel display settings): this menu item
makes it possible to change the
displaying of the information, for
example the Compass (where present),
Outside temperature, Date (day/month),
Time (hours/minutes), Audio information
(where present). Selecting “Reset of the
default settings” makes it possible to
reset and restore the default settings;
Language: allows you to select the
language for showing the
information/warnings;
See phone: used to activate/
deactivate the display of pop-ups on
the instrument panel when there are
incoming calls, outgoing calls, on hold
calls, audio conference and incoming
SMS (where available);
See navigation: allows you to display
the information about the Navigation
mode on the instrument panel;
Automatic Trip B reset: allows you to
set the reset options for Trip B;
Display lighting: this function is used
to set the brightness level (8 levels) for
the display and all the other backlit
components. The display brightness
can be adjusted in all environmental
conditions, whereas all the other
components (e.g. climate control, radio,
41
When the following scheduled servicing
Page 61 of 240
40) 41) 42) 43) 44)
TC (Traction Control)
SYSTEM
The system automatically operates in
the event of slipping, loss of grip on wet
roads (aquaplaning) and acceleration on
slippery, snowy or icy roads, etc. on
one or more drive wheels. Depending
on the slipping conditions, two different
control systems are activated:
if the slipping involves both drive
wheels, the system intervenes, reducing
the power transmitted by the engine;
if the slipping only involves one of the
drive wheels, the BLD (Brake Limited
Differential) function is activated,
automatically braking the wheel which
is slipping (the behaviour of a
self-locking differential is simulated).
This will increase the engine torque
transferred to the wheel which isn't
slipping. This function remains active
even if the "Systems partially disabled"
and "Systems disabled" modes are
selected (see description in the
following pages).
System intervention
The intervention of the system is
indicated by the flashing of the
warning light on the instrument
panel, to inform the driver that the
vehicle is in critical stability and grip
conditions.
45) 46) 47) 48) 49)
PBA (Panic Brake
Assist) SYSTEM
The PBA system is designed to improve
the vehicle’s braking capacity during
emergency braking.
The system detects emergency braking
by monitoring the speed and force with
which the brake pedal is pressed, and
consequently applies the optimal brake
pressure. This can reduce the braking
distance: the PBA system therefore
completes the ABS.
Maximum assistance from the PBA
system is obtained by pressing the
brake pedal very quickly. In addition, the
brake pedal should be pressed
continuously during braking, avoiding
intermittent presses, to get the most
out of the system. Do not reduce
pressure on the brake pedal until
braking is no longer necessary.
The PBA system is deactivated when
the brake pedal is released.
51) 51) 52)
HHC (Hill Hold Control)
SYSTEM
This is an integral part of the ESC
system and facilitates starting on
slopes, activating automatically in the
following cases:
uphill: vehicle stationary on a roadwith a gradient higher than 5%, engine
running, brake pressed and
transmission in neutral or gear other
than reverse engaged;
downhill: vehicle stationary on a road
with a gradient higher than 5%, engine
running, brake pressed and reverse
gear engaged.
When setting off, the ESC system
control unit maintains the braking
pressure on the wheels until the engine
torque necessary for starting is
reached, or in any case for a maximum
of 2 seconds, allowing your right foot to
be moved easily from the brake pedal
to the accelerator.
When two seconds have elapsed,
without starting, the system is
automatically deactivated, gradually
releasing the braking pressure. During
this release stage it is possible to hear a
typical mechanical brake release noise,
indicating the imminent movement of
the car.
53) 54)
ERM (Electronic Rollover
Mitigation) SYSTEM
The system monitors the tendency of
the wheels to rise from the ground if the
driver performs extreme manoeuvres
like quick steering to avoid an obstacle,
especially in poor road conditions.
59
Page 137 of 240
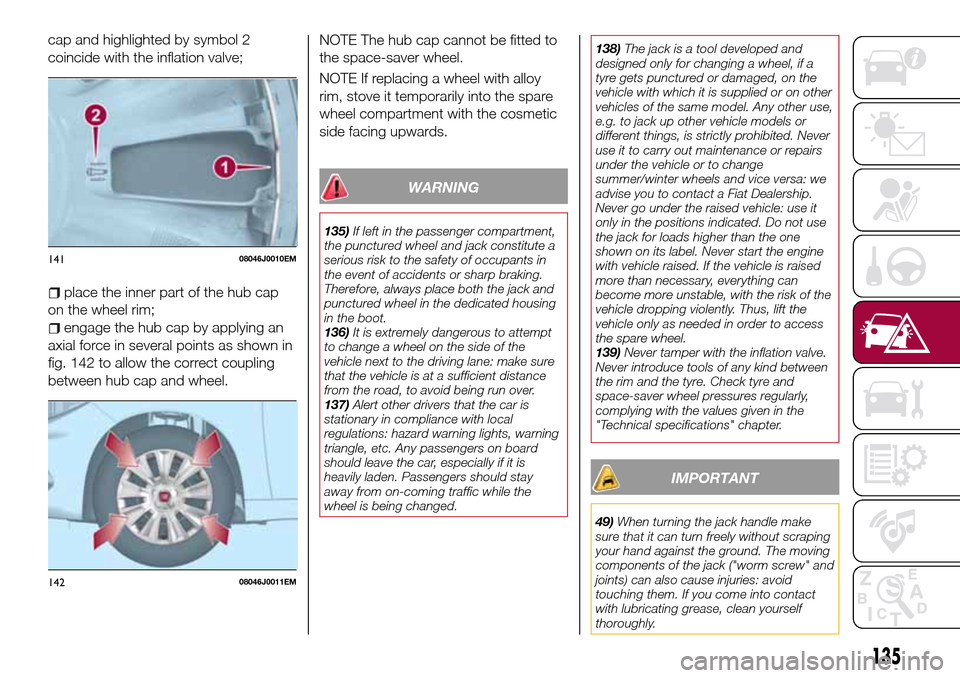
cap and highlighted by symbol 2
coincide with the inflation valve;
place the inner part of the hub cap
on the wheel rim;
engage the hub cap by applying an
axial force in several points as shown in
fig. 142 to allow the correct coupling
between hub cap and wheel.NOTE The hub cap cannot be fitted to
the space-saver wheel.
NOTE If replacing a wheel with alloy
rim, stove it temporarily into the spare
wheel compartment with the cosmetic
side facing upwards.
WARNING
135)If left in the passenger compartment,
the punctured wheel and jack constitute a
serious risk to the safety of occupants in
the event of accidents or sharp braking.
Therefore, always place both the jack and
punctured wheel in the dedicated housing
in the boot.
136)It is extremely dangerous to attempt
to change a wheel on the side of the
vehicle next to the driving lane: make sure
that the vehicle is at a sufficient distance
from the road, to avoid being run over.
137)Alert other drivers that the car is
stationary in compliance with local
regulations: hazard warning lights, warning
triangle, etc. Any passengers on board
should leave the car, especially if it is
heavily laden. Passengers should stay
away from on-coming traffic while the
wheel is being changed.138)The jack is a tool developed and
designed only for changing a wheel, if a
tyre gets punctured or damaged, on the
vehicle with which it is supplied or on other
vehicles of the same model. Any other use,
e.g. to jack up other vehicle models or
different things, is strictly prohibited. Never
use it to carry out maintenance or repairs
under the vehicle or to change
summer/winter wheels and vice versa: we
advise you to contact a Fiat Dealership.
Never go under the raised vehicle: use it
only in the positions indicated. Do not use
the jack for loads higher than the one
shown on its label. Never start the engine
with vehicle raised. If the vehicle is raised
more than necessary, everything can
become more unstable, with the risk of the
vehicle dropping violently. Thus, lift the
vehicle only as needed in order to access
the spare wheel.
139)Never tamper with the inflation valve.
Never introduce tools of any kind between
the rim and the tyre. Check tyre and
space-saver wheel pressures regularly,
complying with the values given in the
"Technical specifications" chapter.
IMPORTANT
49)When turning the jack handle make
sure that it can turn freely without scraping
your hand against the ground. The moving
components of the jack ("worm screw" and
joints) can also cause injuries: avoid
touching them. If you come into contact
with lubricating grease, clean yourself
thoroughly.
14108046J0010EM
14208046J0011EM
135
Page 199 of 240
SWITCHING THE SYSTEM
ON/OFF
The system is switched on/off by
pressing the
button/knob.
Turn the button/knob clockwise to
increase the radio volume or
anticlockwise to decrease it. The
electronic volume adjustment control
rotates continuously (360°) in both
directions, without stop positions.
RADIO (TUNER) MODE
The system is equipped with the
following tuners: AM, FM and DAB (for
versions/markets, where provided).
Radio mode selection
Press the RADIO button on the front
panel to activate radio mode.
Selecting a frequency band
The different tuning modes can be
selected by pressing the RADIO button
on the front panel.
Indications on display
After the desired radio station is
selected on the display, the following
information is shown (INFO mode
activated):
In the upper part: the preset station, the
time and the other active radio settings
are highlighted.
In the central part: the name of the
current station, the frequency and theradio text information (if any) are
highlighted.
FM station list
Press the BROWSE ENTER
button/knob to display the complete list
of the FM stations that can be received.
AM/FM radio station storage
The preset stations are available in all
system modes and are selected by
touching one of the presetting buttons
1-2-3-4-5-6on the front panel. If you
are tuned to a radio station that you
wish to store, hold down the button on
the display which corresponds to the
desired preset until an acoustic
confirmation signal is emitted.
AM/FM radio station selection
To search for the desired radio station
press the
orbutton or use the
wheel of the steering wheel controls, or
turn the "BROWSE ENTER" knob.
Previous/next radio station search
Briefly press the
orbutton:
when the button is released the
previous or the next radio station is
displayed.Previous/next radio station fast
search
Hold down the
orbutton to
start the fast search: when the button is
released, the first tunable radio is
played.
MEDIA MODE
Interaction modes for AUX, USB/iPod
operation.
Audio source selection
To select the desired audio source
among those available: AUX o
USB/iPod, press theMEDIAbutton.
WARNING Some multimedia player
devices may not be compatible with the
Uconnect™system.
Track change (next/previous)
Briefly press the
button to play the
next track or briefly press the
button to return to the beginning
of the selected track or to the beginning
of the previous track if this has been
played for less than 3 seconds.
Fast forward/rewind through tracks
Press and hold down the
button to
fast forward the selected track or keep
the
button pressed to fast rewind
the track.
Track selection (browse)
Use this function to scroll through and
select the tracks on the active device.
197
Page 205 of 240
STEERING WHEEL CONTROL SUMMARY TABLE
Button Interaction
Acceptance of incoming call
Acceptance of the second incoming call and putting the active call on hold
Display of the last 10 calls on the instrument panel
Activation of voice recognition
Interruption of the voice message in order to give a new voice command
Interruption of voice recognition
Rejection of incoming call
Ending of call in progress
Exit the display on the instrument panel of the last calls (only with call browsing active)
Short press (phone mode): selection of next/previous call or SMS (only with call browsing active)
203