2016 FIAT TIPO 5DOORS STATION WAGON Air con
[x] Cancel search: Air conPage 166 of 240

LIFTING THE
VEHICLE
If the vehicle needs to be jacked up, go
to a Fiat Dealership, which is equipped
with shop jacks and jack arms.
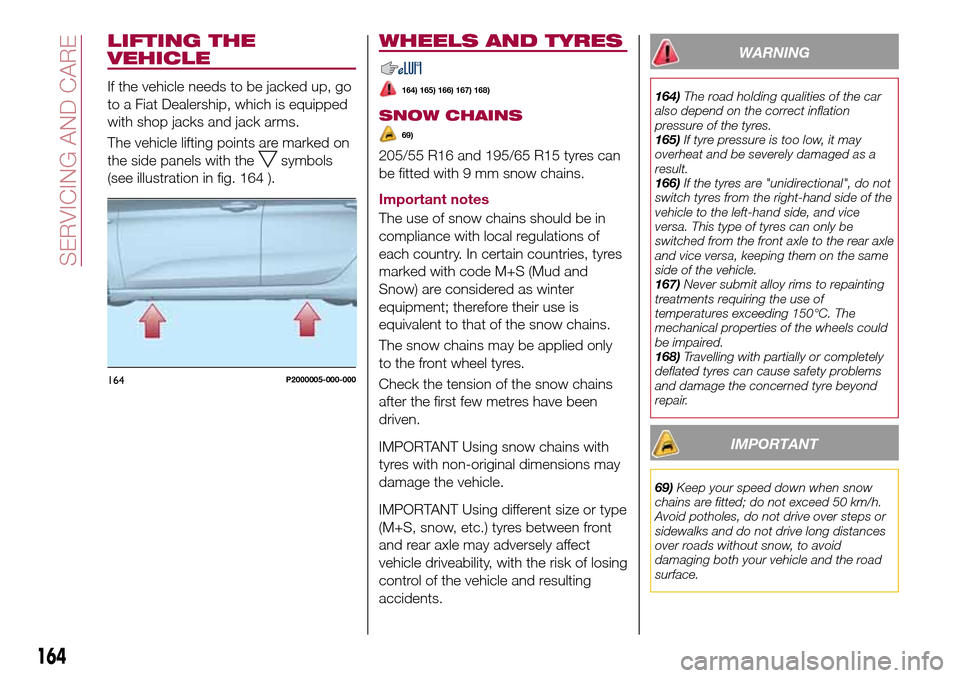
The vehicle lifting points are marked on
the side panels with the
symbols
(see illustration in fig. 164 ).
WHEELS AND TYRES
164) 165) 166) 167) 168)
SNOW CHAINS
69)
205/55 R16 and 195/65 R15 tyres can
be fitted with 9 mm snow chains.
Important notes
The use of snow chains should be in
compliance with local regulations of
each country. In certain countries, tyres
marked with code M+S (Mud and
Snow) are considered as winter
equipment; therefore their use is
equivalent to that of the snow chains.
The snow chains may be applied only
to the front wheel tyres.
Check the tension of the snow chains
after the first few metres have been
driven.
IMPORTANT Using snow chains with
tyres with non-original dimensions may
damage the vehicle.
IMPORTANT Using different size or type
(M+S, snow, etc.) tyres between front
and rear axle may adversely affect
vehicle driveability, with the risk of losing
control of the vehicle and resulting
accidents.
WARNING
164)The road holding qualities of the car
also depend on the correct inflation
pressure of the tyres.
165)If tyre pressure is too low, it may
overheat and be severely damaged as a
result.
166)If the tyres are "unidirectional", do not
switch tyres from the right-hand side of the
vehicle to the left-hand side, and vice
versa. This type of tyres can only be
switched from the front axle to the rear axle
and vice versa, keeping them on the same
side of the vehicle.
167)Never submit alloy rims to repainting
treatments requiring the use of
temperatures exceeding 150°C. The
mechanical properties of the wheels could
be impaired.
168)Travelling with partially or completely
deflated tyres can cause safety problems
and damage the concerned tyre beyond
repair.
IMPORTANT
69)Keep your speed down when snow
chains are fitted; do not exceed 50 km/h.
Avoid potholes, do not drive over steps or
sidewalks and do not drive long distances
over roads without snow, to avoid
damaging both your vehicle and the road
surface.
164P2000005-000-000
164
SERVICING AND CARE
Page 167 of 240

BODY
PRESERVING THE
BODYWORK
Paint
70)
5)
Touch up abrasions and scratches
immediately to prevent the formation of
rust.
Maintenance of paintwork consists of
washing the car: the frequency
depends on the conditions and
environment where the car is used. For
example, it is advisable to wash the
vehicle more often in areas with high
levels of atmospheric pollution or salted
roads.
Some parts of the vehicle may be
covered with a matt paint which, in
order to be maintained intact, requires
special care: see the instructions in the
warning at the end of this paragraph
71)
To correctly wash the vehicle, follow
these instructions:
if the vehicle is washed remove the
aerial from the roof;
if high pressure jets or cleaners are
used to wash the vehicle, keep a
distance of at least 40 cm from thebodywork to avoid damage or
alteration. Build up of water could
cause damage to the vehicle in the long
term;
wash the bodywork using a low
pressure jet of water if possible;
wipe a sponge with a slightly soapy
solution over the bodywork, frequently
rinsing the sponge;
rinse well with water and dry with a
jet of air or a chamois leather.
Dry the less visible parts (e.g. door
frames, bonnet, headlight frames, etc.)
with special care, as water may
stagnate more easily in these areas. Do
not wash the car after it has been left in
the sun or with the bonnet hot: this may
alter the shine of the paintwork.
Exterior plastic parts must be cleaned
in the same way as the rest of the
vehicle.
IMPORTANT NOTES
Avoid parking under trees; the resin
dropped by trees makes the paintwork
go opaque and increases the possibility
of corrosion.
Bird droppings must be washed off
immediately and thoroughly as the acid
they contain is particularly aggressive.Windows
Use specific detergents and clean
cloths to prevent scratching or altering
the transparency.
IMPORTANT Wipe the rear window
inside gently with a cloth following the
direction of the filaments to avoid
damaging the heating device.
Front headlights
Use a soft cloth soaked in water and
detergent for washing cars.
IMPORTANT Never use aromatic
substances (e.g. petrol) or ketones (e.g.
acetone) for cleaning the plastic lenses
of the headlights.
IMPORTANT When cleaning with a
pressure washer, keep the water jet at
least 20 cm away from the headlights.
Engine compartment
At the end of every winter, wash the
engine compartment thoroughly, taking
care not to aim the jet of water directly
at the electronic control units or at the
windscreen/rear window wiper motors.
Have this operation performed at a
specialised workshop.
IMPORTANT The washing should take
place with the engine cold and the
ignition device in the STOP position.
After the washing operation, make sure
165
Page 191 of 240

TIPS, CONTROLS
AND GENERAL
INFORMATION
ROAD SAFETY
Learn how to use the various system
functions before setting off.
Read the instructions for the system
carefully before setting off.
175) 176)
RECEPTION CONDITIONS
Reception conditions change
constantly while driving. Reception may
be interfered with by the presence of
mountains, buildings or bridges,
especially when you are far away from
the broadcaster.
IMPORTANT The volume may be
increased when receiving traffic
information and news.
CARE AND
MAINTENANCE
Observe the following precautions to
ensure the system is fully operational:
the display lens should not come into
contact with pointed or rigid objects
which could damage its surface; use a
soft, dry anti-static cloth to clean and
do not press.
never use alcohol, petrols and
derivatives to clean the display lens.
prevent any liquid from entering the
system: this could damage it beyond
repair.
74) 75)
ANTITHEFT PROTECTION
The system is equipped with an
anti-theft protection system based on
the exchange of information with the
electronic control unit (Body Computer)
on the vehicle.
This guarantees maximum safety and
prevents the secret code from being
entered after the power supply has
been disconnected.
If the check has a positive outcome, the
system will start to operate, whereas if
the comparison codes are not the same
or if the electronic control unit (Body
Computer) is replaced, the system will
ask the user to enter the secret code
according to the procedure described
in the paragraph below.
Entering the secret code
When the system is switched on, if the
code is requested, the display will show
"Please enter Anti-Theft Code" followed
by the screen showing a keypad to
enter the secret code.
The secret code is made up of four
digits from 0 to 9.Uconnect™ 3" Radio:
To enter the first digit of the code,
turn the "BROWSE/ENTER" right knob
and press to confirm.
After inserting the fourth digit, move
the cursor to "OK" and press the
"BROWSE ENTER" right knob: the
system will start to operate.
Uconnect™ 5" LIVE and
Uconnect™ 5" Nav LIVE:
Use the graphic buttons on the
display to enter the code digits.
If an incorrect code is entered, the
system displays "Incorrect Code" to
notify the user of the need to enter the
correct code.
After the 3 available attempts to enter
the code, the system displays
"Incorrect Code. Radio locked. Wait for
30 minutes". After the text has
disappeared it is possible to start the
code entering procedure again.
Vehicle radio passport
This document certifies ownership of
the system. The vehicle radio passport
shows the system model, serial number
and secret code.
In case of loss of the car radio
passport, contact the Fiat Dealership,
taking an ID document and the car
ownership documents.
189
Page 192 of 240

can give the information to the relevant
authorities if the system is stolen.
IMPORTANT NOTES
Look at the screen only and when it is
necessary and safe. If you need to look
at the screen for a long time, pull over
to a safe place so as not to be
distracted while driving.
Immediately stop using the system in
the event of a fault. Otherwise the
system might be damaged. Contact a
Fiat Dealership as soon as possible to
have the system repaired.
WARNING
175)Follow the safety rules here below:
otherwise serious injuries may occur to the
occupants or the system may be
damaged.
176)If the volume is too loud this can be
dangerous. Adjust the volume so that you
can still hear background noises (e.g.
horns, ambulances, police vehicles, etc.).
IMPORTANT
74)Only clean the front panel and the
display lens with a soft, clean, dry,
anti-static cloth. Cleaning and polishing
products may damage the surface. Never
use alcohol, petrols and derivatives.75)Do not use the display as a base for
supports with suction pads or adhesives for
external navigators or smartphones or
similar devices.
190
MULTIMEDIA
IMPORTANT Keep the vehicle radio
passport in a safe place so that you
Page 201 of 240

display and call contacts from the
registers of previous calls;
pair up to 8 phones to make access
and connection easier and quicker;
transfer calls from the system to the
mobile phone and vice versa and
deactivate the microphone audio for
private conversations.
The mobile phone audio is transmitted
through the vehicle’s audio system; the
system automatically mutes the radio
when the Phone function is used.
Pairing a mobile phone
To pair the mobile phone, proceed as
follows:
activate theBluetooth®function on
the mobile phone;
press thePHONEbutton on the
front panel;
if no phone is paired with the system
yet, the display shows a dedicated
screen;
select "Connect Phone" to start the
pairing procedure then search for the
Uconnect™device on the mobile
phone (if "No" is selected, the Phone
main screen is displayed);
when prompted by the mobile
phone, use the phone keypad to enter
the PIN code shown on the system
display or confirm on the mobile phone
the PIN displayed;
from the "Settings" menu you can
always pair a mobile phone by selecting
"Phone menu/Add phone", then
proceed as described above;
during the pairing stage a screen is
displayed showing the progress of the
operation.
NOTE After updating the telephone
software, it is advisable for correct
operation to remove the telephone from
the list of devices paired to the radio,
delete the previous pairing of the
system also from the available
Bluetooth device list on the telephone
and pair it again.
Making a phone call
The operations described below can
only be accessed if supported by the
mobile phone in use.
A call can be made by:
selecting "Contacts" (Phonebook
......);
selecting "Recent Calls list";
selecting "Keypad".Dialling the phone number using
the "keypad" on the display
Enter the phone number using the
graphic keypad displayed.
Proceed as follows:
press thePHONEbutton on the
front panel;
select "Keypad" on the display and
use the "BROWSE/ENTER" right knob
to enter the number;
select theicon to call.
Dialling the phone number using
the mobile phone
It is possible to dial a phone number
with the mobile phone and continue
using the system (never allow yourself
to be distracted while driving).
When a phone number is dialled with
the keypad of the mobile phone, the
audio of the call is played over your
vehicle's sound system.
199
display and call the contacts in the
mobile phone phonebook; The available commands can be used
to:
dial the wished phone number;
Page 207 of 240

SWITCHING THE SYSTEM
ON/OFF
The system is switched on/off by
pressing the
button/knob.
Turn the button/knob clockwise to
increase the radio volume or
anticlockwise to decrease it. The
electronic volume adjustment control
rotates continuously (360°) in both
directions, without stop positions.
RADIO MODE
To activate Radio mode press the
RADIO button on the front panel and
the following information will appear on
the display:
At the top: the list of radio stations
stored (preset) is displayed; the station
being listened to is highlighted.
In the middle: display of the name of
the current radio station and the
buttons for selecting the previous or
next radio station.
At the bottom: display of the following
buttons:
"Browse": list of the radio stations
available;
"AM/FM", "AM/DAB", "FM/DAB":
selection of the desired frequency band
(button reconfigurable according to the
band selected: AM, FM or DAB);
"Tune" : manual radio station tuning
(not available for DAB radios);
"Info": additional information on the
source being listened to;
"Audio": access to the "Audio
setting" screen.
Audio menu
To access the "Audio" menu press the
Audio" button
on the front panel or
the "Audio" graphic button located at
the bottom of the display.
The following adjustments can be
carried out using the "Audio" menu:
"Equalizer" (for versions/markets,
where provided);
"Balance/Fader" (left/right and
front/rear audio balance adjustment);
"Speed/Volume" (speed-dependent
automatic volume control);
"Loudness" (for versions/markets,
where provided);
"Auto-On Radio";
To exit the "Audio" menu, press the
/Done button.
MEDIA MODE
Press the "Source" button to select the
desired audio source among those
available: AUX, USB, iPod and
Bluetooth®.
Applications used on portable devices
may be not compatible with the
Uconnect™system.Track selection (Browse)
Use this function to scroll through and
select the tracks on the active device.
The choices available depend on the
device connected.
For example, on a USB/iPod device you
can also scroll through the list of artists,
genres and albums available on the
device depending on the information
present on the tracks using the
BROWSE ENTER button/knob.
Within each list, the "ABC" button
allows the user to skip to the desired
letter in the list.
NOTE This button might be disabled for
some
Apple®devices.
NOTE The BROWSE ENTER button
does not allow any operation on an
AUX device.
Press the BROWSE ENTER button to
activate this function on the source
being played.
Turn the BROWSE ENTER button/knob
to select the desired category and then
press the button/knob to confirm the
selection.
Press the
button on the front panel
to cancel the function.
Bluetooth® SOURCE
This mode is activated by pairing a
Bluetooth®device containing music
tracks with the system.
205
Page 208 of 240

PAIRING A Bluetooth®
AUDIO DEVICE
To pair aBluetooth®audio device,
proceed as follows:
activate theBluetooth®function on
the device;
press the MEDIA button on the front
panel;
if the "Media" source is active, press
the "Source" button;
select theBluetooth®Media
source;
press the "Add Device" button;
search forUconnect™on the
Bluetooth®audio device (during the
pairing stage a screen is displayed
showing the progress of the operation);
when requested by the audio device,
enter the PIN code shown on the
system display or confirm on the device
the PIN displayed;
if the pairing procedure is completed
successfully, a screen is displayed.
Answer "Yes" to the question to pair the
Bluetooth®audio device as favourite
(the device will have priority over all
other devices to be paired
subsequently). If "No" is selected, the
priority is determined according to the
order of connection. The last device
connected will have the highest priority;
an audio device can also be paired
by pressing the PHONE button on the
front panel and by selecting "Settings"
or, from the "Settings" menu, selecting
"Phone/Bluetooth".WARNING If the
Bluetooth®
connection between mobile phone and
system is lost, consult the mobile
phone handbook.
USB/iPod SOURCE
To activate the USB/iPod mode insert
the corresponding device (USB or iPod)
in the USB port located in the central
console.
If a USB/iPod device is inserted with the
system on, this starts playing the tracks
present on the device.
AUX SOURCE
To activate AUX mode, insert an
appropriate device in the AUX socket
on the vehicle.
When a device is inserted using the
AUX output socket the system starts
reproducing the AUX source
connected, if it is already being played.
Adjust the volume using the
button/knob on the front panel or
using the volume adjustment control on
the connected device.
IMPORTANT NOTES
The functions of the device connected
with the AUX socket are directly
managed by the device itself: it is not
possible to change track/folder/playlist
or control playing start/end/pause with
the controls on the front panel or on the
steering wheel.Do not leave the cable of your portable
player connected to the AUX socket
after disconnection, to avoid possible
hiss from the speakers.
PHONE MODE
PHONE MODE ACTIVATION
Press the PHONE button on the front
panel to activate the Phone mode.
NOTE To consult the list of mobile
phones and supported functions, visit
the www.DriveUconnect.eu website.
Use the buttons on the display to:
dial the phone number (using the
graphic keypad on the display);
display and call the contacts in the
mobile phone phonebook;
display and call contacts from the
registers of previous calls;
pair up to 10 phones/audio devices
to make access and connection easier
and quicker;
transfer calls from the system to the
mobile phone and vice versa and
deactivate the microphone audio for
private conversations.
The mobile phone audio is transmitted
through the vehicle’s audio system; the
system automatically mutes the radio
when the Phone function is used.
206
MULTIMEDIA
Page 209 of 240

PAIRING A MOBILE PHONE
IMPORTANT Carry out this operation
only with vehicle stationary and in safety
conditions; this function is deactivated
when the vehicle is moving.
The pairing procedure for a mobile
phone is described below: always
consult the handbook for the mobile
phone in any case.
To pair the mobile phone, proceed as
follows:
activate theBluetooth®function on
the mobile phone;
press the PHONE button on the front
panel;
if no phone is paired with the system
yet, the display shows a dedicated
screen;
select "Yes" to start the pairing
procedure, then search for the
Uconnect™device on the mobile
phone (if "No" is selected, the Phone
main screen is displayed);
when prompted by the mobile
phone, use its keypad to enter the PIN
code shown on the system display or
confirm on the mobile phone the PIN
displayed;
from the "Phone" screen you can
always pair a mobile phone by pressing
the "Settings" button: press the "Add
Device" button and proceed as
described above;
during the pairing stage a screen is
displayed showing the progress of the
operation;
when the pairing procedure is
completed successfully, a screen is
displayed: answer "Yes" to the question
to pair the mobile phone as favourite
(the mobile phone will have priority over
all other mobile phones to be paired
subsequently). If no other devices are
paired, the system will consider the first
associated device as favourite.
NOTE After updating the telephone
software, it is advisable for correct
operation to remove the telephone from
the list of devices paired to the radio,
delete the previous pairing of the
system also from the available
Bluetooth device list on the telephone
and pair it again.
MAKING A PHONE CALL
The operations described below can
only be accessed if supported by the
mobile phone in use.
For all functions available, refer to the
mobile phone owner's handbook.
A call can be made by:
selecting theicon (mobile phone
phonebook);
selecting "Recent Calls";
selecting theicon;
pressing the "Redial" button.SMS MESSAGE READER
The system can read the messages
received by the mobile phone.
To use this function the mobile phone
must support the SMS exchange
function through
Bluetooth®.
If this function is not supported by the
phone, the corresponding
button is
deactivated (greyed out).
When a text message is received, the
display will show a screen where the
options "Listen", "Call" or "Ignore" can
be selected.
Press the
button to access the list
of SMS messages received by the
mobile phone (the list displays a
maximum of 60 messages received).
Uconnect™LIVE
SERVICES
Press the APPS button to access the
Uconnect™LIVEapps.
The services available depend on the
car configuration and the market.
To use theUconnect™LIVEservices,
you need to download theUconnect™
LIVEapp from Google Play or Apple
Store and register using the app or on
www.DriveUconnect.eu.
First access to the vehicle
Once you have launched the
Uconnect™ LIVEApp and entered
your details, to access theUconnect™
207