2016 FIAT TIPO 5DOORS STATION WAGON reset
[x] Cancel search: resetPage 67 of 240
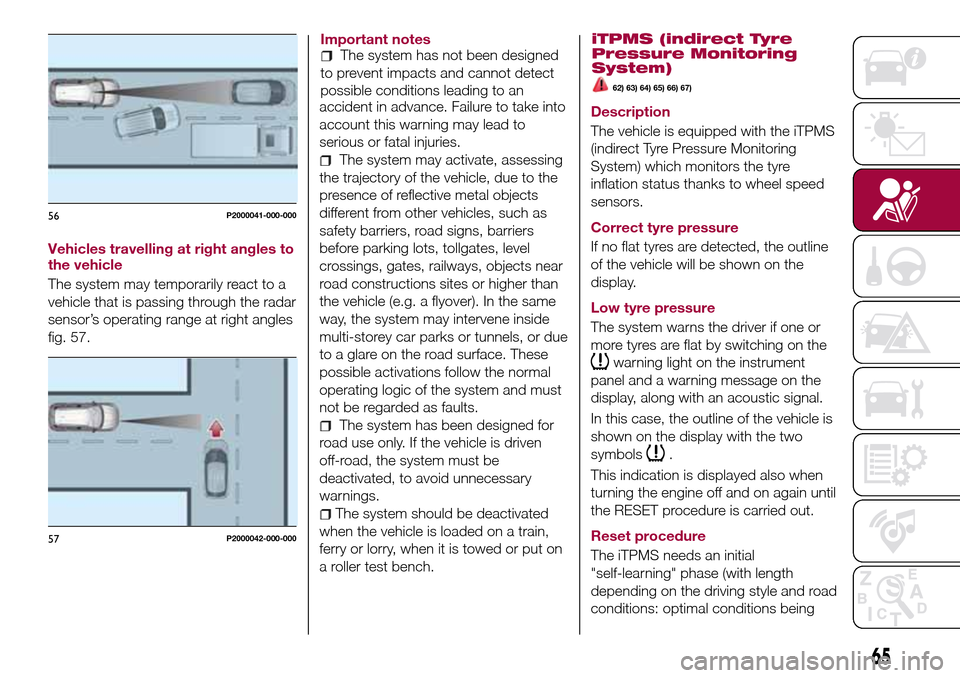
Vehicles travelling at right angles to
the vehicle
The system may temporarily react to a
vehicle that is passing through the radar
sensor’s operating range at right angles
fig. 57.Important notes
The system has not been designed
to prevent impacts and cannot detect
possible conditions leading to an
accident in advance. Failure to take into
account this warning may lead to
serious or fatal injuries.
The system may activate, assessing
the trajectory of the vehicle, due to the
presence of reflective metal objects
different from other vehicles, such as
safety barriers, road signs, barriers
before parking lots, tollgates, level
crossings, gates, railways, objects near
road constructions sites or higher than
the vehicle (e.g. a flyover). In the same
way, the system may intervene inside
multi-storey car parks or tunnels, or due
to a glare on the road surface. These
possible activations follow the normal
operating logic of the system and must
not be regarded as faults.
The system has been designed for
road use only. If the vehicle is driven
off-road, the system must be
deactivated, to avoid unnecessary
warnings.
The system should be deactivated
when the vehicle is loaded on a train,
ferry or lorry, when it is towed or put on
a roller test bench.
iTPMS (indirect Tyre
Pressure Monitoring
System)
62) 63) 64) 65) 66) 67)
Description
The vehicle is equipped with the iTPMS
(indirect Tyre Pressure Monitoring
System) which monitors the tyre
inflation status thanks to wheel speed
sensors.
Correct tyre pressure
If no flat tyres are detected, the outline
of the vehicle will be shown on the
display.
Low tyre pressure
The system warns the driver if one or
more tyres are flat by switching on the
warning light on the instrument
panel and a warning message on the
display, along with an acoustic signal.
In this case, the outline of the vehicle is
shown on the display with the two
symbols
.
This indication is displayed also when
turning the engine off and on again until
the RESET procedure is carried out.
Reset procedure
The iTPMS needs an initial
"self-learning" phase (with length
depending on the driving style and road
conditions: optimal conditions being
56P2000041-000-000
57P2000042-000-000
65
Page 68 of 240
each time tyre pressure is modified;
when even only one tyre is changed;
when tyres are rotated/inverted;
when the space-saver wheel is fitted.
Before carrying out the RESET
procedure, inflate the tyres to the rated
pressure values specified in the inflation
pressure table (see "Wheels" paragraph
in the "Technical specifications"
chapter).
If the RESET is not carried out, in all
above cases, the
warning light may
give false indications on one or more
tyres.
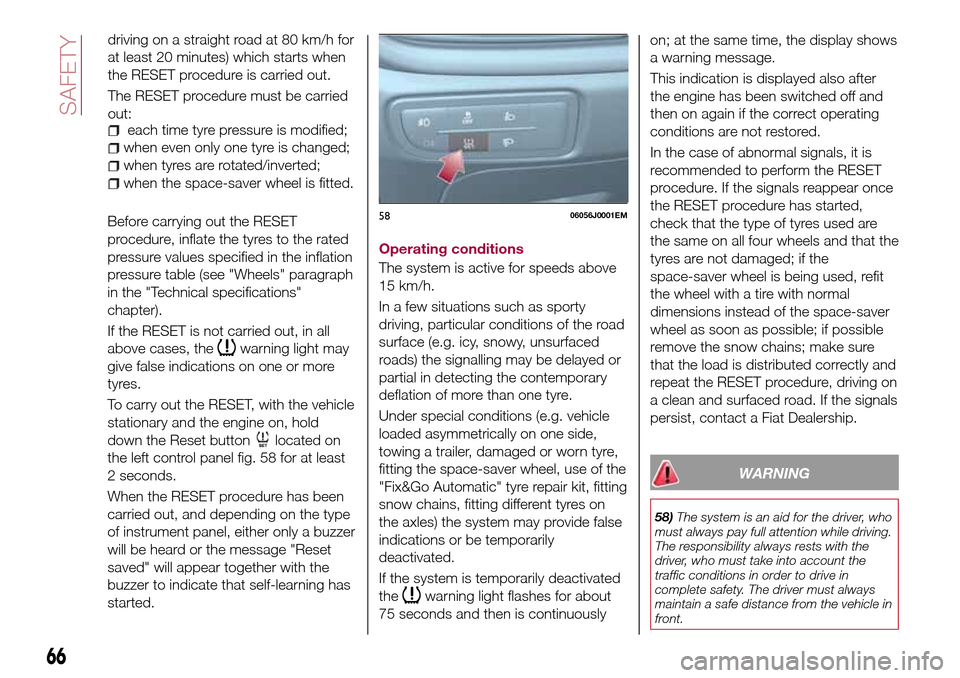
To carry out the RESET, with the vehicle
stationary and the engine on, hold
down the Reset button
located on
the left control panel fig. 58 for at least
2 seconds.
When the RESET procedure has been
carried out, and depending on the type
of instrument panel, either only a buzzer
will be heard or the message "Reset
saved" will appear together with the
buzzer to indicate that self-learning has
started.Operating conditions
The system is active for speeds above
15 km/h.
In a few situations such as sporty
driving, particular conditions of the road
surface (e.g. icy, snowy, unsurfaced
roads) the signalling may be delayed or
partial in detecting the contemporary
deflation of more than one tyre.
Under special conditions (e.g. vehicle
loaded asymmetrically on one side,
towing a trailer, damaged or worn tyre,
fitting the space-saver wheel, use of the
"Fix&Go Automatic" tyre repair kit, fitting
snow chains, fitting different tyres on
the axles) the system may provide false
indications or be temporarily
deactivated.
If the system is temporarily deactivated
the
warning light flashes for about
75 seconds and then is continuouslyon; at the same time, the display shows
a warning message.
This indication is displayed also after
the engine has been switched off and
then on again if the correct operating
conditions are not restored.
In the case of abnormal signals, it is
recommended to perform the RESET
procedure. If the signals reappear once
the RESET procedure has started,
check that the type of tyres used are
the same on all four wheels and that the
tyres are not damaged; if the
space-saver wheel is being used, refit
the wheel with a tire with normal
dimensions instead of the space-saver
wheel as soon as possible; if possible
remove the snow chains; make sure
that the load is distributed correctly and
repeat the RESET procedure, driving on
a clean and surfaced road. If the signals
persist, contact a Fiat Dealership.
WARNING
58)The system is an aid for the driver, who
must always pay full attention while driving.
The responsibility always rests with the
driver, who must take into account the
traffic conditions in order to drive in
complete safety. The driver must always
maintain a safe distance from the vehicle in
front.
5806056J0001EM
66
SAFETY
driving on a straight road at 80 km/h for
at least 20 minutes) which starts when
the RESET procedure is carried out.
The RESET procedure must be carried
out:
Page 71 of 240
ADJUSTING THE FRONT
SEAT BELT HEIGHT
70) 71)
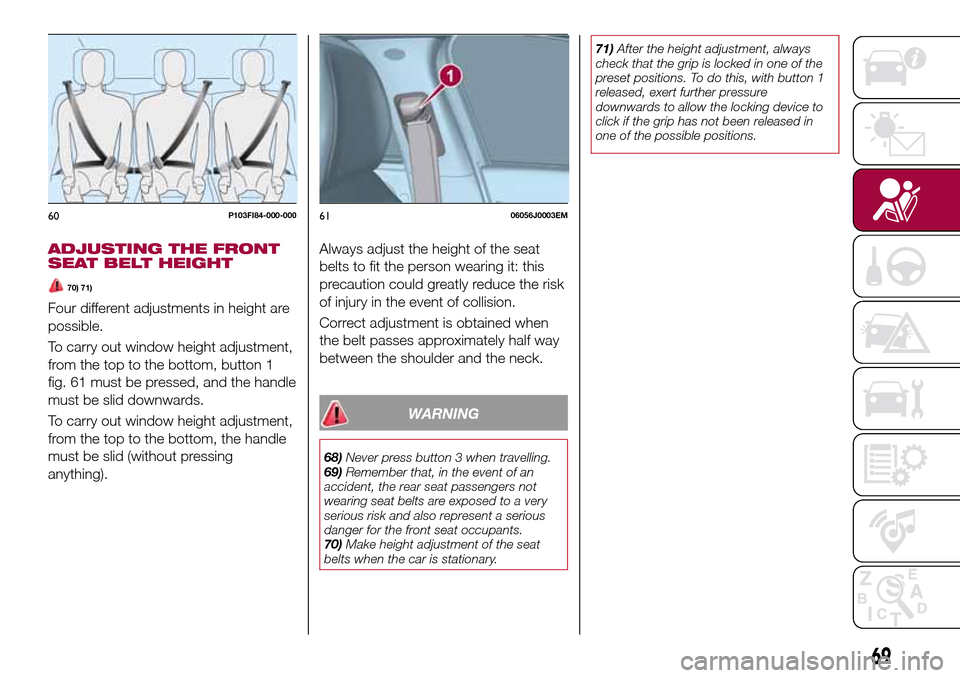
Four different adjustments in height are
possible.
To carry out window height adjustment,
from the top to the bottom, button 1
fig. 61 must be pressed, and the handle
must be slid downwards.
To carry out window height adjustment,
from the top to the bottom, the handle
must be slid (without pressing
anything).Always adjust the height of the seat
belts to fit the person wearing it: this
precaution could greatly reduce the risk
of injury in the event of collision.
Correct adjustment is obtained when
the belt passes approximately half way
between the shoulder and the neck.
WARNING
68)Never press button 3 when travelling.
69)Remember that, in the event of an
accident, the rear seat passengers not
wearing seat belts are exposed to a very
serious risk and also represent a serious
danger for the front seat occupants.
70)Make height adjustment of the seat
belts when the car is stationary.71)After the height adjustment, always
check that the grip is locked in one of the
preset positions. To do this, with button 1
released, exert further pressure
downwards to allow the locking device to
click if the grip has not been released in
one of the possible positions.
60P103FI84-000-0006106056J0003EM
69
Page 103 of 240

ADAPTIVE CRUISE
CONTROL (ACC)
(where provided)
114) 115) 116) 117) 118) 119)
34) 35) 36) 38) 38) 39) 40)
DESCRIPTION
The Adaptive Cruise Control (ACC) is a
driver assist device which combines the
Cruise Control functions with one for
controlling the distance from the vehicle
ahead.
The device allows to hold the vehicle at
the desired speed without needing to
press the accelerator. It also allows to
hold a given distance from the vehicle
ahead (the distance can be set by the
driver).
The Adaptive Cruise Control (ACC) uses
a radar sensor, located behind the front
bumper fig. 87, to detect the presence
of a vehicle close ahead.The device further enhances driving
comfort provided by the electronic
Cruise Control when on the motorway
or out of town with light traffic.
The use of the device is therefore not
advantageous on busy roads or in
town.
IMPORTANT NOTES
If the sensor does not detect any
vehicle ahead, the device will maintain a
fixed set speed.
If the sensor detects a vehicle ahead,
the device automatically intervenes by
braking (or accelerating) slightly in order
not to exceed the original set speed, so
that the vehicle keeps the preset
distance, seeking to adapt to the speed
of the vehicle ahead.
It is advisable to turn the device off in
the following cases:
driving in fog, heavy rain, snow,
heavy traffic and in complex driving
situations (e.g. on motorways with
roadworks in progress);
driving near a bend (winding roads),
icy, snowy, slippery roads or with steep
climbs and descents;
entering a turn lane or on a slip road;
towing a trailer;
when circumstances do not allow
safe driving at a constant speed.There are two operating modes:
“Adaptive Cruise Control” mode
to hold an appropriate distance
between vehicles (a dedicated message
is shown on the instrument panel
display);
electronic “Cruise Control” mode
to hold the vehicle at a constant
preset speed.
To change the operation mode, use the
button on the steering wheel (see that
described on the following pages).
The "electronic Cruise Control" does
not vary the speed according to the
presence or not of vehicles ahead.
Always adjust the speed according to
traffic conditions.
ADAPTIVE CRUISE
CONTROL ACTIVATION/
DEACTIVATION
Activation
To activate the device, press and
release the button
fig. 88.
87P2000076-000-000
88P2000060-000-000
101
Page 107 of 240
IMPORTANT The maximum breaking
applied by the device is limited. The
driver may apply the brakes in all cases
if needed.
IMPORTANT If the device predicts that
the braking level is not sufficient to hold
the set distance, the driver is warned by
a message indicating that the vehicle
ahead is too close. An acoustic signal is
also emitted. In this case, it is advisable
to brake immediately as necessary to
hold a safe distance from the vehicle
ahead.
IMPORTANT The driver is responsible
for ensuring that there are no
pedestrians, other vehicles or
objectives along the direction of the
vehicle. Failure to comply with these
precautions may cause serious
accidents and injuries.
IMPORTANT The driver is fully
responsible for holding a safe distance
from the vehicle ahead respecting the
highway code in force in the respective
country.
DEACTIVATION
The device is deactivated and the set
speed is cancelled if:
thebutton is pressed on the
Adaptive Cruise Control;
thebutton is pressed on the
electronic Cruise Control;
the Speed Limiter button is pressed;
the ignition device is in the STOP
position.
The device is cancelled (the set speed
and distance are stored):
when the CANC button is pressed;
when the conditions shown in the
“Setting the desired speed” paragraph
occur;
when the vehicle speed drops under
the minimum set speed (e.g. in
presence of slow vehicles).
If these conditions occur while the
system is decelerating with respect to a
vehicle ahead, the system could
continue the deceleration, if necessary,
also after it is cancelled or deactivated
within the minimum speed settable on
the system.
SYSTEM LIMITED
OPERATION SIGNAL
If the dedicated message is shown on
the display, a condition limiting the
system operation may have occurred.
The possible cause of this limitation is a
failure.
When the conditions limiting the system
functions end, this will go back to
normal and complete operation. Should
the fault persist, contact a Fiat
Dealership.
PRECAUTIONS WHILE
DRIVING
The device may not work correctly in
some driving conditions (see below):
the driver must control the vehicle at all
times.
Towing a trailer
Use of the device is not recommended
while towing a trailer.
Vehicle not aligned
The device may not detect a vehicle
travelling on the same lane but which is
not aligned along the same direction of
travel or a vehicle which is cutting in
from a side lane. Sufficient distance
from the vehicles ahead may not be
guaranteed in these cases.
The non-aligned vehicle can weave in
and out of the driving direction causing
the vehicle to brake or accelerate
unexpectedly.
Steering and curves
On curves fig. 91 with the device set, it
could limit speed and acceleration to
guarantee vehicle stability even if no
vehicles are detected ahead. When
leaving the curve, the device resets the
previously set speed.
105
Page 115 of 240

to each country you are driving in, in the
case of vehicles towing trailers. In any
case, the top speed must not exceed
100 km/h.
Any electric brake must be powered
directly by the battery through a cable
with a cross-section of no less than 2.5
mm
2.
In addition to the electrical branches,
the vehicle electrical system can only be
connected to the supply cable for an
electric brake and to the cable for an
internal light for the trailer, not
exceeding 15 W. For connections, use
the preset control unit with a battery
cable with section not less than 2.5 mm
2.
IMPORTANT The use of auxiliary loads
other than external lights (e.g. electric
brake) must take place with engine
running.
INSTALLING A TOW
HOOK
To install a tow hook contact a Fiat
Dealership.
WARNING
122)The ABS with which the car is
equipped will not control the braking
system of the trailer. Particular caution is
required on slippery roads.123)Never modify the braking system of
the vehicle to control the trailer brake. The
trailer braking system must be fully
independent of the car’s hydraulic system.
REFUELLING THE
VEHICLE
124) 125) 126)
Before refuelling, make sure that the
fuel type is correct.
Also stop the engine before refuelling.
PETROL ENGINES
Only use unleaded petrol with a number
of octanes (R.O.N.) not lower than 95
(EN228 specification).
DIESEL ENGINES
45)
Only use Diesel for motor vehicles
(EN590 specification).
When using or parking the vehicle for a
long time in the mountains or cold
areas, it is advisable to refuel using
locally available Diesel. In this case, it is
also advisable to keep the tank over
50% full.
REFUELLING CAPACITY
To ensure that you fill the tank
completely, top up twice after the first
click of the fuel supply gun.
Further top-ups could cause faults in
the fuel feeding system.
113
Page 143 of 240
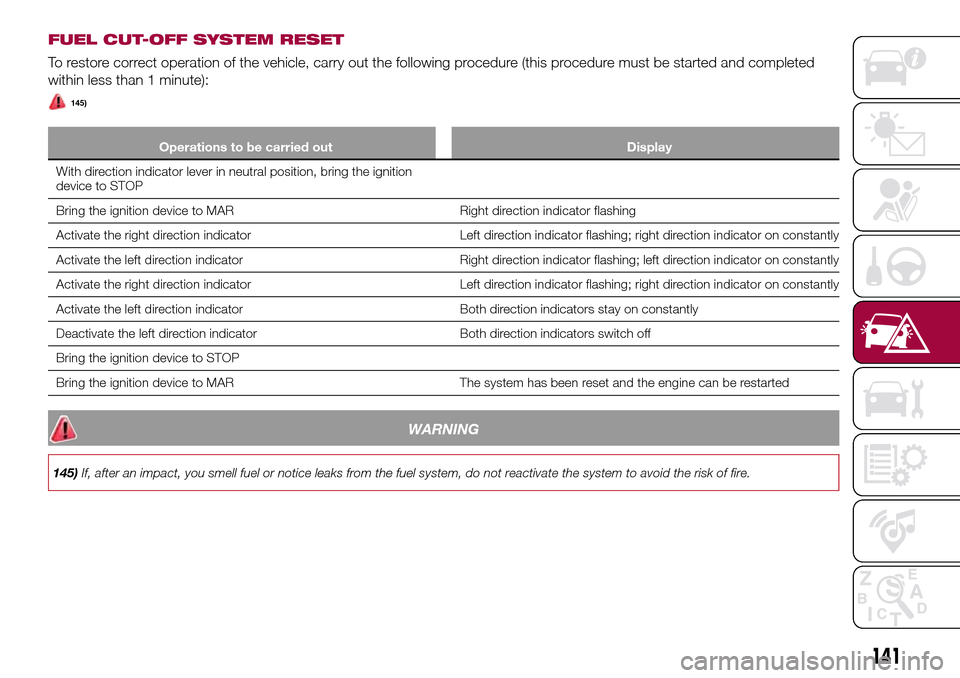
FUEL CUT-OFF SYSTEM RESET
To restore correct operation of the vehicle, carry out the following procedure (this procedure must be started and completed
within less than 1 minute):
145)
Operations to be carried out Display
With direction indicator lever in neutral position, bring the ignition
device to STOP
Bring the ignition device to MAR Right direction indicator flashing
Activate the right direction indicator Left direction indicator flashing; right direction indicator on constantly
Activate the left direction indicator Right direction indicator flashing; left direction indicator on constantly
Activate the right direction indicator Left direction indicator flashing; right direction indicator on constantly
Activate the left direction indicator Both direction indicators stay on constantly
Deactivate the left direction indicator Both direction indicators switch off
Bring the ignition device to STOP
Bring the ignition device to MAR The system has been reset and the engine can be restarted
WARNING
145)If, after an impact, you smell fuel or notice leaks from the fuel system, do not reactivate the system to avoid the risk of fire.
141
Page 194 of 240
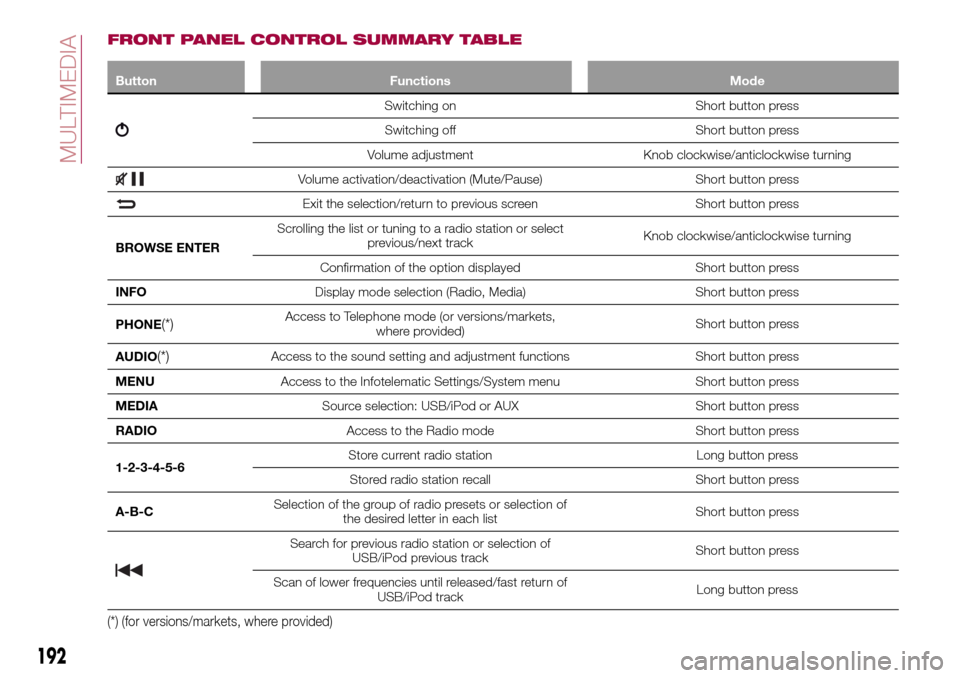
FRONT PANEL CONTROL SUMMARY TABLE
Button Functions Mode
Switching on Short button press
Switching off Short button press
Volume adjustment Knob clockwise/anticlockwise turning
Volume activation/deactivation (Mute/Pause) Short button press
Exit the selection/return to previous screen Short button press
BROWSE ENTERScrolling the list or tuning to a radio station or select
previous/next trackKnob clockwise/anticlockwise turning
Confirmation of the option displayed Short button press
INFODisplay mode selection (Radio, Media) Short button press
PHONE
(*)Access to Telephone mode (or versions/markets,
where provided)Short button press
AUDIO
(*)Access to the sound setting and adjustment functions Short button press
MENUAccess to the Infotelematic Settings/System menu Short button press
MEDIASource selection: USB/iPod or AUX Short button press
RADIOAccess to the Radio mode Short button press
1-2-3-4-5-6Store current radio station Long button press
Stored radio station recall Short button press
A-B-CSelection of the group of radio presets or selection of
the desired letter in each listShort button press
Search for previous radio station or selection of
USB/iPod previous trackShort button press
Scan of lower frequencies until released/fast return of
USB/iPod trackLong button press
(*) (for versions/markets, where provided)
192
MULTIMEDIA