2016 FIAT TIPO 5DOORS STATION WAGON ECU
[x] Cancel search: ECUPage 114 of 240

IMPORTANT NOTES
IMPORTANT In some circumstances,
such as with ice, snow or mud on the
surface of the camera, the camera
sensitivity may be reduced.
IMPORTANT When parking, take the
utmost care over obstacles that may be
above or under the camera range.
WARNING
121)Parking and other potentially
dangerous manoeuvres are, however,
always the driver’s responsibility. While
carrying out these manoeuvres, always
make sure that no people (especially
children) or animals are in the area
concerned. The camera is an aid for the
driver, but the driver must never allow
his/her attention to lapse during potentially
dangerous manoeuvres, even those
executed at low speeds. Always keep a
slow speed, so as to promptly brake in the
case of obstacles.
IMPORTANT
44)It is vital, for correct operation, that the
camera is always kept clean and free from
any mud, dirt, snow or ice. Be careful not
to scratch or damage the camera while
cleaning it. Avoid using dry, rough or hard
cloths. The camera must be washed using
clean water, with the addition of car
shampoo if necessary. In washing stations
which use steam or high-pressure jets,
clean the camera quickly, keeping the
nozzle more than 10 cm away from the
sensors. Also, do not apply stickers to the
camera.
TOWING TRAILERS
IMPORTANT NOTES
122) 123)
For towing caravans or trailers the
vehicle must be fitted with an approved
tow hook and an adequate electrical
system. Should aftermarket installation
be requested, this must be carried out
by specialists.
Install any specific and/or additional
door mirrors as specified by the
Highway Code.
Remember that, when towing a trailer,
steep hills are harder to climb, braking
distances increase and overtaking takes
longer depending on the overall weight
of the trailer.
Engage a low gear when driving
downhill, rather than constantly using
the brake.
The weight the trailer exerts on the
vehicle tow hook reduces the vehicle's
loading capacity by the same amount.
To make sure that the maximum
towable weight is not exceeded (given
in the vehicle registration document)
account should be taken of the fully
laden trailer, including accessories and
luggage.
Do not exceed the speed limits specific
112
STARTING AND DRIVING
Page 122 of 240

REPLACING AN
EXTERNAL BULB
Versions with polyelliptical
headlights
Front bulb position
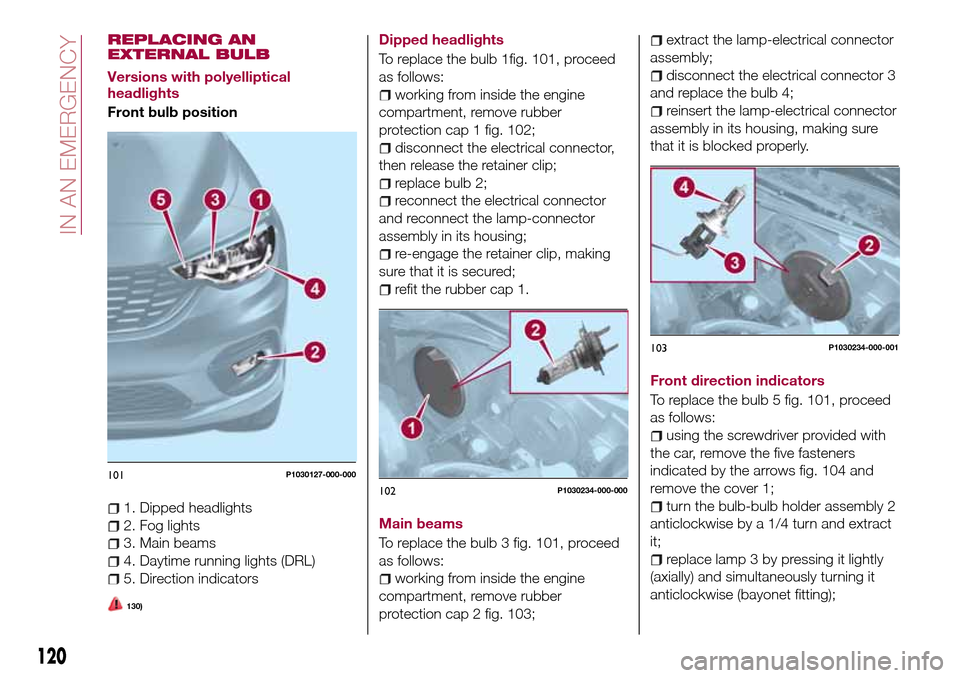
1. Dipped headlights
2. Fog lights
3. Main beams
4. Daytime running lights (DRL)
5. Direction indicators
130)
Dipped headlights
To replace the bulb 1fig. 101, proceed
as follows:
working from inside the engine
compartment, remove rubber
protection cap 1 fig. 102;
disconnect the electrical connector,
then release the retainer clip;
replace bulb 2;
reconnect the electrical connector
and reconnect the lamp-connector
assembly in its housing;
re-engage the retainer clip, making
sure that it is secured;
refit the rubber cap 1.
Main beams
To replace the bulb 3 fig. 101, proceed
as follows:
working from inside the engine
compartment, remove rubber
protection cap 2 fig. 103;
extract the lamp-electrical connector
assembly;
disconnect the electrical connector 3
and replace the bulb 4;
reinsert the lamp-electrical connector
assembly in its housing, making sure
that it is blocked properly.
Front direction indicators
To replace the bulb 5 fig. 101, proceed
as follows:
using the screwdriver provided with
the car, remove the five fasteners
indicated by the arrows fig. 104 and
remove the cover 1;
turn the bulb-bulb holder assembly 2
anticlockwise by a 1/4 turn and extract
it;
replace lamp 3 by pressing it lightly
(axially) and simultaneously turning it
anticlockwise (bayonet fitting);
101P1030127-000-000
102P1030234-000-000
103P1030234-000-001
120
IN AN EMERGENCY
Page 130 of 240

at the same time slowly rotate the
screw anticlockwise, until resistance is
encountered (do not overtighten);
slowly release the screw;
opening is indicated by the entire
screw head coming out of its housing;
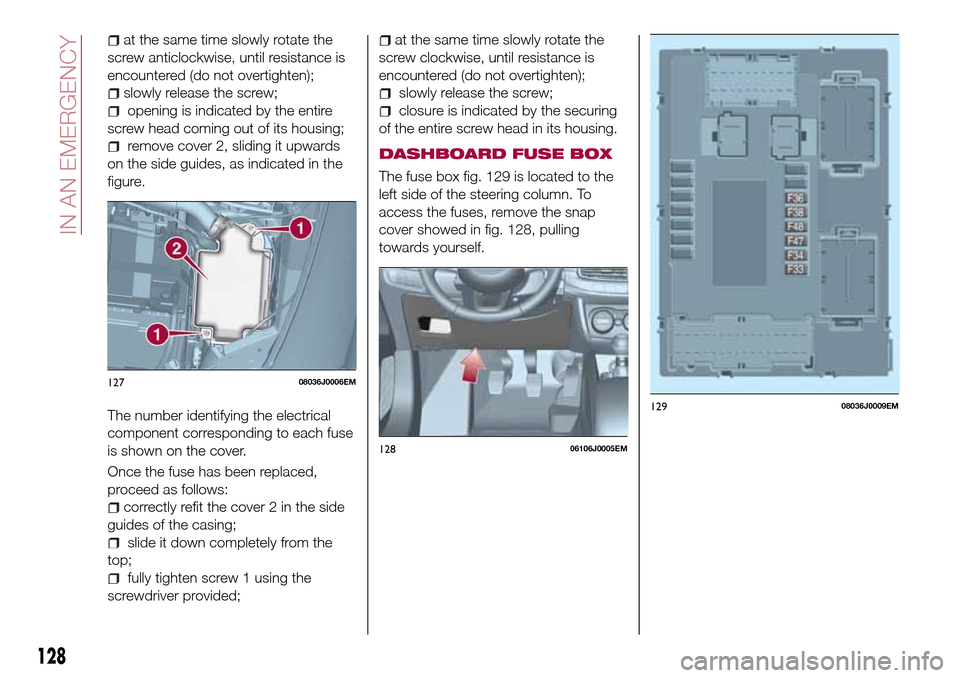
remove cover 2, sliding it upwards
on the side guides, as indicated in the
figure.
The number identifying the electrical
component corresponding to each fuse
is shown on the cover.
Once the fuse has been replaced,
proceed as follows:
correctly refit the cover 2 in the side
guides of the casing;
slide it down completely from the
top;
fully tighten screw 1 using the
screwdriver provided;
at the same time slowly rotate the
screw clockwise, until resistance is
encountered (do not overtighten);
slowly release the screw;
closure is indicated by the securing
of the entire screw head in its housing.
DASHBOARD FUSE BOX
The fuse box fig. 129 is located to the
left side of the steering column. To
access the fuses, remove the snap
cover showed in fig. 128, pulling
towards yourself.
12708036J0006EM
12806106J0005EM
12908036J0009EM
128
IN AN EMERGENCY
Page 140 of 240

if the pressure indicated is equal to or
higher than 1.8 bar / 26 psi, switch on
the compressor and reach the required
pressure. Disconnect and replace the
kit in the specific compartment.
Carefully drive and reach the Fiat
Dealership as soon as possible;
PRESSURE RESTORING
The compressor can also be used to
check and, if necessary, restore the tyre
pressure.
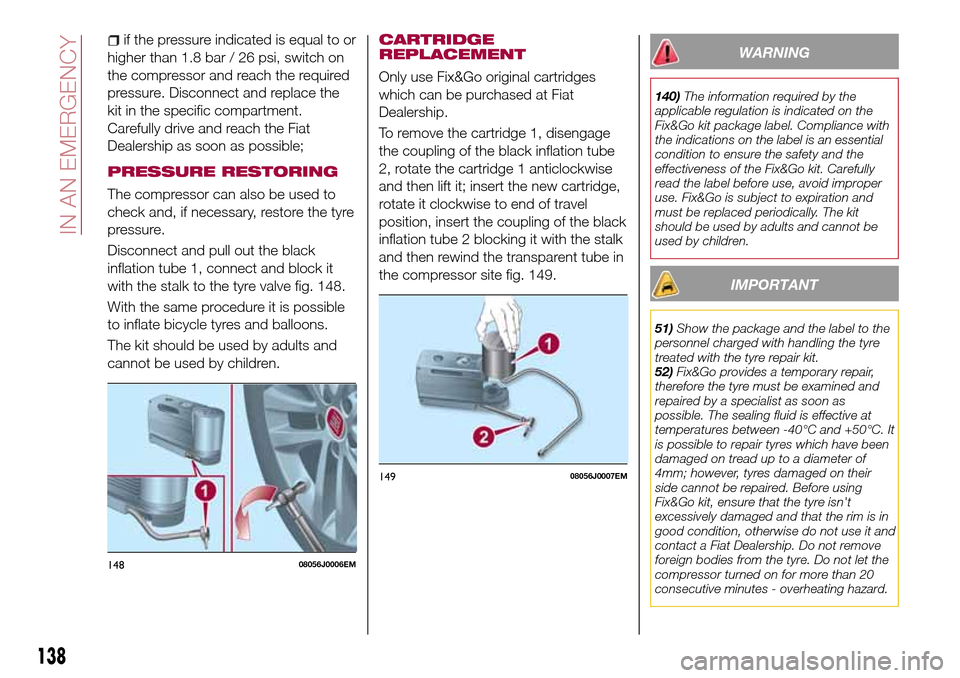
Disconnect and pull out the black
inflation tube 1, connect and block it
with the stalk to the tyre valve fig. 148.
With the same procedure it is possible
to inflate bicycle tyres and balloons.
The kit should be used by adults and
cannot be used by children.
CARTRIDGE
REPLACEMENT
Only use Fix&Go original cartridges
which can be purchased at Fiat
Dealership.
To remove the cartridge 1, disengage
the coupling of the black inflation tube
2, rotate the cartridge 1 anticlockwise
and then lift it; insert the new cartridge,
rotate it clockwise to end of travel
position, insert the coupling of the black
inflation tube 2 blocking it with the stalk
and then rewind the transparent tube in
the compressor site fig. 149.
WARNING
140)The information required by the
applicable regulation is indicated on the
Fix&Go kit package label. Compliance with
the indications on the label is an essential
condition to ensure the safety and the
effectiveness of the Fix&Go kit. Carefully
read the label before use, avoid improper
use. Fix&Go is subject to expiration and
must be replaced periodically. The kit
should be used by adults and cannot be
used by children.
IMPORTANT
51)Show the package and the label to the
personnel charged with handling the tyre
treated with the tyre repair kit.
52)Fix&Go provides a temporary repair,
therefore the tyre must be examined and
repaired by a specialist as soon as
possible. The sealing fluid is effective at
temperatures between -40°C and +50°C. It
is possible to repair tyres which have been
damaged on tread up to a diameter of
4mm; however, tyres damaged on their
side cannot be repaired. Before using
Fix&Go kit, ensure that the tyre isn't
excessively damaged and that the rim is in
good condition, otherwise do not use it and
contact a Fiat Dealership. Do not remove
foreign bodies from the tyre. Do not let the
compressor turned on for more than 20
consecutive minutes - overheating hazard.
14808056J0006EM
14908056J0007EM
138
IN AN EMERGENCY
Page 160 of 240

159)When performing any operation on
the battery or near it, always protect your
eyes with special goggles.
IMPORTANT
55)Be careful not to confuse the various
types of fluids while topping up: they are
not compatible with each other! Topping up
with an unsuitable fluid could severely
damage your vehicle.
56)The oil level must never exceed the
MAX. mark.
57)Always top up using engine oil of the
same specifications as that already in the
engine.
58)PARAFLU
UPanti-freeze is used in the
engine cooling system. Use fluid of the
same type as that contained in the cooling
system for any top-ups. PARAFLU
UP
cannot be mixed with any other type of
fluid. If this happens, do not start the
engine under any circumstances and
contact a Fiat Dealership.
59)Prevent brake fluid, which is highly
corrosive, from coming into contact with
painted parts. Should it happen,
immediately wash with water.
60)If the vehicle must remain unused for a
long time at a very low temperature,
remove the battery and take it to a warm
place, to avoid freezing.61)Incorrect installation of electric and
electronic devices may cause severe
damage to your car. After purchasing your
vehicle, if you wish to install any
accessories (e.g. anti-theft, radio phone,
etc.), go to a Fiat Dealership, which will
suggest the most suitable devices and
advise you whether a higher capacity
battery needs to be installed.
IMPORTANT
3)The used engine oil and the filter that has
been replaced contain substances that are
harmful to the environment. To change the
oil and filters, we advise you to contact a
Fiat Dealership.
4)Batteries contain substances which are
very dangerous for the environment. For
battery replacement, contact a Fiat
Dealership.
BATTERY
RECHARGING
IMPORTANT NOTES
IMPORTANT The battery recharging
procedure is given as information only.
To carry out this operation contact a
Fiat Dealership.
IMPORTANT After setting the ignition
device to STOP and having closed the
driver side door, wait at least one
minute before disconnecting the
electrical supply from the battery. When
reconnecting the electrical supply to the
battery, make sure that the ignition
device is in the STOP position and the
driver side door is closed.
IMPORTANT Charging should be slow
at a low ampere rating for
approximately 24 hours. Charging for a
longer time may damage the battery.
IMPORTANT The cables of the
electrical system must be correctly
reconnected to the battery, i.e. the
positive cable (+) to the positive
terminal and the negative cable (–) to
the negative terminal. The battery
terminals are marked with the positive
(+) and negative (–) symbols, and are
shown on the battery cover. The battery
terminals must also be corrosion-free
and firmly secured to the terminals. If a
158
SERVICING AND CARE