2016 FIAT TIPO 5DOORS STATION WAGON change time
[x] Cancel search: change timePage 6 of 240
WARNINGS AND PRECAUTIONS
While reading this Owner Handbook you will find a series ofWARNINGSto prevent procedures that could damage your
vehicle.
There are alsoPRECAUTIONSthat must be carefully followed to prevent incorrect use of the components of the vehicle,
which could cause accidents or injuries.
Therefore allWARNINGSandPRECAUTIONSmust always be carefully followed.
WARNINGSandPRECAUTIONSare recalled in the text with the following symbols:
personal safety;
vehicle safety;
environmental protection.
NOTE These symbols, when necessary, are indicated besides the title or at the end of the line and are followed by a number.
That number recalls the corresponding warning at the end of the relevant section.
IMPORTANT
This Owner Handbook describes all vehicle versions. Options, equipment dedicated to specific markets or
versions are not explicitly indicated in the text: as a consequence, you should only consider the information which
is related to the trim level, engine and version that you have purchased. Any content introduced throughout the
production of the model, outside the specific request of options at the time of purchase, will be identified with the
wording(where provided).
All data contained in this publication are intended to help you use your vehicle in the best possible way. FCA Italy
S.p.A. aims at a constant improvement of the vehicles produced. For this reason it reserves the right to make
changes to the model described for technical and/or commercial reasons. For further information, contact a Fiat
Dealership.
VEHICLE CHANGES / ALTERATIONS
IMPORTANT Any change or alteration of the vehicle might seriously affect its safety and road holding, thus causing accidents,
in which the occupants could even be fatally injured.
4
Page 24 of 240
HEADLIGHT ALIGNMENT
CORRECTOR
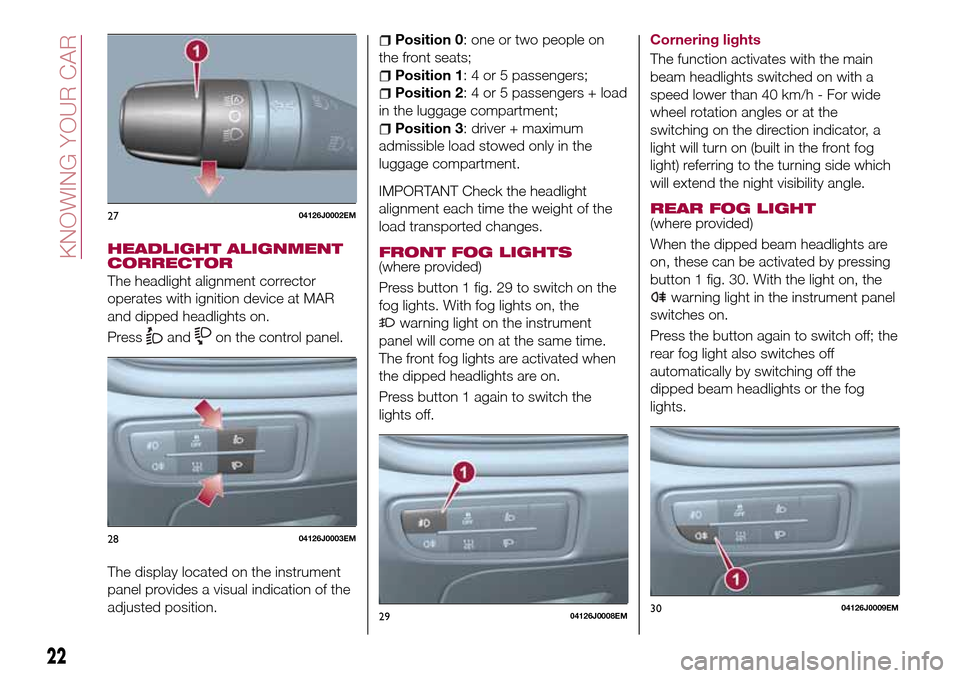
The headlight alignment corrector
operates with ignition device at MAR
and dipped headlights on.
Press
andon the control panel.
The display located on the instrument
panel provides a visual indication of the
adjusted position.
Position 0: one or two people on
the front seats;
Position 1: 4 or 5 passengers;
Position 2: 4 or 5 passengers + load
in the luggage compartment;
Position 3: driver + maximum
admissible load stowed only in the
luggage compartment.
IMPORTANT Check the headlight
alignment each time the weight of the
load transported changes.
FRONT FOG LIGHTS
(where provided)
Press button 1 fig. 29 to switch on the
fog lights. With fog lights on, the
warning light on the instrument
panel will come on at the same time.
The front fog lights are activated when
the dipped headlights are on.
Press button 1 again to switch the
lights off.Cornering lights
The function activates with the main
beam headlights switched on with a
speed lower than 40 km/h - For wide
wheel rotation angles or at the
switching on the direction indicator, a
light will turn on (built in the front fog
light) referring to the turning side which
will extend the night visibility angle.
REAR FOG LIGHT(where provided)
When the dipped beam headlights are
on, these can be activated by pressing
button 1 fig. 30. With the light on, the
warning light in the instrument panel
switches on.
Press the button again to switch off; the
rear fog light also switches off
automatically by switching off the
dipped beam headlights or the fog
lights.
2704126J0002EM
2804126J0003EM
2904126J0008EM3004126J0009EM
22
KNOWING YOUR CAR
Page 37 of 240
CLOSING
To close the tailgate, lower it onto the
lock until you hear it click.
IMPORTANT Before closing the tailgate
make sure that you have the keys,
since the tailgate is automatically
locked.
INITIALISATION
IMPORTANT If the battery is
disconnected or the protective fuse
blows, the tailgate opening/closing
mechanism must be reinitialised as
follows:
close all the doors and the tailgate;
press the"FIAT" button on the
remote control;
press thebutton on the remote
control.
SECURING YOUR LOAD
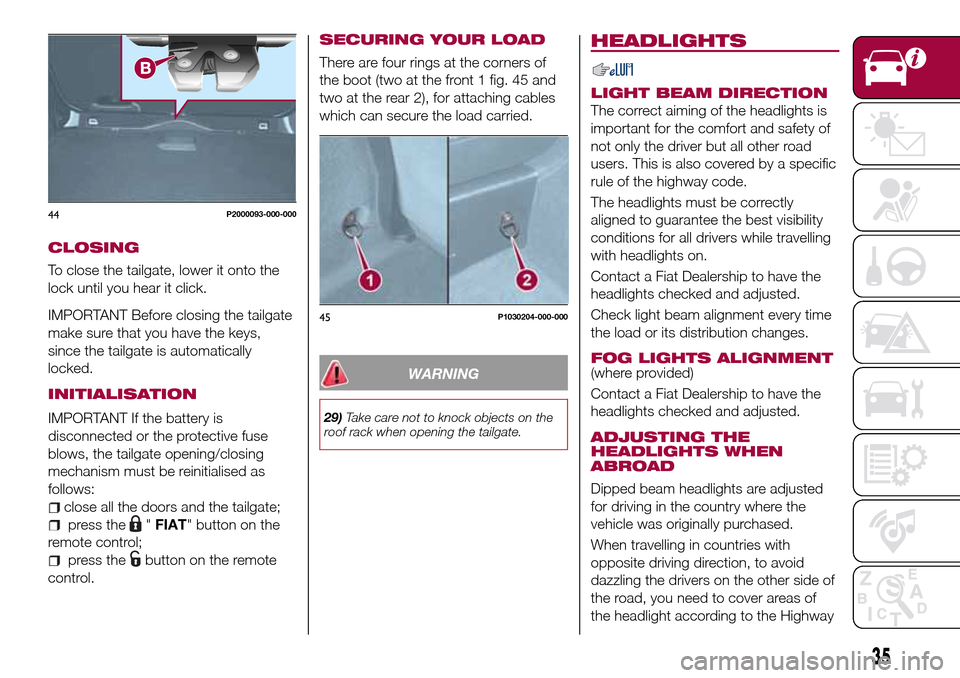
There are four rings at the corners of
the boot (two at the front 1 fig. 45 and
two at the rear 2), for attaching cables
which can secure the load carried.
WARNING
29)Take care not to knock objects on the
roof rack when opening the tailgate.
HEADLIGHTS
LIGHT BEAM DIRECTION
The correct aiming of the headlights is
important for the comfort and safety of
not only the driver but all other road
users. This is also covered by a specific
rule of the highway code.
The headlights must be correctly
aligned to guarantee the best visibility
conditions for all drivers while travelling
with headlights on.
Contact a Fiat Dealership to have the
headlights checked and adjusted.
Check light beam alignment every time
the load or its distribution changes.
FOG LIGHTS ALIGNMENT(where provided)
Contact a Fiat Dealership to have the
headlights checked and adjusted.
ADJUSTING THE
HEADLIGHTS WHEN
ABROAD
Dipped beam headlights are adjusted
for driving in the country where the
vehicle was originally purchased.
When travelling in countries with
opposite driving direction, to avoid
dazzling the drivers on the other side of
the road, you need to cover areas of
the headlight according to the Highway
44P2000093-000-000
45P1030204-000-000
35
Page 41 of 240
DISPLAY
DESCRIPTION
The vehicle is equipped with a display
that can show useful information to the
driver while driving.
With the ignition device in STOP
position and ignition key removed, the
display lights up and shows the time
and total odometer reading (in km or
miles) for a few seconds when a door is
opened/closed.
GEAR SHIFT INDICATOR
The Gear Shift Indicator (GSI) system
advises the driver to change gear
through a special indication on the
display.
Through the GSI, the driver is informed
that the gear change will allow a
reduction in fuel consumption.
When the
symbol appears on the
display, the GSI suggests switching to a
higher gear, while when the
symbol
is displayed, the GSI suggests
changing to a lower gear.
The indication in the display remains
until a gear is shifted or the driving
conditions go back to a situation where
gearshifting is not required to improve
consumption.
RECONFIGURABLE
MULTIFUNCTION
DISPLAY
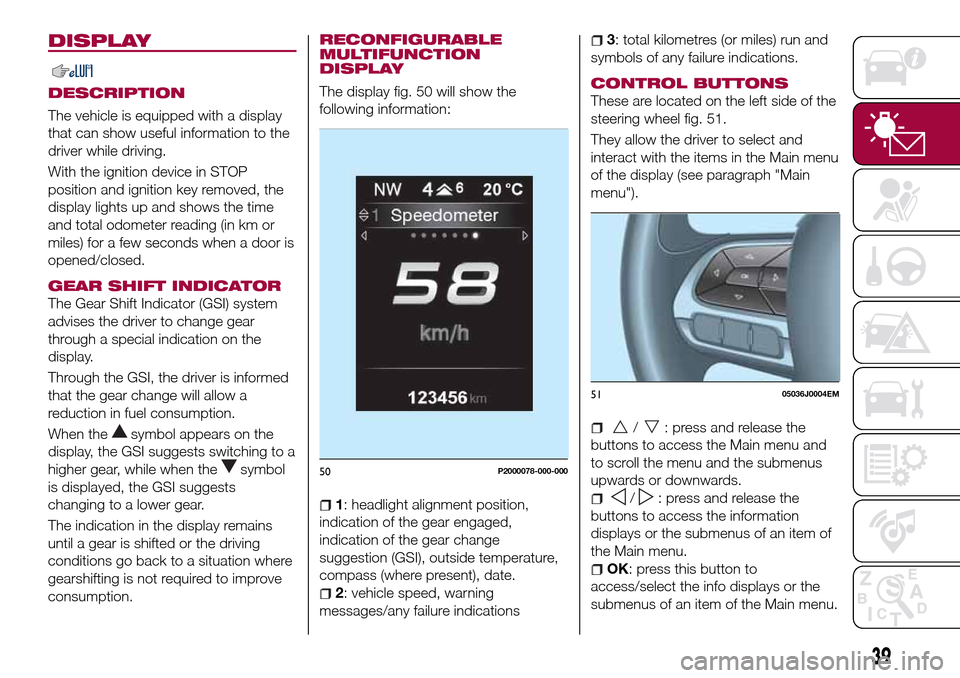
The display fig. 50 will show the
following information:
1: headlight alignment position,
indication of the gear engaged,
indication of the gear change
suggestion (GSI), outside temperature,
compass (where present), date.
2: vehicle speed, warning
messages/any failure indications
3: total kilometres (or miles) run and
symbols of any failure indications.
CONTROL BUTTONS
These are located on the left side of the
steering wheel fig. 51.
They allow the driver to select and
interact with the items in the Main menu
of the display (see paragraph "Main
menu").
/: press and release the
buttons to access the Main menu and
to scroll the menu and the submenus
upwards or downwards.
/: press and release the
buttons to access the information
displays or the submenus of an item of
the Main menu.
OK: press this button to
access/select the info displays or the
submenus of an item of the Main menu.
50P2000078-000-000
5105036J0004EM
39
Page 42 of 240
to reset the displayed/selected
functions.
MAIN MENU
The Main menu comprises a series of
items which can be selected using the
control buttons to access the different
selection and setting options given in
the following paragraphs.
REMARKS
Some options have a submenu.
With theUconnect™ 5"or7" HD
system, some Menu items are shown
and managed on the display of the
latter and not on the instrument panel
display (refer to the dedicated
Multimedia chapter or to the
supplement available online).
MENU OPTIONS
The Menu includes the following items:
TRIP
GSI
VEHICLE INFO
DRIVER ASSIST
AUDIO
PHONE
NAVIGATION
ALERTS
SYSTEM VEHICLE
Trip
This menu item displays the information
on the "Trip computer" (for furtherinformation, see the description of the
"Trip computer" paragraph in this
chapter).
The information shown on the display is
as follows:
Instant info: distance (km or miles),
instantaneous consumption (mpg,
l/100 km or km/l);
Trip A: distance A (km or miles), trip
time A (hours/minutes/seconds),
average consumption A (mpg, or
l/100 km or km/l), average speed A
(km/h or mph);
Trip B: distance B (km or miles),
average consumption B (mpg, or
l/100 km or km/l), trip time B
(hours/minutes/seconds), average
speed B (km/h or mph).
Speedometer: km or miles displayed.
By pressing theOKbutton with
speedometer display active, you can
change the measurement unit (km/h
or mph). On leaving this screen, the
measurement unit set will take effect.
GSI
This menu item makes it possible to
see the gear shift indicator provided by
the GSI (gear shift indicator) system on
the display.
Vehicle info
This menu item displays the information
on the vehicle conditions.Press the
orbutton to select the
items listed below.
Tyre pressure: information displayed on
the iTPMS (where provided) (for further
information, see the description in
paragraph "Auxiliary driving systems" in
the "Safety" chapter).
Engine oil temperature: engine oil
temperature displayed.
Change engine oil: indication for engine
oil change.
Battery voltage: display of the battery
voltage value (charge level).
Service (Scheduled servicing):Number
of kilometres (or miles) and days until
the next Scheduled Servicing operation.
WARNING
The “Scheduled Servicing Plan”
includes vehicle maintenance at fixed
intervals (refer to the "Maintenance and
care" chapter).
This is displayed automatically, with
ignition device at MAR, 2000 km before
servicing or, where provided, 30 days
before servicing. It is also displayed
each time the ignition device is turned
to MAR or, for some versions, every
200 km. Below this threshold servicing
indications are more frequent. The
display will be in km or miles according
to the unit of measurement set.
40
KNOWING THE INSTRUMENT PANEL
Hold the button pressed for 1 second
Page 43 of 240
is approaching ("coupon"), the word
"Service" will be displayed, followed by
the number of kilometres/miles or days
left, when the ignition device is turned
to MAR. Go to a Fiat Dealership, where
the "Scheduled Servicing Plan"
operations will be performed and the
message will be reset.
Driver Assist
This menu item allows you to view and
change the Adaptive Cruise Control
(ACC) settings on the instrument panel
display.
Audio
This Menu item allows some
information displayed on the
Uconnect™system to be repeated on
the instrument panel display (for further
information see the dedicated chapter).
Phone
(where provided)
This Menu item allows some
information displayed on the
Uconnect™system to be repeated on
the instrument panel display (for further
information see the dedicated chapter).
The information displayed includes the
mobile pairing condition (mobile paired
or not paired), active/incoming/on hold
calls and the management of double
calls (first incoming, second on hold,
etc.).In the phone menu, you can also select
3 sub-menus “SMS reader”, “recent
calls” and “favourite numbers” (available
with theUconnect™7'' HDsystem),
which can be selected with the arrows
or. This menu can also be used
to select and manage the last 10 calls
or the last 10 SMS using the directional
buttons on the steering wheel.
Navigation
(where provided)
This Menu item allows some
information displayed on the
Uconnect™ 5"o7" HDsystem to be
shown on the instrument panel display
(for further information see the
dedicated chapter).
Alerts
This menu item displays information/
failure messages stored by the system.
System Vehicle
This menu item allows you to change
the settings for:
Display;
Units;
Clock & Date;
Safety;
Safety & Assistance;
Lights;
Doors & Locks.Display
By selecting item "Display" you can
access the following settings:
System Display (changing instrument
panel display settings): this menu item
makes it possible to change the
displaying of the information, for
example the Compass (where present),
Outside temperature, Date (day/month),
Time (hours/minutes), Audio information
(where present). Selecting “Reset of the
default settings” makes it possible to
reset and restore the default settings;
Language: allows you to select the
language for showing the
information/warnings;
See phone: used to activate/
deactivate the display of pop-ups on
the instrument panel when there are
incoming calls, outgoing calls, on hold
calls, audio conference and incoming
SMS (where available);
See navigation: allows you to display
the information about the Navigation
mode on the instrument panel;
Automatic Trip B reset: allows you to
set the reset options for Trip B;
Display lighting: this function is used
to set the brightness level (8 levels) for
the display and all the other backlit
components. The display brightness
can be adjusted in all environmental
conditions, whereas all the other
components (e.g. climate control, radio,
41
When the following scheduled servicing
Page 45 of 240
TRIP COMPUTER
The "Trip computer" is used to display
information on vehicle operation when
the ignition device is at MAR.
This function has two separate
memories, called “Trip A” and “Trip B”,
where the trip data are recorded
separately from each other.
Both memories can be reset.
“Trip A” and “Trip B” are used to display
the values relating to:
Autonomy
Instant consumption
Distance (distance travelled)
Average fuel consumption
Average speed
Trip time (driving time)
NOTE The displayed data can change
based on the vehicle version.
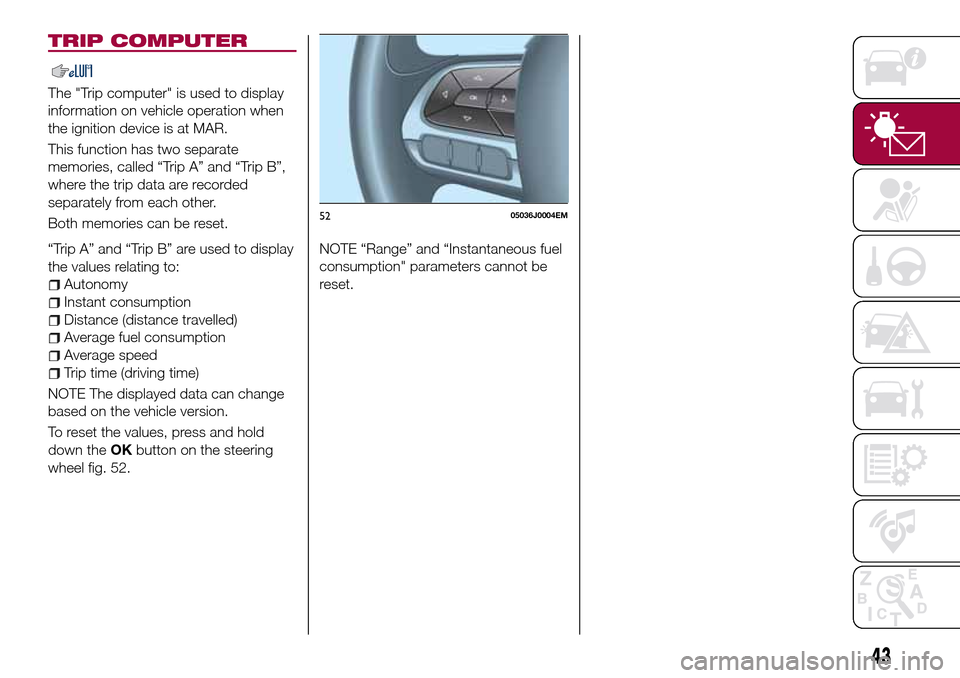
To reset the values, press and hold
down theOKbutton on the steering
wheel fig. 52.NOTE “Range” and “Instantaneous fuel
consumption" parameters cannot be
reset.
5205036J0004EM
43
Page 54 of 240

Symbol What it means
ENGINE OIL DETERIORATED
(where provided)
Diesel versions: the symbol turns on and is displayed for 3 minute cycles and intervals of 5
seconds until the oil is changed.
The symbol is displayed until the problem is solved.
Petrol versions: the symbol switches on and then is not displayed when the display cycle is
completed.
IMPORTANT After the first indication, each time the engine is started the symbol will continue
to switch on as described above until the oil is changed.
If the symbol flashes, this does not mean that there is a fault on the vehicle, rather it simply
reports that it is now necessary to change the oil as a result of regular use of the vehicle.
The deterioration of engine oil is accelerated by using the vehicle for short drives, preventing
the engine from reaching operating temperature.
Contact a Fiat Dealership as soon as possible.
14) 15)
RAIN SENSOR FAILURE
The symbol switches on in the case of failure of the rain sensor. Contact a Fiat Dealership as
soon as possible.
FUEL CUT-OFF SYSTEM OPERATION
The symbol switches on in the event of fuel cut-off system intervention.
For reactivating the fuel cut-off system, refer to the description in the "Fuel cut-off system"
section in the "In an emergency" chapter. If it is still not possible to restore the fuel supply,
contact a Fiat Dealership.
FUEL CUT-OFF SYSTEM FAILURE
The symbol switches on in the event of fuel cut-off system failure. Contact a Fiat Dealership as
soon as possible.
WATER IN DIESEL FILTER (Diesel versions)
The symbol switches on constantly when driving (along with a message in the display), to
indicate the presence of water in the diesel filter.
16)
START&STOP SYSTEM FAILURE
(for versions/markets, where provided)
The symbol switches on to report a failure of the Start&Stop system. The display will show a
dedicated message. Contact a Fiat Dealership as soon as possible.
52
KNOWING THE INSTRUMENT PANEL