2016 FIAT TIPO 4DOORS ECU
[x] Cancel search: ECUPage 17 of 204
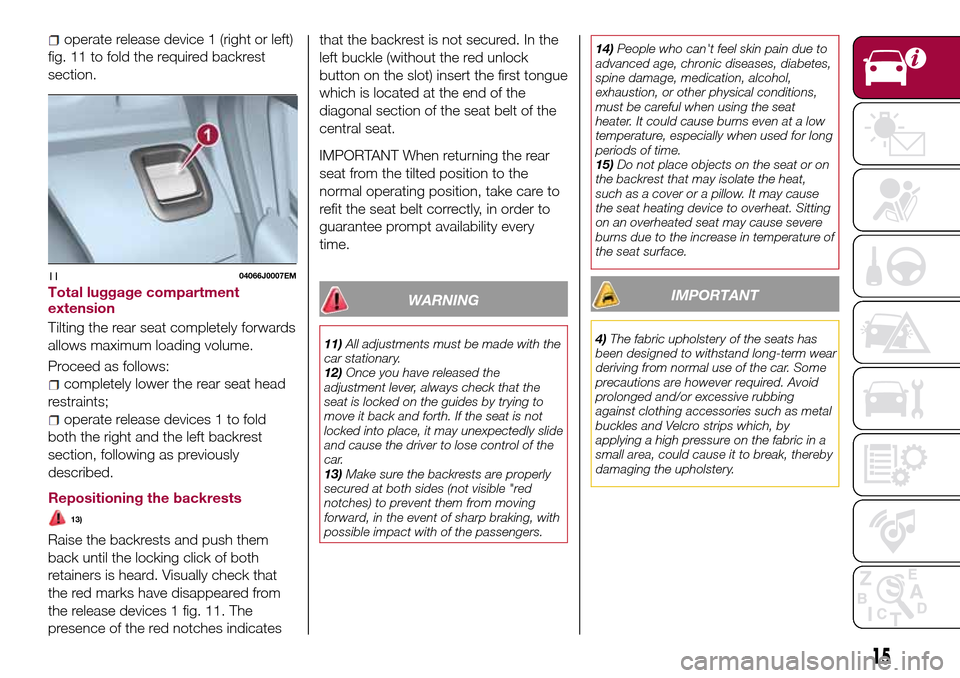
fig. 11 to fold the required backrest
section.
Total luggage compartment
extension
Tilting the rear seat completely forwards
allows maximum loading volume.
Proceed as follows:
completely lower the rear seat head
restraints;
operate release devices 1 to fold
both the right and the left backrest
section, following as previously
described.
Repositioning the backrests
13)
Raise the backrests and push them
back until the locking click of both
retainers is heard. Visually check that
the red marks have disappeared from
the release devices 1 fig. 11. The
presence of the red notches indicatesthat the backrest is not secured. In the
left buckle (without the red unlock
button on the slot) insert the first tongue
which is located at the end of the
diagonal section of the seat belt of the
central seat.
IMPORTANT When returning the rear
seat from the tilted position to the
normal operating position, take care to
refit the seat belt correctly, in order to
guarantee prompt availability every
time.
WARNING
11)All adjustments must be made with the
car stationary.
12)Once you have released the
adjustment lever, always check that the
seat is locked on the guides by trying to
move it back and forth. If the seat is not
locked into place, it may unexpectedly slide
and cause the driver to lose control of the
car.
13)Make sure the backrests are properly
secured at both sides (not visible "red
notches) to prevent them from moving
forward, in the event of sharp braking, with
possible impact with of the passengers.14)People who can't feel skin pain due to
advanced age, chronic diseases, diabetes,
spine damage, medication, alcohol,
exhaustion, or other physical conditions,
must be careful when using the seat
heater. It could cause burns even at a low
temperature, especially when used for long
periods of time.
15)Do not place objects on the seat or on
the backrest that may isolate the heat,
such as a cover or a pillow. It may cause
the seat heating device to overheat. Sitting
on an overheated seat may cause severe
burns due to the increase in temperature of
the seat surface.
IMPORTANT
4)The fabric upholstery of the seats has
been designed to withstand long-term wear
deriving from normal use of the car. Some
precautions are however required. Avoid
prolonged and/or excessive rubbing
against clothing accessories such as metal
buckles and Velcro strips which, by
applying a high pressure on the fabric in a
small area, could cause it to break, thereby
damaging the upholstery.
1104066J0007EM
15
operate release device 1 (right or left)
Page 42 of 204

CONTROL BUTTONS
These are located on the left side of the
steering wheel fig. 51.
They allow the driver to select and
interact with the items in the Main menu
of the display (see paragraph "Main
menu").
/: press and release the
buttons to access the Main menu and
to scroll the menu and the submenus
upwards or downwards.
/: press and release the
buttons to access the information
displays or the submenus of an item of
the Main menu.
OK: press this button to
access/select the info displays or the
submenus of an item of the Main menu.
Hold the button pressed for 1 second
to reset the displayed/selected
functions.
MAIN MENU
The Menu includes the following items:
TRIP
GSI
VEHICLE INFO
AUDIO
TELEPHONE
NAVIGATION
ALERTS
SYSTEM VEHICLE
System Vehicle
This menu item allows you to change
the settings for:
Display;
Units;
Clock & Date;
Safety
Safety & Assistance;
Lights;
Doors & Locks.
Display
By selecting item "Display" you can
access the settings/information
regarding: " Display settings”,
"Language", "See phone", "See
navigation", "Automatic Trip B reset",
“Display lighting”.
Unit of measurement
Select item "Units" to choose the unit of
measurement between: "Imperial",
"Metric", "Customised".Clock & Date
Select item "Clock & Date" to make the
following adjustments: "Set time", "Time
format", "Set date".
Safety
Select item "Security" to make the
following adjustments: "Passenger
AIRBAG", "Speed beep", "Seat belt
buzzer", "Hill Hold Control".
"Passenger AIRBAG" adjustment allows
you to activate/deactivate the
passenger airbag:Passenger's
protection not active: the
LED
comes on constantly in the instrument
panel dashboard.
Safety & Assistance
Select item "Safety & Assistance" to
make the following adjustments: Rain
sensor, Park Assist, Park Assist vol.
Lights
Select item "Lights" to make the
following adjustments: "Courtesy
lights", "Daytime running lights",
"Cornering lights", "Headlamp sensor",
"Follow me".
Doors & Locks
Select item "Doors & Locks" to make
the following adjustments: "Autoclose",
"Flash Lights w/Lock", "Auto unlock on
exit".
5105036J0004EM
40
KNOWING THE INSTRUMENT PANEL
Page 70 of 204
the child restraint system which must
never be removed.
Lineaccessori MOPAR
®includes child
restraint systems for each weight
group. These devices are
recommended having been specifically
designed for Fiat vehicles.
FITTING A CHILD
RESTRAINT SYSTEM
WITH SEAT BELTS
The Universal child restraint systems
installed with the seat belts only are
type-approved on the basis of the ECE
R44 standard and are divided into
various weight groups.
74) 75) 76) 77)
IMPORTANT The figures are indicative
and provided for assembly purposes
only. Fit the child restraint system
according to the instructions, which
must be included.
Group 0 and 0+
Babies up to 13 kg must be carried
with a rear facing child restraint system
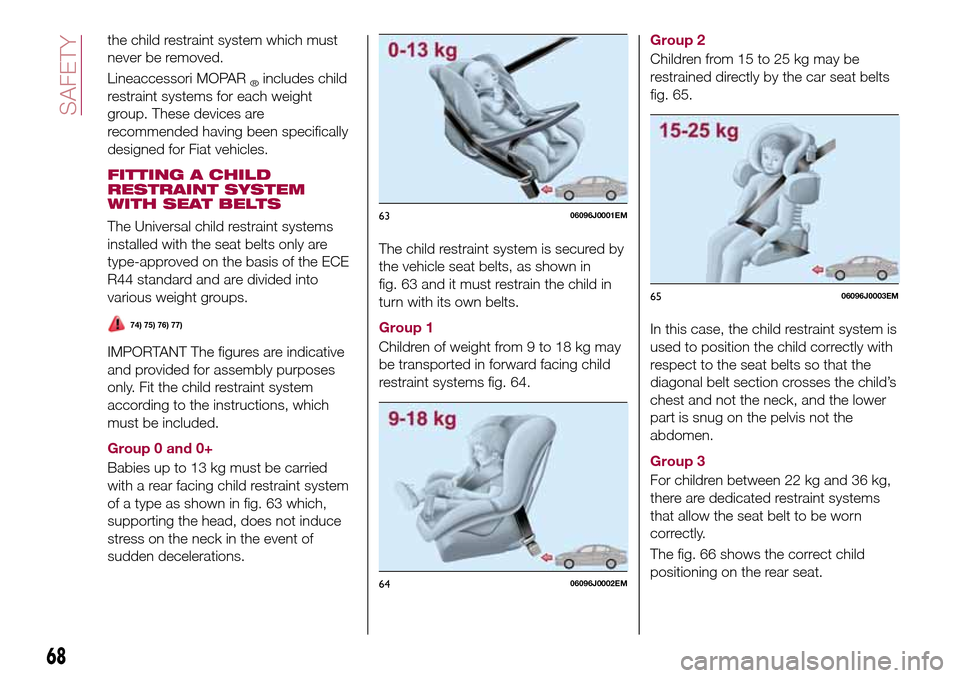
of a type as shown in fig. 63 which,
supporting the head, does not induce
stress on the neck in the event of
sudden decelerations.The child restraint system is secured by
the vehicle seat belts, as shown in
fig. 63 and it must restrain the child in
turn with its own belts.
Group 1
Children of weight from 9 to 18 kg may
be transported in forward facing child
restraint systems fig. 64.Group 2
Children from 15 to 25 kg may be
restrained directly by the car seat belts
fig. 65.
In this case, the child restraint system is
used to position the child correctly with
respect to the seat belts so that the
diagonal belt section crosses the child’s
chest and not the neck, and the lower
part is snug on the pelvis not the
abdomen.
Group 3
For children between 22 kg and 36 kg,
there are dedicated restraint systems
that allow the seat belt to be worn
correctly.
The fig. 66 shows the correct child
positioning on the rear seat.
6306096J0001EM
6406096J0002EM
6506096J0003EM
68
SAFETY
Page 78 of 204
Main recommendations to carry
children safely
Install the child restraint systems on
the rear seat, which is the most
protected position in the event of an
impact.
Keep children in rearward facing child
restraint systems for as long as
possible, until 3–4 years old if possible.
If the passenger's front airbag is
deactivated always check the
dedicated warning light on the trim
located on the dashboard to make sure
that it has actually been deactivated.
Carefully follow the instructions
supplied with the child restraint system.
Keep the instructions in the vehicle
along with the other documents and
this handbook. Do not use
second-hand child restraint systems
without instructions.
Only one child is to be strapped into
each restraint system; never carry two
children using one child restraint
system.
Always check that the seat belts do
not rest on the child’s neck.
Always check that the seat belt is
well fastened by pulling on it.
While travelling, do not let the child
sit incorrectly or unfasten the belts.
Never allow a child to put the belt's
diagonal section under an arm or
behind their back.
Never carry children on your lap,
even newborns. No one can hold a
child in the case of an accident.
In the event of an accident, replace
the child restraint system with a new
one. In addition, and depending on the
type of child restraint system installed,
replace the seat belt with which the
child restraint system was connected.
WARNING
70)SEVERE DANGER When a front
passenger airbag is fitted, do not install
rearward facing child restraint systems on
the front passenger seat. Deployment of
the airbag in an accident could cause fatal
injuries to the child regardless of the
severity of the collision. It is advisable to
always carry children in a child restraint
system on the rear seat, which is the most
protected position in the event of a
collision.
71)On the sun visor there is a label with
suitable symbols reminding the user that it
is compulsory to deactivate the airbag if a
rearward facing child restraint system is
fitted. Always comply with the instructions
on the passenger side sun visor (see the
"Supplementary Restraint System (SRS) -
Airbag" paragraph).72)Should it be necessary to carry a child
on the passenger side front seat in a rear
facing child restraint system, the passenger
side front airbag and side bag must be
deactivated through the Connect system
main menu (see the "Supplementary
Restraint System (SRS) - Airbag"
paragraph), verifying deactivation by
checking whether the
LED has
illuminated on the front ceiling light. Move
the passenger's seat as far back as
possible to avoid contact between the
child seat and the dashboard.
73)Do not move the front or rear seat if a
child is seated on it or on the dedicated
child restraint system
74)Incorrect fitting of the child restraint
system may result in an inefficient
protection system. In the event of an
accident the child restraint system may
become loose and the child may be
injured, even fatally. When fitting a restraint
system for newborns or children, strictly
comply with the instructions provided by
the Manufacturer.
75)When the child restraint system is not
used, secure it with the seat belt or with
the ISOFIX anchorages, or remove it from
the vehicle. Do not leave it unsecured
inside the passenger compartment. In this
way, in the case of sudden braking or an
accident, it will not cause injuries to the
occupants.
76)After installing a child restraint system,
do not move the seat: always remove the
child restraint system before making any
adjustment.
76
SAFETY
Page 79 of 204
77)Always make sure that the diagonal
section of the seat belt does not pass
under the arms or behind the back of the
child. In the event of an accident the seat
belt will not be able to secure the child,
with the risk of injury, including fatal injury.
Therefore the child must always wear the
seat belt correctly.
78)Do not use the same lower anchorage
to install more than one child restraint
system.
79)If a Universal ISOFIX child restraint
system is not fixed to all three anchorages,
it will not be able to protect the child
correctly. In a crash, the child could be
seriously or fatally injured.
80)Fit the child restraint system when the
car is stationary. The child restraint system
is correctly fixed to the brackets when you
hear the click. Follow the instructions for
assembly, disassembly and positioning that
the Manufacturer must supply with the
child restraint system.
81)If the vehicle was involved in an
accident of a certain severity, have the
ISOFIX anchorages and the child restraint
system replaced.
82)If the vehicle was involved in an
accident of a certain severity, have both the
child restraint system and the seat belt it
was attached to replaced.SUPPLEMENTARY
RESTRAINT SYSTEM
(SRS) - AIRBAG
The vehicle is equipped with:
front driver airbag;
front passenger airbag;
driver and passenger front side bags
(if present) for pelvis, chest and
shoulder protection (Side bags);
side bags (if present) for head
protection of front seat passengers and
rear side seat passengers (window
bag).
The location of the airbags on the
vehicle is marked by the word
"AIRBAG" in the middle of the steering
wheel, on the dashboard, on the side
trim or on a label placed next to the
airbag deployment area.
FRONT AIRBAGS
The front (driver and passenger) airbags
protect the front seat occupants in the
event of head-on crashes of
medium-high severity, by placing the
cushion between the occupant and the
steering wheel or dashboard.
The non-activation of airbags in other
types of collisions (side impacts, rear
shunts, roll-overs, etc...) (if present)
therefore does not indicate a system
malfunction.
Driver and passenger front airbags arenot a replacement of but
complementary to the seat belts, which
should always be worn, as specified by
law in Europe and most non-European
countries.
In the event of impact, those not
wearing a seat belt are projected
forwards and may come into contact
with the bag which is still inflating. The
protection offered by the bag is
compromised in these circumstances.
Front airbags may not activate in the
following situations:
frontal impacts against highly
deformable objects not involving the
front surface of the vehicle (e.g. wing
collision against guard rail, etc.);
vehicle wedging under other
vehicles or protective barriers (e.g.
trucks or guard rails).
Failure to activate in the conditions
described above is due to the fact that
they may not provide any additional
protection compared with seat belts, so
their activation would be inappropriate.
In these cases, non-deployment does
not indicate a system malfunction.
Driver's side front airbag
This consists of an instantly inflating
bag contained in a special
compartment in the centre of the
steering wheel fig. 71.
77
Page 87 of 204
20)When the engine is switched off never
leave the ignition device in the MAR
position to prevent useless current
absorption from draining the battery.
21)A quick burst on the accelerator before
turning off the engine serves absolutely no
practical purpose; it wastes fuel and is
especially damaging to turbocharged
engines.
22)Warning light
will flash after starting
or during prolonged cranking to indicate a
fault with the glow plug heating system. If
the engine starts, the vehicle can be used
as normal, but a Fiat Dealership must be
contacted as soon as possible.
PARKING BRAKE
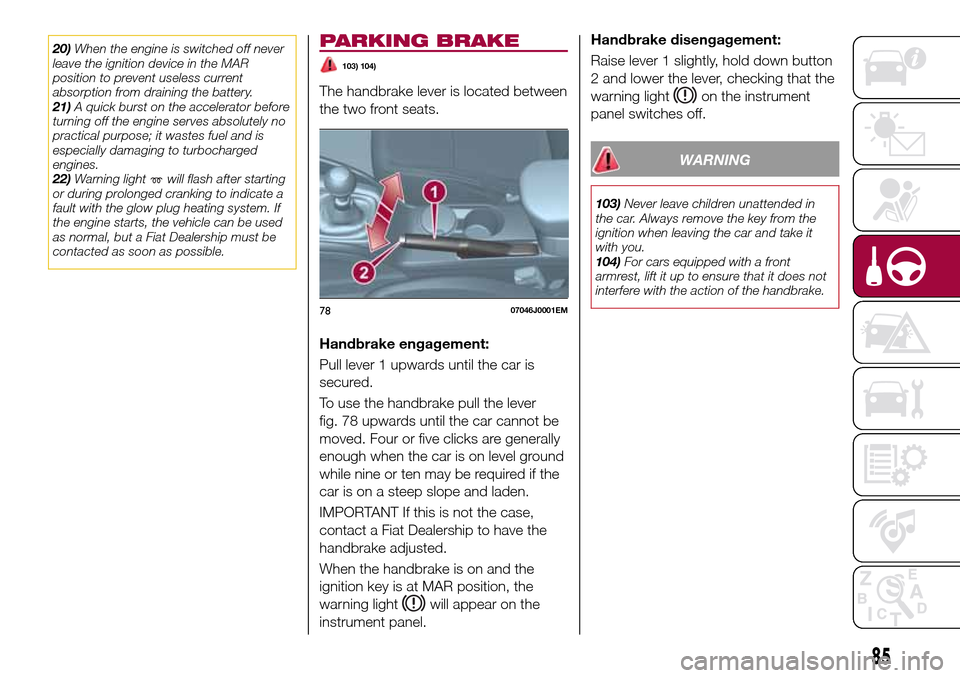
103) 104)
The handbrake lever is located between
the two front seats.
Handbrake engagement:
Pull lever 1 upwards until the car is
secured.
To use the handbrake pull the lever
fig. 78 upwards until the car cannot be
moved. Four or five clicks are generally
enough when the car is on level ground
while nine or ten may be required if the
car is on a steep slope and laden.
IMPORTANT If this is not the case,
contact a Fiat Dealership to have the
handbrake adjusted.
When the handbrake is on and the
ignition key is at MAR position, the
warning light
will appear on the
instrument panel.Handbrake disengagement:
Raise lever 1 slightly, hold down button
2 and lower the lever, checking that the
warning light
on the instrument
panel switches off.
WARNING
103)Never leave children unattended in
the car. Always remove the key from the
ignition when leaving the car and take it
with you.
104)For cars equipped with a front
armrest, lift it up to ensure that it does not
interfere with the action of the handbrake.
7807046J0001EM
85
Page 95 of 204

interference") due to mechanical
interference, for example when washing
the vehicle, in rain (strong wind), hail;
the signals sent by the sensor can
also be altered by the presence of
ultrasonic systems (e.g. pneumatic
brake systems of trucks or pneumatic
drills) near the vehicle;
parking assistance system
performance can also be influenced by
the position of the sensors, for example
due to a change in the ride setting
(caused by wear to the shock
absorbers, suspension), or by changing
tyres, overloading the vehicle or fitting
specific trims that require the vehicle to
be lowered;
the presence of a tow hook without
trailer, which may interfere with the
correct operation of the parking
sensors. In the case of vehicles fitted
with removable tow hook, whether as
standard or installed after the vehicle
was purchased, it is advisable to
remove it whenever it is not used, to
prevent incorrect operation of the
sensors;
the presence of adhesives on the
sensors. Therefore, take care not to
place adhesives on the sensors.
WARNING
113)Parking and other potentially
dangerous manoeuvres are, however,
always the driver’s responsibility. When
performing these operations, always make
sure that there are no other people
(especially children) or animals on the route
you want to take. The parking sensors are
an aid for the driver, but the driver must
never allow their attention to lapse during
potentially dangerous manoeuvres, even
those executed at low speeds.
IMPORTANT
27)The sensors must be clean of mud,
dirt, snow or ice in order for the system to
operate correctly. Be careful not to scratch
or damage the sensors while cleaning
them. Avoid using dry, rough or hard
cloths. The sensors should be washed
using clean water with the addition of car
shampoo if necessary. When using special
washing equipment such as high pressure
jets or steam cleaning, clean the sensors
very quickly keeping the jet more than 10
cm away.
28)Have interventions on the bumper in
the area of the sensors carried out only by
a Fiat Dealership. Interventions on the
bumper that are not carried out properly
may compromise the operation of the
parking sensors29)Only have the bumpers repainted or
any retouches to the paintwork in the area
of the sensors carried out by a Fiat
Dealership. Incorrect paint application
could affect the operation of the parking
sensors.
93
Page 96 of 204

REAR VIEW CAMERA
(where provided)
DESCRIPTION
The rear camera 1 fig. 84 is located on
the rear lid.
114)
30)
Every time reverse is engaged, the
display fig. 85 shows the area around
the vehicle, as seen by the rear camera.
SYMBOLS AND
MESSAGES ON THE
DISPLAY
A superimposed central broken line
indicates the centre of the vehicle to
facilitate parking manoeuvres or tow
hook alignment. The various coloured
areas indicate the distance from the
rear of the vehicle.
The table below shows the approximate
distances for each area fig. 85:
AreaDistance from the
rear of the vehicle
Red (1) 0–30 cm
Yellow (2) 30–100 cm
Green (3) 1 m or more
IMPORTANT When parking, take the
utmost care over obstacles that may be
above or under the camera range.
WARNING
114)Parking and other potentially
dangerous manoeuvres are, however,
always the driver’s responsibility. While
carrying out these manoeuvres, always
make sure that no people (especially
children) or animals are in the area
concerned. The camera is an aid for the
driver, but the driver must never allow
his/her attention to lapse during potentially
dangerous manoeuvres, even those
executed at low speeds. Always keep a
slow speed, so as to promptly brake in the
case of obstacles.
IMPORTANT
30)It is vital, for correct operation, that the
camera is always kept clean and free from
any mud, dirt, snow or ice. Be careful not
to scratch or damage the camera while
cleaning it. Avoid using dry, rough or hard
cloths. The camera must be washed using
clean water, with the addition of car
shampoo if necessary. In washing stations
which use steam or high-pressure jets,
clean the camera quickly, keeping the
nozzle more than 10 cm away from the
sensors. Also, do not apply stickers to the
camera.8407186J0001EM
8507186J0002EM
94
STARTING AND DRIVING