Page 99 of 204

WARNING
117)Do not apply any object/plug to the
end of the filler which is not provided for
the car. The use of non-compliant
objects/plugs could cause a pressure
increase inside the tank, resulting in
dangerous situations.
118)Do not bring naked flames or lit
cigarettes near to the fuel filler: fire risk.
Keep your face away from the fuel filler to
prevent breathing in harmful vapours.
119)Do not use a mobile phone near the
refuelling pump: risk of fire.
IMPORTANT
31)For diesel engines, only use diesel fuel
for motor vehicles in accordance with EN
590 European specifications. The use of
other products or mixtures may damage
the engine beyond repair and consequently
invalidate the warranty, due to the damage
caused. If you accidentally introduce other
types of fuel into the tank, do not start the
engine. Empty the tank. If the engine has
been run for even an extremely limited
amount of time, you must not only drain the
fuel tank, but the rest of the supply circuit
as well.
97
Page 104 of 204

REPLACING AN
EXTERNAL BULB
Front bulb position
1. Dipped headlights
2. Fog lights
3. Main beam headlights/Daytime
running lights (DRL)
4. Direction indicator.
Main beam headlights/Daytime
running lights (DRL)
To replace the bulb 3 fig. 89, proceed
as follows:
working from inside the engine
compartment, remove rubber cap 1
fig. 90;
rotate the bulb-bulb holder assembly
anticlockwise and extract it;
disconnect the electrical connector
and replace the bulb-bulb holder
assembly 2;
reconnect the electrical connector to
the new assembly;
then insert the assembly in its
housing and turn it clockwise, making
sure that it is locked correctly;
refit the rubber cap 1.
IMPORTANT Only replace the bulb
when the engine is off. Also ensure that
the engine is cold, to prevent the risk of
burns.
Dipped headlights
Right headlight
To replace the bulb 1 fig. 89, proceed
as follows:
steer the vehicle wheels completely
inwards;
adjust the tabs indicated in the figure
fig. 91 and remove the flap;
remove the rubber plug
disconnect the electrical connector;
extract the bulb, releasing it from the
retaining springs;
replace the new bulb and carry out
the procedure described previously in
reverse.
Left headlight
working from inside the engine
compartment, remove the rubber cap
from the dipped beam headlight bulb 1
fig. 89;
extract the bulb, releasing it from the
retaining springs;
disconnect the electrical connector
and replace the bulb 1 fig. 89;
reconnect the electrical connector to
the new bulb;
8908026J0002EM
9008026J0025EM9108026J0004EM
102
IN AN EMERGENCY
Page 105 of 204

reposition the assembly in the seat;
refit the rubber cap.
IMPORTANT Only replace the bulb
when the engine is off. Also ensure that
the engine is cold, to prevent the risk of
burns.
Front direction indicators
To replace the bulb 4 fig. 89, proceed
as follows:
use the provided screwdriver to lift
the indicated pins and remove the
cover 1 fig. 92;
rotate the bulb-bulb holder assembly
anticlockwise;
replace the "bayonet-fitted" bulb;
then insert the bulb and bulb holder
assembly in its housing and turn it
clockwise, making sure that it is locked
correctly;
refit the cover and block it by placing
its pins in their seats.
Front fog lights
To replace the bulbs, proceed as
follows:
steer the vehicle wheels completely
inwards;
adjust the tabs indicated in
fig. 93 and remove the flap;
turn the bulb-bulb holder assembly 1fig. 94 anticlockwise and then remove it
sliding it outwards;
disconnect the electrical connector;
reconnect the connector to the new
assembly: then insert it, turning it
clockwise, ensuring that it locks
correctly;
finally, refit the inspection lid.
Side direction indicators
To replace the bulb, proceed as follows:
adjust the lens 1 fig. 95 to compress
in the internal clip 2, then pull the
cluster outwards;
turn the bulb holder 3 anticlockwise,
extract the press-fitted bulb 4 and
replace it;
refit the bulb holder 3 in the lens and
turn it clockwise;
refit the cluster making sure that the
internal clip 2 clicks into position.
9208026J0011EM
9308026J0012EM
9408026J0016EM
9508026J0005EM
103
Page 108 of 204
IMPORTANT
32)Halogen bulbs must be handled
holding the metallic part only. Touching the
transparent part of the bulb with your
fingers may reduce the intensity of the
emitted light and even reduce the lifespan
of the bulb. In the event of accidental
contact, wipe the bulb with a cloth
moistened with alcohol and let the bulb dry.
REPLACING FUSES
GENERAL
123) 124) 125) 126)
33)
Fuses protect the electrical system:
they intervene (blow) in the event of a
failure or improper action on the
system.
Fuse extracting pliers
To replace a fuse, use the pliers hooked
inside the engine compartment fuse
box cover (see fig. 106 ).
The pliers have two different ends,
specifically designed to remove the
different types of fuses present in the
vehicle.
After use, refit the pliers in position.
FUSE LOCATION
The fuses are grouped in three control
units: on the dashboard, in the engine
compartment and inside the boot.
10608036J0002EM
106
IN AN EMERGENCY
Page 109 of 204

ENGINE COMPARTMENT
FUSE BOX
34)
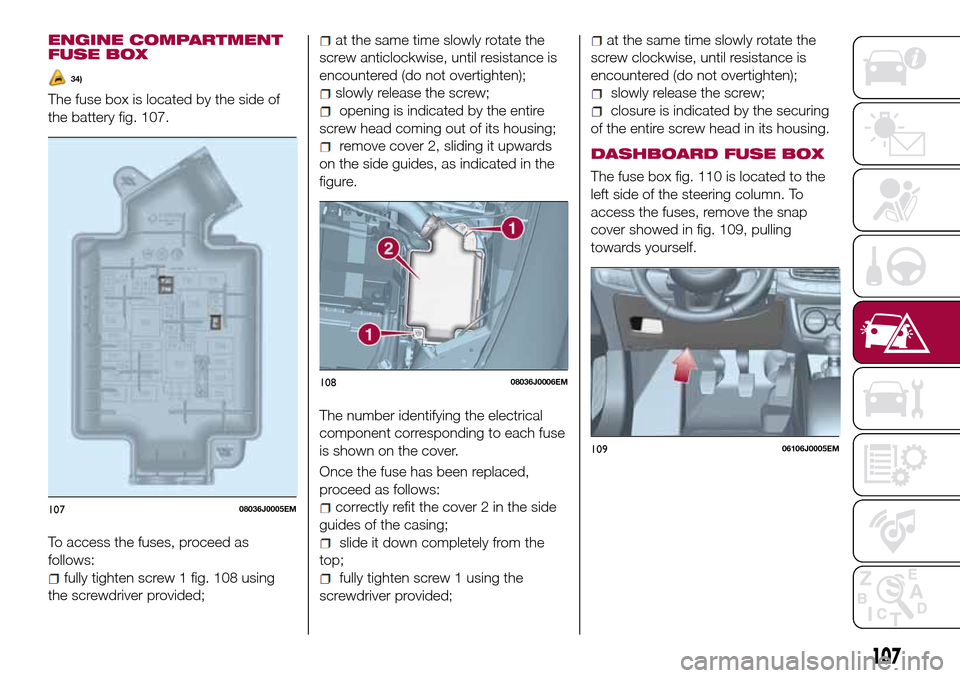
The fuse box is located by the side of
the battery fig. 107.
To access the fuses, proceed as
follows:
fully tighten screw 1 fig. 108 using
the screwdriver provided;
at the same time slowly rotate the
screw anticlockwise, until resistance is
encountered (do not overtighten);
slowly release the screw;
opening is indicated by the entire
screw head coming out of its housing;
remove cover 2, sliding it upwards
on the side guides, as indicated in the
figure.
The number identifying the electrical
component corresponding to each fuse
is shown on the cover.
Once the fuse has been replaced,
proceed as follows:
correctly refit the cover 2 in the side
guides of the casing;
slide it down completely from the
top;
fully tighten screw 1 using the
screwdriver provided;
at the same time slowly rotate the
screw clockwise, until resistance is
encountered (do not overtighten);
slowly release the screw;
closure is indicated by the securing
of the entire screw head in its housing.
DASHBOARD FUSE BOX
The fuse box fig. 110 is located to the
left side of the steering column. To
access the fuses, remove the snap
cover showed in fig. 109, pulling
towards yourself.
10708036J0005EM
10808036J0006EM
10906106J0005EM
107
Page 111 of 204
ENGINE COMPARTMENT FUSE BOX
USERSFUSE AMPERE
Two-tone horn F10 15
Heater mirrors F88 7.5
Heated rear window F20 30
DASHBOARD FUSE BOX
USERSFUSE AMPERE
Front electric window (driver side) F47 25
Front electric window (passenger side) F48 25
Supply forUconnect
™system, Climate Control system, EOBD
system, USB/AUX port, steering wheel controls.F36 15
Dead Lock device (Driver side door unlocking for
versions/markets, where provided)/Door unlocking/Central
locking/Electric rear flap unlockingF38 20
Windscreen washer pump F43 20
Rear left electric window F33 25
Rear right electric window F34 25
109
Page 112 of 204
LUGGAGE COMPARTMENT FUSE BOX
USERSFUSE AMPERE
Rear 12 V socket F97 15
Driver's front seat heater F99 10
Passenger side front seat heater F92 10
Driver's front seat lumbar adjustment F90 10
WARNING
123)If the replaced fuse blows again, contact a Fiat Dealership.
124)Never replace a fuse with another with a higher amp rating; DANGER OF FIRE
125)If a fuse NOT indicated in this or the previous page is used, contact a Fiat Dealership.
126)Before replacing a fuse, make sure that the ignition device is at STOP, that the key, if mechanical, has been removed and that all devices
are switched off and/or disconnected.
IMPORTANT
33)Never replace a fuse with metal wires or anything else.
34)If it is necessary to wash the engine compartment, take care not to directly hit the fuse box and the window wiper motor with the water jet.
110
IN AN EMERGENCY
Page 113 of 204

CHANGING A WHEEL
JACK
132)
37)
Please note that:
the jack weight is 2.15 kg;
the jack cannot be repaired and in
the event of a fault it must be replaced
by another genuine one;
No tool other than its cranking device
may be fitted on the jack.
Servicing
Prevent any dirt from depositing on
the "worm screw";
Keep the "worm screw" lubricated;
Never modify the jack.
Conditions for non-use
Temperatures below −40°C;
On sandy or muddy ground;
On uneven ground;
On steep roads;
In extreme weather conditions:
thunderstorms, typhoons, hurricanes,
blizzards, storms, etc.
In direct contact with the engine or
for repairs under the vehicle.
On boats.
CHANGING PROCEDURE
127) 128) 129) 130) 131)
35) 36)
Proceed as follows:
stop the car in a position that is not
dangerous for oncoming traffic where
you can change the wheel safely. The
ground must be flat and sufficiently
compact;
stop the engine, engage the hazard
warning lights and the parking brake;
engage first gear or reverse or, for
versions with automatic transmission (if
present), move the lever to position P
(Park);
wear the reflective safety jacket
before getting out of the car (anyway
comply with the laws in force in the
country you are driving in);
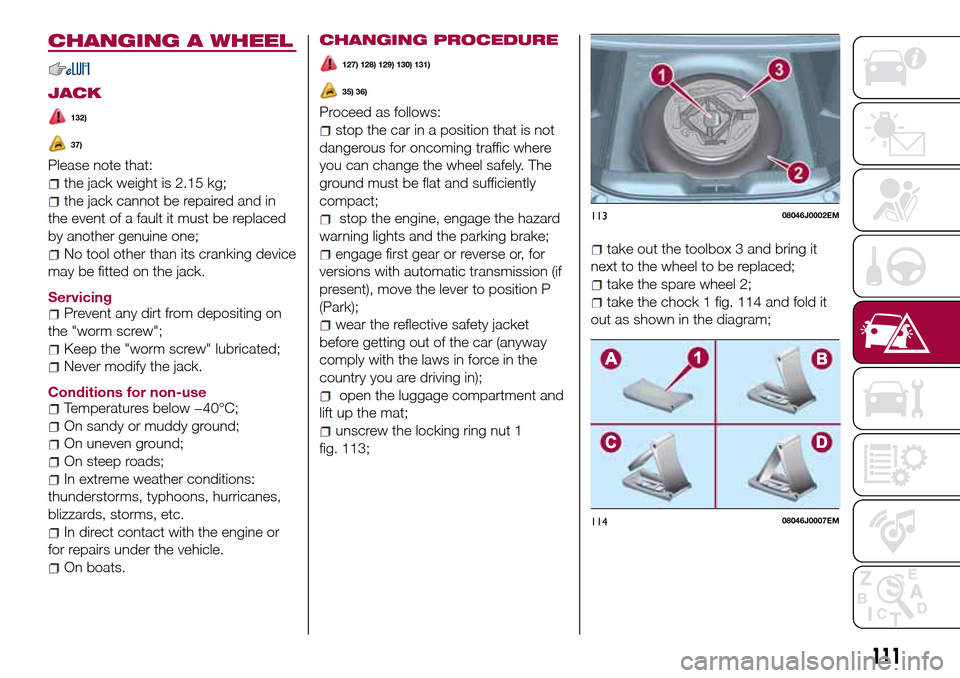
open the luggage compartment and
lift up the mat;
unscrew the locking ring nut 1
fig. 113;
take out the toolbox 3 and bring it
next to the wheel to be replaced;
take the spare wheel 2;
take the chock 1 fig. 114 and fold it
out as shown in the diagram;
11308046J0002EM
11408046J0007EM
111