2016 FIAT TIPO 4DOORS wheel
[x] Cancel search: wheelPage 79 of 204
77)Always make sure that the diagonal
section of the seat belt does not pass
under the arms or behind the back of the
child. In the event of an accident the seat
belt will not be able to secure the child,
with the risk of injury, including fatal injury.
Therefore the child must always wear the
seat belt correctly.
78)Do not use the same lower anchorage
to install more than one child restraint
system.
79)If a Universal ISOFIX child restraint
system is not fixed to all three anchorages,
it will not be able to protect the child
correctly. In a crash, the child could be
seriously or fatally injured.
80)Fit the child restraint system when the
car is stationary. The child restraint system
is correctly fixed to the brackets when you
hear the click. Follow the instructions for
assembly, disassembly and positioning that
the Manufacturer must supply with the
child restraint system.
81)If the vehicle was involved in an
accident of a certain severity, have the
ISOFIX anchorages and the child restraint
system replaced.
82)If the vehicle was involved in an
accident of a certain severity, have both the
child restraint system and the seat belt it
was attached to replaced.SUPPLEMENTARY
RESTRAINT SYSTEM
(SRS) - AIRBAG
The vehicle is equipped with:
front driver airbag;
front passenger airbag;
driver and passenger front side bags
(if present) for pelvis, chest and
shoulder protection (Side bags);
side bags (if present) for head
protection of front seat passengers and
rear side seat passengers (window
bag).
The location of the airbags on the
vehicle is marked by the word
"AIRBAG" in the middle of the steering
wheel, on the dashboard, on the side
trim or on a label placed next to the
airbag deployment area.
FRONT AIRBAGS
The front (driver and passenger) airbags
protect the front seat occupants in the
event of head-on crashes of
medium-high severity, by placing the
cushion between the occupant and the
steering wheel or dashboard.
The non-activation of airbags in other
types of collisions (side impacts, rear
shunts, roll-overs, etc...) (if present)
therefore does not indicate a system
malfunction.
Driver and passenger front airbags arenot a replacement of but
complementary to the seat belts, which
should always be worn, as specified by
law in Europe and most non-European
countries.
In the event of impact, those not
wearing a seat belt are projected
forwards and may come into contact
with the bag which is still inflating. The
protection offered by the bag is
compromised in these circumstances.
Front airbags may not activate in the
following situations:
frontal impacts against highly
deformable objects not involving the
front surface of the vehicle (e.g. wing
collision against guard rail, etc.);
vehicle wedging under other
vehicles or protective barriers (e.g.
trucks or guard rails).
Failure to activate in the conditions
described above is due to the fact that
they may not provide any additional
protection compared with seat belts, so
their activation would be inappropriate.
In these cases, non-deployment does
not indicate a system malfunction.
Driver's side front airbag
This consists of an instantly inflating
bag contained in a special
compartment in the centre of the
steering wheel fig. 71.
77
Page 82 of 204
SIDE BAGS
(where provided)
To help increase occupants protection
in the event of side impact collisions,
the vehicle is equipped with front side
bags and window bags.
Side bag
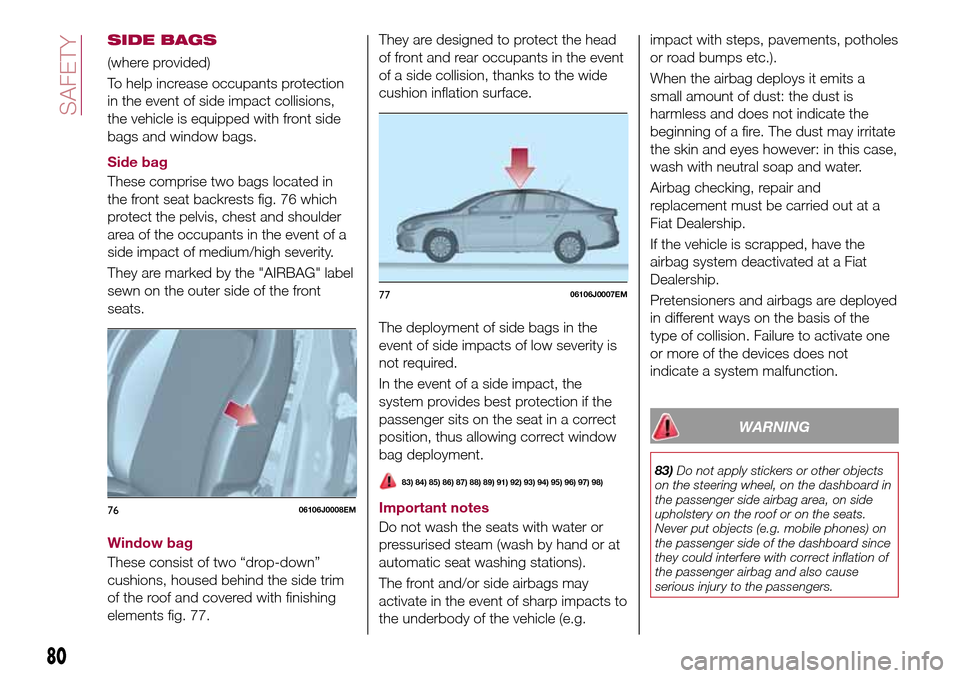
These comprise two bags located in
the front seat backrests fig. 76 which
protect the pelvis, chest and shoulder
area of the occupants in the event of a
side impact of medium/high severity.
They are marked by the "AIRBAG" label
sewn on the outer side of the front
seats.
Window bag
These consist of two “drop-down”
cushions, housed behind the side trim
of the roof and covered with finishing
elements fig. 77.They are designed to protect the head
of front and rear occupants in the event
of a side collision, thanks to the wide
cushion inflation surface.
The deployment of side bags in the
event of side impacts of low severity is
not required.
In the event of a side impact, the
system provides best protection if the
passenger sits on the seat in a correct
position, thus allowing correct window
bag deployment.
83) 84) 85) 86) 87) 88) 89) 91) 92) 93) 94) 95) 96) 97) 98)
Important notes
Do not wash the seats with water or
pressurised steam (wash by hand or at
automatic seat washing stations).
The front and/or side airbags may
activate in the event of sharp impacts to
the underbody of the vehicle (e.g.impact with steps, pavements, potholes
or road bumps etc.).
When the airbag deploys it emits a
small amount of dust: the dust is
harmless and does not indicate the
beginning of a fire. The dust may irritate
the skin and eyes however: in this case,
wash with neutral soap and water.
Airbag checking, repair and
replacement must be carried out at a
Fiat Dealership.
If the vehicle is scrapped, have the
airbag system deactivated at a Fiat
Dealership.
Pretensioners and airbags are deployed
in different ways on the basis of the
type of collision. Failure to activate one
or more of the devices does not
indicate a system malfunction.
WARNING
83)Do not apply stickers or other objects
on the steering wheel, on the dashboard in
the passenger side airbag area, on side
upholstery on the roof or on the seats.
Never put objects (e.g. mobile phones) on
the passenger side of the dashboard since
they could interfere with correct inflation of
the passenger airbag and also cause
serious injury to the passengers.
7606106J0008EM
7706106J0007EM
80
SAFETY
Page 83 of 204
84)Always drive with your hands on the
rim of the steering wheel so that the airbag
can inflate freely if required. Do not drive
with your body bent forward. Keep your
back straight against the backrest.
85)When there is an active passenger
airbag, DO NOT install rearward facing
child restraint systems on the front seat.
Deployment of the airbag in an accident
could cause fatal injuries to the child
regardless of the severity of the impact.
Therefore, always deactivate the passenger
side airbag when a rearward facing child
restraint system is installed on the front
passenger seat. The front passenger seat
must also be positioned back as far as
possible in order to prevent the child
restraint system from coming into contact
with the dashboard. Immediately reactivate
the passenger airbag as soon as the child
restraint system has been removed.
86)To deactivate the airbags using the
instrument panel menu, see the description
in the "Knowing the instrument panel"
chapter, "Menu Options" paragraph.
87)Do not affix rigid objects to the
garment hooks or support handles.
88)Do not rest your head, arms or elbows
on the door, windows or the area in which
the Window bag is located to avoid
possible injury during airbag inflation.
89)Never lean your head, arms or elbows
out of the window.90)If, when the ignition device is turned to
MAR, thewarning light does not switch
on or stays on whilst driving, a fault may
have occurred in the restraint systems. In
this case the airbags or pretensioners may
not be deployed in an impact or, in a lower
number of cases, they may be deployed
accidentally. Contact a Fiat Dealership
immediately to have the system checked.
91)In some versions, in case of a LED
failure (located on the plate of the
instrument panel), thewarning light on
the instrument panel turns on and the
passenger side airbags are deactivated.
92)On cars with side bags, do not cover
the front seat backrests with extra covers.
93)Do not travel carrying objects in your
lap, in front of your chest or between your
lips (pipe, pencils, etc.): they could cause
severe injury if the airbag is deployed.
94)If the car has been stolen or in the case
of attempt to steal it, if it has been
subjected to vandalism or floods, have the
airbag system checked by a Fiat
Dealership.95)If the ignition device is at MAR, even if
the engine is switched off, airbags may be
deployed when the vehicle is stationary
and hit by another vehicle. Therefore, even
if the vehicle is stationary, when an active
front passenger airbag is fitted, DO NOT
install rearward facing child restraint
systems on the front passenger seat.
Deployment of the airbag following an
impact could cause fatal injuries to the
child. Therefore, always deactivate the
passenger side airbag when a rearward
facing child restraint system is installed on
the front passenger seat. The front
passenger seat must also be positioned
back as far as possible in order to prevent
the child restraint system from coming into
contact with the dashboard. Immediately
reactivate the passenger airbag as soon as
the child restraint system has been
removed. Also remember that, if the
ignition device is set to STOP, none of the
safety devices (airbags or pretensioners)
will be deployed in the event of collision.
Non-deployment in such cases does not
indicate a system malfunction.
96)Malfunction of the
warning light is
indicated by the activation of an airbag
failure icon and a dedicated message on
the instrument panel display (or, for
versions where provided, by the activation
of a blinking generic failure warning light).
The pyrotechnic charges are not disabled.
Contact a Fiat Dealership immediately to
have the system checked.
97)The airbag deployment threshold is
higher than that of the pretensioners. For
collisions in the range between the two
thresholds, it is normal for only the
pretensioners to be activated.
81
Page 89 of 204
To select the "sequential" mode, move
the lever from D (Drive) to the left: the
position + (upper gear) or – (lower gear)
can be reached; these are unstable
positions, which means that the lever
always returns to the central position.
The brake pedal and button 1 fig. 80 on
the knob must be pressed to exit
position P (Park).
Also to shift from position N (neutral) to
position D (drive) or R (reverse), you
need to press the brake pedal.
IMPORTANT DO NOT accelerate while
shifting from position P (or N) to another
position.
IMPORTANT After selecting a gear, wait
a few seconds before accelerating. This
precaution is particularly important with
engine cold.
AUTOMATIC DRIVING
MODE
To select the automatic driving mode,
you need to shift the gear lever to D
(Drive): the best ratio is selected by the
electronic transmission control unit
depending on vehicle speed, engine
load (accelerator pedal position) and
gradient of the road.
D can be selected from sequential
operation in any driving conditions.
AUTOSTICK - Sequential
mode
In the case of frequent gearshifting (e.g.
when the vehicle is driven with a heavy
load, on slopes, with strong headwind),
it is recommended to use the Autostick
(sequential shifting) mode to select and
keep a lower fixed ratio.
In these conditions, using a lower gear
improves vehicle performance and
prolongs the transmission's life, limiting
gearshifting and preventing overheating.
It is possible to shift from position D
(Drive) to the sequential mode
regardless of vehicle speed.
Activation
With gear lever in position D (Drive), to
activate the sequential drive mode,
move the lever to the left (– and +
indication of the trim). The gear
engaged will be shown on the display.
Gearshifting is made by moving the
gear lever forwards, towards symbol –
or backwards, towards symbol +.
Deactivation
To deactivate the sequential driving
mode, bring the gear lever back to
position D (Drive), automatic mode.
Important notes
Do not downshift on slippery
surfaces: the drive wheels might lose
grip with following risk for the vehicle toslip. This could cause accidents or
personal injuries.
The vehicle will keep the gear
selected by the driver until the safety
conditions allow it. This means, for
example, that the system will try to
prevent the engine from switching off,
automatically downshifting if the engine
speed is too low.
TRANSMISSION
EMERGENCY FUNCTION
(where provided)
Transmission operation is constantly
monitored to detect any fault. If a
condition that might damage the
transmission is detected, the "recovery"
function is activated.
In this condition, the transmission stays
in 3
thgear, regardless of the selected
gear.
Positions P (Parking), R (Reverse) and N
(Neutral) still work. Icon
might light
up on the display.
In the case of "recovery" operation
immediately contact the nearest Fiat
Dealership.
Temporary failure
In the event of a temporary failure,
correct transmission operation can be
restored for all the forwards gears by
proceeding as follows:
stop the vehicle;
87
Page 100 of 204
IN AN EMERGENCY
A punctured tyre or a burnt-out bulb?
At times, a problem may interfere with
our journey.
The pages on emergencies can help
you to deal with critical situations
independently and with calm.
In an emergency we recommend that
you call the freephone number found in
the Warranty Booklet.
It is also possible to call the national or
international universal freephone
number to search for the nearest Fiat
Dealership.HAZARD WARNING LIGHTS......99
BULB REPLACEMENT.........99
REPLACING FUSES..........106
CHANGING A WHEEL.........111
FIX&GO AUTOMATIC KIT.......115
EMERGENCY STARTING.......117
FUEL CUT-OFF SYSTEM.......119
AUTOMATIC TRANSMISSION. . . .119
TOWING THE VEHICLE........121
98
IN AN EMERGENCY
Page 104 of 204

REPLACING AN
EXTERNAL BULB
Front bulb position
1. Dipped headlights
2. Fog lights
3. Main beam headlights/Daytime
running lights (DRL)
4. Direction indicator.
Main beam headlights/Daytime
running lights (DRL)
To replace the bulb 3 fig. 89, proceed
as follows:
working from inside the engine
compartment, remove rubber cap 1
fig. 90;
rotate the bulb-bulb holder assembly
anticlockwise and extract it;
disconnect the electrical connector
and replace the bulb-bulb holder
assembly 2;
reconnect the electrical connector to
the new assembly;
then insert the assembly in its
housing and turn it clockwise, making
sure that it is locked correctly;
refit the rubber cap 1.
IMPORTANT Only replace the bulb
when the engine is off. Also ensure that
the engine is cold, to prevent the risk of
burns.
Dipped headlights
Right headlight
To replace the bulb 1 fig. 89, proceed
as follows:
steer the vehicle wheels completely
inwards;
adjust the tabs indicated in the figure
fig. 91 and remove the flap;
remove the rubber plug
disconnect the electrical connector;
extract the bulb, releasing it from the
retaining springs;
replace the new bulb and carry out
the procedure described previously in
reverse.
Left headlight
working from inside the engine
compartment, remove the rubber cap
from the dipped beam headlight bulb 1
fig. 89;
extract the bulb, releasing it from the
retaining springs;
disconnect the electrical connector
and replace the bulb 1 fig. 89;
reconnect the electrical connector to
the new bulb;
8908026J0002EM
9008026J0025EM9108026J0004EM
102
IN AN EMERGENCY
Page 105 of 204

reposition the assembly in the seat;
refit the rubber cap.
IMPORTANT Only replace the bulb
when the engine is off. Also ensure that
the engine is cold, to prevent the risk of
burns.
Front direction indicators
To replace the bulb 4 fig. 89, proceed
as follows:
use the provided screwdriver to lift
the indicated pins and remove the
cover 1 fig. 92;
rotate the bulb-bulb holder assembly
anticlockwise;
replace the "bayonet-fitted" bulb;
then insert the bulb and bulb holder
assembly in its housing and turn it
clockwise, making sure that it is locked
correctly;
refit the cover and block it by placing
its pins in their seats.
Front fog lights
To replace the bulbs, proceed as
follows:
steer the vehicle wheels completely
inwards;
adjust the tabs indicated in
fig. 93 and remove the flap;
turn the bulb-bulb holder assembly 1fig. 94 anticlockwise and then remove it
sliding it outwards;
disconnect the electrical connector;
reconnect the connector to the new
assembly: then insert it, turning it
clockwise, ensuring that it locks
correctly;
finally, refit the inspection lid.
Side direction indicators
To replace the bulb, proceed as follows:
adjust the lens 1 fig. 95 to compress
in the internal clip 2, then pull the
cluster outwards;
turn the bulb holder 3 anticlockwise,
extract the press-fitted bulb 4 and
replace it;
refit the bulb holder 3 in the lens and
turn it clockwise;
refit the cluster making sure that the
internal clip 2 clicks into position.
9208026J0011EM
9308026J0012EM
9408026J0016EM
9508026J0005EM
103
Page 111 of 204
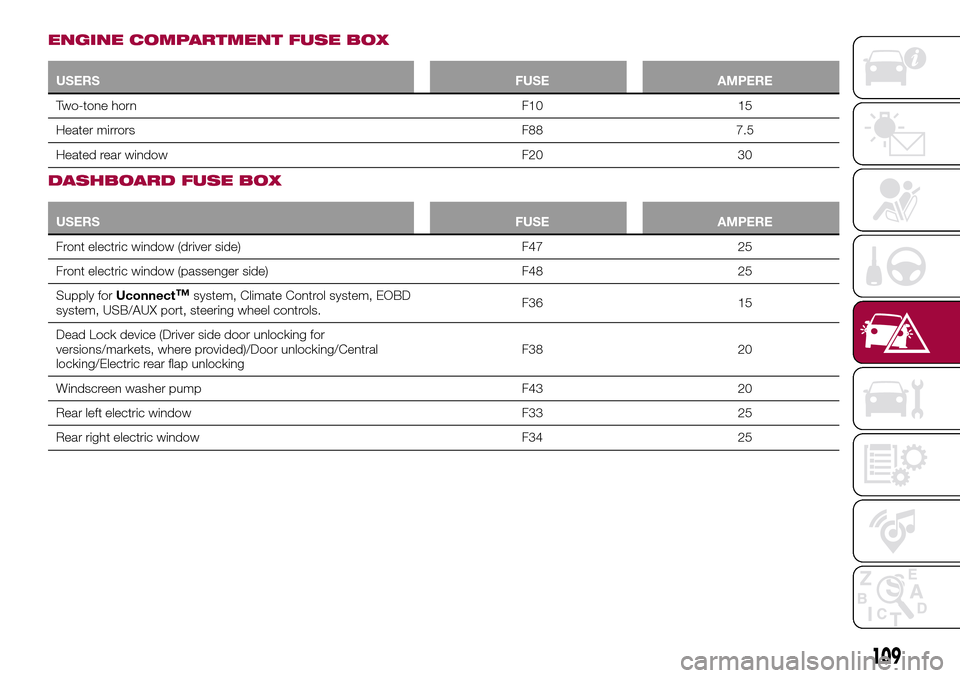
ENGINE COMPARTMENT FUSE BOX
USERSFUSE AMPERE
Two-tone horn F10 15
Heater mirrors F88 7.5
Heated rear window F20 30
DASHBOARD FUSE BOX
USERSFUSE AMPERE
Front electric window (driver side) F47 25
Front electric window (passenger side) F48 25
Supply forUconnect
™system, Climate Control system, EOBD
system, USB/AUX port, steering wheel controls.F36 15
Dead Lock device (Driver side door unlocking for
versions/markets, where provided)/Door unlocking/Central
locking/Electric rear flap unlockingF38 20
Windscreen washer pump F43 20
Rear left electric window F33 25
Rear right electric window F34 25
109