2016 FIAT TIPO 4DOORS key
[x] Cancel search: keyPage 80 of 204
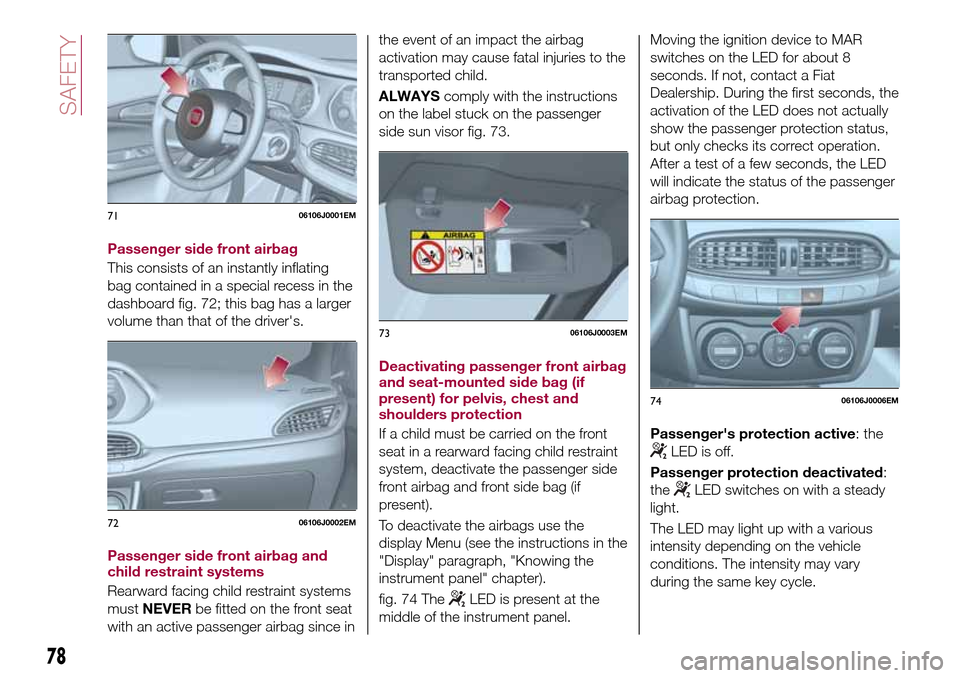
Passenger side front airbag
This consists of an instantly inflating
bag contained in a special recess in the
dashboard fig. 72; this bag has a larger
volume than that of the driver's.
Passenger side front airbag and
child restraint systems
Rearward facing child restraint systems
mustNEVERbe fitted on the front seat
with an active passenger airbag since inthe event of an impact the airbag
activation may cause fatal injuries to the
transported child.
ALWAYScomply with the instructions
on the label stuck on the passenger
side sun visor fig. 73.
Deactivating passenger front airbag
and seat-mounted side bag (if
present) for pelvis, chest and
shoulders protection
If a child must be carried on the front
seat in a rearward facing child restraint
system, deactivate the passenger side
front airbag and front side bag (if
present).
To deactivate the airbags use the
display Menu (see the instructions in the
"Display" paragraph, "Knowing the
instrument panel" chapter).
fig. 74 The
LED is present at the
middle of the instrument panel.Moving the ignition device to MAR
switches on the LED for about 8
seconds. If not, contact a Fiat
Dealership. During the first seconds, the
activation of the LED does not actually
show the passenger protection status,
but only checks its correct operation.
After a test of a few seconds, the LED
will indicate the status of the passenger
airbag protection.
Passenger's protection active: the
LED is off.
Passenger protection deactivated:
the
LED switches on with a steady
light.
The LED may light up with a various
intensity depending on the vehicle
conditions. The intensity may vary
during the same key cycle.
7106106J0001EM
7206106J0002EM
7306106J0003EM
7406106J0006EM
78
SAFETY
Page 87 of 204
20)When the engine is switched off never
leave the ignition device in the MAR
position to prevent useless current
absorption from draining the battery.
21)A quick burst on the accelerator before
turning off the engine serves absolutely no
practical purpose; it wastes fuel and is
especially damaging to turbocharged
engines.
22)Warning light
will flash after starting
or during prolonged cranking to indicate a
fault with the glow plug heating system. If
the engine starts, the vehicle can be used
as normal, but a Fiat Dealership must be
contacted as soon as possible.
PARKING BRAKE
103) 104)
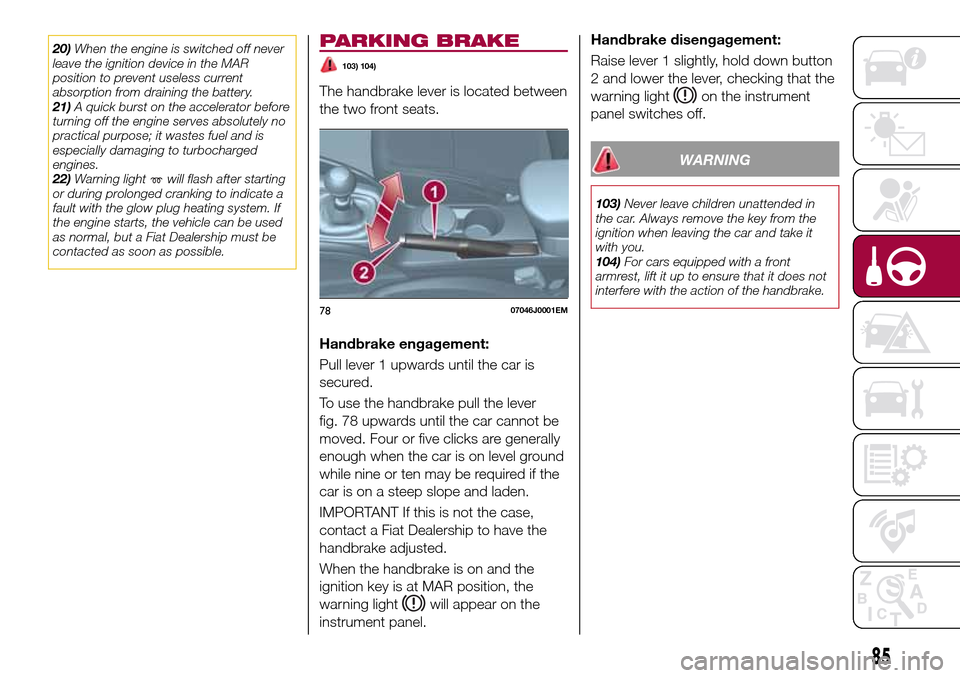
The handbrake lever is located between
the two front seats.
Handbrake engagement:
Pull lever 1 upwards until the car is
secured.
To use the handbrake pull the lever
fig. 78 upwards until the car cannot be
moved. Four or five clicks are generally
enough when the car is on level ground
while nine or ten may be required if the
car is on a steep slope and laden.
IMPORTANT If this is not the case,
contact a Fiat Dealership to have the
handbrake adjusted.
When the handbrake is on and the
ignition key is at MAR position, the
warning light
will appear on the
instrument panel.Handbrake disengagement:
Raise lever 1 slightly, hold down button
2 and lower the lever, checking that the
warning light
on the instrument
panel switches off.
WARNING
103)Never leave children unattended in
the car. Always remove the key from the
ignition when leaving the car and take it
with you.
104)For cars equipped with a front
armrest, lift it up to ensure that it does not
interfere with the action of the handbrake.
7807046J0001EM
85
Page 112 of 204
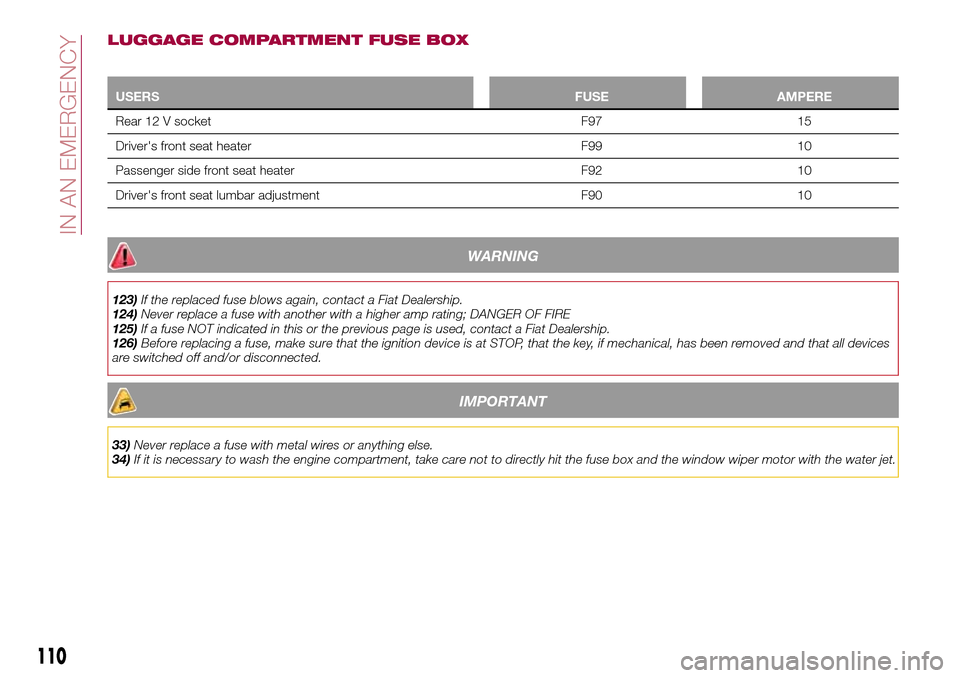
LUGGAGE COMPARTMENT FUSE BOX
USERSFUSE AMPERE
Rear 12 V socket F97 15
Driver's front seat heater F99 10
Passenger side front seat heater F92 10
Driver's front seat lumbar adjustment F90 10
WARNING
123)If the replaced fuse blows again, contact a Fiat Dealership.
124)Never replace a fuse with another with a higher amp rating; DANGER OF FIRE
125)If a fuse NOT indicated in this or the previous page is used, contact a Fiat Dealership.
126)Before replacing a fuse, make sure that the ignition device is at STOP, that the key, if mechanical, has been removed and that all devices
are switched off and/or disconnected.
IMPORTANT
33)Never replace a fuse with metal wires or anything else.
34)If it is necessary to wash the engine compartment, take care not to directly hit the fuse box and the window wiper motor with the water jet.
110
IN AN EMERGENCY
Page 120 of 204

connect one end of the cable used
for positive (+) to the positive terminal
(+) of the vehicle with flat battery;
connect the other end of the cable
used for positive (+) to the positive
terminal (+) of the auxiliary battery;
connect one end of the cable used
for negative (–) to the negative terminal
(–) of the auxiliary battery;
connect the other end of the cable
used for negative (–) to an engine earth
(a visible metal part of the engine or
gearbox/transmission of the vehicle
with flat battery) away from the battery
and the fuel injection system;
start the vehicle engine with the
auxiliary battery, let it run for a few
minutes at idling. Start the engine of the
vehicle with flat battery.Cable disconnection
Once the engine is started, remove the
leads, reversing the order above.
If after a few attempts the engine does
not start, do not persist but contact a
Fiat Dealership.
If it is often necessary to perform a
jump starting, have the vehicle battery
and the recharging system checked by
a Fiat Dealership.
WARNING
134)Before opening the bonnet, make
sure that the engine is off and that the
ignition key is in the STOP position. Follow
the indications on the plate underneath the
bonnet. We recommend that you remove
the key from the ignition if other people
remain in the vehicle. The vehicle should
always be left after the key has been
removed or turned to the STOP position.
During refuelling, make sure that the engine
is off (and that the ignition key is in the
STOP position).
135)Do not get too close to the radiator
cooling fan: the electric fan may start;
danger of injury. Scarves, ties and other
loose clothing might be pulled by moving
parts.
136)Remove any metal objects (e.g. rings,
watches, bracelets), that might cause an
accidental electrical contact and cause
serious injury.137)The batteries contain acid that can
burn skin or eyes. Batteries produce
hydrogen, which is easily flammable and
explosive. Therefore, keep away flames or
devices which may cause sparks.
IMPORTANT
40)Never use a fast battery-charger to
start the engine as this could damage the
electronic systems of your vehicle,
particularly the ignition and engine fuel
supply control units.
41)Do not connect the cable to the
negative terminal (–) of the flat battery. The
following spark could lead to battery
explosion and cause serious harm. Only
use the specific earth point; do not use any
other exposed metallic part.
12808066J0003EM
118
IN AN EMERGENCY
Page 122 of 204
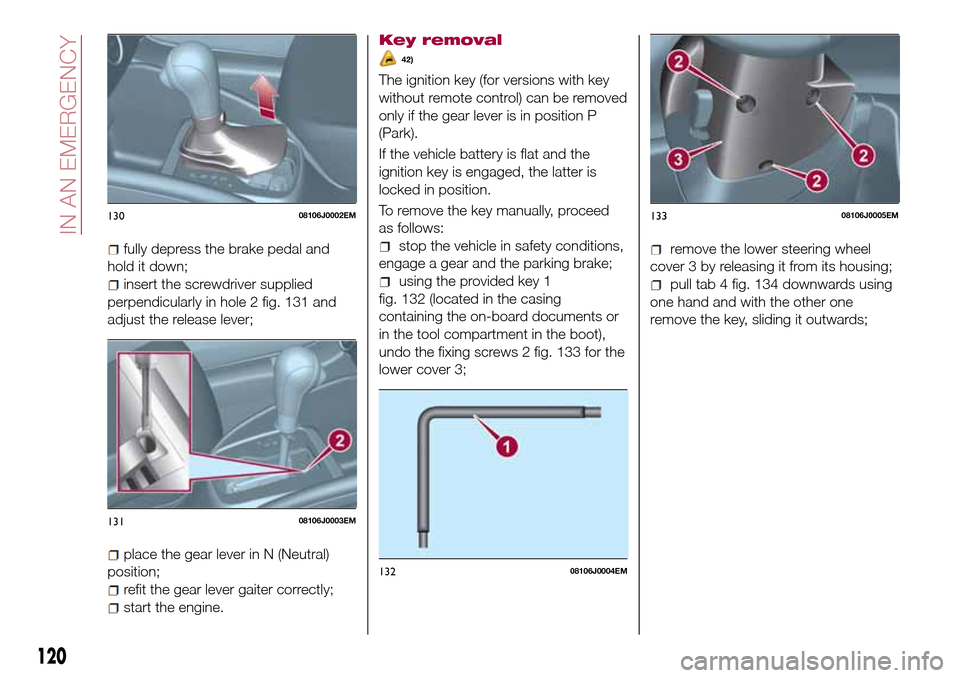
fully depress the brake pedal and
hold it down;
insert the screwdriver supplied
perpendicularly in hole 2 fig. 131 and
adjust the release lever;
place the gear lever in N (Neutral)
position;
refit the gear lever gaiter correctly;
start the engine.
Key removal
42)
The ignition key (for versions with key
without remote control) can be removed
only if the gear lever is in position P
(Park).
If the vehicle battery is flat and the
ignition key is engaged, the latter is
locked in position.
To remove the key manually, proceed
as follows:
stop the vehicle in safety conditions,
engage a gear and the parking brake;
using the provided key 1
fig. 132 (located in the casing
containing the on-board documents or
in the tool compartment in the boot),
undo the fixing screws 2 fig. 133 for the
lower cover 3;
remove the lower steering wheel
cover 3 by releasing it from its housing;
pull tab 4 fig. 134 downwards using
one hand and with the other one
remove the key, sliding it outwards;
13008106J0002EM
13108106J0003EM
13208106J0004EM
13308106J0005EM
120
IN AN EMERGENCY
Page 123 of 204
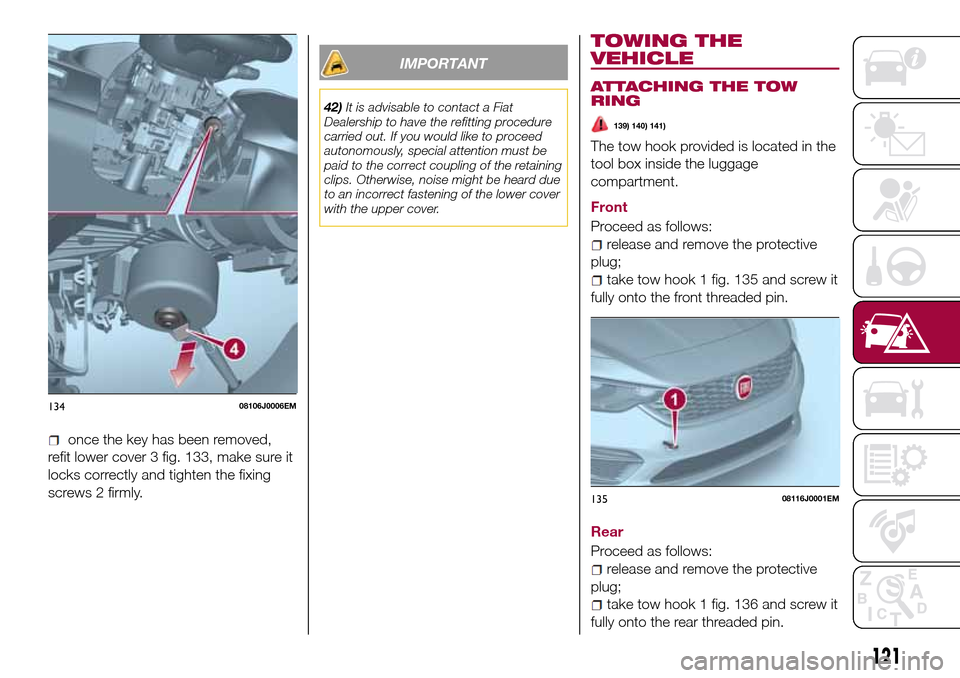
once the key has been removed,
refit lower cover 3 fig. 133, make sure it
locks correctly and tighten the fixing
screws 2 firmly.
IMPORTANT
42)It is advisable to contact a Fiat
Dealership to have the refitting procedure
carried out. If you would like to proceed
autonomously, special attention must be
paid to the correct coupling of the retaining
clips. Otherwise, noise might be heard due
to an incorrect fastening of the lower cover
with the upper cover.
TOWING THE
VEHICLE
ATTACHING THE TOW
RING
139) 140) 141)
The tow hook provided is located in the
tool box inside the luggage
compartment.
Front
Proceed as follows:
release and remove the protective
plug;
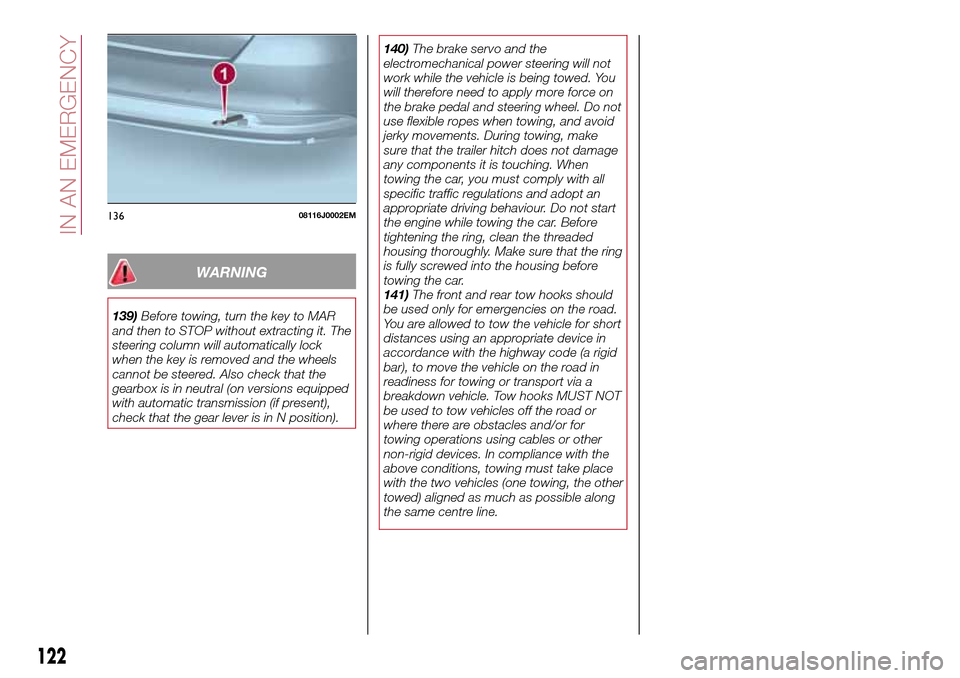
take tow hook 1 fig. 135 and screw it
fully onto the front threaded pin.
Rear
Proceed as follows:
release and remove the protective
plug;
take tow hook 1 fig. 136 and screw it
fully onto the rear threaded pin.
13408106J0006EM
13508116J0001EM
121
Page 124 of 204
WARNING
139)Before towing, turn the key to MAR
and then to STOP without extracting it. The
steering column will automatically lock
when the key is removed and the wheels
cannot be steered. Also check that the
gearbox is in neutral (on versions equipped
with automatic transmission (if present),
check that the gear lever is in N position).140)The brake servo and the
electromechanical power steering will not
work while the vehicle is being towed. You
will therefore need to apply more force on
the brake pedal and steering wheel. Do not
use flexible ropes when towing, and avoid
jerky movements. During towing, make
sure that the trailer hitch does not damage
any components it is touching. When
towing the car, you must comply with all
specific traffic regulations and adopt an
appropriate driving behaviour. Do not start
the engine while towing the car. Before
tightening the ring, clean the threaded
housing thoroughly. Make sure that the ring
is fully screwed into the housing before
towing the car.
141)The front and rear tow hooks should
be used only for emergencies on the road.
You are allowed to tow the vehicle for short
distances using an appropriate device in
accordance with the highway code (a rigid
bar), to move the vehicle on the road in
readiness for towing or transport via a
breakdown vehicle. Tow hooks MUST NOT
be used to tow vehicles off the road or
where there are obstacles and/or for
towing operations using cables or other
non-rigid devices. In compliance with the
above conditions, towing must take place
with the two vehicles (one towing, the other
towed) aligned as much as possible along
the same centre line.
13608116J0002EM
122
IN AN EMERGENCY
Page 170 of 204
TIPS, CONTROLS
AND GENERAL
INFORMATION
ROAD SAFETY
Learn how to use the various system
functions before setting off.
Read the instructions for the system
carefully before setting off.
166) 167)
RECEPTION CONDITIONS
Reception conditions change
constantly while driving. Reception may
be interfered with by the presence of
mountains, buildings or bridges,
especially when you are far away from
the broadcaster.
IMPORTANT The volume may be
increased when receiving traffic
information and news.
CARE AND
MAINTENANCE
Observe the following precautions to
ensure the system is fully operational:
the display lens should not come into
contact with pointed or rigid objects
which could damage its surface; use a
soft, dry anti-static cloth to clean and
do not press.
never use alcohol, petrols and
derivatives to clean the display lens.
prevent any liquid from entering the
system: this could damage it beyond
repair.
63) 64)
ANTITHEFT PROTECTION
The system is equipped with an
anti-theft protection system based on
the exchange of information with the
electronic control unit (Body Computer)
on the vehicle.
This guarantees maximum safety and
prevents the secret code from being
entered after the power supply has
been disconnected.
If the check has a positive outcome, the
system will start to operate, whereas if
the comparison codes are not the same
or if the electronic control unit (Body
Computer) is replaced, the system will
ask the user to enter the secret code
according to the procedure described
in the paragraph below.
Entering the secret code
When the system is switched on, if the
code is requested, the display will show
"Please enter Anti-Theft Code" followed
by the screen showing a keypad to
enter the secret code.
The secret code is made up of four
digits from 0 to 9.Uconnect™ 3” Radio:
To enter the first digit of the code,
turn the "BROWSE/ENTER" right knob
and press to confirm.
After inserting the fourth digit, move
the cursor to "OK" and press the
"BROWSE ENTER" right knob: the
system will start to operate.
Uconnect™ 5” and Uconnect™ 5”
Nav:
Use the graphic buttons on the
display to enter the code digits.
If an incorrect code is entered, the
system displays "Incorrect Code" to
notify the user of the need to enter the
correct code.
After the 3 available attempts to enter
the code, the system displays
"Incorrect Code. Radio locked. Wait for
30 minutes". After the text has
disappeared it is possible to start the
code entering procedure again.
Vehicle radio passport
This document certifies ownership of
the system. The vehicle radio passport
shows the system model, serial number
and secret code.
In case of loss of the car radio
passport, contact the Fiat Dealership,
taking an ID document and the car
ownership documents.
IMPORTANT Keep the vehicle radio
passport in a safe place so that you
168
MULTIMEDIA