2016 FIAT TIPO 4DOORS headlights
[x] Cancel search: headlightsPage 10 of 204

INSTRUMENT PANEL
1. Adjustable side air diffusers 2. Left stalk: direction indicators, main beam headlights, flashings 3. Instrument panel
4. Steering wheel controls: Cruise Control 5. Right stalk: windscreen wiper / windscreen washer, setting of the rain sensor
sensitivity level
6.Adjustable central air diffusers 7.
Uconnect™radio8. Passenger front airbag 9.
Glove compartment 10.Control buttons
11.Buttons on the central console: seat heating, USB port + AUX plug panel,
socket/cigarette lighter12.
Climate controls
13. Ignition device 14. Driver front airbag 15. Steering wheel controls: display menu, trip computer,
multimedia, telephone, voice recognition 16. Control panel: front fog lights (where present), rear fog lights, headlight alignment
adjustment, iTPMS reset, ESC OFF (where present).
103036J0001EM
8
KNOWING YOUR CAR
Page 21 of 204

Heated
Pressing the
button (heated rear
window) on the central dashboard
panel activates the demisting/defrosting
of the external rear view mirrors.
WARNING
19)As the driver's door mirror is curved, it
may slightly alter the perception of
distance.
EXTERNAL LIGHTS
The left-hand stalk 1 fig. 21 operates
most of the external lights. The exterior
lights turn on also with the ignition key
in the MAR position. The instrument
panel and the various dashboard
controls will come on with the external
lights.
AUTO FUNCTION(Dusk sensor)
(where provided)
This is an infrared LED sensor that
works in conjunction with the rain
sensor and is located on the
windscreen. It is able to detect
variations in outside lighting based on
the light sensitivity set in the display
Menu or theUconnect™system
(where provided).The higher the sensitivity, the lower the
amount of external light needed to
automatically switch the external lights
on.
Function activation
Turn the left stalk ring nut to position
.
IMPORTANT The function can only be
activated with the ignition device at
MAR.
Function deactivation
To deactivate the function, turn the left
stalk ring nut to a position other than
.
DIPPED HEADLIGHTS
With the ignition key turned to MAR,
turn the ring nut 1 fig. 21 to
.Ifthe
dipped beam headlights are activated,
the daytime running lights are switched
off and the dipped beam headlights,
rear side lights and number plate lights
are switched on. The
warning light
switches on in the instrument panel.
DAYTIME RUNNING
LIGHTS (DRL)
"Daytime Running Lights"
20) 21)
With the key in MAR position and the
ring nut turned to theOposition, the
daytime running lights and the rear side
lights switch on automatically; the other
2004106J0004EM
2104126J0001EM
19
Page 22 of 204

lights and the internal lighting remain
off. If the daytime running lights are
deactivated (for versions/markets where
it is provided), no light comes on when
the ring nut is turned toO.
FRONT FOG LIGHTS(where provided)
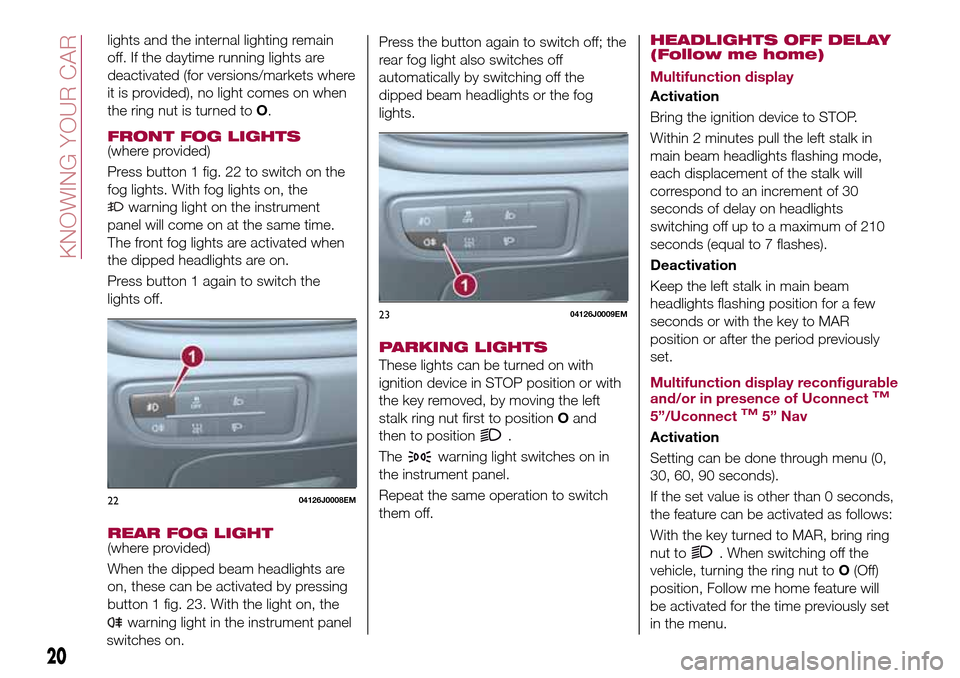
Press button 1 fig. 22 to switch on the
fog lights. With fog lights on, the
warning light on the instrument
panel will come on at the same time.
The front fog lights are activated when
the dipped headlights are on.
Press button 1 again to switch the
lights off.
REAR FOG LIGHT(where provided)
When the dipped beam headlights are
on, these can be activated by pressing
button 1 fig. 23. With the light on, the
warning light in the instrument panel
switches on.Press the button again to switch off; the
rear fog light also switches off
automatically by switching off the
dipped beam headlights or the fog
lights.
PARKING LIGHTS
These lights can be turned on with
ignition device in STOP position or with
the key removed, by moving the left
stalk ring nut first to positionOand
then to position
.
The
warning light switches on in
the instrument panel.
Repeat the same operation to switch
them off.
HEADLIGHTS OFF DELAY
(Follow me home)
Multifunction display
Activation
Bring the ignition device to STOP.
Within 2 minutes pull the left stalk in
main beam headlights flashing mode,
each displacement of the stalk will
correspond to an increment of 30
seconds of delay on headlights
switching off up to a maximum of 210
seconds (equal to 7 flashes).
Deactivation
Keep the left stalk in main beam
headlights flashing position for a few
seconds or with the key to MAR
position or after the period previously
set.
Multifunction display reconfigurable
and/or in presence of Uconnect
TM
5”/UconnectTM5” Nav
Activation
Setting can be done through menu (0,
30, 60, 90 seconds).
If the set value is other than 0 seconds,
the feature can be activated as follows:
With the key turned to MAR, bring ring
nut to
. When switching off the
vehicle, turning the ring nut toO(Off)
position, Follow me home feature will
be activated for the time previously set
in the menu.
2204126J0008EM
2304126J0009EM
20
KNOWING YOUR CAR
Page 23 of 204

If the set value is at 0 seconds, the
feature can be activated as follows:
Bring the ignition device to STOP.
Within 2 minutes pull the left stalk in
main beam headlights flashing mode,
each displacement of the stalk will
correspond to an increment of 30
seconds of delay on headlights
switching off up to a maximum of 210
seconds (equal to 7 flashes).
If the vehicle also features the dusk
sensor, it is possible to activate feature
in automatic mode - with key to MAR
bring the ring nut to
position.
Bringing the key in OFF position with
the headlights turned on, the feature
automatically activates for the time
previously set in menu.
Deactivation
If activation is done by pulling the main
beam headlight stalk, deactivate the
feature keeping the left stalk in main
beam headlights flashing position for at
least two seconds, with key to MAR or
after the set time.
If activation is done via the ring nut of
lights placed on the left stalk, it won't
be possible to disable the feature and
the switching off of the headlights will
happen at the end of the set time or
with key to MAR.
MAIN BEAM HEADLIGHTS
With ring nut in position, push the
stalk forward toward the dashboard
(stable position). The
warning light
switches on in the instrument panel.
They are switched off by pulling the
stalk towards the steering wheel.
Flashing the headlights
Pull the left stalk 1 fig. 24 toward
yourself, to the stable position; the stalk
goes back to the central stable position
when it is released.
With main beam headlights on, the
warning light on the instrument
panel will come on at the same time.
DIRECTION INDICATORS
Bring the left stalk 1 fig. 24 to the
(stable) position:
upwards: activates the right direction
indicator;downwards: activates the left direction
indicator.
The
orwarning light respectively
will flash on the instrument panel.
The direction indicators switch off
automatically when the steering wheel
is straightened or when the daytime
running lights (D.R.L.) /parking lights are
activated.
Cornering lights
The function activates with the main
beam headlights switched on with a
speed lower than 40 km/h - For wide
wheel rotation angles or at the
switching on the direction indicator, a
light will turn on (built in the front fog
light) referring to the turning side which
will extend the night visibility angle.
HEADLIGHT ALIGNMENT
ADJUSTMENT
Headlight alignment corrector
The headlight alignment corrector
operates with ignition device at MAR
and dipped headlights on.
Press
andon the control panel.2404126J0002EM
21
Page 24 of 204

The display located on the instrument
panel provides a visual indication of the
adjusted position.
Position 0: one or two people on
the front seats;
Position 1: 4 or 5 passengers;
Position 2: 4 or 5 passengers + load
in the luggage compartment;
Position 3: driver + maximum
admissible load stowed only in the
luggage compartment.
IMPORTANT Check the headlight
alignment each time the weight of the
load transported changes.INSTRUMENT PANEL AND
CONTROL BUTTON
GRAPHIC BRIGHTNESS
ADJUSTMENT
The brightness for the instrument panel
and the control buttons can be
adjusted using the main menu on the
instrument panel (refer to the
“Reconfigurable Multifunction Display”
paragraph).
WARNING
20)The daytime running lights are an
alternative to the dipped headlights for
driving during the daytime in countries
where it is compulsory to have lights on
during the day; where it is not compulsory,
the use of daytime running lights is
permitted.
21)Daytime running lights cannot replace
dipped beam headlights when driving at
night or through tunnels. The use of
daytime running lights is governed by the
highway code of the country in which you
are driving. Comply with legal
requirements.
INTERIOR LIGHTS
FRONT CEILING LIGHT
Singe-bulb ceiling light
To switch on/off the ceiling light press
the fig. 26 button:
pressed to 1: interior ceiling light
always off;
pressed to 2: interior ceiling light
always on;
position 0: the interior ceiling light
switches on when a door is opened.
Multi-bulb ceiling light
Switch 1 fig. 27 is used to switch on/off
the ceiling light bulbs.
Switch 1 positions:
central position: lights 2 and 5 switch
on/off when the doors are
opened/closed;
2504126J0003EM
26F1B0043C
22
KNOWING YOUR CAR
Page 40 of 204

DISPLAY
DESCRIPTION
The vehicle is equipped with a display
that can show useful information to the
driver while driving.
GEAR SHIFT INDICATOR
The Gear Shift Indicator (GSI) system
advises the driver to change gear
through a special indication on the
display.
Through the GSI, the driver is informed
that the gear change will allow a
reduction in fuel consumption.
When the
icon appears on the
display, the GSI suggests switching to a
higher gear, while when the
icon is
displayed, the GSI suggests changing
to a lower gear.
The indication in the display remains
until a gear is shifted or the driving
conditions go back to a situation where
gearshifting is not required to improve
consumption.
MULTIFUNCTION
DISPLAY
The display fig. 48 will show the
following information:
1: Headlight alignment position (only
with dipped beam headlights on)
2: Gear Shift Indicator (GSI)
3: Engaged gear indication
4: Time
5: Outside temperature (for
versions/markets, where provided)
6: Odometer (display of distance
travelled in kilometres/miles)
7: Display of "Cruise Control" or
instantaneous speed (for
versions/markets, where provided)
CONTROL BUTTONS
These are located on the left side of the
steering wheel fig. 49.
They allow the driver to select and
interact with the items in the Main menu
of the display (see paragraph "Main
menu").
/: press and release the
buttons to access the Main menu and
to scroll the menu and the submenus
upwards or downwards.
: press briefly to access the
menu and/or go to next screen or to
confirm the required menu option.
: press and release the button to
return to the previous menu item.
: press and release the button
to display the "Trip computer"
information.
4805036J0001EM
4905036J0002EM
38
KNOWING THE INSTRUMENT PANEL
Page 52 of 204

Warning light What it means
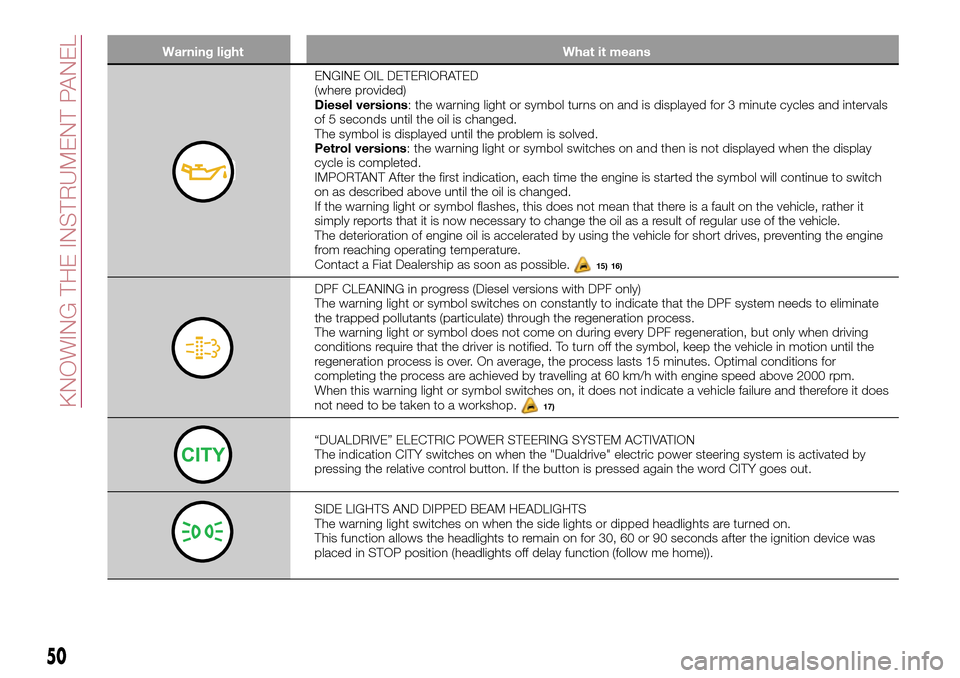
ENGINE OIL DETERIORATED
(where provided)
Diesel versions: the warning light or symbol turns on and is displayed for 3 minute cycles and intervals
of 5 seconds until the oil is changed.
The symbol is displayed until the problem is solved.
Petrol versions: the warning light or symbol switches on and then is not displayed when the display
cycle is completed.
IMPORTANT After the first indication, each time the engine is started the symbol will continue to switch
on as described above until the oil is changed.
If the warning light or symbol flashes, this does not mean that there is a fault on the vehicle, rather it
simply reports that it is now necessary to change the oil as a result of regular use of the vehicle.
The deterioration of engine oil is accelerated by using the vehicle for short drives, preventing the engine
from reaching operating temperature.
Contact a Fiat Dealership as soon as possible.
15) 16)
DPF CLEANING in progress (Diesel versions with DPF only)
The warning light or symbol switches on constantly to indicate that the DPF system needs to eliminate
the trapped pollutants (particulate) through the regeneration process.
The warning light or symbol does not come on during every DPF regeneration, but only when driving
conditions require that the driver is notified. To turn off the symbol, keep the vehicle in motion until the
regeneration process is over. On average, the process lasts 15 minutes. Optimal conditions for
completing the process are achieved by travelling at 60 km/h with engine speed above 2000 rpm.
When this warning light or symbol switches on, it does not indicate a vehicle failure and therefore it does
not need to be taken to a workshop.
17)
“DUALDRIVE” ELECTRIC POWER STEERING SYSTEM ACTIVATION
The indication CITY switches on when the "Dualdrive" electric power steering system is activated by
pressing the relative control button. If the button is pressed again the word CITY goes out.
SIDE LIGHTS AND DIPPED BEAM HEADLIGHTS
The warning light switches on when the side lights or dipped headlights are turned on.
This function allows the headlights to remain on for 30, 60 or 90 seconds after the ignition device was
placed in STOP position (headlights off delay function (follow me home)).
50
KNOWING THE INSTRUMENT PANEL
Page 53 of 204

Warning light What it means
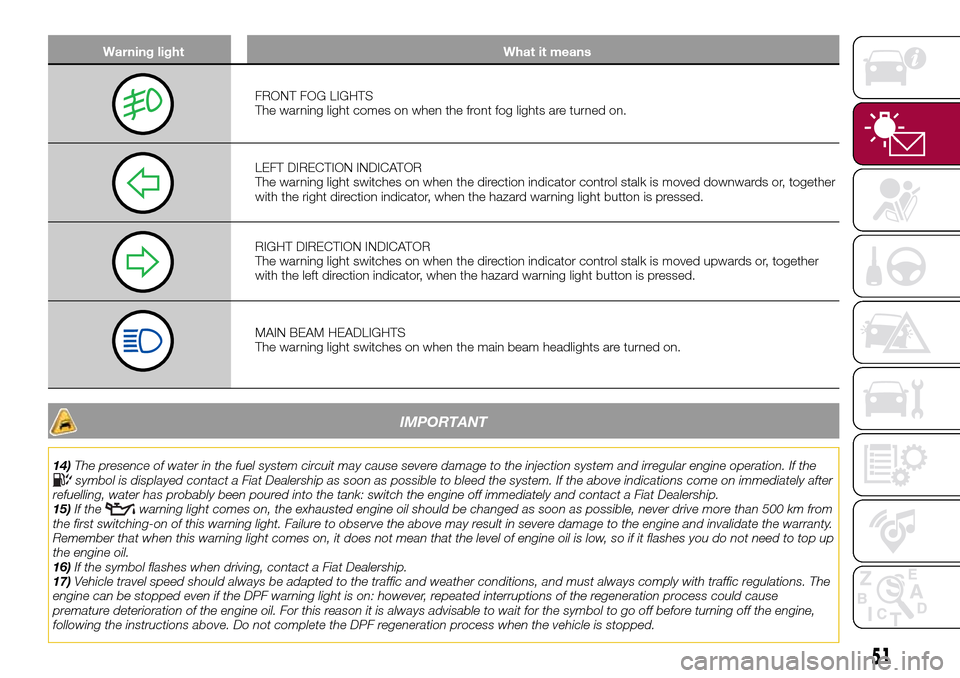
FRONT FOG LIGHTS
The warning light comes on when the front fog lights are turned on.
LEFT DIRECTION INDICATOR
The warning light switches on when the direction indicator control stalk is moved downwards or, together
with the right direction indicator, when the hazard warning light button is pressed.
RIGHT DIRECTION INDICATOR
The warning light switches on when the direction indicator control stalk is moved upwards or, together
with the left direction indicator, when the hazard warning light button is pressed.
MAIN BEAM HEADLIGHTS
The warning light switches on when the main beam headlights are turned on.
IMPORTANT
14)The presence of water in the fuel system circuit may cause severe damage to the injection system and irregular engine operation. If thesymbol is displayed contact a Fiat Dealership as soon as possible to bleed the system. If the above indications come on immediately after
refuelling, water has probably been poured into the tank: switch the engine off immediately and contact a Fiat Dealership.
15)If the
warning light comes on, the exhausted engine oil should be changed as soon as possible, never drive more than 500 km from
the first switching-on of this warning light. Failure to observe the above may result in severe damage to the engine and invalidate the warranty.
Remember that when this warning light comes on, it does not mean that the level of engine oil is low, so if it flashes you do not need to top up
the engine oil.
16)If the symbol flashes when driving, contact a Fiat Dealership.
17)Vehicle travel speed should always be adapted to the traffic and weather conditions, and must always comply with traffic regulations. The
engine can be stopped even if the DPF warning light is on: however, repeated interruptions of the regeneration process could cause
premature deterioration of the engine oil. For this reason it is always advisable to wait for the symbol to go off before turning off the engine,
following the instructions above. Do not complete the DPF regeneration process when the vehicle is stopped.
51