2016 FIAT TIPO 4DOORS headlight
[x] Cancel search: headlightPage 53 of 204
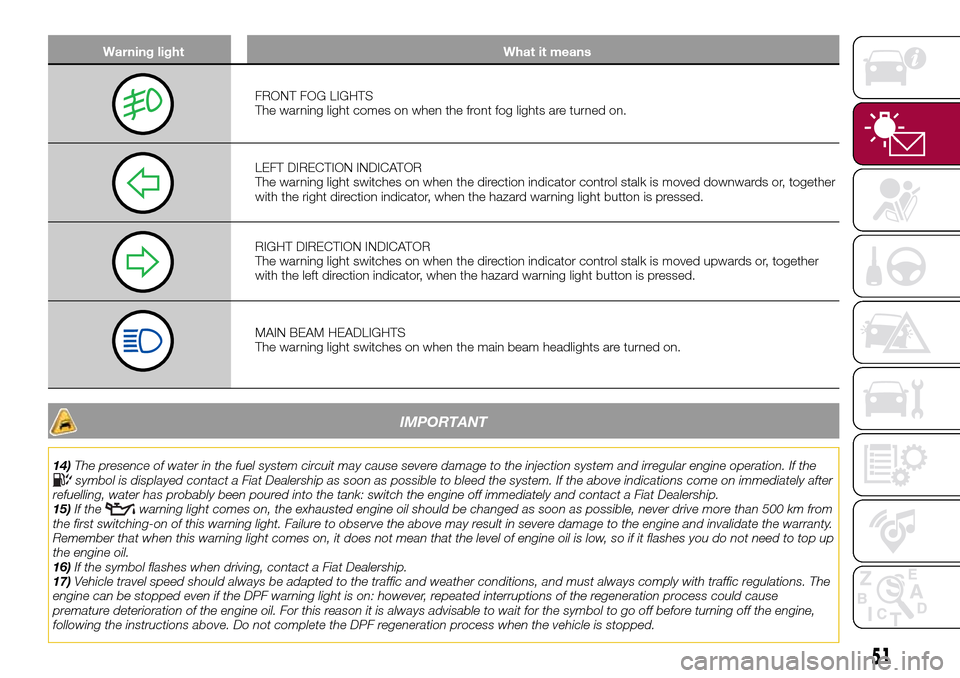
Warning light What it means
FRONT FOG LIGHTS
The warning light comes on when the front fog lights are turned on.
LEFT DIRECTION INDICATOR
The warning light switches on when the direction indicator control stalk is moved downwards or, together
with the right direction indicator, when the hazard warning light button is pressed.
RIGHT DIRECTION INDICATOR
The warning light switches on when the direction indicator control stalk is moved upwards or, together
with the left direction indicator, when the hazard warning light button is pressed.
MAIN BEAM HEADLIGHTS
The warning light switches on when the main beam headlights are turned on.
IMPORTANT
14)The presence of water in the fuel system circuit may cause severe damage to the injection system and irregular engine operation. If thesymbol is displayed contact a Fiat Dealership as soon as possible to bleed the system. If the above indications come on immediately after
refuelling, water has probably been poured into the tank: switch the engine off immediately and contact a Fiat Dealership.
15)If the
warning light comes on, the exhausted engine oil should be changed as soon as possible, never drive more than 500 km from
the first switching-on of this warning light. Failure to observe the above may result in severe damage to the engine and invalidate the warranty.
Remember that when this warning light comes on, it does not mean that the level of engine oil is low, so if it flashes you do not need to top up
the engine oil.
16)If the symbol flashes when driving, contact a Fiat Dealership.
17)Vehicle travel speed should always be adapted to the traffic and weather conditions, and must always comply with traffic regulations. The
engine can be stopped even if the DPF warning light is on: however, repeated interruptions of the regeneration process could cause
premature deterioration of the engine oil. For this reason it is always advisable to wait for the symbol to go off before turning off the engine,
following the instructions above. Do not complete the DPF regeneration process when the vehicle is stopped.
51
Page 57 of 204
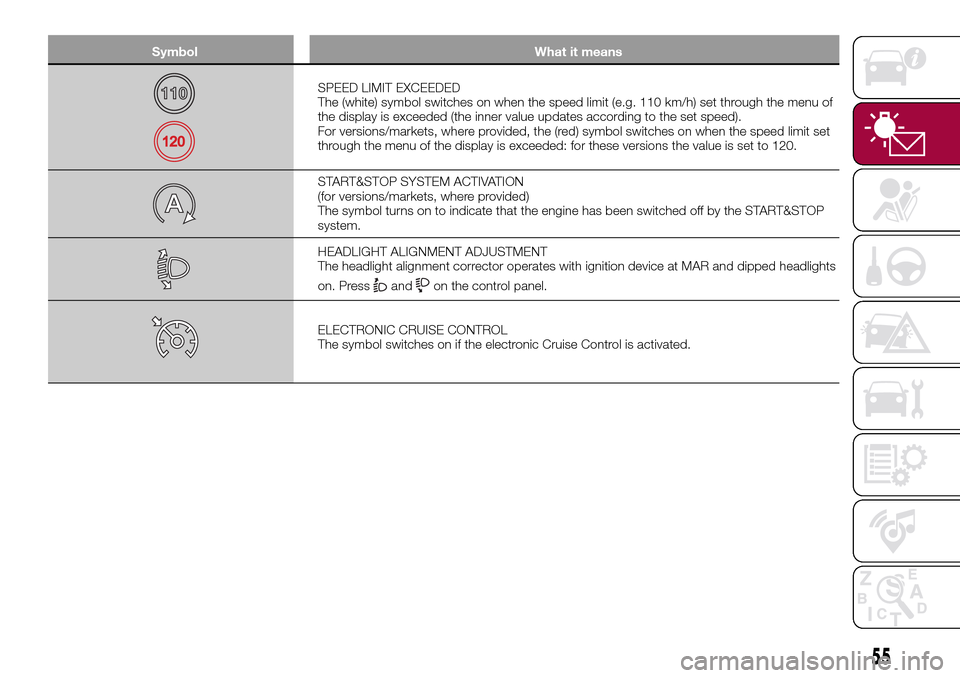
Symbol What it means
SPEED LIMIT EXCEEDED
The (white) symbol switches on when the speed limit (e.g. 110 km/h) set through the menu of
the display is exceeded (the inner value updates according to the set speed).
For versions/markets, where provided, the (red) symbol switches on when the speed limit set
through the menu of the display is exceeded: for these versions the value is set to 120.
START&STOP SYSTEM ACTIVATION
(for versions/markets, where provided)
The symbol turns on to indicate that the engine has been switched off by the START&STOP
system.
HEADLIGHT ALIGNMENT ADJUSTMENT
The headlight alignment corrector operates with ignition device at MAR and dipped headlights
on. Press
andon the control panel.
ELECTRONIC CRUISE CONTROL
The symbol switches on if the electronic Cruise Control is activated.
55
Page 101 of 204

HAZARD WARNING
LIGHTS
CONTROL
Press the fig. 88 button to switch the
lights on/off.
When the hazard warning lights are on,
the
andwarning lights flash.
IMPORTANT The use of hazard warning
lights is governed by the highway code
of the country you are driving in:
comply with legal requirements.
Emergency braking
In the event of emergency braking the
hazard warning lights switch on
automatically as well as warning lights
andin the instrument panel.
The lights switch off automatically when
emergency braking ceases.
BULB
REPLACEMENT
120) 121) 122)
32)
GENERAL
INSTRUCTIONS
Before replacing a bulb check the
contacts for oxidation;
replace blown bulbs with others of
the same type and power;
after replacing a headlight bulb,
always check its alignment;
when a light is not working, check
that the corresponding fuse is intact
before changing the bulb. For the
location of fuses, refer to the paragraph
"If a fuse blows" in this chapter.
IMPORTANT When the weather is cold
or damp or after heavy rain or washing,
the surface of headlights or rear lights
may steam up and/or form drops of
condensation on the inside. This is a
natural phenomenon due to the
difference in temperature and humidity
between the inside and the outside of
the glass which does not indicate a
fault and does not compromise the
normal operation of lighting devices.
The mist disappears quickly when the
lights are turned on, starting from the
centre of the diffuser, extending
progressively towards the edges.
8808016J0001EM
99
Page 103 of 204

Light bulbs Type Power Figure reference
Front side lights/Daytime running lights (DRL) H15 15W 4
Main beam headlights (halogen) H15 55 W 4
Dipped headlights H7 55 W 3
Front direction indicators PY21W 21 W 2
Number plate W5W 5 W 1
Rear side/brake light P21W 21 W 2
Rear direction indicators WY16W 16 W 1
Reversing light W16W 16 W 1
3rd stop W5W 5 W 1
Fog lights H11 55 W 4
Rear fog light W16W 16 W 1
Front ceiling light C5W 5 W 1
Front roof lights (sun visors) C5W 5 W 1
Rear ceiling light C5W 6W 1
Luggage compartment light W5W 5 W 1
Glove compartment light W5W 5 W 1
101
Page 104 of 204

REPLACING AN
EXTERNAL BULB
Front bulb position
1. Dipped headlights
2. Fog lights
3. Main beam headlights/Daytime
running lights (DRL)
4. Direction indicator.
Main beam headlights/Daytime
running lights (DRL)
To replace the bulb 3 fig. 89, proceed
as follows:
working from inside the engine
compartment, remove rubber cap 1
fig. 90;
rotate the bulb-bulb holder assembly
anticlockwise and extract it;
disconnect the electrical connector
and replace the bulb-bulb holder
assembly 2;
reconnect the electrical connector to
the new assembly;
then insert the assembly in its
housing and turn it clockwise, making
sure that it is locked correctly;
refit the rubber cap 1.
IMPORTANT Only replace the bulb
when the engine is off. Also ensure that
the engine is cold, to prevent the risk of
burns.
Dipped headlights
Right headlight
To replace the bulb 1 fig. 89, proceed
as follows:
steer the vehicle wheels completely
inwards;
adjust the tabs indicated in the figure
fig. 91 and remove the flap;
remove the rubber plug
disconnect the electrical connector;
extract the bulb, releasing it from the
retaining springs;
replace the new bulb and carry out
the procedure described previously in
reverse.
Left headlight
working from inside the engine
compartment, remove the rubber cap
from the dipped beam headlight bulb 1
fig. 89;
extract the bulb, releasing it from the
retaining springs;
disconnect the electrical connector
and replace the bulb 1 fig. 89;
reconnect the electrical connector to
the new bulb;
8908026J0002EM
9008026J0025EM9108026J0004EM
102
IN AN EMERGENCY
Page 127 of 204
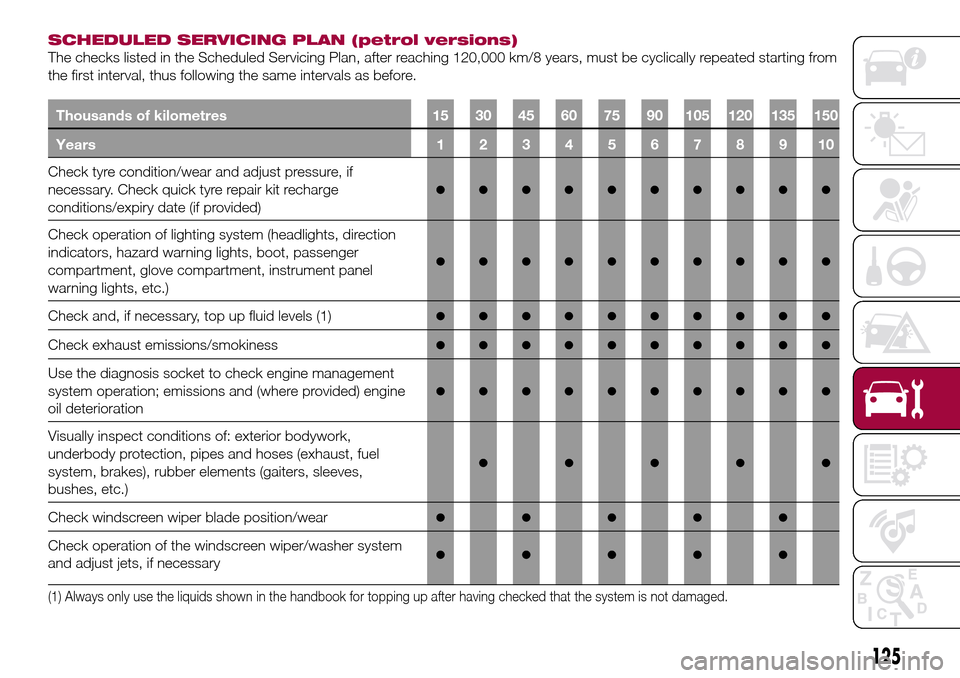
SCHEDULED SERVICING PLAN (petrol versions)
The checks listed in the Scheduled Servicing Plan, after reaching 120,000 km/8 years, must be cyclically repeated starting from
the first interval, thus following the same intervals as before.
Thousands of kilometres 15 30 45 60 75 90 105 120 135 150
Years 1 2 3 4 5 6 7 8 9 10
Check tyre condition/wear and adjust pressure, if
necessary. Check quick tyre repair kit recharge
conditions/expiry date (if provided)
●●●●●●●●●●
Check operation of lighting system (headlights, direction
indicators, hazard warning lights, boot, passenger
compartment, glove compartment, instrument panel
warning lights, etc.)
●●●●●●●●●●
Check and, if necessary, top up fluid levels (1)●●●●●●●●●●
Check exhaust emissions/smokiness●●●●●●●●●●
Use the diagnosis socket to check engine management
system operation; emissions and (where provided) engine
oil deterioration
●●●●●●●●●●
Visually inspect conditions of: exterior bodywork,
underbody protection, pipes and hoses (exhaust, fuel
system, brakes), rubber elements (gaiters, sleeves,
bushes, etc.)
●●●●●
Check windscreen wiper blade position/wear●●●●●
Check operation of the windscreen wiper/washer system
and adjust jets, if necessary●●●●●
(1) Always only use the liquids shown in the handbook for topping up after having checked that the system is not damaged.
125
Page 130 of 204
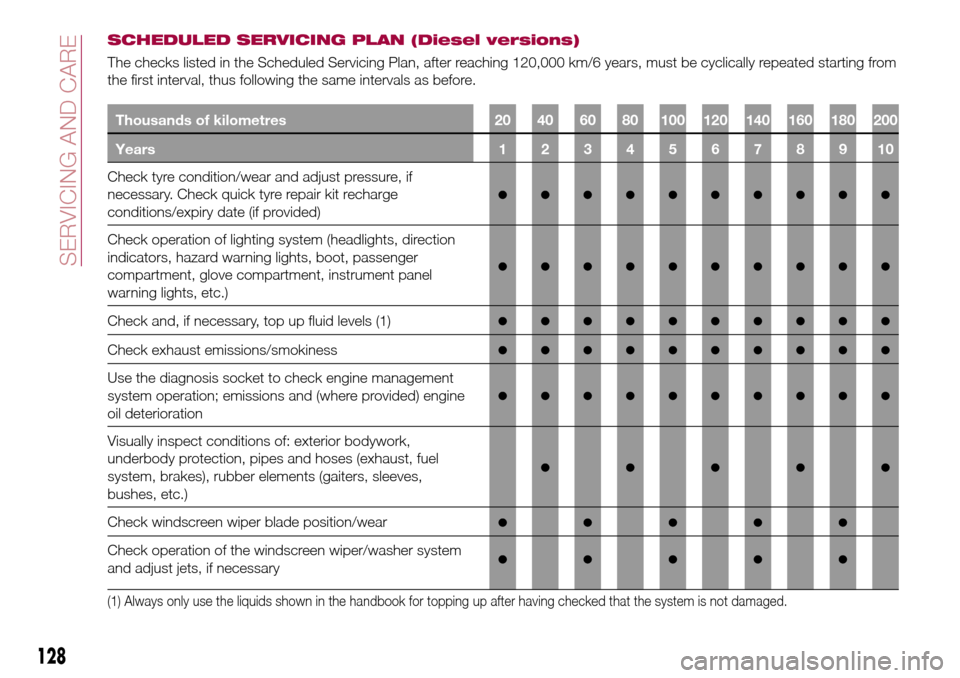
SCHEDULED SERVICING PLAN (Diesel versions)
The checks listed in the Scheduled Servicing Plan, after reaching 120,000 km/6 years, must be cyclically repeated starting from
the first interval, thus following the same intervals as before.
Thousands of kilometres 20 40 60 80 100 120 140 160 180 200
Years12345678910
Check tyre condition/wear and adjust pressure, if
necessary. Check quick tyre repair kit recharge
conditions/expiry date (if provided)
●●●●●●●●●●
Check operation of lighting system (headlights, direction
indicators, hazard warning lights, boot, passenger
compartment, glove compartment, instrument panel
warning lights, etc.)
●●●●●●●●●●
Check and, if necessary, top up fluid levels (1)●●●●●●●●●●
Check exhaust emissions/smokiness●●●●●●●●●●
Use the diagnosis socket to check engine management
system operation; emissions and (where provided) engine
oil deterioration
●●●●●●●●●●
Visually inspect conditions of: exterior bodywork,
underbody protection, pipes and hoses (exhaust, fuel
system, brakes), rubber elements (gaiters, sleeves,
bushes, etc.)
●●●●●
Check windscreen wiper blade position/wear●●●●●
Check operation of the windscreen wiper/washer system
and adjust jets, if necessary●●●●●
(1) Always only use the liquids shown in the handbook for topping up after having checked that the system is not damaged.
128
SERVICING AND CARE
Page 133 of 204
PERIODIC CHECKS
Every1,000km or before long trips
check and, if necessary, top up:
engine coolant level;
brake fluid level;
windscreen washer fluid level;
tyre inflation pressure and condition;
operation of lighting system
(headlights, direction indicators, hazard
warning lights, etc.);
operation of screen washer/wiper
system and positioning/wear of
windscreen.
Every3,000km, check and top up if
required: engine oil level.
HEAVY USAGE OF THE
CAR
If the vehicle is used mainly under one
of the following conditions:
dusty roads;
short, repeated journeys (less than
7-8 km) at sub-zero outside
temperatures;
engine often idling or driving long
distances at low speeds or long periods
of inactivity;
the following checks must be carried
out more often than indicated in the
Scheduled Servicing Plan:
check front disc brake pad condition
and wear;
check cleanliness of bonnet and
luggage compartment locks,cleanliness and lubrication of linkage;
visually inspect conditions of: engine,
gearbox, transmission, pipes and hoses
(exhaust/fuel system/brakes) and
rubber elements (gaiters/sleeves/
bushes, etc.);
check battery charge and battery
fluid level (electrolyte);
visually inspect conditions of the
accessory drive belts;
check and, if necessary, change
engine oil and replace oil filter;
check and, if necessary, replace
pollen filter;
check and, if necessary, replace air
cleaner.
On versions with AT6 automatic
transmission, change the oil and
replace filters every 90,000 km (or 2
years) if the vehicle is used in the
following conditions: city driving, short
and repeated journeys (less than
78 km) or frequent towing of trailers or
caravans.
131