2016 FIAT TIPO 4DOORS battery
[x] Cancel search: batteryPage 87 of 204
20)When the engine is switched off never
leave the ignition device in the MAR
position to prevent useless current
absorption from draining the battery.
21)A quick burst on the accelerator before
turning off the engine serves absolutely no
practical purpose; it wastes fuel and is
especially damaging to turbocharged
engines.
22)Warning light
will flash after starting
or during prolonged cranking to indicate a
fault with the glow plug heating system. If
the engine starts, the vehicle can be used
as normal, but a Fiat Dealership must be
contacted as soon as possible.
PARKING BRAKE
103) 104)
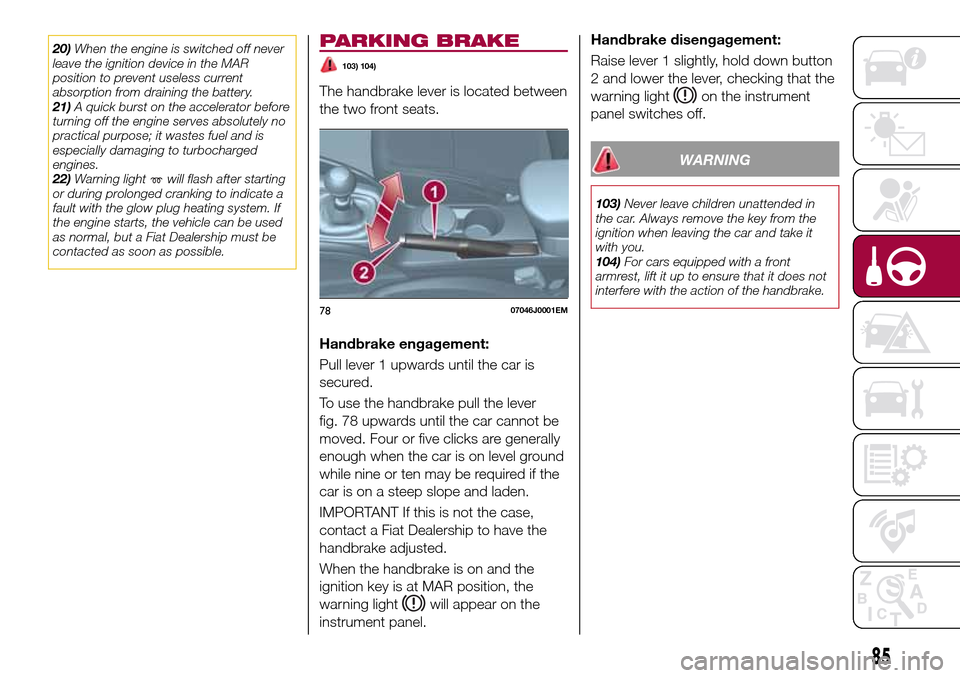
The handbrake lever is located between
the two front seats.
Handbrake engagement:
Pull lever 1 upwards until the car is
secured.
To use the handbrake pull the lever
fig. 78 upwards until the car cannot be
moved. Four or five clicks are generally
enough when the car is on level ground
while nine or ten may be required if the
car is on a steep slope and laden.
IMPORTANT If this is not the case,
contact a Fiat Dealership to have the
handbrake adjusted.
When the handbrake is on and the
ignition key is at MAR position, the
warning light
will appear on the
instrument panel.Handbrake disengagement:
Raise lever 1 slightly, hold down button
2 and lower the lever, checking that the
warning light
on the instrument
panel switches off.
WARNING
103)Never leave children unattended in
the car. Always remove the key from the
ignition when leaving the car and take it
with you.
104)For cars equipped with a front
armrest, lift it up to ensure that it does not
interfere with the action of the handbrake.
7807046J0001EM
85
Page 90 of 204
bring the transmission lever to P
(Park);
bring the ignition device to STOP;
wait for about 10 seconds, then
restart the engine;
select the desired gear: correct
transmission operation should be
restored.
IMPORTANT In the event of a
temporary failure it is in any case
recommended to contact a Fiat
Dealership as soon as possible.
GEAR ENGAGEMENT
DISABLING SYSTEM
WITHOUT BRAKE PEDAL
PRESSED
This system prevents you from moving
the gear lever from position P (Park)
and N (Neutral) if the brake pedal has
not been previously depressed.
To bring the gear lever to a position
other than P (Park) or from N (Neutral)
to R (Reverse), the ignition device must
be in position MAR (engine on or off)
and the brake pedal must be
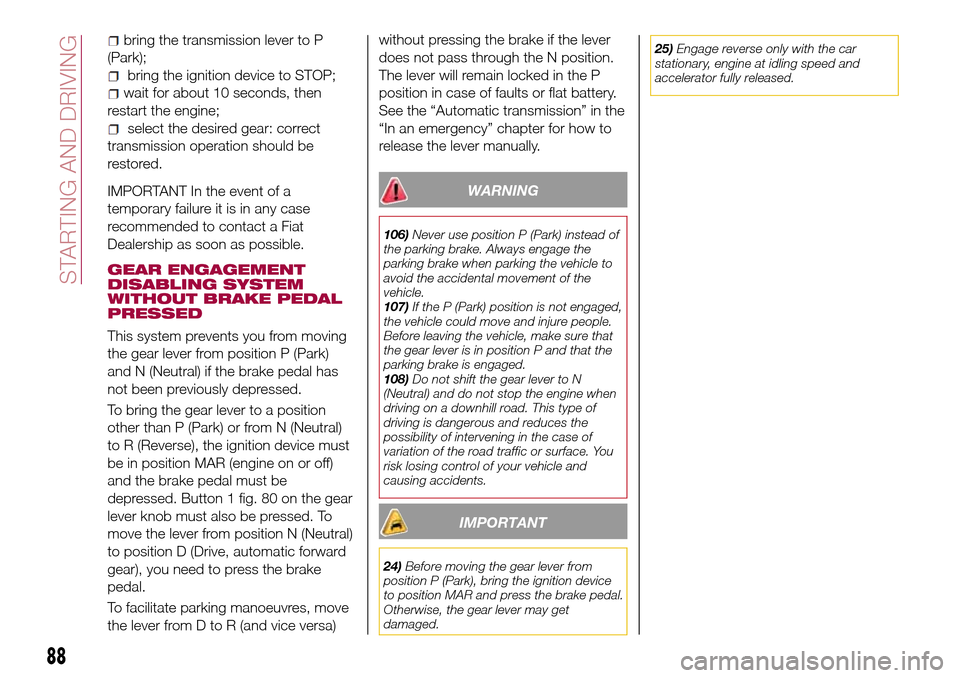
depressed. Button 1 fig. 80 on the gear
lever knob must also be pressed. To
move the lever from position N (Neutral)
to position D (Drive, automatic forward
gear), you need to press the brake
pedal.
To facilitate parking manoeuvres, move
the lever from D to R (and vice versa)without pressing the brake if the lever
does not pass through the N position.
The lever will remain locked in the P
position in case of faults or flat battery.
See the “Automatic transmission” in the
“In an emergency” chapter for how to
release the lever manually.
WARNING
106)Never use position P (Park) instead of
the parking brake. Always engage the
parking brake when parking the vehicle to
avoid the accidental movement of the
vehicle.
107)If the P (Park) position is not engaged,
the vehicle could move and injure people.
Before leaving the vehicle, make sure that
the gear lever is in position P and that the
parking brake is engaged.
108)Do not shift the gear lever to N
(Neutral) and do not stop the engine when
driving on a downhill road. This type of
driving is dangerous and reduces the
possibility of intervening in the case of
variation of the road traffic or surface. You
risk losing control of your vehicle and
causing accidents.
IMPORTANT
24)Before moving the gear lever from
position P (Park), bring the ignition device
to position MAR and press the brake pedal.
Otherwise, the gear lever may get
damaged.25)Engage reverse only with the car
stationary, engine at idling speed and
accelerator fully released.
88
STARTING AND DRIVING
Page 92 of 204
System deactivation
Deactivation of the system is indicated
by the
warning light switching on
and, where provided, by a message on
the display.
SAFETY FUNCTIONS
When the engine is stopped through
the Stop/Start system, if the driver
releases their seat belt or opens the
driver's or passenger's door, the engine
can be restarted only by using the
ignition device.
This condition is indicated to the driver
both through a buzzer and a message
on the display.
WARNING
109)If the battery needs to be replaced,
always contact a Fiat Dealership. Replace
the battery with a new one of the same
type and specifications.
IMPORTANT
26)If the climate comfort is to be favoured,
the Start&Stop system can be deactivated,
for a continuous operation of the climate
control system.
ELECTRONIC
CRUISE CONTROL
(where provided)
This is an electronically controlled
driving assistance device that allows the
desired vehicle speed to be maintained,
without having to press the accelerator
pedal. This device can be used at a
speed above 30 km/h on long stretches
of dry, straight roads with few variations
(e.g. motorways).
It is therefore not recommended to use
this device on extra-urban roads with
traffic. Do not use it in town.
ACTIVATING THE DEVICE
110) 111) 112)
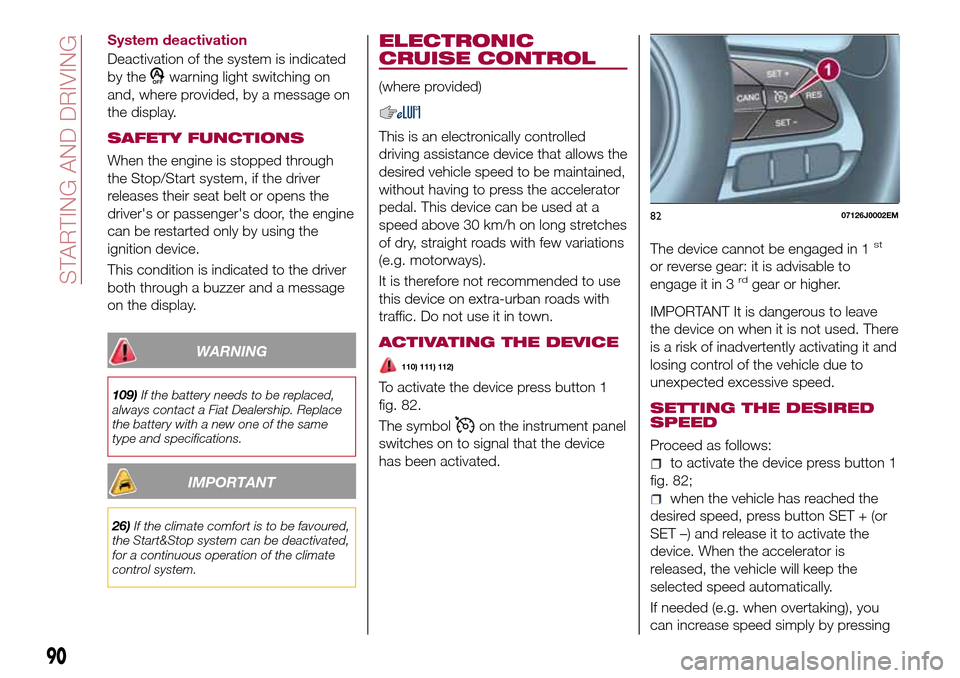
To activate the device press button 1
fig. 82.
The symbol
on the instrument panel
switches on to signal that the device
has been activated.The device cannot be engaged in 1
st
or reverse gear: it is advisable to
engage it in 3rdgear or higher.
IMPORTANT It is dangerous to leave
the device on when it is not used. There
is a risk of inadvertently activating it and
losing control of the vehicle due to
unexpected excessive speed.
SETTING THE DESIRED
SPEED
Proceed as follows:
to activate the device press button 1
fig. 82;
when the vehicle has reached the
desired speed, press button SET + (or
SET –) and release it to activate the
device. When the accelerator is
released, the vehicle will keep the
selected speed automatically.
If needed (e.g. when overtaking), you
can increase speed simply by pressing
8207126J0002EM
90
STARTING AND DRIVING
Page 97 of 204

TOWING TRAILERS
IMPORTANT NOTES
115) 116)
For towing caravans or trailers the
vehicle must be fitted with an approved
tow hook and an adequate electrical
system. Should aftermarket installation
be requested, this must be carried out
by specialists.
Install any specific and/or additional
door mirrors as specified by the
Highway Code.
Remember that, when towing a trailer,
steep hills are harder to climb, braking
distances increase and overtaking takes
longer depending on the overall weight
of the trailer.
Engage a low gear when driving
downhill, rather than constantly using
the brake.
The weight the trailer exerts on the
vehicle tow hook reduces the vehicle's
loading capacity by the same amount.
To make sure that the maximum
towable weight is not exceeded (given
in the vehicle registration document)
account should be taken of the fully
laden trailer, including accessories and
luggage.
Do not exceed the speed limits specific
to each country you are driving in, in thecase of vehicles towing trailers. In any
case, the top speed must not exceed
100 km/h.
Any electric brake must be powered
directly by the battery through a cable
with a cross-section of no less than 2.5
mm
2.
In addition to the electrical branches,
the vehicle electrical system can only be
connected to the supply cable for an
electric brake and to the cable for an
internal light for the trailer, not
exceeding 15 W. For connections, use
the preset control unit with a battery
cable with section not less than 2.5 mm
2.
IMPORTANT The use of auxiliary loads
other than external lights (e.g. electric
brake) must take place with engine
running.
INSTALLING A TOW
HOOK
The towing device should be fastened
to the body by specialised personnel
according to any additional and/or
integrative information supplied by the
Manufacturer of the device.
The towing device must meet current
regulations with reference to Directive
94/20/EC and subsequent
amendments.For any version the towing device used
must be right for the towable weight of
the vehicle on which it is to be installed.
For the electrical connection a standard
connector should be used which is
generally placed on a special bracket
normally fastened to the towing device,
and a special ECU for external trailer
light control must be installed on the
vehicle.
Seven or thirteen pin 12 V DC
connections should be used
(CUNA/UNI and ISO/DIN Standards).
Follow any instructions provided by the
vehicle manufacturer and/or the towing
device manufacturer.
WARNING
115)The ABS with which the car is
equipped will not control the braking
system of the trailer. Particular caution is
required on slippery roads.
116)Never modify the braking system of
the vehicle to control the trailer brake. The
trailer braking system must be fully
independent of the car’s hydraulic system.
95
Page 109 of 204
ENGINE COMPARTMENT
FUSE BOX
34)
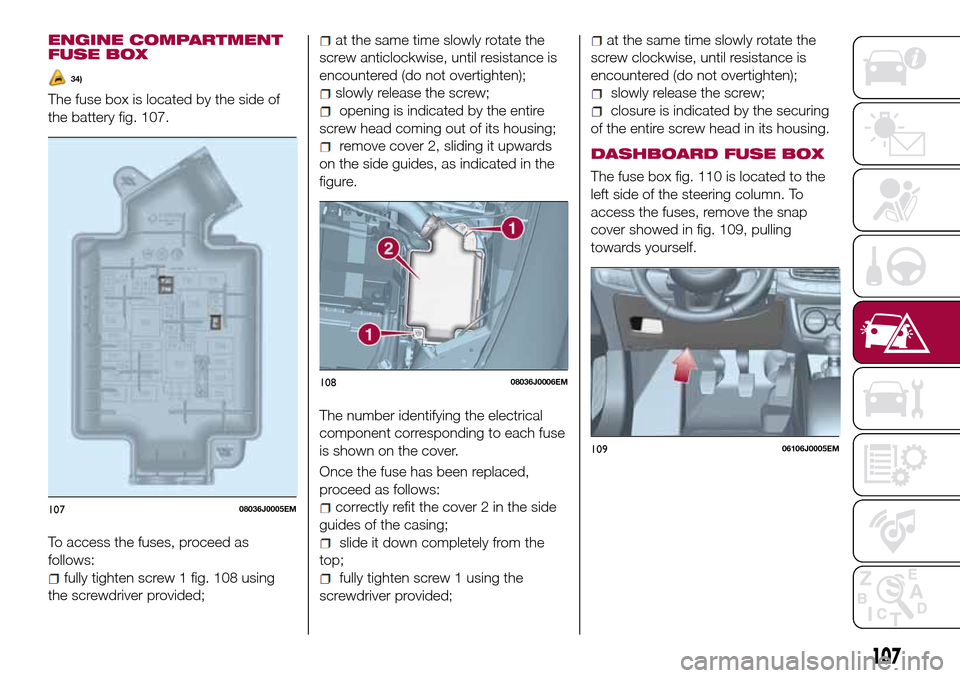
The fuse box is located by the side of
the battery fig. 107.
To access the fuses, proceed as
follows:
fully tighten screw 1 fig. 108 using
the screwdriver provided;
at the same time slowly rotate the
screw anticlockwise, until resistance is
encountered (do not overtighten);
slowly release the screw;
opening is indicated by the entire
screw head coming out of its housing;
remove cover 2, sliding it upwards
on the side guides, as indicated in the
figure.
The number identifying the electrical
component corresponding to each fuse
is shown on the cover.
Once the fuse has been replaced,
proceed as follows:
correctly refit the cover 2 in the side
guides of the casing;
slide it down completely from the
top;
fully tighten screw 1 using the
screwdriver provided;
at the same time slowly rotate the
screw clockwise, until resistance is
encountered (do not overtighten);
slowly release the screw;
closure is indicated by the securing
of the entire screw head in its housing.
DASHBOARD FUSE BOX
The fuse box fig. 110 is located to the
left side of the steering column. To
access the fuses, remove the snap
cover showed in fig. 109, pulling
towards yourself.
10708036J0005EM
10808036J0006EM
10906106J0005EM
107
Page 119 of 204
WARNING
133)The information required by the
applicable regulation is indicated on the
Fix&Go kit package label. Compliance with
the indications on the label is an essential
condition to ensure the safety and the
effectiveness of the Fix&Go kit. Carefully
read the label before use, avoid improper
use. Fix&Go is subject to expiration and
must be replaced periodically. The kit
should be used by adults and cannot be
used by children.
IMPORTANT
38)Show the package and the label to the
personnel charged with handling the tyre
treated with the tyre repair kit.
39)Fix&Go provides a temporary repair,
therefore the tyre must be examined and
repaired by a specialist as soon as
possible. The sealing fluid is effective at
temperatures between -40°C and +50°C. It
is possible to repair tyres which have been
damaged on tread up to a diameter of
4mm; however, tyres damaged on their
side cannot be repaired. Before using
Fix&Go kit, ensure that the tyre isn't
excessively damaged and that the rim is in
good condition, otherwise do not use it and
contact a Fiat Dealership. Do not remove
foreign bodies from the tyre. Do not let the
compressor turned on for more than 20
consecutive minutes - overheating hazard.
EMERGENCY
STARTING
If the battery is flat, a jump starting can
be performed using the battery and the
cables of another vehicle, or using an
auxiliary battery. In all cases, the battery
used must have a capacity equal to or
a little higher than the flat one.
40)
IMPORTANT NOTES
Do not use an auxiliary battery or any
other source of external supply with a
voltage above 12 V: the battery, the
starter, the alternator and the electrical
system of the vehicle could be
damaged.
Do not attempt jump starting if the
battery is frozen. The battery could
break and explode!
PREPARATION TO JUMP
STARTING
The vehicle battery is located in the
engine compartment, behind the left
light cluster.
134) 135) 136) 137)
IMPORTANT The positive terminal (+) of
the battery is shielded by a protective
element. Raise it to access the terminal.
Proceed as follows:
operate the parking brake, move the
lever to P (Park), for versions equipped
with automatic transmission (if present),
or neutral, for versions with manual
gearbox, then set the ignition device to
STOP;
switch off all the other electrical
devices in the vehicle;
should you be using the battery of
another vehicle, park the other vehicle
within the range of the cables used for
the connection, operate the parking
brake and ensure that its ignition is off.
IMPORTANT Never connect the
negative terminals of the two batteries
directly! If the auxiliary battery is
installed on another vehicle, check that
there is no accidental contact of metal
parts between the two vehicles, since
an earth connection may result, with
the risk of serious injury to any people
who may be nearby.
IMPORTANT If the procedure below is
carried out incorrectly, it can cause
severe injury to people or damage the
recharging system of one or both
vehicles. Carefully follow the
instructions given below.
Cable connection
41)
Proceed as follows to carry out a jump
starting fig. 128:
117
Page 120 of 204

connect one end of the cable used
for positive (+) to the positive terminal
(+) of the vehicle with flat battery;
connect the other end of the cable
used for positive (+) to the positive
terminal (+) of the auxiliary battery;
connect one end of the cable used
for negative (–) to the negative terminal
(–) of the auxiliary battery;
connect the other end of the cable
used for negative (–) to an engine earth
(a visible metal part of the engine or
gearbox/transmission of the vehicle
with flat battery) away from the battery
and the fuel injection system;
start the vehicle engine with the
auxiliary battery, let it run for a few
minutes at idling. Start the engine of the
vehicle with flat battery.Cable disconnection
Once the engine is started, remove the
leads, reversing the order above.
If after a few attempts the engine does
not start, do not persist but contact a
Fiat Dealership.
If it is often necessary to perform a
jump starting, have the vehicle battery
and the recharging system checked by
a Fiat Dealership.
WARNING
134)Before opening the bonnet, make
sure that the engine is off and that the
ignition key is in the STOP position. Follow
the indications on the plate underneath the
bonnet. We recommend that you remove
the key from the ignition if other people
remain in the vehicle. The vehicle should
always be left after the key has been
removed or turned to the STOP position.
During refuelling, make sure that the engine
is off (and that the ignition key is in the
STOP position).
135)Do not get too close to the radiator
cooling fan: the electric fan may start;
danger of injury. Scarves, ties and other
loose clothing might be pulled by moving
parts.
136)Remove any metal objects (e.g. rings,
watches, bracelets), that might cause an
accidental electrical contact and cause
serious injury.137)The batteries contain acid that can
burn skin or eyes. Batteries produce
hydrogen, which is easily flammable and
explosive. Therefore, keep away flames or
devices which may cause sparks.
IMPORTANT
40)Never use a fast battery-charger to
start the engine as this could damage the
electronic systems of your vehicle,
particularly the ignition and engine fuel
supply control units.
41)Do not connect the cable to the
negative terminal (–) of the flat battery. The
following spark could lead to battery
explosion and cause serious harm. Only
use the specific earth point; do not use any
other exposed metallic part.
12808066J0003EM
118
IN AN EMERGENCY
Page 121 of 204

FUEL CUT-OFF
SYSTEM
DESCRIPTION
This intervenes in the case of an impact
causing:
the interruption of the fuel supply
with the engine consequently switching
off;
the automatic unlocking of the
doors;
turning on of the lights inside the
vehicle;
deactivation of climate control
system ventilation;
switching on of the hazard warning
lights (to deactivate the lights press the
button on the dashboard).
On some versions, the intervention of
the system is indicated by a message
shown on the display. In the same way,
a dedicated message on the display
warns the driver if system operation is
compromised.
IMPORTANT Carefully check the vehicle
for fuel leaks, for instance in the engine
compartment, under the vehicle or near
the tank area. After a collision, bring the
ignition device to STOP to prevent the
battery from running down.FUEL CUT-OFF SYSTEM
RESET
To restore correct operation of the
vehicle, carry out the following
procedure (this procedure must be
started and completed within less than
1 minute):
138)
Operations to be carried out
With direction indicator lever in neutral
position, bring the ignition device to STOP
Bring the ignition device to MAR
Activate the right direction indicator
Activate the left direction indicator
Activate the right direction indicator
Activate the left direction indicator
Deactivate the left direction indicator
Bring the ignition device to STOP
Bring the ignition device to MAR
WARNING
138)If, after an impact, you smell fuel or
notice leaks from the fuel system, do not
reactivate the system to avoid the risk of
fire.
AUTOMATIC
TRANSMISSION
Lever release
In the event of a fault, to move the gear
lever from P (Park), proceed as follows:
stop the engine;
engage the parking brake;
working carefully in the point
indicated by the arrow, remove the gear
lever gaiter 1 fig. 129 (also see
fig. 130 );
12908106J0001EM
119