Page 89 of 232

System malfunction
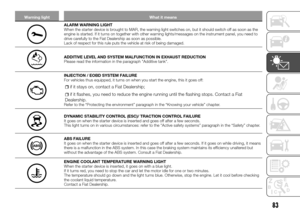
The warning lights described below are together with an acoustic signal.
Warning lights on panel Message Meaning
"VIEW DEDICATED MESSAGE ON THE
SCREEN"Indicates a system malfunction. Contact a
Fiat Dealership as soon as possible.
"VIEW DEDICATED MESSAGE ON THE
SCREEN"Indicates that in less than 1100 km you will
not be able to restart the vehicle. These
alarms will be repeated every 100 km.
Contact a Fiat Dealership as soon as
possible.
"VIEW DEDICATED MESSAGE ON THE
SCREEN"Indicates that once the engine has been
stopped, it will not restart. Contact a Fiat
Dealership.
WARNING
83)For driver safety, the warning lightSTOPobliges you to stop as soon as traffic conditions allow. Stop the engine and do not turn it back
on. Contact a Fiat Dealership.
IMPORTANT
18)If the lights or acoustic signals do not reappear, it is because of an instrument panel malfunction. When these lights go on, you need to
stop as soon as traffic conditions allow. Check that the vehicle is correctly immobilised and contact a Fiat Dealership.
87
Page 90 of 232

CONTROL PANEL
AND ON-BOARD
INSTRUMENTS
On-board computer 1 fig. 167
Depending on the vehicle version, it
includes the following functions:
distance travelled;
travel parameters;
information messages;
malfunction messages (together with
warning lights
);
alarm messages (together with the
STOPwarning light).
Selection buttons for displaying
Scroll up (button 9) or down (button 10)
for the following information, pressing a
few times briefly (the display will depend
on the vehicle's equipment and country
of sale) fig. 168.You can view the following information
on the display screen:
overall and partial odometer for the
distance travelled;
fuel consumed;
average fuel consumption;
instantaneous consumption;
foreseeable autonomy;
distance travelled;
average speed;
service limit, oil change counter;
tyre pressure re-initialisation;
speed set on the Cruise Control /
Speed Limiter;
time and temperature;
on-board log, information message
scrolling and operational malfunction;
percentage volume of remaining
additives.Resetting the trip odometer
When the "overall and partial milometer"
display is selected, press either button
9 or 10 fig. 168 until the milometer is
reset to zero.
Resetting travel parameters
When one of the trip parameters is
selected on the display, press button
9 or 10 fig. 168 until the display is reset.
Interpreting some of the displayed
values after resetting
The further you travel after the last
reset, the more accurate and significant
the average fuel consumption,
autonomy and average speed become.
During the first kilometers travelled after
resetting, you will notice that the
autonomy increases as you travel. This
is because the system takes the
average fuel consumption since the last
reset into account. The average fuel
consumption can decrease when:
the vehicle is no longer accelerating;
the engine reaches operating
temperature (reset: cold engine);
going from urban to extra-urban
driving.
Automatic travel parameter reset
Reset is automatic when one of the
parameter's capacities is exceeded.
167T36518
168T35570
88
KNOWING THE INSTRUMENT PANEL
Page 91 of 232
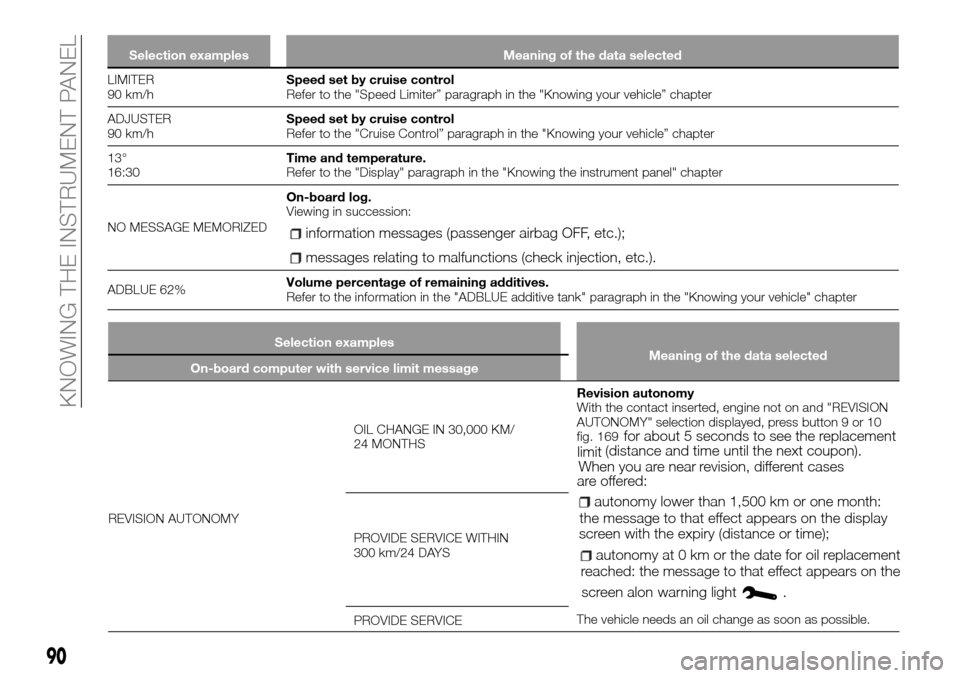
ON BOARD COMPUTER: travel parameters
Selection examples Meaning of the data selected
101778 km 112.4 km General a partial totaliser.
FUEL
8L
Travel parameters.
Fuel consumed.
Fuel consumed since last reset.
AVERAGE FUEL
CONSUMPTION
5.8 L/100
Average fuel consumptionsince last reset.
The value displayed after travelling at least 400 meters from the last reset.
INSTANTANEOUS
7.4 L/100
Instantaneous consumption.
Value displayed after reaching speed of 30 km/h.
AUTONOMY
541 km
Foreseeable autonomy with residual fuel.
Value displayed after travelling at least 400 meters.
DISTANCE
522 km
Distance travelledsince last reset.
AVERAGE SPEED
89.4 km/h
Average speedsince last reset.
Value displayed after travelling at least 400 meters.
TYRE SET PRESSURE
< LONG PRESS >Tyre pressure re-initialisation.
Refer to the “TPMS – TYRE PRESSURE MONITORING SYSTEM” paragraph in the “Safety” chapter
89
Page 92 of 232

Selection examples Meaning of the data selected
LIMITER
90 km/hSpeed set by cruise control
Refer to the "Speed Limiter” paragraph in the "Knowing your vehicle” chapter
ADJUSTER
90 km/hSpeed set by cruise control
Refer to the "Cruise Control” paragraph in the "Knowing your vehicle” chapter
13°
16:30Time and temperature.
Refer to the "Display" paragraph in the "Knowing the instrument panel" chapter
NO MESSAGE MEMORIZEDOn-board log.
Viewing in succession:
information messages (passenger airbag OFF, etc.);
messages relating to malfunctions (check injection, etc.).
ADBLUE 62%Volume percentage of remaining additives.
Refer to the information in the "ADBLUE additive tank" paragraph in the "Knowing your vehicle" chapter
90
KNOWING THE INSTRUMENT PANEL
Selection examples
Meaning of the data selected
On-board computer with service limit message
REVISION AUTONOMYOIL CHANGE IN 30,000 KM/
24 MONTHSRevision autonomy
With the contact inserted, engine not on and "REVISION
AUTONOMY" selection displayed, press button 9 or 10
fig. 169
for about 5 seconds to see the replacement
limit(distance and time until the next coupon).
When you are nearrevision, different cases
are offered:
autonomy lower than 1,500 km or one month:
the message to that effect appears on the display
screen with theexpiry (distance or time);
autonomy at 0 km or the date for oil replacement
reached: the message to that effect appears on the
screen alonwarning light
.
The vehicle needs an oil change as soon as possible. PROVIDE SERVICE WITHIN
300 km/24 DAYS
PROVIDE SERVICE
Page 93 of 232

Selection examples
Meaning of the data selected
On-board computer with service limit message
Depending on how old the vehicle is, the oil change limit will adapt to driving style (frequently at low speeds, door-to-door, the least prolonged
driving, towing a trailer, etc.). The distance that remains until the next oil change can, in certain cases, thus be reduced more rapidly than the
distance actually covered.
Re-initialisation:to re-initialise the system, view the “Maintenance schedule” (distance and time), press button 9 or 10 fig. 168
for about
10 seconds without interruption until the oil change time appears fixed.
ON-BOARD: information messages
These can help vehicle ignition, provide information on a selection or on driving conditions.
ON-BOARD COMPUTER: malfunction messages
They appear along with the warning light
.When these messages appear, drive carefully to the Fiat
Dealership. Failure to follow this instruction could damage the vehicle.
They are deleted when you press the viewing selection button, or automatically after a few seconds. However, they are stored
in the on-board log. The warning light
stays on.
ON-BOARD COMPUTER: alarm messages
They appear along with the STOP warning light to make you stop as soon as traffic conditions allow, for your own
safety. Stop the engine and do not turn it back on. Contact a Fiat Dealership.
91
Page 94 of 232
SAFETY
The chapter that you are about to read
is very important: it describes the safety
systems with which the vehicle is
equipped and provides instructions on
how to use them correctly.OCCUPANT PROTECTION
SYSTEMS.................93
SEATBELTS................93
PRE-TENSIONERS............96
FRONT AIRBAGS.............97
SIDE AIR BAGS.............100
CHILD PROTECTION SYSTEMS . .101
ACTIVE SAFETY SYSTEMS.....126
TPMS – Tyre Pressure Monitoring
System..................129
92
SAFETY
Page 95 of 232

OCCUPANT
PROTECTION
SYSTEMS
84) 85)
19) 20)
3)
Depending on the trim, there could be:load limiters;
driver and front passenger airbags;
These systems are designed to function
separately or at the same time in case
of a frontal collision.
Depending on the violence of the
collision, the system activates:
seat belt locking.
seat belt pre-tensioner (which
activates the belt tension);
the airbags.
WARNING
84)Check the safety devices after every
accident.
85)Any intervention on the complete
system (pre-tensioners, airbags, electronic
modules, wiring) or re-use on another
vehicle, even if identical, is strictly
prohibited.
IMPORTANT
19)In order to prevent accidental
deployments that could cause damage,
only qualified Fiat Dealership personnel can
intervene in pre-tensioners and air bags.
20)Checking the electrical features of the
actuator can only be effected by specifically
prepared personnel using the proper tools.
IMPORTANT
3)When the vehicle is scrapped, see a Fiat
Dealership to remove the pre-tensioner gas
generator and air bags.
SEAT BELTS
86)
For obvious safety reasons, always
fasten the seat belts. In addition, always
comply with the laws of the country you
are in.
IMPORTANT For full effectiveness of the
rear seat belts, make sure that the
single rear seat is correctly locked in
place. Refer to the "Rear single seats”
paragraph in the "Knowing your vehicle”
chapter.
Before starting the engine, first adjust
the driving position and adjust the seat
belts to obtain the best possible
protection (for all the passengers).
The safety belts must always be kept
clean. Use products selected by Fiat
Dealership services or soap and warm
water, rubbing with a sponge and
drying with a dry cloth. Do not use
detergents or chemical products.
ADJUSTING THE DRIVER'S
POSITION
Sit with your back against the
backrest (after taking off clothing like
coat, jacket, etc.). This is an essential
factor for correctly positioning the back;
adjust the seat position according to
the pedals. The seat position must be
so as to allow pressing the clutch pedal
all the way. The backrest must be
inclined so arms are slightly bent;
93
Page 96 of 232

safety, the distance between the head
and headrest must be minimum;
adjust cushion (seat) height. This
adjustment optimises visibility;
adjust the steering wheel.
ADJUSTING THE SEAT BELTS
Sit firmly on the backrest.
The chest belt 1 fig. 169 must be as
close as possible to the neck without
touching it.
The waist belt 2 fig. 169 must be
resting on the thighs and against the
pelvis.
The belt must adhere as much as
possible to the body. (e.g. avoid
wearing clothes that are too bulky or
placing obstacles between the body
and belt).Locking
Pull out the belt slowly without forcing it
and insert the tab 3 fig. 170 into the
buckle 5 (make sure it is locked by
pulling the tab 3).
Repeat the operation if the seat belt
blocks.
If the belt is completely blocked, pull
slowly but firmly and draw out at least
3 cm. Let it rewind normally then pull it
out again. If the problem persists,
contact a Fiat Dealership.
Front seat belts not fastened
warning light
If the seat belt is not buckled, the light
stays on when the engine is started,
then, when you reach 16 km/h, it
flashes and there is an acoustic signal
for about two minutes.Adjusting the front seat belt height
Move the lever 6 fig. 171 to select the
adjustment position so the chest belt 1
fig. 169 adheres to the body as
described above.
After adjusting, make sure it is properly
locked in place.
Unlocking
Press button 4 fig. 170, the belt
rewinds. Accompany it as it rewinds.
Rear side belts
For the first row in the rear, you must
use belts 8 fig. 172;
for the last row at the rear, you must
use the seat belts 7 fig. 172.
When the seat belt 8 fig. 172 is not
worn, insert the tab 9 into the buckle
10.
169T13622
170T13622-1171T36553
94
SAFETY
adjust the headrest. For maximum