Page 152 of 216

151
SAFETY
STARTING
AND DRIVING
WARNING
LIGHTS AND
MESSAGES
SERVICE
AND CARE
TECHNICAL
SPECIFICATIONS
INDEX
CONTROLS
AND DEVICES
IN AN
EMERGENCY
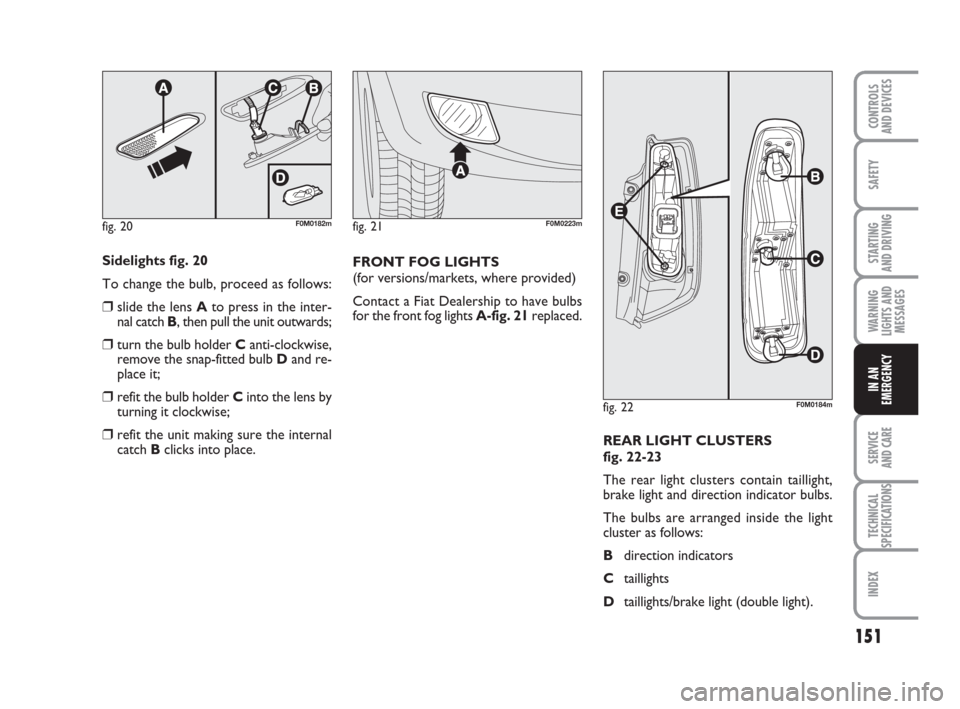
Sidelights fig. 20
To change the bulb, proceed as follows:
❒slide the lens Ato press in the inter-
nal catch B, then pull the unit outwards;
❒turn the bulb holder Canti-clockwise,
remove the snap-fitted bulb Dand re-
place it;
❒refit the bulb holder Cinto the lens by
turning it clockwise;
❒refit the unit making sure the internal
catch Bclicks into place.FRONT FOG LIGHTS
(for versions/markets, where provided)
Contact a Fiat Dealership to have bulbs
for the front fog lights A-fig. 21replaced.
REAR LIGHT CLUSTERS
fig. 22-23
The rear light clusters contain taillight,
brake light and direction indicator bulbs.
The bulbs are arranged inside the light
cluster as follows:
Bdirection indicators
Ctaillights
Dtaillights/brake light (double light).
fig. 20F0M0182m
fig. 22F0M0184m
fig. 21F0M0223m
135-166 ACTUAL 1ed EN 26-07-2010 16:00 Pagina 151
Page 153 of 216
152
SAFETY
STARTING
AND DRIVING
WARNING
LIGHTS AND
MESSAGES
SERVICE
AND CARE
TECHNICAL
SPECIFICATIONS
INDEX
CONTROLS
AND DEVICES
IN AN
EMERGENCY
To change the bulb proceed as follows:
❒open the boot then loosen the two fas-
tening screws A;
❒disconnect the central electric connec-
tor and pull the lens unit outwards;
❒loosen the screws Eand remove the
bulb holder;
❒remove the bulb that needs replacing
B, Cor Dby pushing it in slightly and
turning it anti-clockwise (“bayonet”
clamping), then replace it;
❒refit the bulb holder and tighten the
screws E;
❒reconnect the electric connector, cor-
rectly realign the unit with the car body
and then tighten the fastening screws A.
REAR FOG LIGHTS fig. 24
Contact a Fiat Dealership to have bulbs
for the rear fog lights Areplaced.REVERSE LIGHTS fig. 25
Contact a Fiat Dealership to have bulbs
for the reverse lights Areplaced.
fig. 24F0M0208mfig. 25F0M0209m
fig. 23F0M0185m
135-166 ACTUAL 1ed EN 26-07-2010 16:00 Pagina 152
Page 155 of 216

154
SAFETY
STARTING
AND DRIVING
WARNING
LIGHTS AND
MESSAGES
SERVICE
AND CARE
TECHNICAL
SPECIFICATIONS
INDEX
CONTROLS
AND DEVICES
IN AN
EMERGENCY
CHANGING
AN INTERIOR BULB
For the type of bulb and relevant power
rating, see “Changing a bulb”.
FRONT CEILING LIGHT
(for versions/markets, where provided)
Proceed as follows to replace the bulbs:
❒manipulate the points shown by the ar-
rows and remove the light D-fig. 30;
❒open the protective flap E-fig. 31;
❒replace bulb F-fig. 33by releasing it
from the side contacts and making sure
that the new bulb is correctly clamped
between these contacts;
❒close the protective flap E-fig. 31and
secure light D-fig. 30into its housing
making sure that it locks into place.
FRONT CEILING LIGHT
WITH SPOT LIGHTS
(for versions/markets, where available)
Proceed as follows to replace the bulbs:
❒manipulate the points shown by the
arrows and remove light A-fig. 32;
❒open the protective flap B;
❒replace bulbs C-fig. 33by releasing
them from the side contacts and mak-
ing sure that new bulbs are correctly
clamped between these contacts;
❒close the lid B-fig. 33and secure light
A-fig. 32into its housing making sure
that it locks into place.
fig. 32F0M0213m
fig. 33F0M0234m
fig. 30F0M0214m
fig. 31F0M0235m
135-166 ACTUAL 1ed EN 26-07-2010 16:00 Pagina 154
Page 160 of 216

159
SAFETY
STARTING
AND DRIVING
WARNING
LIGHTS AND
MESSAGES
SERVICE
AND CARE
TECHNICAL
SPECIFICATIONS
INDEX
CONTROLS
AND DEVICES
IN AN
EMERGENCY
1
8
13
2
5
11
4
6
14
7
12
3
107,5
7,5
5
5
10
5
20
20
20
20
5
5
7,5 FUSE TABLE
Dashboard fusebox fig. 36
DEVICESFUSE AMPS
Right dipped beam headlight
Left dipped beam headlight, corrector, headlamp alignment corrector
INT/A supply for switch coils on engine fusebox
and switch coils on body computer control unit
Front ceiling light, rear ceiling light (VAN version)
Supply and battery for EOBD diagnostic plug, alarm, sound system,
Blue&Me control unit
INT supply for instrument panel, switch on brake pedal
(N.O. contact), third brake light
Door locking/unlocking motors, dead lock activation motors,
boot unlocking motor
Windscreen/rear window washer pump
Electric window motor on driver-side front door
Electric window motor on passenger-side front door
INT supply for dashboard control lights, mirror movement exterior electrics,
sunroof control unit, My Port infotelematic system socket
Instrument panel
INT supply for brake pedal switch (NC contact), clutch pedal switch,
interior heating unit, Blue&Me control unit, sound system capabilities,
voltage stabiliser control unit, reverse light on rear bumper,
water sensor on diesel filter, glow plug heating control unit, airflow meter,
brake booster sensor, switch coils on engine compartment fusebox
135-166 ACTUAL 1ed EN 26-07-2010 16:00 Pagina 159
Page 167 of 216

166
SAFETY
STARTING
AND DRIVING
WARNING
LIGHTS AND
MESSAGES
SERVICE
AND CARE
TECHNICAL
SPECIFICATIONS
INDEX
CONTROLS
AND DEVICES
IN AN
EMERGENCY
Do not start the engine while
the car is being towed.
WARNING
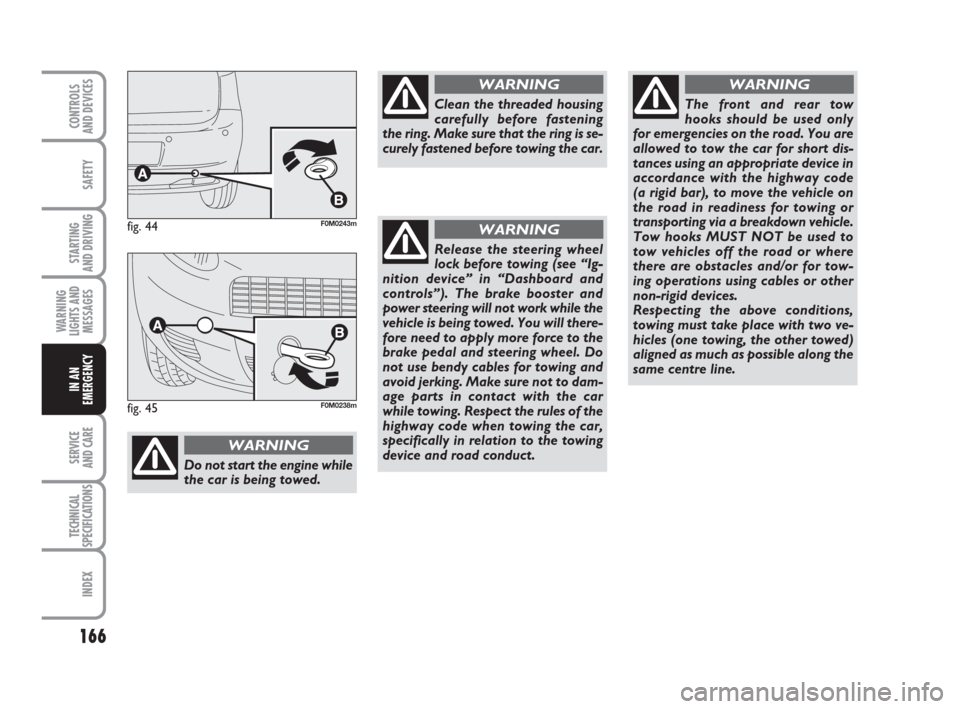
Clean the threaded housing
carefully before fastening
the ring. Make sure that the ring is se-
curely fastened before towing the car.
WARNING
Release the steering wheel
lock before towing (see “Ig-
nition device” in “Dashboard and
controls”). The brake booster and
power steering will not work while the
vehicle is being towed. You will there-
fore need to apply more force to the
brake pedal and steering wheel. Do
not use bendy cables for towing and
avoid jerking. Make sure not to dam-
age parts in contact with the car
while towing. Respect the rules of the
highway code when towing the car,
specifically in relation to the towing
device and road conduct.
WARNING
The front and rear tow
hooks should be used only
for emergencies on the road. You are
allowed to tow the car for short dis-
tances using an appropriate device in
accordance with the highway code
(a rigid bar), to move the vehicle on
the road in readiness for towing or
transporting via a breakdown vehicle.
Tow hooks MUST NOT be used to
tow vehicles off the road or where
there are obstacles and/or for tow-
ing operations using cables or other
non-rigid devices.
Respecting the above conditions,
towing must take place with two ve-
hicles (one towing, the other towed)
aligned as much as possible along the
same centre line.
WARNING
fig. 44F0M0243m
fig. 45F0M0238m
135-166 ACTUAL 1ed EN 26-07-2010 16:00 Pagina 166
Page 170 of 216

169
SAFETY
STARTING
AND DRIVING
WARNING
LIGHTS AND
MESSAGES
IN AN
EMERGENCY
TECHNICAL
SPECIFICATIONS
INDEX
CONTROLS
AND DEVICES
SERVICE
AND CARE
30 60 90 120 150 180
●●●●● ●
●●●●● ●
●●●●● ●
●●●●● ●
●● ●
●●●●● ●
●●●●● ●
●●
●●
●
●●●●● ●
●● ●
SCHEDULED SERVICING PLAN PETROL VERSIONS
Services shall be performed every 30,000 km
Thousands of kilometres
Check tyre conditions/wear and adjust pressure if required
Check operation of lighting system (headlights, direction
indicators, hazard lights, boot lights, passenger compartment
lights, instrument panel warning lights, etc.)
Check windscreen wiper/washer operation
Check front disc brake pad conditions and wear
Check rear drum brake linings condition and wear
Visually inspect the conditions of: bodywork,
underbody protection, pipes and tubes (exhaust – fuel – brakes),
rubber parts (boots, sleeves, bushes, etc.)
Check cleanliness of bonnet and boot locks,
as well as cleanliness and lubrication of linkages
Check tension and adjust accessory drive belts
if necessary (versions 1.2 – 1.4 with heater)
Visually inspect the condition of accessory drive belt/s.
Replace accessory drive belt/s
Check and adjust handbrake lever stroke, if required
Check and adjust tappet clearance, if required
167-186 ACTUAL 1ed EN 27-07-2010 10:30 Pagina 169
Page 172 of 216

171
SAFETY
STARTING
AND DRIVING
WARNING
LIGHTS AND
MESSAGES
IN AN
EMERGENCY
TECHNICAL
SPECIFICATIONS
INDEX
CONTROLS
AND DEVICES
SERVICE
AND CARE
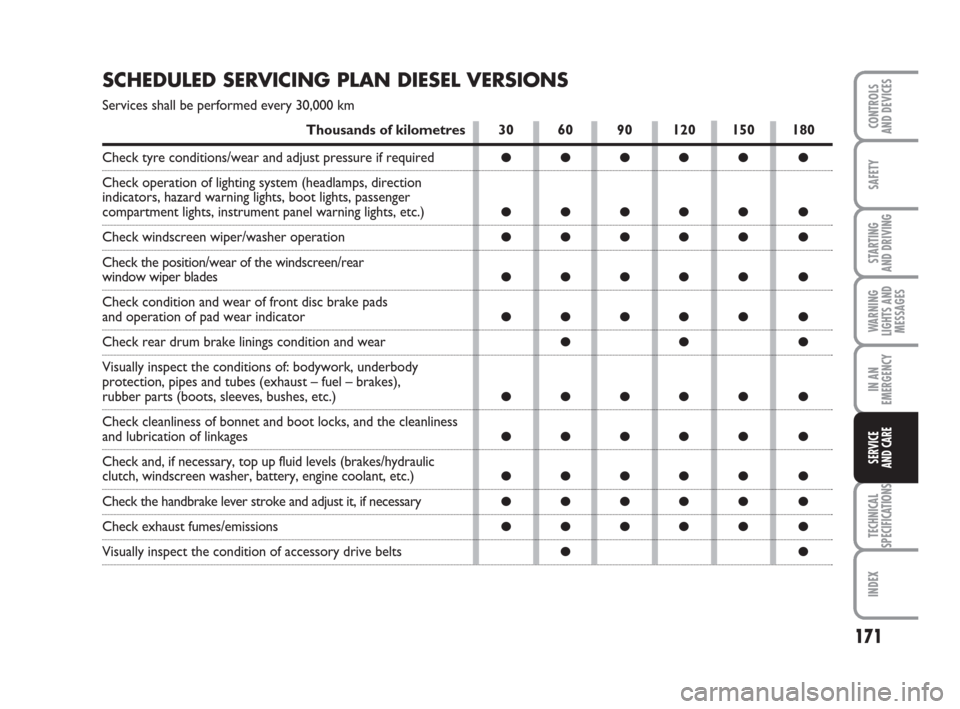
SCHEDULED SERVICING PLAN DIESEL VERSIONS
Services shall be performed every 30,000 km
30 60 90 120 150 180
●●●●● ●
●●●●● ●
●●●●● ●
●●●●● ●
●●●●● ●
●● ●
●●●●● ●
●●●●● ●
●●●●● ●
●●●●● ●
●●●●● ●
●●
Thousands of kilometres
Check tyre conditions/wear and adjust pressure if required
Check operation of lighting system (headlamps, direction
indicators, hazard warning lights, boot lights, passenger
compartment lights, instrument panel warning lights, etc.)
Check windscreen wiper/washer operation
Check the position/wear of the windscreen/rear
window wiper blades
Check condition and wear of front disc brake pads
and operation of pad wear indicator
Check rear drum brake linings condition and wear
Visually inspect the conditions of: bodywork, underbody
protection, pipes and tubes (exhaust – fuel – brakes),
rubber parts (boots, sleeves, bushes, etc.)
Check cleanliness of bonnet and boot locks, and the cleanliness
and lubrication of linkages
Check and, if necessary, top up fluid levels (brakes/hydraulic
clutch, windscreen washer, battery, engine coolant, etc.)
Check the handbrake lever stroke and adjust it, if necessary
Check exhaust fumes/emissions
Visually inspect the condition of accessory drive belts
167-186 ACTUAL 1ed EN 27-07-2010 10:30 Pagina 171
Page 174 of 216

173
SAFETY
STARTING
AND DRIVING
WARNING
LIGHTS AND
MESSAGES
IN AN
EMERGENCY
TECHNICAL
SPECIFICATIONS
INDEX
CONTROLS
AND DEVICES
SERVICE
AND CARE
DEMANDING USE
OF THE CAR
Should the car be used predominantly in
one of the following particularly demand-
ing conditions:
❒trailer or caravan towing;
❒dusty roads;
❒short (less than 7-8 km) and repeated
journeys in sub-zero temperatures;
❒ frequently idling engine or long-dis-
tance, low-speed driving (e.g. door-to-
door deliveries) or lengthy inactivity;
❒ driving in towns and cities;
you should perform the following inspec-
tions more frequently than shown on the
Scheduled Servicing Plan:
❒ check front disc brake pad conditions
and wear;
❒check cleanliness of bonnet and boot
locks, and cleanliness and lubrication of
linkages;
❒ visually inspect the conditions of: en-
gine, gearbox, transmission, pipes and
tubes (exhaust – fuel – brakes), rubber
parts (boots, sleeves, bushes, etc.);
❒check battery charge and liquid level
(electrolyte);
❒visually inspect the condition of the ac-
cessory drive belts;
❒check pollen filter and replace, if re-
quired;
❒check air filter and replace, if required.
REGULAR CHECKS
Every 1,000 km or before long journeys,
check and, if necessary, top up:
❒engine coolant fluid level;
❒brake fluid level;
❒windscreen washer level;
❒tyre pressure and conditions.
❒operation of lights (headlights, direction
indicators, hazard lights, etc.);
❒operation of the windscreen wiper/
washer system, position and wear of
the windscreen and rear window wiper
blades;
Every 3,000 km, check and top up, if re-
quired, the engine oil level.
You are recommended to use PETRONAS
LUBRICANTS products, which have been
designed and produced specifically for
Fiat cars (see table “Capacities” in the
“Technical specifications” section).
167-186 ACTUAL 1ed EN 27-07-2010 10:30 Pagina 173