2016 FIAT GRANDE PUNTO ACTUAL lock
[x] Cancel search: lockPage 113 of 216
112
SAFETY
WARNING
LIGHTS AND
MESSAGES
IN AN
EMERGENCY
SERVICE
AND CARE
TECHNICAL
SPECIFICATIONS
INDEX
CONTROLS
AND DEVICES
STARTING
AND DRIVING
STARTING THE ENGINE
The car is fitted with an electronic engine
lock device: if the engine fails to start, see
the paragraph on “The Fiat CODE sys-
tem” in the “Dashboard and controls”
section.
The engine may be noisier during the first
few seconds of operation, particularly af-
ter a long period of inactivity. This is a fea-
ture of hydraulic tappets, the timing sys-
tem chosen to reduce the number of
servicing interventions, and effects neither
functionality nor reliability.
We recommend that during
the initial period you do not
drive to full car performance
(e.g. excessive acceleration,
long journeys at top speed, sharp brak-
ing etc.).
When the engine is switched
off, never leave the key in
the ignition switch to prevent
draining the battery.
It is dangerous to have the
engine running indoors. The
engine consumes oxygen and pro-
duces carbon dioxide, carbon monox-
ide and other toxic gases.
WARNING
Remember that the brake
booster and power steering
are not operational until the engine
has been started, therefore you need
to apply much more force than usu-
al to the brake pedal and steering
wheel.
WARNING
STARTING PROCEDURE
FOR PETROL VERSIONS
Proceed as follows:
❒ensure that the handbrake is on;
❒put the gear lever into neutral;
❒press the clutch pedal all the way down
without touching the accelerator;
❒turn the ignition key to AVVand re-
lease it the moment the engine starts.
If the engine does not start at the first at-
tempt, return the ignition key to STOP
before repeating the starting procedure.
111-122 ACTUAL 1ed EN 20-07-2010 16:10 Pagina 112
Page 116 of 216
115
SAFETY
WARNING
LIGHTS AND
MESSAGES
IN AN
EMERGENCY
SERVICE
AND CARE
TECHNICAL
SPECIFICATIONS
INDEX
CONTROLS
AND DEVICES
STARTING
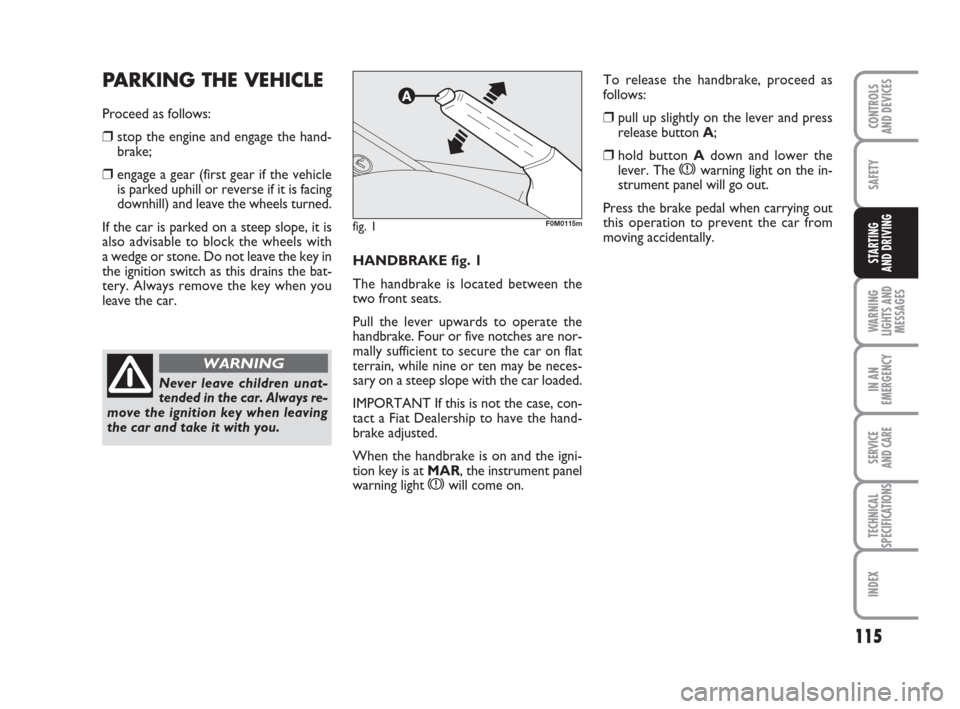
AND DRIVINGHANDBRAKE fig. 1
The handbrake is located between the
two front seats.
Pull the lever upwards to operate the
handbrake. Four or five notches are nor-
mally sufficient to secure the car on flat
terrain, while nine or ten may be neces-
sary on a steep slope with the car loaded.
IMPORTANT If this is not the case, con-
tact a Fiat Dealership to have the hand-
brake adjusted.
When the handbrake is on and the igni-
tion key is at MAR, the instrument panel
warning light
xwill come on.
PARKING THE VEHICLE
Proceed as follows:
❒stop the engine and engage the hand-
brake;
❒engage a gear (first gear if the vehicle
is parked uphill or reverse if it is facing
downhill) and leave the wheels turned.
If the car is parked on a steep slope, it is
also advisable to block the wheels with
a wedge or stone. Do not leave the key in
the ignition switch as this drains the bat-
tery. Always remove the key when you
leave the car.
Never leave children unat-
tended in the car. Always re-
move the ignition key when leaving
the car and take it with you.
WARNING
fig. 1F0M0115m
To release the handbrake, proceed as
follows:
❒pull up slightly on the lever and press
release button A;
❒hold button Adown and lower the
lever. The xwarning light on the in-
strument panel will go out.
Press the brake pedal when carrying out
this operation to prevent the car from
moving accidentally.
111-122 ACTUAL 1ed EN 20-07-2010 16:10 Pagina 115
Page 128 of 216

127
SAFETY
STARTING
AND DRIVING
IN AN
EMERGENCY
SERVICE
AND CARE
TECHNICAL
SPECIFICATIONS
INDEX
CONTROLS
AND DEVICES
WARNING
LIGHTS AND
MESSAGES
DOOR OPEN (red)
On certain versions, the warning light
turns on when one or more doors or the
boot are not properly closed.
A specific message is displayed on certain
versions.
You will hear a warning sound if a door
is open and the car is moving.
´
“DUALDRIVE”
ELECTRIC POWER
STEERING FAILURE
(red)
This warning light comes on when the ig-
nition key is turned to MAR, but it should
go off after a few seconds.
If the warning light stays on, you will not
get the benefit from the electric power
steering and the effort needed to turn the
wheel will be greatly increased, although
it will still be possible to steer the car.
Contact a Fiat Dealership.
A specific message is displayed on certain
versions.
g
EBD FAULT
(red)
(amber)
Warning lights
xand >lit at the same
time with the engine running indicates an
EBD system failure or that the system is
not available. This may cause premature
locking of the rear wheels in the event of
violent braking, causing the car to swerve.
Drive very carefully to a Fiat Dealership to
have the system inspected immediately.
A specific message is displayed on certain
versions.
x>
LOW ENGINE OIL
LEVEL (red)
(for versions/markets, where
provided)
When turning the ignition key to MAR,
the warning light turns on but it should go
off after a few seconds.
This warning light where provided comes
on when the engine oil level falls below the
minimum recommended value. Restore
the correct engine oil level (see “Check-
ing fluid levels” in the “Servicing and care”
section).
A specific message is displayed on certain
versions.
kExhausted engine oil should
be replaced as soon as pos-
sible after the warning light comes on,
never more than 500 km after the
warning light first comes on. Failure
to change the oil within the first 500
km may result in severe damage to
the engine and will result in forfeiture
of the warranty. Remember that
when the warning light flashes, it does
not mean that the level of engine oil
is low, so if the light flashes you must
not top up.
WARNING
For versions/markets, where
provided:
the
vwarning light turns on and flash-
es along with the message on the display
(if applied) when the system detects that
the engine oil is exhausted. The flashing of
the warning light should not be considered
as a fault, rather simply informs the driver
that oil needs to be changed after a stan-
dard period of car utilisation. If the oil is
not changed, when reaching a second de-
terioration threshold, also the warning
light
Uswitches on in the instrument
panel and the engine operation is limited
at 3000 rpm.
If the oil is still not changed, when reach-
ing a third deterioration threshold, the en-
gine is limited at 1500 rpm to avoid dam-
age.
WARNING! To avoid dam-
aging the engine it is recom-
mended to change the en-
gine oil when the warning light
v
flashes. Contact a Fiat Dealership.
123-134 ACTUAL 1ed EN 31-08-2010 9:23 Pagina 127
Page 139 of 216
138
SAFETY
STARTING
AND DRIVING
WARNING
LIGHTS AND
MESSAGES
SERVICE
AND CARE
TECHNICAL
SPECIFICATIONS
INDEX
CONTROLS
AND DEVICES
IN AN
EMERGENCY
To change a wheel proceed
as follows:
❒stop the car where it is not a danger to
other road users and you can replace
the wheel safely. The ground should be
flat and solid;
❒turn the engine off and pull up the hand-
brake.
❒engage first gear or reverse;
❒ wear the reflective safety jacket (com-
pulsory by law in certain countries) be-
fore getting out of the car;
❒open the boot and lift the carpet or re-
move the cargo box (for versions/mar-
kets, where provided);
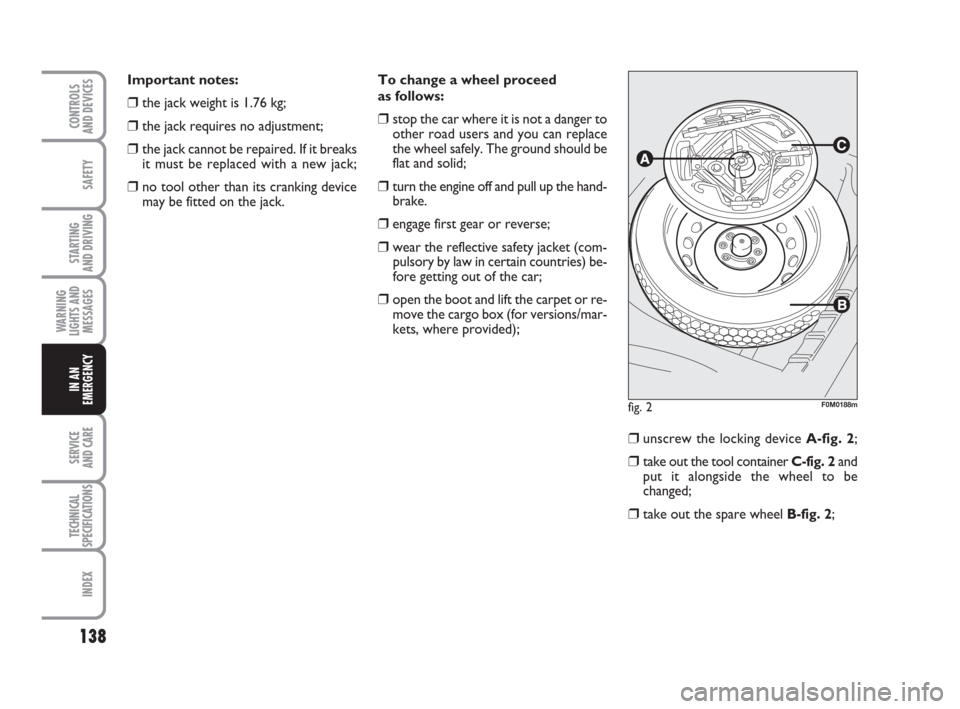
❒unscrew the locking device A-fig. 2;
❒take out the tool container C-fig. 2and
put it alongside the wheel to be
changed;
❒take out the spare wheel B-fig. 2;
fig. 2F0M0188m
Important notes:
❒the jack weight is 1.76 kg;
❒the jack requires no adjustment;
❒the jack cannot be repaired. If it breaks
it must be replaced with a new jack;
❒no tool other than its cranking device
may be fitted on the jack.
135-166 ACTUAL 1ed EN 26-07-2010 16:00 Pagina 138
Page 147 of 216

146
SAFETY
STARTING
AND DRIVING
WARNING
LIGHTS AND
MESSAGES
SERVICE
AND CARE
TECHNICAL
SPECIFICATIONS
INDEX
CONTROLS
AND DEVICES
IN AN
EMERGENCY
❒if you get a pressure reading of at least
1.8 bar, restore the proper pressure
(with engine running and handbrake on)
and restart;
❒drive with the utmost care to the near-
est Fiat Dealership.
FOR CHECKING AND
RESTORING PRESSURE ONLY
The compressor may also be used for
restoring pressure only. Release the fast
coupling and connect it directly to the tyre
valve fig. 13; in this way, the cylinder will
not be connected to the compressor and
no sealant will be injected. CYLINDER REPLACEMENT
PROCEDURE
To replace the cylinder, proceed as fol-
lows:
❒disconnect A-fig. 14;
❒turn the cylinder anticlockwise to lift
it out;
❒insert the new cylinder and turn it
clockwise;
❒connect Ato the cylinder and fit the
transparent tube Binto its allocated
space.
Remember to inform the
workshop that the tyre has
been treated with a quick repair kit.
Give the instruction booklet to the
personnel charged with handling the
treated tyre.
WARNING
fig. 13F0M0365mfig. 14F0M0206m
135-166 ACTUAL 1ed EN 26-07-2010 16:00 Pagina 146
Page 148 of 216

147
SAFETY
STARTING
AND DRIVING
WARNING
LIGHTS AND
MESSAGES
SERVICE
AND CARE
TECHNICAL
SPECIFICATIONS
INDEX
CONTROLS
AND DEVICES
IN AN
EMERGENCY
CHANGING A BULB
GENERAL INSTRUCTIONS
❒When a light is not working, check that
the corresponding fuse is intact before
changing the bulb. For the location of
fuses, refer to the “Changing a fuse”
paragraph in this section;
❒before changing a bulb check the con-
tacts for rusting;
❒burnt bulbs must be replaced by others
of the same type and wattage;
❒for safety reasons, always check the di-
rection of the headlight beam after
changing a bulb.
IMPORTANT The internal surface of the
light may appear slightly misty: this does
not indicate a fault, and is actually caused
by low temperature and the degree of hu-
midity in the air. Misting will rapidly dis-
appear when the headlights are switched
on. The presence of drops inside the head-
lights indicates infiltration of water. Go to
a Fiat Dealership.
TYPES OF BULBS
Various types of bulbs are fitted to your
car:
AGlass bulbs: clipped into position. Pull
to remove.BBayonet-type bulbs: to remove from
its holder, press the bulb in and turn
it anti-clockwise.
CTubular bulbs: release them from
their contacts to remove.
D-EHalogen bulbs: to remove the bulb,
release the clip holding the bulb in
place. Halogen bulbs must be han-
dled holding the metallic part
only. Touching the transpar-
ent part of the bulb with your
fingers may reduce the intensity of the
light emitted and even compromise the
longevity of the bulb itself. In the event
of accidental contact, wipe the bulb
with an alcohol-soaked cloth and leave
to dry.
Modifications or repairs to
the electrical system (ECUs)
that are not carried out properly or
do not take the system’s technical
specifications into account can cause
malfunctions leading to the risk of fire.
WARNING
Halogen bulbs contain pres-
surised gas which may cause
small fragments of glass to be pro-
jected outwards if the bulb is broken.
WARNING
fig. 15F0M0207m
135-166 ACTUAL 1ed EN 26-07-2010 16:00 Pagina 147
Page 150 of 216
149
SAFETY
STARTING
AND DRIVING
WARNING
LIGHTS AND
MESSAGES
SERVICE
AND CARE
TECHNICAL
SPECIFICATIONS
INDEX
CONTROLS
AND DEVICES
IN AN
EMERGENCY
CHANGING AN
EXTERIOR BULB
For the type of bulb and relative power
rating, see “Changing a bulb”.
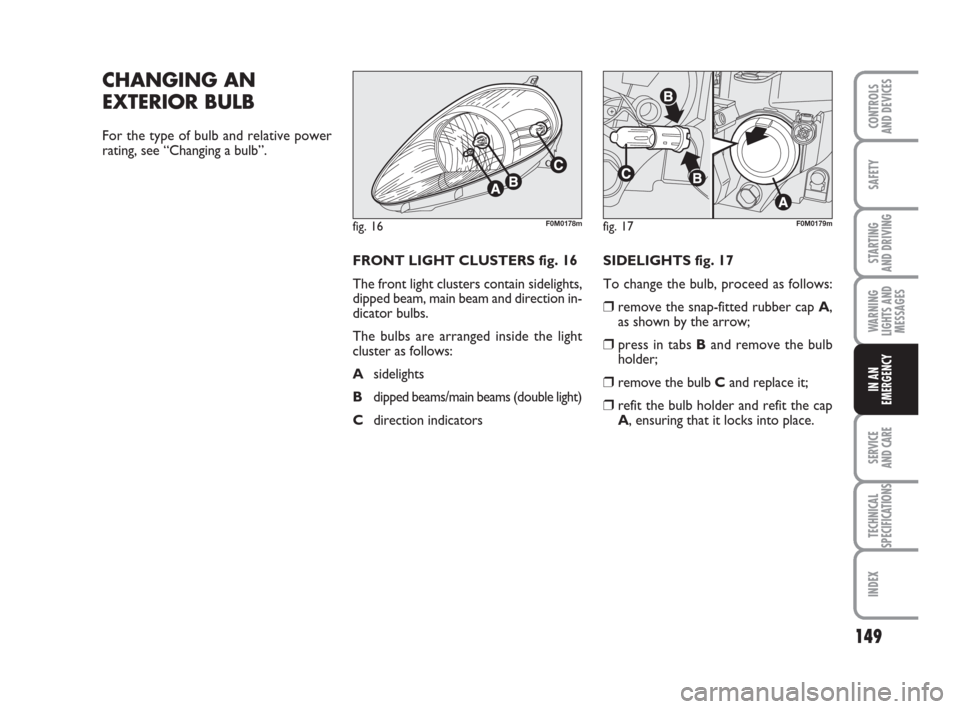
FRONT LIGHT CLUSTERS fig. 16
The front light clusters contain sidelights,
dipped beam, main beam and direction in-
dicator bulbs.
The bulbs are arranged inside the light
cluster as follows:
Asidelights
B
dipped beams/main beams (double light)
Cdirection indicatorsSIDELIGHTS fig. 17
To change the bulb, proceed as follows:
❒remove the snap-fitted rubber cap A,
as shown by the arrow;
❒press in tabs Band remove the bulb
holder;
❒remove the bulb Cand replace it;
❒refit the bulb holder and refit the cap
A, ensuring that it locks into place.
fig. 16F0M0178mfig. 17F0M0179m
135-166 ACTUAL 1ed EN 26-07-2010 16:00 Pagina 149
Page 151 of 216
150
SAFETY
STARTING
AND DRIVING
WARNING
LIGHTS AND
MESSAGES
SERVICE
AND CARE
TECHNICAL
SPECIFICATIONS
INDEX
CONTROLS
AND DEVICES
IN AN
EMERGENCY
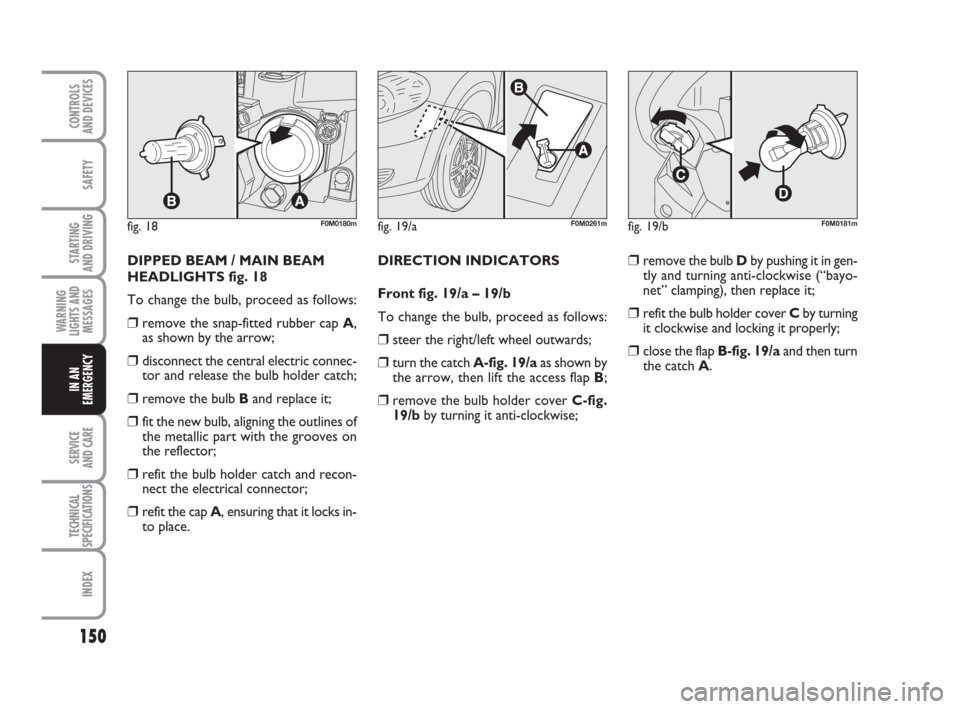
DIPPED BEAM / MAIN BEAM
HEADLIGHTS fig. 18
To change the bulb, proceed as follows:
❒remove the snap-fitted rubber cap A,
as shown by the arrow;
❒disconnect the central electric connec-
tor and release the bulb holder catch;
❒remove the bulb Band replace it;
❒fit the new bulb, aligning the outlines of
the metallic part with the grooves on
the reflector;
❒refit the bulb holder catch and recon-
nect the electrical connector;
❒refit the cap A, ensuring that it locks in-
to place.DIRECTION INDICATORS
Front fig. 19/a – 19/b
To change the bulb, proceed as follows:
❒steer the right/left wheel outwards;
❒turn the catch A-fig. 19/aas shown by
the arrow, then lift the access flap B;
❒remove the bulb holder cover C-fig.
19/bby turning it anti-clockwise;
❒remove the bulb Dby pushing it in gen-
tly and turning anti-clockwise (“bayo-
net” clamping), then replace it;
❒refit the bulb holder cover Cby turning
it clockwise and locking it properly;
❒close the flap B-fig. 19/aand then turn
the catch A.
fig. 18F0M0180mfig. 19/bF0M0181mfig. 19/aF0M0261m
135-166 ACTUAL 1ed EN 26-07-2010 16:00 Pagina 150