2016 FIAT DOBLO PANORAMA roof
[x] Cancel search: roofPage 70 of 323

ROOF RACK/SKI
RACK
44) 45)
8) 9)
FASTENERS
The fasteners are located at points A, B
and C fig. 112.
ROOF RAILS
(for versions/markets, where provided)
On some versions, the vehicle has
two longitudinal bars which, with the
addition of special accessories, can be
used to carry various objects (e.g.
skis, surfboards, etc.).
WARNING
44) Strictly adhere to the laws in
force concerning maximum
clearance.
45) Check that the attachment fixing
screws are tight after a few
kilometres.
IMPORTANT
8) Evenly distribute the load and
take into account, when driving,
the increased responsiveness
of the vehicle to side wind.
9) Never exceed the maximum
permitted loads (see chapter
“Technical specifications”).
HEADLIGHTS
LIGHT BEAM ALIGNMENT
The correct alignment of the headlights
is essential for the comfort and safety
of the driver and other road users.
To ensure the best visibility when
travelling with the headlights on, the
headlight alignment must be correct.
Contact a Fiat Dealership to have
the headlights checked and adjusted.
HEADLIGHT ALIGNMENT
CORRECTOR
This device works with the ignition key
in the MAR position and the dipped
beam headlights on.
The vehicle tilts backwards when it is
laden, raising the beam. The beams
must therefore be realigned in this case.
Headlight alignment
adjustment
Press the
andfig. 113 buttons
on the control panel to adjust.
The display located on the instrument
panel provides a visual indication of the
adjustment position.
Position 0 - one or two people in the
front seats.
Position 1 - five people.
112F0V0123
66
KNOW YOUR VEHICLE
Page 151 of 323

23)
IMPORTANT
22) For diesel engines, use only
diesel fuel for motor vehicles
in accordance with EN590
European specifications. The use
of other products or mixtures
may damage the engine beyond
repair and consequently invalidate
the warranty, due to the damage
caused. If you accidentally refuel
with another type of fuel, do not
start the engine, and drain the
tank. If the engine has run, even
for a very short time, you will need
to have the entire fuel supply
system emptied in addition to the
tank.
23) Do not bring naked flames or lit
cigarettes near the fuel tank filler:
fire risk. Keep your face away
from the fuel filler to prevent
breathing in harmful vapours.
SAVING FUEL
Some useful tips are given below for
fuel saving and reducing harmful
emissions of CO2 and other pollutants
(nitrogen oxides, unburnt
hydrocarbons, Particulate Matter (PM),
etc.).
PRACTICAL ADVICE FOR
REDUCING FUEL
CONSUMPTION AND
HARMFUL EMISSIONS
Vehicle conditions
❒Have checks and adjustments for
vehicle maintenancecarried out
in accordance with the “Scheduled
servicing plan”.
❒Checktyrepressure regularly, at
least once every four weeks.
Excessively low pressures will
increase consumption because
rolling resistance will be higher. In
addition, this wears the tyre more
quickly and impairs performance.
❒Only usesnow tyreswhen
the weather conditions make them
absolutely necessary. They increase
consumption and noise.❒Do not travel witha heavy load: the
weight of the vehicle (especially when
driving in town) and its geometry
greatly affect fuel consumption and
stability.
❒Removeroof racks or ski racks
after use. These accessories reduce
the vehicle's aerodynamic
penetration and have a negative
effect on fuel consumption.
❒When transporting particularly large
objects, use atrailerif possible.
❒Use the vehicle's air vents if possible:
travelling with the windows open
impairs aerodynamics.
❒Use electrical devices only for the
amount of time needed. The vehicle’s
heated rear window, additional
headlights, screen wipers and heater
fan require a considerable amount
of energy; this increases fuel
consumption (by up to +25% in an
urban cycle).
❒Air conditioning leads to higher fuel
consumption (on average up to
+30%). If the temperature outside is
not too extreme, try and use the
air vents.
147
Page 161 of 323

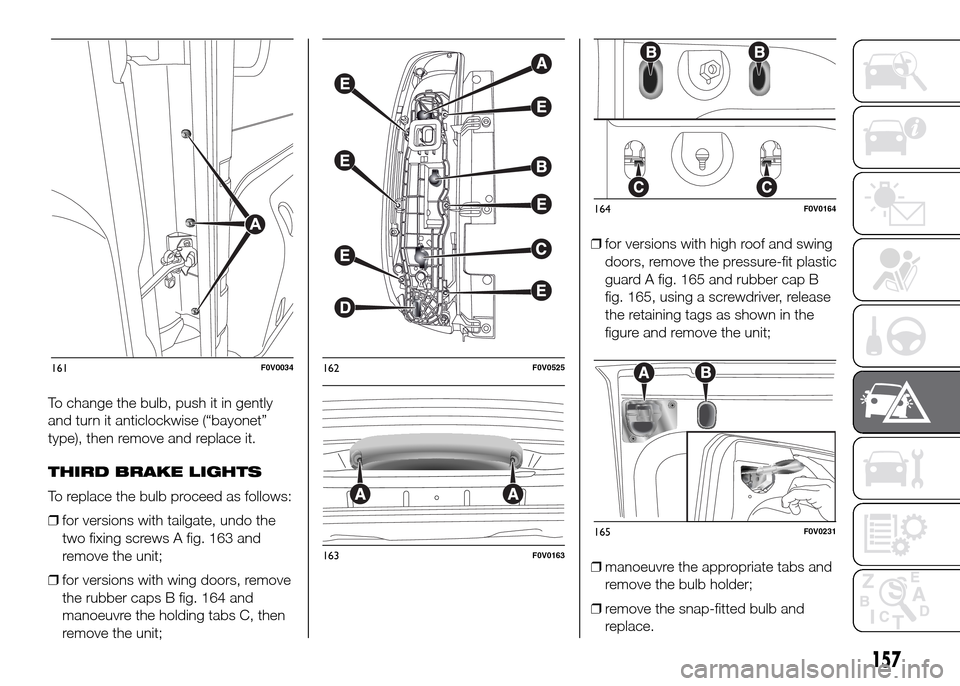
To change the bulb, push it in gently
and turn it anticlockwise (“bayonet”
type), then remove and replace it.
THIRD BRAKE LIGHTS
To replace the bulb proceed as follows:
❒for versions with tailgate, undo the
two fixing screws A fig. 163 and
remove the unit;
❒for versions with wing doors, remove
the rubber caps B fig. 164 and
manoeuvre the holding tabs C, then
remove the unit;❒for versions with high roof and swing
doors, remove the pressure-fit plastic
guard A fig. 165 and rubber cap B
fig. 165, using a screwdriver, release
the retaining tags as shown in the
figure and remove the unit;
❒manoeuvre the appropriate tabs and
remove the bulb holder;
❒remove the snap-fitted bulb and
replace.
161F0V0034162F0V0525
163F0V0163
164F0V0164
165F0V0231
157
Page 162 of 323

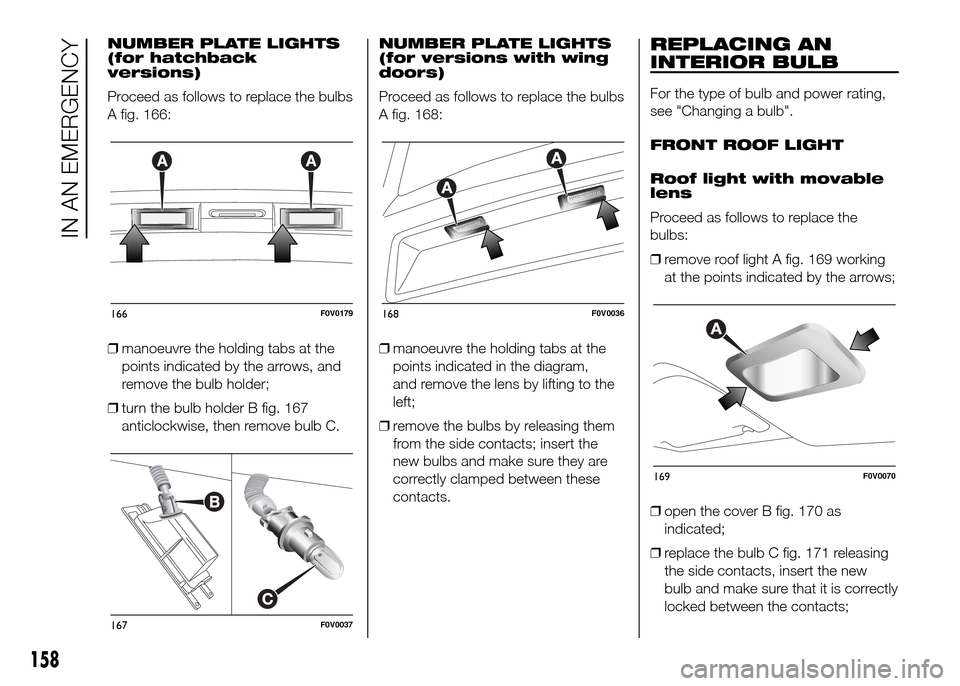
NUMBER PLATE LIGHTS
(for hatchback
versions)
Proceed as follows to replace the bulbs
A fig. 166:
❒manoeuvre the holding tabs at the
points indicated by the arrows, and
remove the bulb holder;
❒turn the bulb holder B fig. 167
anticlockwise, then remove bulb C.NUMBER PLATE LIGHTS
(for versions with wing
doors)
Proceed as follows to replace the bulbs
A fig. 168:
❒manoeuvre the holding tabs at the
points indicated in the diagram,
and remove the lens by lifting to the
left;
❒remove the bulbs by releasing them
from the side contacts; insert the
new bulbs and make sure they are
correctly clamped between these
contacts.REPLACING AN
INTERIOR BULB
For the type of bulb and power rating,
see "Changing a bulb".
FRONT ROOF LIGHT
Roof light with movable
lens
Proceed as follows to replace the
bulbs:
❒remove roof light A fig. 169 working
at the points indicated by the arrows;
❒open the cover B fig. 170 as
indicated;
❒replace the bulb C fig. 171 releasing
the side contacts, insert the new
bulb and make sure that it is correctly
locked between the contacts;
166F0V0179
167F0V0037
168F0V0036
169F0V0070
158
IN AN EMERGENCY
Page 163 of 323

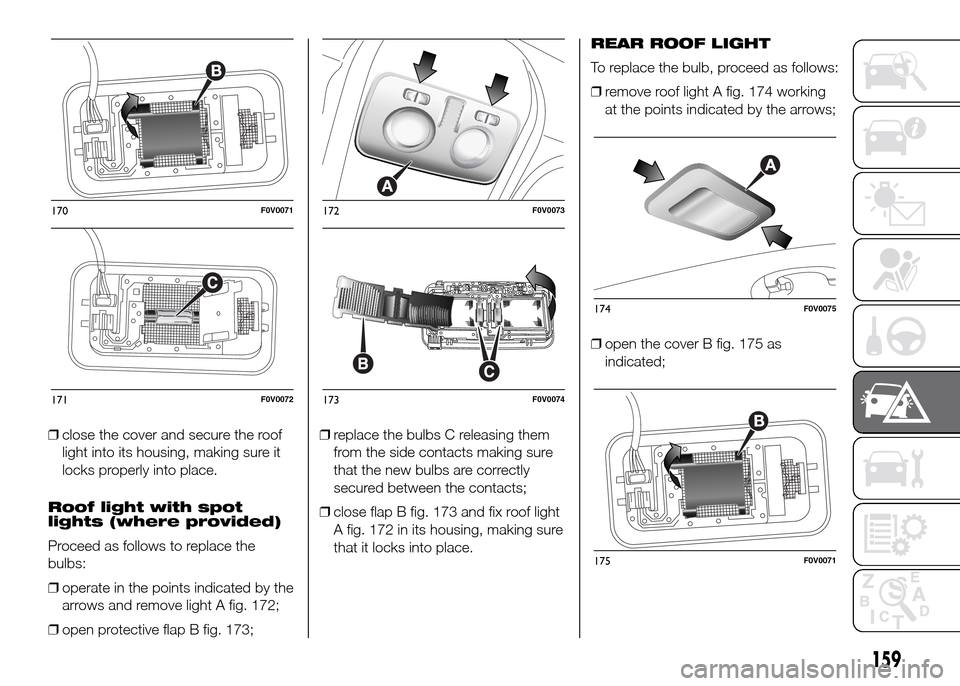
❒close the cover and secure the roof
light into its housing, making sure it
locks properly into place.
Roof light with spot
lights (where provided)
Proceed as follows to replace the
bulbs:
❒operate in the points indicated by the
arrows and remove light A fig. 172;
❒open protective flap B fig. 173;❒replace the bulbs C releasing them
from the side contacts making sure
that the new bulbs are correctly
secured between the contacts;
❒close flap B fig. 173 and fix roof light
A fig. 172 in its housing, making sure
that it locks into place.REAR ROOF LIGHT
To replace the bulb, proceed as follows:
❒remove roof light A fig. 174 working
at the points indicated by the arrows;
❒open the cover B fig. 175 as
indicated;
170F0V0071
171F0V0072
172F0V0073
173F0V0074
174F0V0075
175F0V0071
159
Page 164 of 323

❒replace the bulb C fig. 176 releasing
the side contacts, insert the new
bulb and make sure that it is correctly
locked between the contacts;
❒close the cover B fig. 175 and secure
the roof light into its housing, making
sure it locks properly into place.Removable roof light
To replace the bulb, proceed as follows:
❒press button A fig. 177 and extract
the removable roof light B;
❒remove the roof light, working at the
points indicated by the arrows;
❒replace bulb C fig. 178 releasing the
side contacts, insert the new bulb
and make sure that it is correctly
locked between the contacts;REPLACING FUSES
INTRODUCTION
Fuses protect the electric system: they
blow in the event of a failure or
improper action on the system.
When a device does not work, check
the condition of its protective fuse:
the filament A fig. 179 must be intact.
If it is not, replace the blown fuse with
another having the same amperage
(same colour).
B intact fuse.
C fuse with damaged filament.
To change a fuse, use the tweezers D
located in the tool box or the Fix &
Go container (for versions/markets
where provided).
26)
176F0V0072
177F0V0176
178F0V0177
179F0V0088
160
IN AN EMERGENCY
Page 203 of 323

DIESEL FILTER
DRAINING
CONDENSATION
(MultiJet versions)
36)
IMPORTANT
36) The presence of water in the
supply circuit may cause severe
damage to the injection system
and irregular engine operation. If
the
warning light comes on,
go to a Fiat Dealership as soon as
possible to have the system bled.
If this problem is indicated
immediately after refuelling, water
may have entered the fuel tank.
In this case, immediately turn off
the engine and contact a Fiat
Dealership.
BATTERY
The battery is of the “limited
maintenance” type: under normal
conditions of use, the electrolyte does
not need topping up with distilled water.
It does, however, need to be checked
periodically at a Fiat Dealership or
by specialist personnel to make sure it
is working correctly.
133) 134)
REPLACING THE
BATTERY
If required, replace the battery with an
original spare part with the same
specifications.
If a battery with different specifications
is fitted, the service intervals given in
the “Scheduled Servicing Plan” will no
longer be valid.
Follow the battery manufacturer's
instructions for maintenance.
37) 38)
5)
135)
USEFUL TIPS FOR
EXTENDING BATTERY
LIFE
To avoid draining your battery and
make it last longer, observe the
following instructions:
❒when you park the vehicle, ensure
that the doors, tailgate and bonnet
are closed properly, to prevent any
roof lights from remaining on inside
the passenger's compartment;
❒switch off all roof lights inside the
vehicle: the vehicle is however
equipped with a system which
switches all internal lights off
automatically;
❒do not keep accessories (e.g. radio,
hazard warning lights, etc.) switched
on for a long time when the engine
is not running;
❒before performing any operation on
the electrical system, disconnect
the negative battery pole;
❒completely tighten the battery
terminals.
IMPORTANT If the charge level remains
under 50% for a long time, the battery
is damaged by sulphation, reducing
its capacity and efficiency at starting.
199
Page 211 of 323

❒spraying of plastic parts, with a
protective function in the more
exposed points: underdoor, inner
wing, edges, etc.;
❒use of "open" boxed sections to
prevent condensation and pockets of
moisture from triggering rust inside.
VEHICLE EXTERIOR AND
UNDERBODY WARRANTY
Your vehicle is covered by warranty
against perforation due to corrosion of
any original element of the structure
or body.
For the general terms of this warranty,
refer to the Warranty Booklet.
ADVICE FOR
PRESERVING THE
BODYWORK
Paintwork
Paintwork does not only serve an
aesthetic purpose, but also protects the
underlying sheet metal.
Touch up abrasions and scratches
immediately to prevent rust formation.
Use only original paint products for
touch-ups (see “Bodywork paint
identification plate” in the “Technical
specifications” section).Normal maintenance of paintwork
consists in washing the vehicle: the
frequency depends on the conditions
and environment where the vehicle
is used.
For example, it is advisable to wash the
vehicle more often in areas with high
levels of environmental pollution or on
roads spread with salt.
To correctly wash the vehicle, proceed
as follows:
❒wash the bodywork using a low
pressure jet of water;
❒wipe a sponge with a slightly soapy
solution over the bodywork,
frequently rinsing the sponge;
❒rinse well with water and dry with a
jet of air or a chamois.
If you put the vehicle through a car
wash, follow these recommendations:
– remove the aerial from the roof so
it does not get damaged;
– water added to a soapy solution
should be used for washing;
– rinse thoroughly to avoid soap marks
staying on the bodywork or less visible
parts.
39)
Dry the less visible parts with special
care, such as the door frames, bonnet
and the headlight frames, where water
may stagnate more easily. It is a good
idea to leave the vehicle outdoors
for a while after washing it to give water
time to evaporate.
Do not wash the vehicle after it has
been left in the sun or with the bonnet
hot: this may alter the shine of the
paintwork.
Exterior plastic parts should be cleaned
in the same way as the rest of the
vehicle. Where possible, do not park
the vehicle under trees; the resinous
substances released by many species
give the paint a dull appearance and
increase the possibility of corrosion.
IMPORTANT Bird droppings should be
washed off immediately and thoroughly
as the acid they contain is particularly
aggressive.
6)
Windows
To clean glasses, use specific cleaning
products. Use clean cloths to avoid
scratching the glass or damaging the
transparency.
207