Page 25 of 323

❒opening a front door by inserting the
key into the key pawl. if the power is
not restored;
❒opening the driver side door by key
pawl and the other doors
(passenger's side and sliding side
door) pulling the inner handle.
DOUBLE REAR SWING
DOORS
The double rear swing doors are fitted
with a link system that stops them
when they have opened to an angle of
approximately 90 degrees.
To open them wider to an angle of 180
degrees, push the locking device A
fig. 17 (one on each side) as shown in
the diagram and simultaneously open
the doors.
13)
Using the key latch on the door, you
can do the following:
❒for Cargo versions with wing door:
centrally unlock the load
compartment (sliding side doors +
rear wing doors), centrally lock all the
doors;
❒for Doblò/Doblò Combi versions with
swing door: local unlocking/locking.
Opening/closing the first
swing door from the
outside
To open the door, turn the key metal
insert in the lock or press button
on
the remote control and then pull handle
A fig. 18 in the direction of the arrow.
To close the door, turn the key metal
insert in the closing direction or press
button
on the remote control.
14)
Emergency opening of
the first swing door
from the inside
From inside, use device A fig. 19.
16F0V0383
17F0V006718F0V0518
19F0V0080
21
Page 26 of 323
Opening the second
swing door
After having opened the first door, pull
handle A fig. 20 in the direction shown
by the arrow.
IMPORTANT Pull handle A fig. 20 only
in the direction shown in the diagram.
FIXED WINDOW
(for versions/markets, where provided)
Using the fixed window:
❒Open the swing doors.
❒Push lever A fig. 21 downwards,
ensuring that it is held down until the
lock goes beyond the crossmember;
❒Open using both hands, making sure
to aid the fixed window opening by
using handle B fig. 21;❒To close, pull the fixed window
downwards using the suitable handle
B.
IMPORTANT The fixed window remains
open up to a speed of 110 km/h.
With the fixed window open it is
possible, if necessary, to lower the
crossmember C, accompanying it from
position 1 to position 2 fig. 22.
To release and lower the crossmember,
act, with rear doors open, on lever D
fig. 23.
20F0V0078
21F0V0526
22F0V0527
23F0V0528
22
KNOW YOUR VEHICLE
Page 27 of 323

WARNING
8) Before opening a door, ensure
that you can do it in conditions
of safety.
9) You must not open the left-hand
sliding side door with the fuel cap
open while refuelling. Check that
the fuel cap is closed while
opening/closing the sliding side
door to avoid damage.
10) If you are parked on a slope, do
not leave the sliding door locked
in the open position. An
involuntary impact could unhook
the door, causing it to move.
11) Before leaving the vehicle
parked with the sliding doors
open, always check that they are
locked into place.
12) Always use this device when
carrying children.
13) The spring-loaded system was
designed for optimum usage.
Accidental knocks or a strong
gust of wind may release the
springs, forcing the doors to
close.14) When closing, shut the right
hand door fully before you close
the left hand door. Never shut the
two doors at the same time.
IMPORTANT
2) Make sure that the left sliding
side door is all closed before
refuelling to prevent damage to
the door and to the sliding locking
system with fuel filler cap open,
activated during refuelling.
SEATS
DRIVER’S SEAT
(for Cargo versions, where provided)
15)
Longitudinal adjustment
Raise the lever A fig. 24 and push
the seat forwards or backwards: in
driving position your arms should be
slightly bent and your hands should rest
on the rim of the steering wheel.
16)
Reclining backrest
adjustment
Lift lever B fig. 24 and, slightly
detaching the back from the backrest,
accompany the movement of the
backrest until it is in the desired
position.
24F0V0210
23
Page 32 of 323

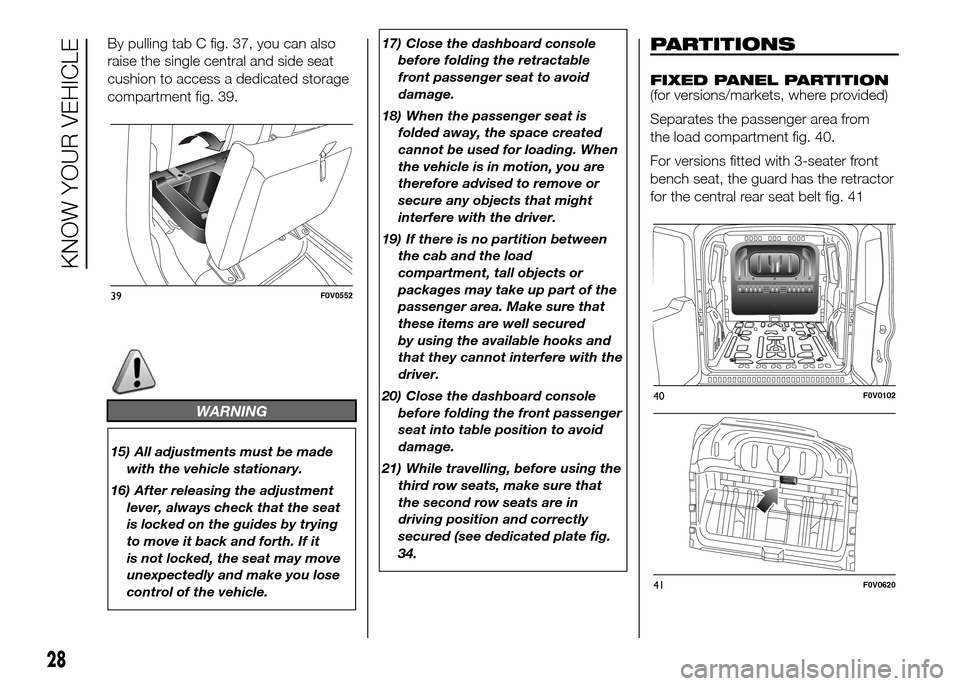
By pulling tab C fig. 37, you can also
raise the single central and side seat
cushion to access a dedicated storage
compartment fig. 39.
WARNING
15) All adjustments must be made
with the vehicle stationary.
16) After releasing the adjustment
lever, always check that the seat
is locked on the guides by trying
to move it back and forth. If it
is not locked, the seat may move
unexpectedly and make you lose
control of the vehicle.17) Close the dashboard console
before folding the retractable
front passenger seat to avoid
damage.
18) When the passenger seat is
folded away, the space created
cannot be used for loading. When
the vehicle is in motion, you are
therefore advised to remove or
secure any objects that might
interfere with the driver.
19) If there is no partition between
the cab and the load
compartment, tall objects or
packages may take up part of the
passenger area. Make sure that
these items are well secured
by using the available hooks and
that they cannot interfere with the
driver.
20) Close the dashboard console
before folding the front passenger
seat into table position to avoid
damage.
21) While travelling, before using the
third row seats, make sure that
the second row seats are in
driving position and correctly
secured (see dedicated plate fig.
34.
PARTITIONS
FIXED PANEL PARTITION
(for versions/markets, where provided)
Separates the passenger area from
the load compartment fig. 40.
For versions fitted with 3-seater front
bench seat, the guard has the retractor
for the central rear seat belt fig. 41
39F0V0552
40F0V0102
41F0V0620
28
KNOW YOUR VEHICLE
Page 33 of 323

FIXED GLAZED
PARTITION
(for versions/markets, where provided)
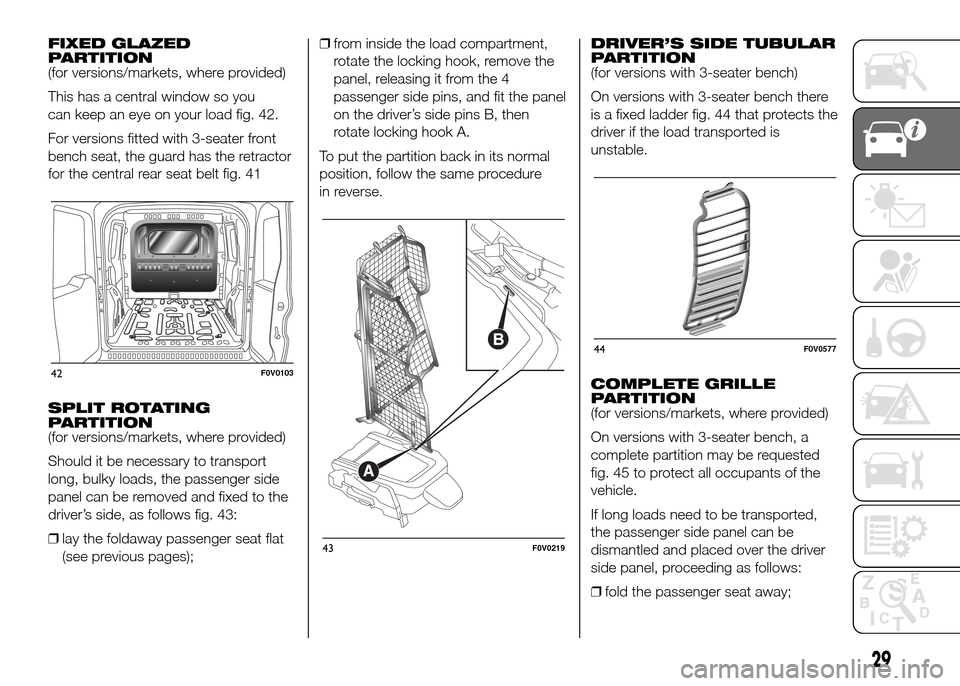
This has a central window so you
can keep an eye on your load fig. 42.
For versions fitted with 3-seater front
bench seat, the guard has the retractor
for the central rear seat belt fig. 41
SPLIT ROTATING
PARTITION
(for versions/markets, where provided)
Should it be necessary to transport
long, bulky loads, the passenger side
panel can be removed and fixed to the
driver’s side, as follows fig. 43:
❒lay the foldaway passenger seat flat
(see previous pages);❒from inside the load compartment,
rotate the locking hook, remove the
panel, releasing it from the 4
passenger side pins, and fit the panel
on the driver’s side pins B, then
rotate locking hook A.
To put the partition back in its normal
position, follow the same procedure
in reverse.DRIVER’S SIDE TUBULAR
PARTITION
(for versions with 3-seater bench)
On versions with 3-seater bench there
is a fixed ladder fig. 44 that protects the
driver if the load transported is
unstable.
COMPLETE GRILLE
PARTITION
(for versions/markets, where provided)
On versions with 3-seater bench, a
complete partition may be requested
fig. 45 to protect all occupants of the
vehicle.
If long loads need to be transported,
the passenger side panel can be
dismantled and placed over the driver
side panel, proceeding as follows:
❒fold the passenger seat away;
42F0V0103
43F0V0219
44F0V0577
29
Page 34 of 323
❒from inside the load compartment,
rotate the locking hook A fig. 46
90° anticlockwise;
❒raise the panel, releasing it from the
pins B fig. 46;
❒arrange the panel, placing it over that
on the driver side, aligning the holes
C fig. 47 on the removed panel
with the locking pins D fig. 47 on the
driver side panel.
WARNING Do not place loads on the
rotated panel fig. 48 and do not leave
the panel in rotated position to avoid
damage.
.
HEAD RESTRAINTS
FRONT
The head restraints are height-
adjustable and lock into the desired
position automatically.
45F0V0578
46F0V0602
47F0V0603
48F0V0604
49F0V0105
30
KNOW YOUR VEHICLE
Page 36 of 323

STEERING WHEEL
The height and axial position of the
steering wheel can be adjusted on all
versions.
To carry out the adjustment, proceed as
follows:
❒release lever A fig. 52 by pushing it
forwards (position 1);
❒adjust the steering wheel;
❒lock lever A fig. 52 by pulling it
towards the steering wheel (position
2).
24) 25)
WARNING
24) All adjustments must only be
carried out with the vehicle
stationary and the engine off.
25) Under no circumstances should
aftermarket operations involving
steering system or steering
column modifications (e.g.:
installation of anti-theft device) be
carried out that could badly
affect performance and safety.
This also causes the warranty to
become null and void and results
in vehicle non-compliance with
type-approval requirements.
REAR VIEW
MIRRORS
INTERIOR MIRROR
(for versions/markets, where provided)
The mirror is fitted with a safety device
that causes its release in the event of
a violent impact with the passenger.
Lever A fig. 53 can be used to move
the mirror to two different positions:
normal or antiglare.
Some versions may feature an internal
child surveillance mirror B fig. 54.
52F0V0014
53F0V0125
32
KNOW YOUR VEHICLE
Page 37 of 323

Manual mirror folding
When required (for example when the
shape causes difficulty in narrow
spaces), it is possible to fold the mirrors
by moving them from position A fig.
55 to position B.
26)
Manual adjustment
From inside, use device A fig. 56.
Electric adjustment
(for versions/markets, where provided)
Door mirrors can be adjusted only if the
ignition key is in MAR position.
Proceed as follows:
❒select the required mirror with switch
A fig. 57 (right or left);
❒move switch A to position B and
manipulate it to adjust the left door
mirror;
❒turn switch A to position D and
manipulate it to adjust the right door
mirror.
Once you have finished the adjustment,
return switch A to intermediate locking
position C.Electric folding
Door mirrors can be folded only if the
ignition key is in MAR position.
Bring switch A fig. 57 to position E to
fold the mirrors in the closed position.
Bring switch A to position C to move
the mirrors back to the driving position.
WARNING
26) When driving, these mirrors must
always be in position A fig. 55. As
door mirrors are curved, they
may slightly alter the perception
of distance.
54F0V0542
55F0V0084
56F0V0120
57F0V0560
33
DOOR MIRRORS