2016 FIAT DOBLO PANORAMA interior lights
[x] Cancel search: interior lightsPage 15 of 323

.
AIR VENTS
❒Diffusers ............................................. 42
LEFT STALK
❒External lights ..................................... 34
INSTRUMENT PANEL
❒Control panel and on-board
instruments ......................................... 72
❒Warning lights ..................................... 88
RIGHT STALK
❒Window cleaning ................................ 39
CAR RADIO
❒System ............................................... 67
PASSENGER SIDE FRONT AIRBAG
❒Front airbag ........................................122
GLOVE COMPARTMENT
❒Interior fittings ..................................... 62
DASHBOARD CONTROLS
❒Operation ........................................... 56
HEATER/CLIMATE CONTROL
SYSTEM
❒Heating and ventilation ........................ 43❒Manual climate control system ............ 45
❒Automatic climate control .................... 49
GEAR LEVER
❒Operation ...........................................133
STEERING WHEEL
❒Adjustment ......................................... 32
❒Driver's side front airbag .....................122
3F0V0538
11
Page 17 of 323

KNOW YOUR VEHICLE
In-depth knowledge of your new vehicle
starts here.
The booklet that you are reading simply
and directly explains how it is made
and how it works.
That’s why we advise you to read it
seated comfortably on board, so that
you can see what is described here for
yourself.THE KEYS....................................... 14
IGNITION DEVICE ........................... 16
SYMBOLS ...................................... 17
THE FIAT CODE SYSTEM ............... 18
DOORS ........................................... 19
SEATS ............................................ 23
PARTITIONS ................................... 28
HEAD RESTRAINTS ........................ 30
STEERING WHEEL ......................... 32
REAR VIEW MIRRORS .................... 32
EXTERIOR LIGHTS ......................... 34
INTERIOR LIGHTS .......................... 36
WINDSCREEN/REAR WINDOW
WIPER ............................................ 39
HEATING AND VENTILATION
SYSTEM ......................................... 41
DIFFUSERS..................................... 42
HEATING AND VENTILATION.......... 43
MANUAL CLIMATE CONTROL
SYSTEM ......................................... 45
AUTOMATIC CLIMATE CONTROL
SYSTEM ......................................... 49
ELECTRIC WINDOWS .................... 55
CONTROLS .................................... 56
BONNET ......................................... 57
BOOT ............................................. 58
INTERIOR FITTINGS ....................... 62
ROOF RACK/SKI RACK .................. 66HEADLIGHTS.................................. 66
RADIO............................................. 67
PROTECTING THE
ENVIRONMENT .............................. 68
13
Page 38 of 323

EXTERIOR LIGHTS
IN BRIEF
The left stalk includes the controls for
the exterior lights.
The external lights can only be
switched on when the ignition key is
at MAR.
The instrument panel and the various
dashboard controls will come on
with the external lights.
DAYTIME RUNNING
LIGHTS (DRL)
(for versions/markets, where provided)
With the ignition key turned to MAR
and the ring nut turned to position
Othe daytime running lights are
automatically activated; the other lights
and interior lighting remain off. In some
markets, the automatic operation of
the daytime running lights can be
activated/deactivated via the display
menu (see "Digital/multifunction display"
in this section). If the daytime running
lights are deactivated, no light comes
on when the ring nut is turned toO.
27)
DIPPED HEADLIGHTS/
SIDE LIGHTS
With the ignition key turned to MAR,
turn the ring nut to
. If dipped
headlights are activated, the daytime
running lights switch off and the side
lights and dipped headlights switch on.
The
warning light switches on in
the instrument panel. When the ignition
key is turned to STOP or removed
and the ring nut is turned fromOto
,
all the side lights and the number plate
lights come on. The
warning
light will come on in the instrument
panel.MAIN BEAM HEADLIGHTS
With ring nut in position
, push the
stalk forward toward the dashboard
(stable position). The
warning light
switches on in the instrument panel.
Pulling the stalk towards the steering
wheel, the main beams are turned
off and the dipped headlights on.
FLASHING
You can flash the beams pulling the
stalk toward the steering wheel
(unstable position). The
warning
light switches on in the instrument
panel.
DIRECTION INDICATORS
Bring the stalk into (stable) position fig.
59:
❒up (position 1): to activate the right
direction indicator;
❒down (position 2): activates the left
direction indicator.
Warning light
orwill blink on the
instrument panel.
Direction indicators switch off
automatically when the vehicle is back
in a straight line.
58F0V0515
34
KNOW YOUR VEHICLE
Page 40 of 323

INTERIOR LIGHTS
FRONT ROOF LIGHT WITH
MOVABLE LENS
The light fades up or reaches full
brightness immediately if pushed at the
sides.
On the Doblò Cargo versions, it is only
connected to the front doors.
On the Doblò/Doblò Combi people
carrier versions, it is connected to the
front doors and the sliding side doors.
FRONT ROOF LIGHT WITH
SPOT LIGHTS
(for versions/markets, where provided)
On the Doblò Cargo versions, it is
only connected to the front doors.
On the Doblò/Doblò Combi people
carrier versions, it is connected to the
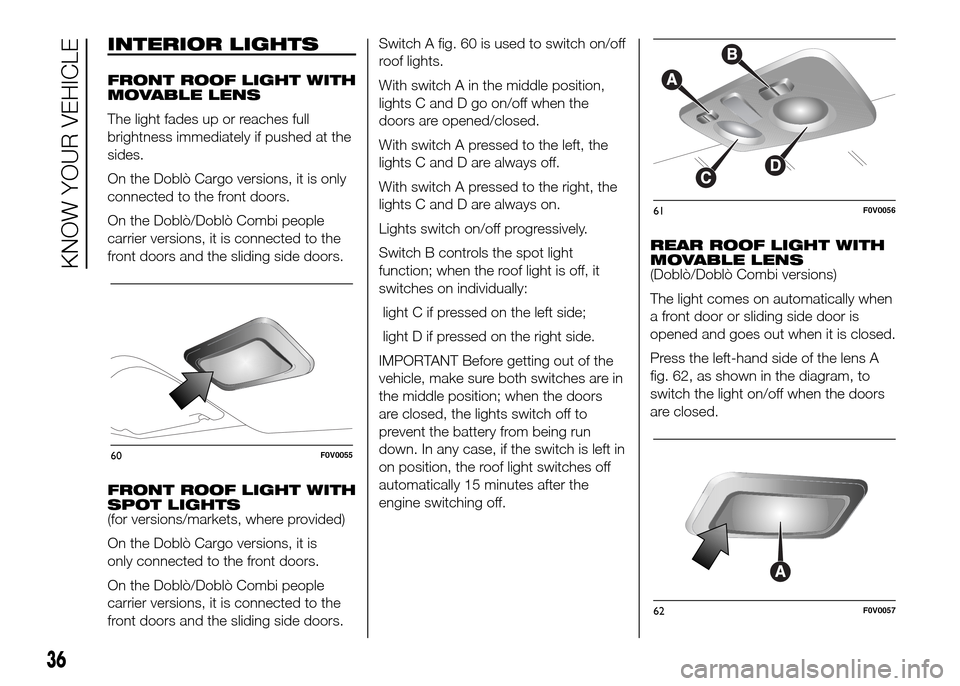
front doors and the sliding side doors.Switch A fig. 60 is used to switch on/off
roof lights.
With switch A in the middle position,
lights C and D go on/off when the
doors are opened/closed.
With switch A pressed to the left, the
lights C and D are always off.
With switch A pressed to the right, the
lights C and D are always on.
Lights switch on/off progressively.
Switch B controls the spot light
function; when the roof light is off, it
switches on individually:
light C if pressed on the left side;
light D if pressed on the right side.
IMPORTANT Before getting out of the
vehicle, make sure both switches are in
the middle position; when the doors
are closed, the lights switch off to
prevent the battery from being run
down. In any case, if the switch is left in
on position, the roof light switches off
automatically 15 minutes after the
engine switching off.REAR ROOF LIGHT WITH
MOVABLE LENS
(Doblò/Doblò Combi versions)
The light comes on automatically when
a front door or sliding side door is
opened and goes out when it is closed.
Press the left-hand side of the lens A
fig. 62, as shown in the diagram, to
switch the light on/off when the doors
are closed.
60F0V0055
61F0V0056
62F0V0057
36
KNOW YOUR VEHICLE
Page 80 of 323

Selecting a menu option
– briefly press theMENU
button to
select the menu option to set;
– press buttons
and(with single
presses) to select the new setting;
– press briefly theMENU
button to
store the new setting and go back to
the previous menu option.
Selecting “Set Clock”
– briefly press buttonMENU
to
select the first value to change (hours);
– press buttons
and(with single
presses) to select the new setting;
– briefly press theMENU
button to
store the new setting and go to the
next setup menu option (minutes);
– after setting the values with the same
procedure, go back to the previous
menu item.
Hold down theMENU
button
– to quit the setup menu if you are in
the menu;
– to quit to the menu if you are setting
an option;
– to save only the settings already
stored (and confirmed by pressing the
MENU
button).The environment of the Set Up menu is
timed; when the menu is exited due
to expiry of the time allowed, only the
changes already stored by the user
(confirmed beforehand by a brief press
of theMENU
button) will be saved.
Adjusting the vehicle
interior lighting (ILLU)
This function is available, with the
dipped headlamps on and at night, to
adjust the brightness of the instrument
panel, buttons, sound system display
and automatic climate control display.
During the daytime, and with the
dipped headlamps on, the instrument
panel, buttons and sound system
and automatic climate control displays
are set to maximum brightness.
❒press theMENU
button briefly:
the display will show the wording
ILLU;
❒press button
andto set the
required brightness level;
❒press theMENU
button briefly
to return to the menu screen or hold
the button down to return to the
standard screen without storing.Setting a speed limit
(SPEEd)
This function is used to set a speed
limit (km/h or mph); the driver is alerted
when this limit is exceeded (see
“Warning lights and messages”).
To set the desired speed limit, proceed
as follows:
- press theMENU
button briefly:
the display will show the wording
(SPEED) and the unit (km/h) or (mph)
previously set;
- press
orto select speed limit
activation (On) or deactivation (Off);
- if the function is on, press
orto
select the required speed limit and then
pressMENU
to confirm;
NOTE The speed may be set in the
range from 30 to 200 km/h, or from 20
to 125 mph according to the previously
chosen unit (see “Setting the distance
unit”) described below. The setting
will increase/decrease by five units each
time the
/button is pressed. Hold
down the
/button to automatically
increase/decrease the setting rapidly.
Complete the adjustment with single
presses of the button when you
approach the desired value.
76
KNOWING THE INSTRUMENT PANEL
Page 83 of 323

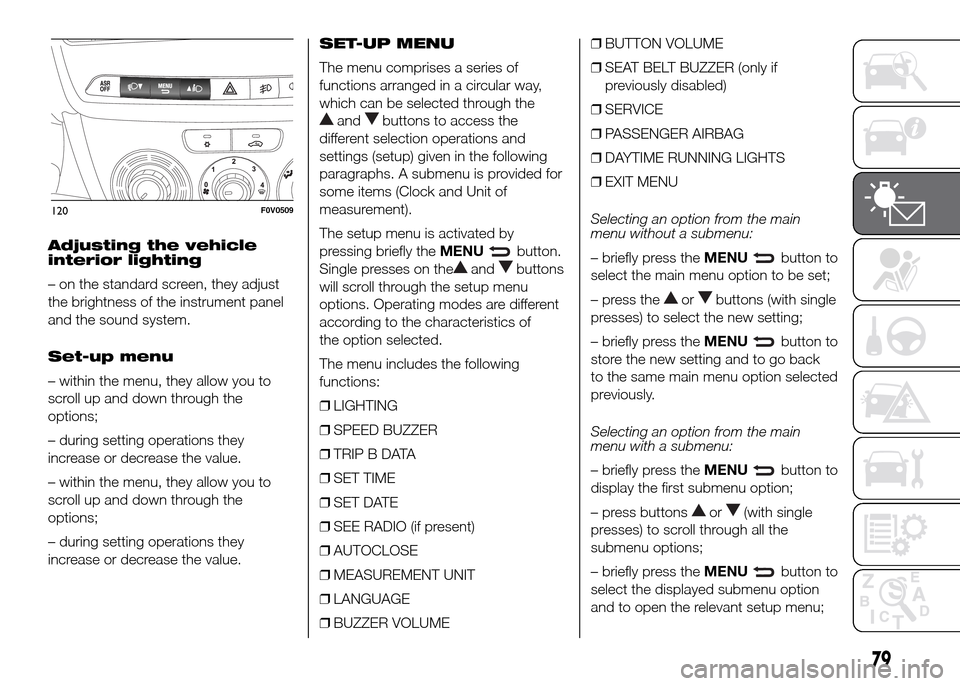
Adjusting the vehicle
interior lighting
– on the standard screen, they adjust
the brightness of the instrument panel
and the sound system.
Set-up menu
– within the menu, they allow you to
scroll up and down through the
options;
– during setting operations they
increase or decrease the value.
– within the menu, they allow you to
scroll up and down through the
options;
– during setting operations they
increase or decrease the value.SET-UP MENU
The menu comprises a series of
functions arranged in a circular way,
which can be selected through the
andbuttons to access the
different selection operations and
settings (setup) given in the following
paragraphs. A submenu is provided for
some items (Clock and Unit of
measurement).
The setup menu is activated by
pressing briefly theMENU
button.
Single presses on the
andbuttons
will scroll through the setup menu
options. Operating modes are different
according to the characteristics of
the option selected.
The menu includes the following
functions:
❒LIGHTING
❒SPEED BUZZER
❒TRIP B DATA
❒SET TIME
❒SET DATE
❒SEE RADIO (if present)
❒AUTOCLOSE
❒MEASUREMENT UNIT
❒LANGUAGE
❒BUZZER VOLUME❒BUTTON VOLUME
❒SEAT BELT BUZZER (only if
previously disabled)
❒SERVICE
❒PASSENGER AIRBAG
❒DAYTIME RUNNING LIGHTS
❒EXIT MENU
Selecting an option from the main
menu without a submenu:
– briefly press theMENUbutton to
select the main menu option to be set;
– press the
orbuttons (with single
presses) to select the new setting;
– briefly press theMENU
button to
store the new setting and to go back
to the same main menu option selected
previously.
Selecting an option from the main
menu with a submenu:
– briefly press theMENU
button to
display the first submenu option;
– press buttons
or(with single
presses) to scroll through all the
submenu options;
– briefly press theMENU
button to
select the displayed submenu option
and to open the relevant setup menu;
120F0V0509
79
Page 84 of 323

– press buttonsor(with single
presses) to select the new setting
for this submenu option;
– briefly press theMENU
button to
store the new setting and to go back
to the same submenu option selected
previously.
Adjusting the vehicle
interior lighting
This function is available, with the
dipped headlamps on and at night, to
adjust the brightness of the instrument
panel, buttons, sound system display
and automatic climate control display.
During the daytime, and with the
dipped headlamps on, the instrument
panel, buttons and sound system
and automatic climate control displays
are set to maximum brightness.
Proceed as follows to adjust the
brightness:
– press theMENU
button briefly to
make the display flash the previously
stored level;
– press button
andto set the
required brightness level;
– press theMENU
button briefly to
return to the menu screen or hold the
button down to return to the standard
screen without storing.Speed warning (Speed
limit)
This function enables setting of the
vehicle speed limit (km/h or mph).
When this limit is exceeded the driver is
immediately alerted (see section
“Warning lights and messages”).
To set the desired speed limit, proceed
as follows:
– briefly press theMENU
button:
the display will show the words (Speed
Beep);
– press the
orbutton to select
speed limit activation (On) or
deactivation (Off);
– if the function is on, press the
or
buttons to select the required speed
limit and then pressMENU
to
confirm;
NOTE The speed may be set anywhere
between 30 and 200 km/h or 20 and
125 mph, depending on the previously
chosen unit (see “Setting the unit of
measurement (Unit)”). The setting will
increase/decrease by 5 units each time
button
/is pressed. Hold down
the
/button to automatically
increase/decrease the setting rapidly.
Complete the adjustment with single
presses of the button when you
approach the desired value.– press theMENU
button briefly to
return to the menu screen or hold the
button down to return to the standard
screen without storing.
To cancel the setting, proceed as
follows:
– briefly press buttonMENU
, (On)
will flash on the display;
– press button
, (Off) will flash on the
display;
– press buttonMENU
briefly to
return to the menu screen or hold the
button down to return to the standard
screen without storing.
Trip B data (Activating
Trip B)
This function can be used to activate
(On) or deactivate (Off) the Trip B
display (partial trip).
For more information see the "Trip
computer" section.
Proceed as follows to switch the
function on/off:
– press theMENU
button briefly to
make the display flash On or Off
according to the previous setting;
– press the
orbutton to select;
80
KNOWING THE INSTRUMENT PANEL
Page 155 of 323

IN AN EMERGENCY
A punctured tyre or a burnt-out bulb?
At times, a problem may interfere
with our journey.
The pages on emergencies can help
you to deal with critical situations
independently and with calm.
In an emergency we recommend that
you call the freephone number found in
the Warranty Booklet.
It is also possible to call the 00 800
3428 0000 freephone number to
search the nearest Fiat Dealership.HAZARD WARNING LIGHTS...........152
REPLACING A BULB ......................152
REPLACING AN EXTERIOR BULB ..155
REPLACING AN INTERIOR BULB ...158
REPLACING FUSES........................160
CHANGING A WHEEL ....................166
FIX&GO AUTOMATIC QUICK TYRE
REPAIR KIT .....................................170
EMERGENCY STARTING ................174
FUEL CUT-OFF SYSTEM ................175
LIFTING THE VEHICLE....................176
TOWING THE VEHICLE ..................176
151