Page 96 of 298

Warning lights on
panelWhat it means What to do
amberVEHICLE PROTECTION SYSTEM FAILURE - FIAT CODE
When the key is turned to MAR the warning light will flash
only once and then switch off.
If, with the ignition key at MAR, the warning light stays on
permanently, this indicates a possible failure (see “Fiat
Code system” in the “Know your vehicle” chapter);
If, with the engine running, thewarning light flashes,
it means that the vehicle is not protected by the engine
immobiliser device.Contact a Fiat Dealership to have all the keys stored in
the memory.
amberREAR FOG LIGHTS
The warning light comes on when the rear fog lights are
turned on.
Warning lights on
panelWhat it means What to do
amberGENERIC FAILURE INDICATION
The warning light turns on in the following circumstances:
Engine oil pressure sensor failure
Lights failure (rear fog, direction indicator, reverse,
number plate, side, daytime running)The failure relating to these lights could be: one or
more blown bulbs, a blown protection fuse or a break
in the electrical connection.
92
KNOWING THE INSTRUMENT PANEL
Page 147 of 298
IN AN EMERGENCY
A punctured tyre or a burnt-out bulb?
At times, a problem may interfere
with our journey.
The pages on emergencies can help
you to deal with critical situations
independently and with calm.
In an emergency we recommend that
you call the freephone number found in
the Warranty Booklet.
It is also possible to call the 00 800
3428 0000 freephone number to
search the nearest Fiat Dealership.HAZARD WARNING LIGHTS...........144
REPLACING A BULB ......................144
REPLACING AN EXTERIOR BULB ..147
REPLACING AN INTERIOR BULB ...150
REPLACING FUSES........................152
CHANGING A WHEEL ....................158
FIX&GO AUTOMATIC KIT ................162
EMERGENCY STARTING ................165
FUEL CUT-OFF SYSTEM ................166
LIFTING THE VEHICLE....................167
TOWING THE VEHICLE ..................167
143
Page 148 of 298

HAZARD WARNING
LIGHTS
They are turned on by pressing switch
A fig. 152, regardless of the position
of the ignition key. Warning lights
andare lit up in the instrument
panel when this device is activated.
Press switch A again to turn the lights
off.
IMPORTANT The use of hazard warning
lights is governed by the highway
code of the country you are in. Comply
with legal requirements.Emergency braking
(for versions/markets, where provided)
In the event of emergency braking
the hazard warning lights come on
automatically, as do the
and
warning lights in the panel.
The function switches off automatically
when the nature of the braking
changes. This function complies with
the relevant legislation currently in force.
REPLACING A BULB
GENERAL
INSTRUCTIONS
Before replacing a bulb check the
contacts for oxidation;
burnt bulbs must be replaced by
others of the same type and power;
always check the headlight beam
alignment after replacing a bulb;
when a light is not working, check
that the corresponding fuse is intact
before changing a bulb. For the location
of fuses, refer to the paragraph “If a
fuse blows” in this section.
120) 121)
24) 25)IMPORTANT The headlight inner
surface might be slightly misted: this
does not indicate a fault, it is a natural
phenomenon due to low temperature
and the air humidity level. Misting
will disappear rapidly when the
headlights are turned on. The presence
of drops inside the headlights indicates
infiltration of water. Contact a Fiat
Dealership.
152F0V0513
144
IN AN EMERGENCY
Page 156 of 298

close the cover B fig. 173 and
secure the roof light into its housing,
making sure it locks properly into place.
Removable roof light
To replace the bulb, proceed as follows:
press button A fig. 175 and extract
the removable roof light B;
remove the roof light, working at the
points indicated by the arrows;
replace bulb C fig. 176 releasing the
side contacts, insert the new bulb
and make sure that it is correctly locked
between the contacts;
REPLACING FUSES
INTRODUCTION
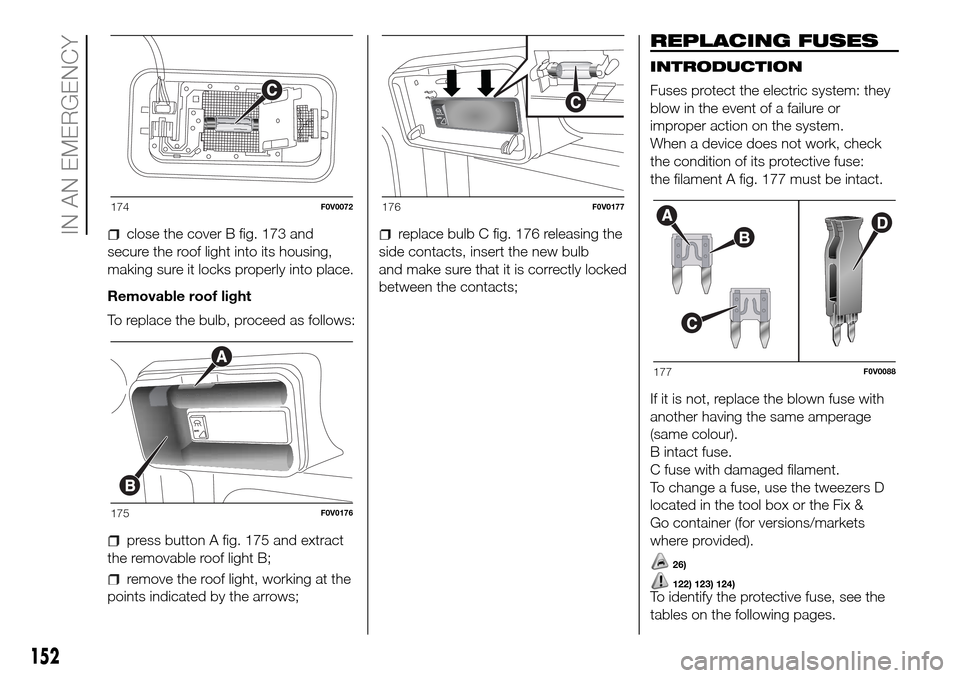
Fuses protect the electric system: they
blow in the event of a failure or
improper action on the system.
When a device does not work, check
the condition of its protective fuse:
the filament A fig. 177 must be intact.
If it is not, replace the blown fuse with
another having the same amperage
(same colour).
B intact fuse.
C fuse with damaged filament.
To change a fuse, use the tweezers D
located in the tool box or the Fix &
Go container (for versions/markets
where provided).
26)
122) 123) 124)To identify the protective fuse, see the
tables on the following pages.
174F0V0072
175F0V0176
176F0V0177
177F0V0088
152
IN AN EMERGENCY
Page 157 of 298
ENGINE COMPARTMENT
FUSE BOX
The fuse box fig. 179 is located on the
right-hand side of the engine, next to
the battery. To remove the protective
cover A fig. 178 and access the fuse
box, undo the two fixing screws B.
27)
178F0V0081
179F0V0089
153
Page 158 of 298
PASSENGER
COMPARTMENT FUSE
BOXES
To access the fuses, remove snap-fitted
protective cover A fig. 180.
The fuses are located in the two fuse
boxes shown in fig. 181.
180F0V0562
181F0V0563
154
IN AN EMERGENCY
Page 159 of 298
Engine compartment fuse box
fig. 178 - fig. 179
DEVICE PROTECTEDFUSE AMPERE
Remote control switch for opening swing door (Cargo version) F09 10
Single tone hornF10 10
Main beam headlightsF14 15
Heated rear windowF20 30
Fog lightsF30 15
Rear power socketF85 15
Passenger compartment power socket F86 15
155
Page 160 of 298
Passenger compartment fuse boxes
fig. 180 - fig. 181
DEVICE PROTECTEDFUSE AMPERE
Door locking/unlocking motors, dead lock actuator motors, tailgate unlocking motor F38 20
Supply + battery for EOBD diagnosis socket, radio, tyre pressure monitoring control unit F36 10
Windscreen/rear window washer pump F43 15
Electric window motor on passenger-side front door F48 20
Left low beam, headlight corrector F13 7,5
Electric window motor on driver-side front door F47 20
156
IN AN EMERGENCY