2016 FIAT 500L LIVING tailgate
[x] Cancel search: tailgatePage 32 of 240
CLOSING
Grip the handle located inside the
tailgate and lower the latter, pressing
next to the lock until it clicks.
IMPORTANT Before closing the
luggage compartment make sure that
you have the keys since the luggage
compartment is automatically locked.
LUGGAGE
COMPARTMENT
INITIALISATION
IMPORTANT If the battery is
disconnected or the protection fuse
blows, the luggage compartment
opening/closing mechanism must be
reinitialised as follows:
❒close all the doors and the luggage
compartment;
❒press the
button on the remote
control;
❒press the
button on the remote
control.
"CARGO MAGIC SPACE"(for versions/markets, where provided)
14)The adjustable load platform "Cargo
Magic Space" can be positioned on
three different height levels:
❒Position 0 (platform completely
lowered);❒Position 1 (platform at threshold
level);
❒Position 2 (platform completely
raised).
Load platform tilting
The load platform can be located in
oblique position (tilted towards the rear
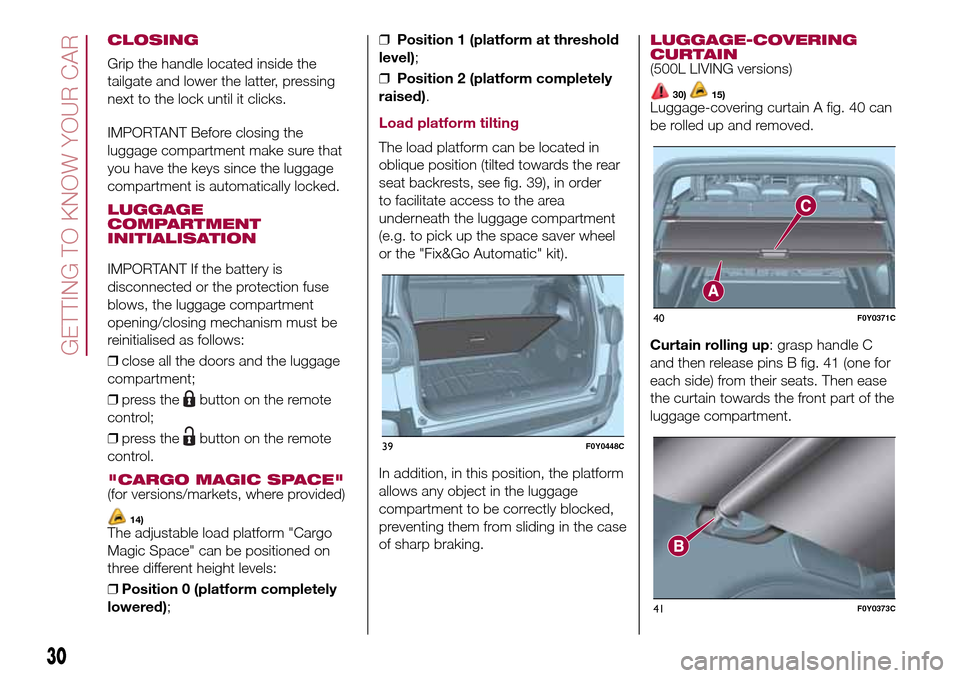
seat backrests, see fig. 39), in order
to facilitate access to the area
underneath the luggage compartment
(e.g. to pick up the space saver wheel
or the "Fix&Go Automatic" kit).
In addition, in this position, the platform
allows any object in the luggage
compartment to be correctly blocked,
preventing them from sliding in the case
of sharp braking.
LUGGAGE-COVERING
CURTAIN
(500L LIVING versions)
30)15)Luggage-covering curtain A fig. 40 can
be rolled up and removed.
Curtain rolling up: grasp handle C
and then release pins B fig. 41 (one for
each side) from their seats. Then ease
the curtain towards the front part of the
luggage compartment.
39F0Y0448C
40F0Y0371C
41F0Y0373C
30
GETTING TO KNOW YOUR CAR
Page 33 of 240
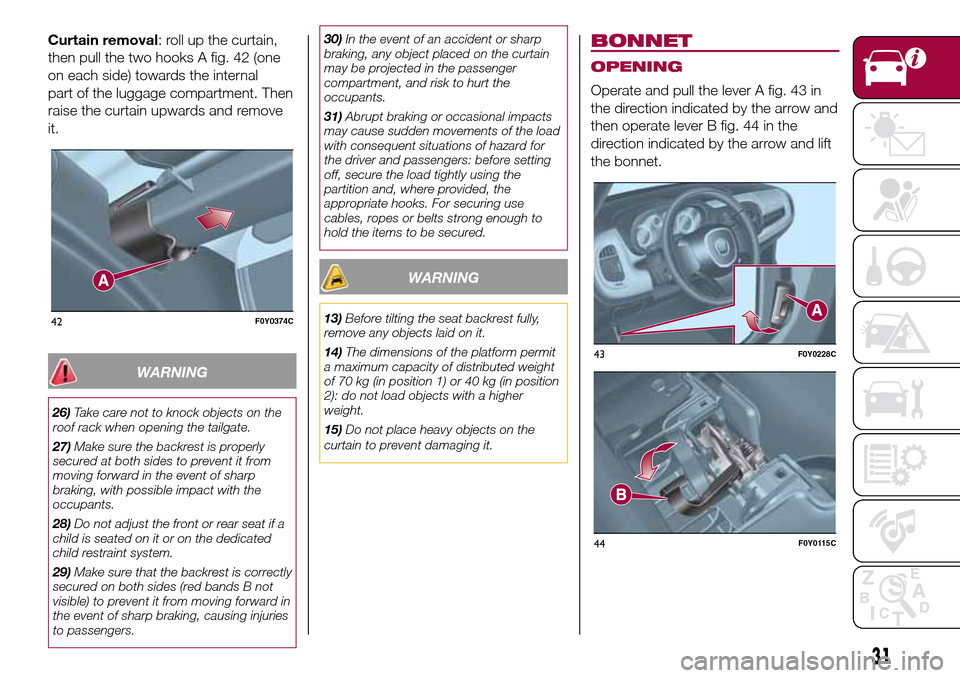
Curtain removal: roll up the curtain,
then pull the two hooks A fig. 42 (one
on each side) towards the internal
part of the luggage compartment. Then
raise the curtain upwards and remove
it.
WARNING
26)Take care not to knock objects on the
roof rack when opening the tailgate.
27)Make sure the backrest is properly
secured at both sides to prevent it from
moving forward in the event of sharp
braking, with possible impact with the
occupants.
28)Do not adjust the front or rear seat if a
child is seated on it or on the dedicated
child restraint system.
29)Make sure that the backrest is correctly
secured on both sides (red bands B not
visible) to prevent it from moving forward in
the event of sharp braking, causing injuries
to passengers.30)In the event of an accident or sharp
braking, any object placed on the curtain
may be projected in the passenger
compartment, and risk to hurt the
occupants.
31)Abrupt braking or occasional impacts
may cause sudden movements of the load
with consequent situations of hazard for
the driver and passengers: before setting
off, secure the load tightly using the
partition and, where provided, the
appropriate hooks. For securing use
cables, ropes or belts strong enough to
hold the items to be secured.
WARNING
13)Before tilting the seat backrest fully,
remove any objects laid on it.
14)The dimensions of the platform permit
a maximum capacity of distributed weight
of 70 kg (in position 1) or 40 kg (in position
2): do not load objects with a higher
weight.
15)Do not place heavy objects on the
curtain to prevent damaging it.
BONNET
OPENING
Operate and pull the lever A fig. 43 in
the direction indicated by the arrow and
then operate lever B fig. 44 in the
direction indicated by the arrow and lift
the bonnet.
42F0Y0374C
43F0Y0228C
44F0Y0115C
31
Page 48 of 240
Warning light What it means
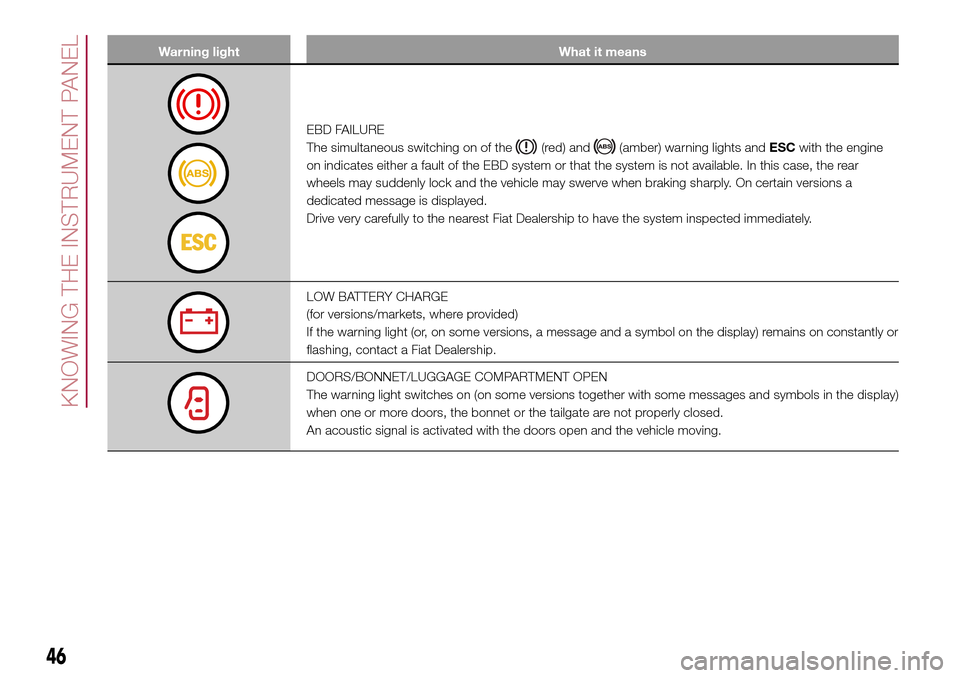
EBD FAILURE
The simultaneous switching on of the
(red) and(amber) warning lights andESCwith the engine
on indicates either a fault of the EBD system or that the system is not available. In this case, the rear
wheels may suddenly lock and the vehicle may swerve when braking sharply. On certain versions a
dedicated message is displayed.
Drive very carefully to the nearest Fiat Dealership to have the system inspected immediately.
LOW BATTERY CHARGE
(for versions/markets, where provided)
If the warning light (or, on some versions, a message and a symbol on the display) remains on constantly or
flashing, contact a Fiat Dealership.
DOORS/BONNET/LUGGAGE COMPARTMENT OPEN
The warning light switches on (on some versions together with some messages and symbols in the display)
when one or more doors, the bonnet or the tailgate are not properly closed.
An acoustic signal is activated with the doors open and the vehicle moving.
46
KNOWING THE INSTRUMENT PANEL
Page 105 of 240
REAR VIEW CAMERA
111)60)
DESCRIPTION
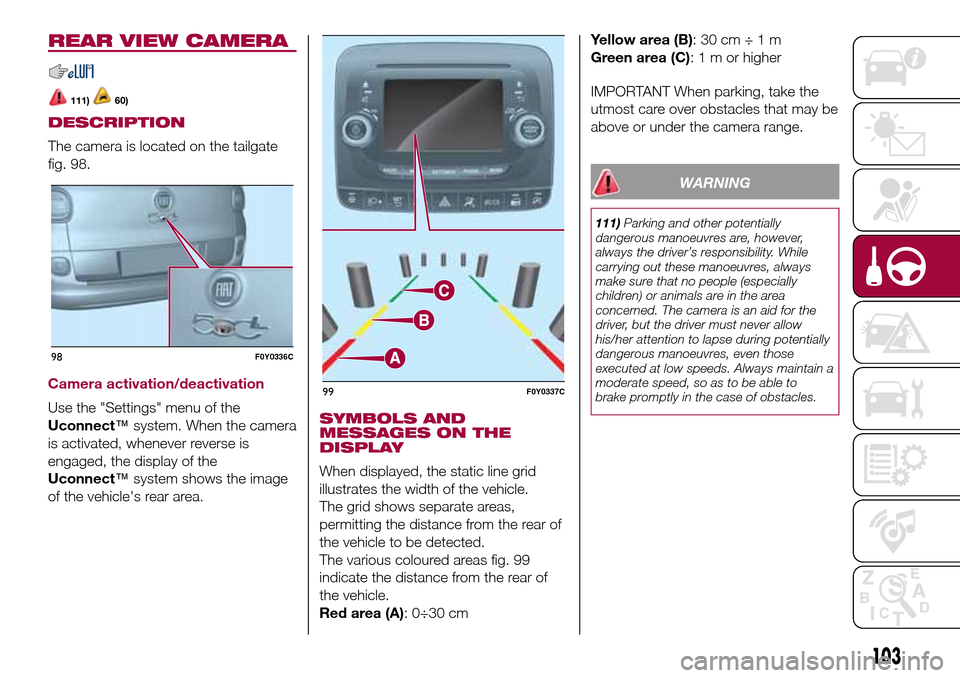
The camera is located on the tailgate
fig. 98.
Camera activation/deactivation
Use the "Settings" menu of the
Uconnect™system. When the camera
is activated, whenever reverse is
engaged, the display of the
Uconnect™system shows the image
of the vehicle's rear area.SYMBOLS AND
MESSAGES ON THE
DISPLAY
When displayed, the static line grid
illustrates the width of the vehicle.
The grid shows separate areas,
permitting the distance from the rear of
the vehicle to be detected.
The various coloured areas fig. 99
indicate the distance from the rear of
the vehicle.
Red area (A): 0÷30 cmYellow area (B):30cm÷1m
Green area (C):1morhigher
IMPORTANT When parking, take the
utmost care over obstacles that may be
above or under the camera range.
WARNING
111)Parking and other potentially
dangerous manoeuvres are, however,
always the driver’s responsibility. While
carrying out these manoeuvres, always
make sure that no people (especially
children) or animals are in the area
concerned. The camera is an aid for the
driver, but the driver must never allow
his/her attention to lapse during potentially
dangerous manoeuvres, even those
executed at low speeds. Always maintain a
moderate speed, so as to be able to
brake promptly in the case of obstacles.
98F0Y0336C
99F0Y0337C
103
Page 111 of 240
HAZARD WARNING
LIGHTS
CONTROL
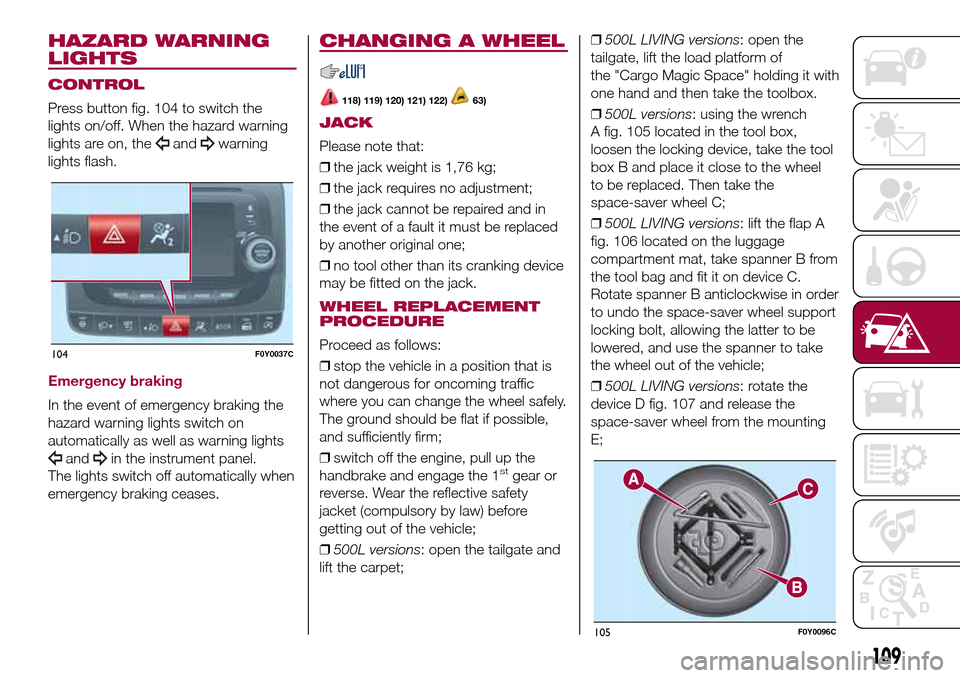
Press button fig. 104 to switch the
lights on/off. When the hazard warning
lights are on, the
andwarning
lights flash.
Emergency braking
In the event of emergency braking the
hazard warning lights switch on
automatically as well as warning lights
andin the instrument panel.
The lights switch off automatically when
emergency braking ceases.
CHANGING A WHEEL
118) 119) 120) 121) 122)63)
JACK
Please note that:
❒the jack weight is 1,76 kg;
❒the jack requires no adjustment;
❒the jack cannot be repaired and in
the event of a fault it must be replaced
by another original one;
❒no tool other than its cranking device
may be fitted on the jack.
WHEEL REPLACEMENT
PROCEDURE
Proceed as follows:
❒stop the vehicle in a position that is
not dangerous for oncoming traffic
where you can change the wheel safely.
The ground should be flat if possible,
and sufficiently firm;
❒switch off the engine, pull up the
handbrake and engage the 1
stgear or
reverse. Wear the reflective safety
jacket (compulsory by law) before
getting out of the vehicle;
❒500L versions: open the tailgate and
lift the carpet;❒500L LIVING versions: open the
tailgate, lift the load platform of
the "Cargo Magic Space" holding it with
one hand and then take the toolbox.
❒500L versions: using the wrench
A fig. 105 located in the tool box,
loosen the locking device, take the tool
box B and place it close to the wheel
to be replaced. Then take the
space-saver wheel C;
❒500L LIVING versions: lift the flap A
fig. 106 located on the luggage
compartment mat, take spanner B from
the tool bag and fit it on device C.
Rotate spanner B anticlockwise in order
to undo the space-saver wheel support
locking bolt, allowing the latter to be
lowered, and use the spanner to take
the wheel out of the vehicle;
❒500L LIVING versions: rotate the
device D fig. 107 and release the
space-saver wheel from the mounting
E;
104F0Y0037C
105F0Y0096C
109
Page 113 of 240
❒fit the space-saver wheel by inserting
the first stud bolt for two threads into
the hole closest to the valve; then,
tighten the stud bolt by some threads
and proceed in the same way for the
others;
❒take the spanner A fig. 105 and fully
tighten the fixing stud bolts;
❒operate the jack handle D to lower
the car. Then extract the jack;
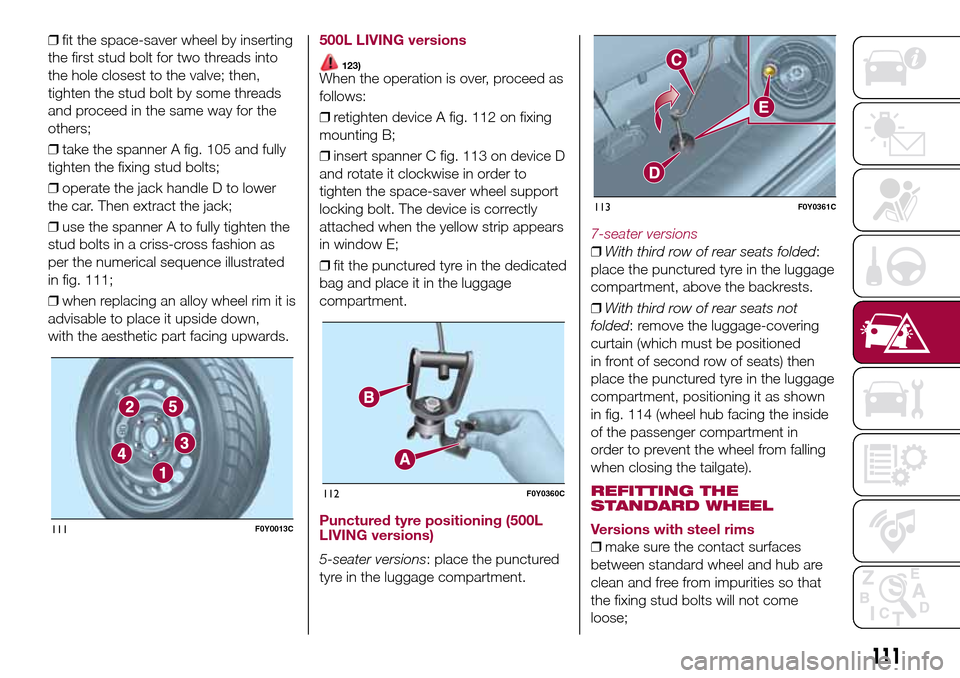
❒use the spanner A to fully tighten the
stud bolts in a criss-cross fashion as
per the numerical sequence illustrated
in fig. 111;
❒when replacing an alloy wheel rim it is
advisable to place it upside down,
with the aesthetic part facing upwards.500L LIVING versions
123)When the operation is over, proceed as
follows:
❒retighten device A fig. 112 on fixing
mounting B;
❒insert spanner C fig. 113 on device D
and rotate it clockwise in order to
tighten the space-saver wheel support
locking bolt. The device is correctly
attached when the yellow strip appears
in window E;
❒fit the punctured tyre in the dedicated
bag and place it in the luggage
compartment.
Punctured tyre positioning (500L
LIVING versions)
5-seater versions: place the punctured
tyre in the luggage compartment.
7-seater versions
❒With third row of rear seats folded:
place the punctured tyre in the luggage
compartment, above the backrests.
❒With third row of rear seats not
folded: remove the luggage-covering
curtain (which must be positioned
in front of second row of seats) then
place the punctured tyre in the luggage
compartment, positioning it as shown
in fig. 114 (wheel hub facing the inside
of the passenger compartment in
order to prevent the wheel from falling
when closing the tailgate).
REFITTING THE
STANDARD WHEEL
Versions with steel rims
❒make sure the contact surfaces
between standard wheel and hub are
clean and free from impurities so that
the fixing stud bolts will not come
loose;
111F0Y0013C
112F0Y0360C
113F0Y0361C
111
Page 115 of 240
120)Vehicle handling is modified with the
space-saver wheel fitted. Avoid violent
acceleration and braking, abrupt steering
and fast cornering. The overall duration
of the space-saver wheel is about 3000
km, after which the relevant tyre must be
replaced with another one of the same
type. Never install a standard tyre on a rim
that is designed for use with a space-saver
wheel. Have the wheel repaired and refitted
as soon as possible. Using two or more
space-saver wheels at the same time
is forbidden. Do not grease the threads of
the stud bolts before fitting them: they
might slip out when driving.
121)The jack shall only be used for raising
the car model it has been supplied with.
Never use the jack for other purposes,
such as raising other car models. Never
use the jack for repair operations under the
vehicle. Incorrect positioning of the jack
may cause the vehicle to fall. Do not use
the jack for loads higher than the one
shown on its label. The space-saver wheel
cannot be fitted with snow chains. If a
front (drive) tyre is punctured and chains
are needed, use a standard wheel from the
rear axle and install the space-saver wheel
on the rear axle. This way, with two
standard front driving wheels, you can
install the snow chains on them.
122)Incorrect hub cap assembly may
cause it to come off when the vehicle is
moving. Never tamper with the inflation
valve. Never introduce tools of any kind
between rim and tyre. Check tyre and
space-saver wheel pressures regularly,
complying with the values given in the
"Technical specifications" chapter.123)At the end of the operation of
raising/locking the spare wheel, the ignition
key must be extracted, taking care not to
turn it in the wrong direction to facilitate the
extraction of the key itself, to prevent the
attachment device from being released and
the wheel assembly not being securely
retained.
WARNING
63)Contact a Fiat Dealership as soon as
possible to have the correct tightening
of the wheel stud bolts checked.
"Fix&Go Automatic"
kit
124) 125) 126) 127) 128) 129) 130) 131)
64)3)
DESCRIPTION
The "Fix&Go Automatic" kit is located in
the luggage compartment, inside a
dedicated container. Inside the
container there are also a screwdriver,
the tow ring and the funnel for
refuelling, in the event of an emergency.
To access the kit, open the tailgate,
remove the load platform and lift the
carpet.
LPG versions: a tool box secured to
the luggage compartment carpet with
dedicated fastenings contains the kit.
The kit includes:
❒a bottle A fig. 115 containing sealing
fluid and fitted with: filling tube B and
adhesive label C with the wording
“max. 80 km/h” to be placed in a
clearly visible position (e.g. on
the dashboard) after repairing the tyre;
❒a compressor D including a pressure
gauge and connections, found in the
compartment;
113
Page 123 of 240
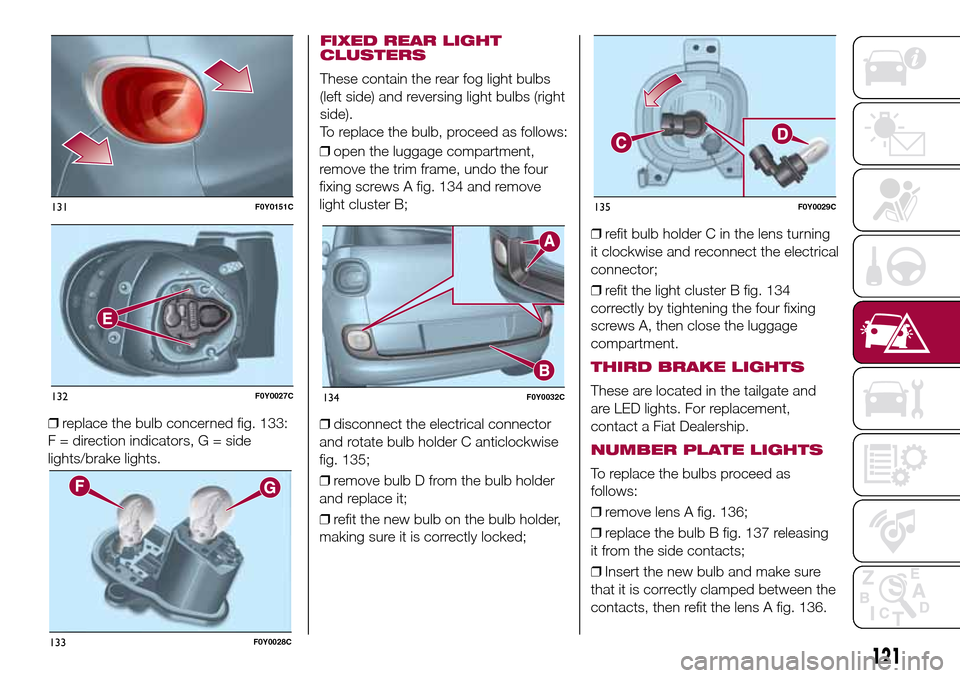
❒replace the bulb concerned fig. 133:
F = direction indicators, G = side
lights/brake lights.❒open the luggage compartment,
remove the trim frame, undo the four
fixing screws A fig. 134 and remove
light cluster B;
❒disconnect the electrical connector
and rotate bulb holder C anticlockwise
fig. 135;
❒remove bulb D from the bulb holder
and replace it;
❒refit the new bulb on the bulb holder,
making sure it is correctly locked;❒refit bulb holder C in the lens turning
it clockwise and reconnect the electrical
connector;
❒refit the light cluster B fig. 134
correctly by tightening the four fixing
screws A, then close the luggage
compartment.
THIRD BRAKE LIGHTS
These are located in the tailgate and
are LED lights. For replacement,
contact a Fiat Dealership.
NUMBER PLATE LIGHTS
To replace the bulbs proceed as
follows:
❒remove lens A fig. 136;
❒replace the bulb B fig. 137 releasing
it from the side contacts;
❒Insert the new bulb and make sure
that it is correctly clamped between the
contacts, then refit the lens A fig. 136.
131F0Y0151C
132F0Y0027C
133F0Y0028C
134F0Y0032C
135F0Y0029C
121
FIXED REAR LIGHT
CLUSTERS
These contain the rear fog light bulbs
(left side) and reversing light bulbs (right
side).
To replace the bulb, proceed as follows: