2016 FIAT 500L LIVING mirror
[x] Cancel search: mirrorPage 5 of 240
USE OF THE OWNER HANDBOOK
OPERATING INSTRUCTIONS
Each time direction instructions (left/right or forwards/backwards) about the vehicle are given, these must be intended as
regarding an occupant in the driver's seat. Special cases not complying with this rule will be specified as appropriate in the text.
The figures in the Owner Handbook are provided by way of example only: this might imply that some details of the image do
not correspond to the actual arrangement of your vehicle. In addition, the Handbook has been conceived considering vehicles
with steering wheel on the left side; it is therefore possible that on vehicles with steering wheel on the right side, the position
or construction of some controls is not exactly mirror-like with respect to the figure.
To identify the chapter with the information needed you can consult the index at the end of this Owner Handbook.
Chapters can be rapidly identified with dedicated graphic tabs, at the side of each odd page. A few pages further there is a key
for getting to know the chapter order and the relevant symbols in the tabs. There is in any case a textual indication of the
current chapter at the side of each even page.
WARNINGS AND PRECAUTIONS
While reading this Owner Handbook you will find a series ofWARNINGSto prevent procedures that could damage your
vehicle.
There are alsoPRECAUTIONSthat must be carefully followed to prevent incorrect use of the components of the vehicle,
which could cause accidents or injuries.
Therefore allWARNINGSandPRECAUTIONSmust always be carefully followed.
WARNINGSandPRECAUTIONSare recalled in the text with the following symbols:
personal safety;
vehicle safety;
environmental protection.
NOTE These symbols, when necessary, are indicated besides the title or at the end of the line and are followed by a number.
That number recalls the corresponding warning at the end of the relevant section.
Page 8 of 240
GETTING TO KNOW YOUR CAR
In-depth knowledge of your new vehicle
starts here.
The handbook that you are reading
simply and directly explains how it
is made and how it works.
That’s why we advise you to read it
seated comfortably on board, so that
you can see immediately what is
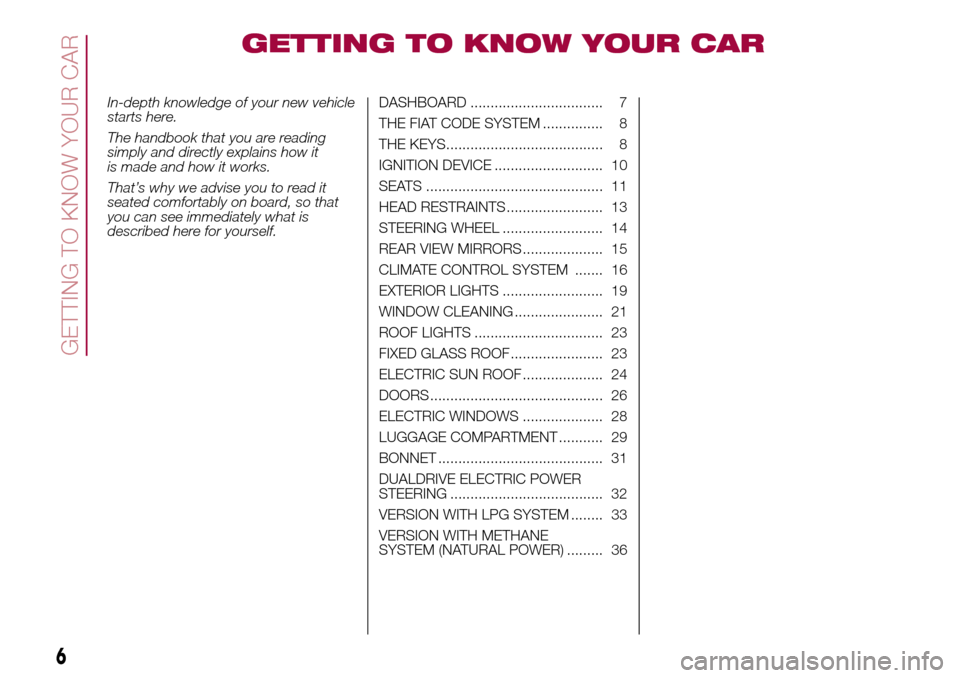
described here for yourself.DASHBOARD ................................. 7
THE FIAT CODE SYSTEM ............... 8
THE KEYS....................................... 8
IGNITION DEVICE ........................... 10
SEATS ............................................ 11
HEAD RESTRAINTS ........................ 13
STEERING WHEEL ......................... 14
REAR VIEW MIRRORS .................... 15
CLIMATE CONTROL SYSTEM ....... 16
EXTERIOR LIGHTS ......................... 19
WINDOW CLEANING ...................... 21
ROOF LIGHTS ................................ 23
FIXED GLASS ROOF ....................... 23
ELECTRIC SUN ROOF .................... 24
DOORS ........................................... 26
ELECTRIC WINDOWS .................... 28
LUGGAGE COMPARTMENT ........... 29
BONNET ......................................... 31
DUALDRIVE ELECTRIC POWER
STEERING ...................................... 32
VERSION WITH LPG SYSTEM ........ 33
VERSION WITH METHANE
SYSTEM (NATURAL POWER) ......... 36
6
GETTING TO KNOW YOUR CAR
Page 17 of 240
REAR VIEW
MIRRORS
INTERIOR MIRROR
The mirror is fitted with a safety device
that causes its release in the event of
a violent impact with the passenger.
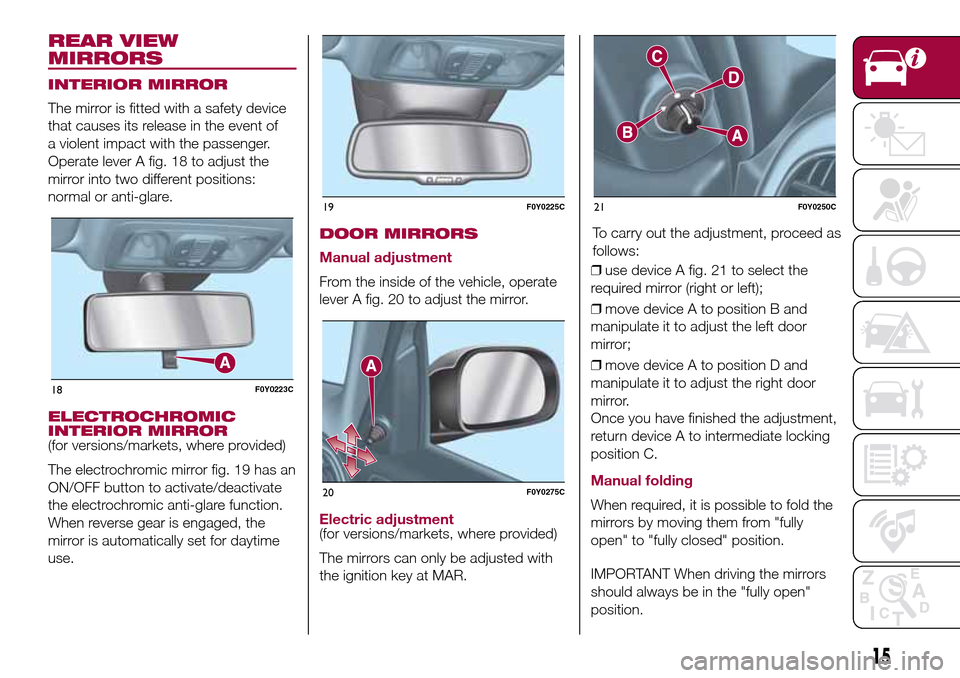
Operate lever A fig. 18 to adjust the
mirror into two different positions:
normal or anti-glare.
ELECTROCHROMIC
INTERIOR MIRROR
(for versions/markets, where provided)
The electrochromic mirror fig. 19 has an
ON/OFF button to activate/deactivate
the electrochromic anti-glare function.
When reverse gear is engaged, the
mirror is automatically set for daytime
use.
DOOR MIRRORS
Manual adjustment
From the inside of the vehicle, operate
lever A fig. 20 to adjust the mirror.
Electric adjustment(for versions/markets, where provided)
The mirrors can only be adjusted with
the ignition key at MAR.To carry out the adjustment, proceed as
follows:
❒use device A fig. 21 to select the
required mirror (right or left);
❒move device A to position B and
manipulate it to adjust the left door
mirror;
❒move device A to position D and
manipulate it to adjust the right door
mirror.
Once you have finished the adjustment,
return device A to intermediate locking
position C.
Manual folding
When required, it is possible to fold the
mirrors by moving them from "fully
open" to "fully closed" position.
IMPORTANT When driving the mirrors
should always be in the "fully open"
position.
18F0Y0223C
19F0Y0225C
20F0Y0275C
21F0Y0250C
15
Page 20 of 240
AUTOMATIC DUAL-ZONE CLIMATE CONTROL SYSTEM
19)5)
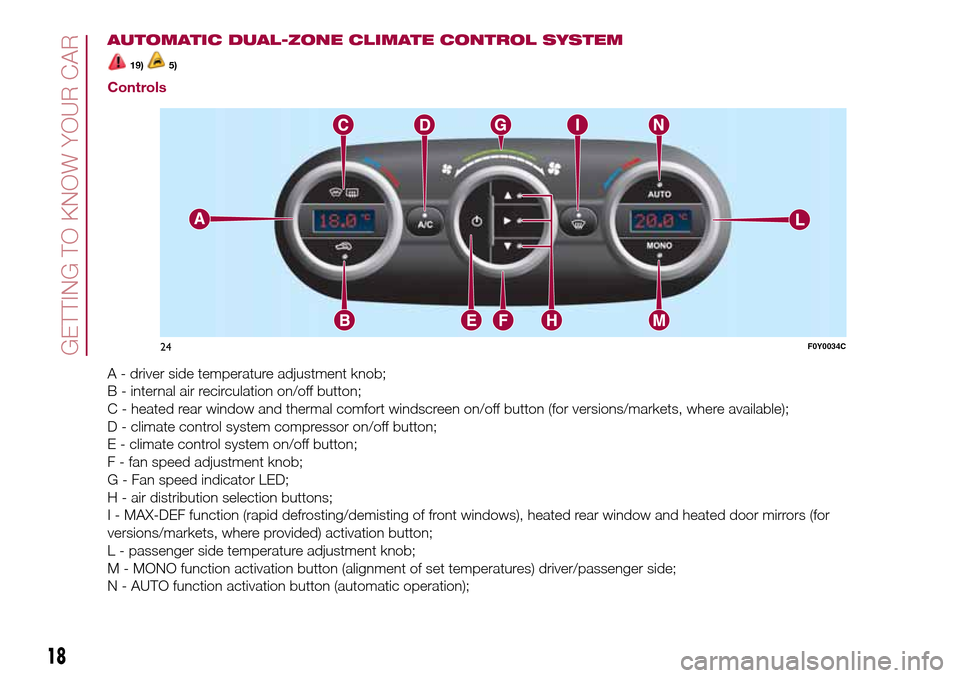
Controls
A - driver side temperature adjustment knob;
B - internal air recirculation on/off button;
C - heated rear window and thermal comfort windscreen on/off button (for versions/markets, where available);
D - climate control system compressor on/off button;
E - climate control system on/off button;
F - fan speed adjustment knob;
G - Fan speed indicator LED;
H - air distribution selection buttons;
I - MAX-DEF function (rapid defrosting/demisting of front windows), heated rear window and heated door mirrors (for
versions/markets, where provided) activation button;
L - passenger side temperature adjustment knob;
M - MONO function activation button (alignment of set temperatures) driver/passenger side;
N - AUTO function activation button (automatic operation);
24F0Y0034C
18
GETTING TO KNOW YOUR CAR
Page 21 of 240
STOP/START SYSTEM
HANDLING
The dual-zone automatic climate
control manages the Stop/Start system
(engine off and vehicle at a standstill)
in order to guarantee sufficient comfort
inside the vehicle.
IMPORTANT In particularly severe
climate conditions it is recommended to
limit the use of the Stop/Start system
to prevent the compressor from
continuously switching on and off, with
consequent rapid misting of the
windows and accumulation of humidity
with unpleasant smells in the passenger
compartment.
IMPORTANT When the Stop/Start
system is on (engine off and vehicle at a
standstill), the automatic recirculation
management is turned off always taking
air in from outside, to reduce the
probability of the windows misting up
(as the compressor is off).
WARNING
19)It is inadvisable to use internal air
recirculation when the outside temperature
is low, since the windows could mist up
rapidly.
WARNING
5)The climate control system detects the
passenger compartment temperature
using a mean radiant temperature sensor
located in the interior rear view mirror
and protected by a specific cover.
Obstructing the field of view of this sensor
with any object could cause the climate
control system to operate with less than
optimal efficiency.
WARNING
2)The system uses R134a coolant which
does not pollute the environment in the
event of accidental leakage. Under no
circumstances use R12 fluid, which is
incompatible with the components of the
system.
EXTERIOR LIGHTS
The ignition key has to be in the MAR
position for the exterior lights to come
on.
DAYTIME RUNNING
LIGHTS (DRL)
"Daytime Running Lights"
(for versions/markets, where provided)
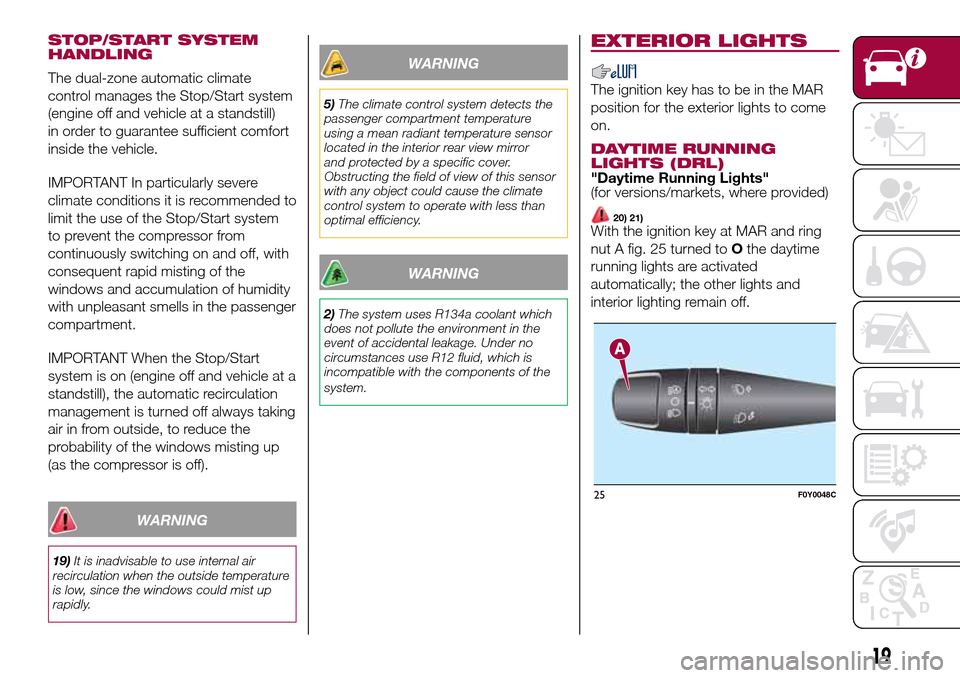
20) 21)With the ignition key at MAR and ring
nut A fig. 25 turned toOthe daytime
running lights are activated
automatically; the other lights and
interior lighting remain off.
25F0Y0048C
19
Page 24 of 240
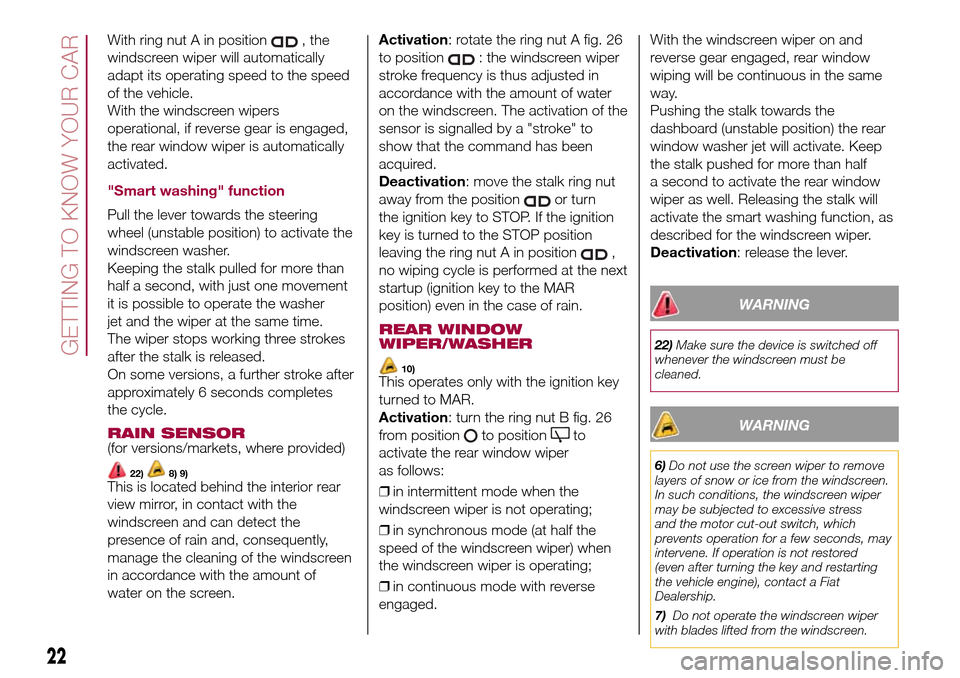
With ring nut A in position, the
windscreen wiper will automatically
adapt its operating speed to the speed
of the vehicle.
With the windscreen wipers
operational, if reverse gear is engaged,
the rear window wiper is automatically
activated.
"Smart washing" function
Pull the lever towards the steering
wheel (unstable position) to activate the
windscreen washer.
Keeping the stalk pulled for more than
half a second, with just one movement
it is possible to operate the washer
jet and the wiper at the same time.
The wiper stops working three strokes
after the stalk is released.
On some versions, a further stroke after
approximately 6 seconds completes
the cycle.
RAIN SENSOR(for versions/markets, where provided)
22)8) 9)This is located behind the interior rear
view mirror, in contact with the
windscreen and can detect the
presence of rain and, consequently,
manage the cleaning of the windscreen
in accordance with the amount of
water on the screen.Activation: rotate the ring nut A fig. 26
to position
: the windscreen wiper
stroke frequency is thus adjusted in
accordance with the amount of water
on the windscreen. The activation of the
sensor is signalled by a "stroke" to
show that the command has been
acquired.
Deactivation: move the stalk ring nut
away from the position
or turn
the ignition key to STOP. If the ignition
key is turned to the STOP position
leaving the ring nut A in position
,
no wiping cycle is performed at the next
startup (ignition key to the MAR
position) even in the case of rain.
REAR WINDOW
WIPER/WASHER
10)This operates only with the ignition key
turned to MAR.
Activation: turn the ring nut B fig. 26
from position
to positionto
activate the rear window wiper
as follows:
❒in intermittent mode when the
windscreen wiper is not operating;
❒in synchronous mode (at half the
speed of the windscreen wiper) when
the windscreen wiper is operating;
❒in continuous mode with reverse
engaged.With the windscreen wiper on and
reverse gear engaged, rear window
wiping will be continuous in the same
way.
Pushing the stalk towards the
dashboard (unstable position) the rear
window washer jet will activate. Keep
the stalk pushed for more than half
a second to activate the rear window
wiper as well. Releasing the stalk will
activate the smart washing function, as
described for the windscreen wiper.
Deactivation: release the lever.
WARNING
22)Make sure the device is switched off
whenever the windscreen must be
cleaned.
WARNING
6)Do not use the screen wiper to remove
layers of snow or ice from the windscreen.
In such conditions, the windscreen wiper
may be subjected to excessive stress
and the motor cut-out switch, which
prevents operation for a few seconds, may
intervene. If operation is not restored
(even after turning the key and restarting
the vehicle engine), contact a Fiat
Dealership.
7)Do not operate the windscreen wiper
with blades lifted from the windscreen.
22
GETTING TO KNOW YOUR CAR
Page 73 of 240
37)Sensor operation may also be
compromised by the presence of dust,
condensation, dirt or ice on the
windscreen, by traffic conditions (e.g.
vehicles that are driving not aligned with
yours, vehicles driving in a transverse
or opposite way on the same lane, bend
with a small radius of curvature), by road
surface conditions and by driving
conditions (e.g. off-road driving). Make sure
the windscreen is always clean. Use
specific detergents and clean cloths to
avoid scratching the windscreen. The
sensor operation may also be limited or
absent in some driving, traffic and road
surface conditions.
38)Projecting loads on the roof of the
vehicle may interfere with the correct
operation of the sensor. Before starting
make sure the load is correctly positioned,
in order not to cover the sensor operating
range.
39)If the windscreen must be replaced
due to scratches, chipping or breakage,
contact exclusively a Fiat Dealership.
Do not replace the windscreen on your
own, risk of malfunction! It is advisable to
replace the windscreen if it is damaged
in the area of the laser sensor.
40)Do not tamper with nor operate on the
laser sensor. Do not close the openings
in the aesthetic cover located under the
interior rear view mirror. In the event of
a sensor failure, contact a Fiat Dealership.
41)If you are driving on roads close to
trees with protruding branches it is
advisable to deactivate the system to
prevent the branches at the height of the
bonnet or the windscreen from interfering
with the system.42)Do not cover the operating range of the
sensor with stickers or other objects. Also
pay attention to other objects on the
bonnet (e.g. a layer of snow) and make
sure they do not interfere with the light
emitted by the laser.
43)If a trailer or a vehicle is towed, the
system must be deactivated with the
display Setup Menu.
44)If the system signals a pressure
decrease on a specific tyre, it is
recommended to check the pressure on all
four tyres.
45)iTPMS does not relieve the driver from
the obligation to check the tyre pressure
every month; it is not to be considered
a system to replace maintenance or a
safety system.
46)The iTPMS cannot indicate sudden tyre
pressure drops (for example when a tyre
bursts). In this case, stop the vehicle,
braking with caution and avoiding abrupt
steering.
47)The iTPMS only warns that the tyre
pressure is low: it is not able to inflate
them.
48)Insufficient tyre inflation increases fuel
consumption, reduces the tread duration
and may affect the capacity to drive safely.
49)Tyre pressure must be checked with
tyres cold. Should it become necessary for
whatever reason to check pressure with
warm tyres, do not reduce pressure even
though it is higher than the prescribed
value, but repeat the check when tyres are
cold.OCCUPANT
PROTECTION
SYSTEMS
The most important safety equipment
of the vehicle comprise the following
protection systems:
❒seat belts;
❒SBR (Seat Belt Reminder) system;
❒head restraints;
❒child restraint systems;
❒front airbags and side bags.
Read the information given the
following pages with the utmost care. It
is of fundamental importance that the
protection systems are used in the
correct way to guarantee the maximum
possible safety level for the driver and
the passengers.
For the description of the head restraint
adjustment see paragraph "Head
restraints" in chapter "Knowing your
vehicle".
71
Page 95 of 240
STARTING THE
ENGINE
99) 100)51) 52) 53) 54) 55)
Before starting the engine, adjust the
seat, the interior rear view mirrors,
the door mirrors and fasten the seat
belt correctly.
Never press the accelerator pedal for
starting the engine.
VERSIONS WITH MANUAL
GEARBOX
Petrol versions
Proceed as follows:
❒engage the handbrake and place the
gear lever in neutral.For 0.9 TwinAir
Turbo 105 HP versionsengage the
handbrake and place the gear lever
in neutral or fully press the clutch pedal
if a gear other than neutral is engaged;
❒for all versions (except 0.9
TwinAir Turbo 105 HP)fully depress
the clutch pedal, without pressing
the accelerator;
❒turn the ignition key to AVV and
release it as soon as the engine starts.
Diesel versions
Proceed as follows:
❒engage the handbrake, put the gear
lever into neutral and turn the ignition
key to MAR: the warning lights
andon the instrument panel
will turn on;
❒wait for the warning lights
and
to turn off and then fully depress
the clutch pedal without pressing the
accelerator;
❒turn the ignition key to AVV as soon
as warning light
switches off.
Release the ignition key as soon as the
engine starts.
IMPORTANT If the engine does not
start at the first attempt, return the
ignition key to STOP before repeating
the procedure. If, with the ignition
key at MAR, the warning lights
and
(only for petrol versions) stay on
in the instrument panel, the ignition key
must be brought back to STOP and
then to MAR again. If the
warning
light stays on, retry with the other
keys provided. Contact a Fiat
Dealership if you still cannot start the
engine.
VERSIONS WITH
DUALOGIC GEARBOX
101)Engine starting is allowed both with a
gear engaged and with the gearbox
in neutral (N).
However, the brake pedal must always
be pressed first if neutral is not
engaged. It is therefore advisable to
place the gear lever in neutral (N) before
starting the engine.
LPG AND NATURAL
POWER VERSIONS
The engine always starts up on petrol
independently of the mode previously
selected.
There must therefore always be an
adequate reserve of petrol in the tank to
protect the petrol pump and to
guarantee temporary switching from
methane or LPG to petrol operation, if
high performance is required.
STOPPING THE ENGINE
Turn the ignition key to STOP while the
engine is idling.
IMPORTANT After a demanding drive,
before turning the engine off you should
allow it to idle to allow the temperature
in the engine compartment to
decrease.
93