2016 FIAT 500L LIVING steering wheel
[x] Cancel search: steering wheelPage 88 of 240
82)Always make sure that the chest
section of the seat belt does not pass
under the arms or behind the back of the
child. In the event of an accident the seat
belt will not be able to secure the child,
with the risk of injury, including fatal injury.
Therefore the child must always wear
the seat belt correctly.
83)Do not use the same lower anchorage
to install more than one child restraint
system.
84)If a Universal ISOFIX child restraint
system is not fixed to all three anchorages,
it will not be able to protect the child
correctly. In a crash, the child could be
seriously or fatally injured.
85)Fit the child restraint system only when
the vehicle is stationary. The child restraint
system is correctly fixed to the brackets
when you hear the click. Follow the
instructions for assembly, disassembly and
positioning that the Manufacturer must
supply with the child restraint system.SUPPLEMENTARY
RESTRAINT SYSTEM
(SRS) - AIRBAG
The vehicle is equipped with:
❒front driver airbag;
❒front passenger airbag;
❒driver knee bag (for versions/
markets, where provided);
❒front side bags for pelvis, chest and
shoulder protection of driver and
passenger (for versions/markets, where
provided);
❒side bags for head protection of front
seat passengers and rear side seat
passengers (window bag).
FRONT AIRBAGS
The front driver/passenger airbags and
the driver's knee bag (for versions/
markets, where provided) protect the
front seat occupants in the event of
frontal impacts of medium/high severity,
by placing the bag between the
occupant and the steering wheel or
dashboard.
Therefore non-activation in other types
of collisions (side collisions, rear shunts,
roll-overs, etc.) is not a system
malfunction.Driver and passenger front airbags are
not a replacement of but
complementary to the seat belts, which
should always be worn, as specified
by law in Europe and most non-
European countries.
In the event of impact, those not
wearing a seat belt are projected
forwards and may come into contact
with the bag which is still inflating. The
protection offered by the bag is
compromised in these circumstances.
The front airbags may not activate in
the case of a frontal impact against
highly deformable objects not involving
the front surface of the vehicle (e.g.
wing collision against guard rail) or in
the case of the vehicle wedging under
other vehicles or protective barriers
(e.g. under trucks or guard rails).
Failure to activate in the conditions
described above is due to the fact that
they may not provide any additional
protection compared with seat belts, so
their activation would be inappropriate.
In these cases, non-deployment does
not indicate a system malfunction.
86
SAFETY
Page 89 of 240
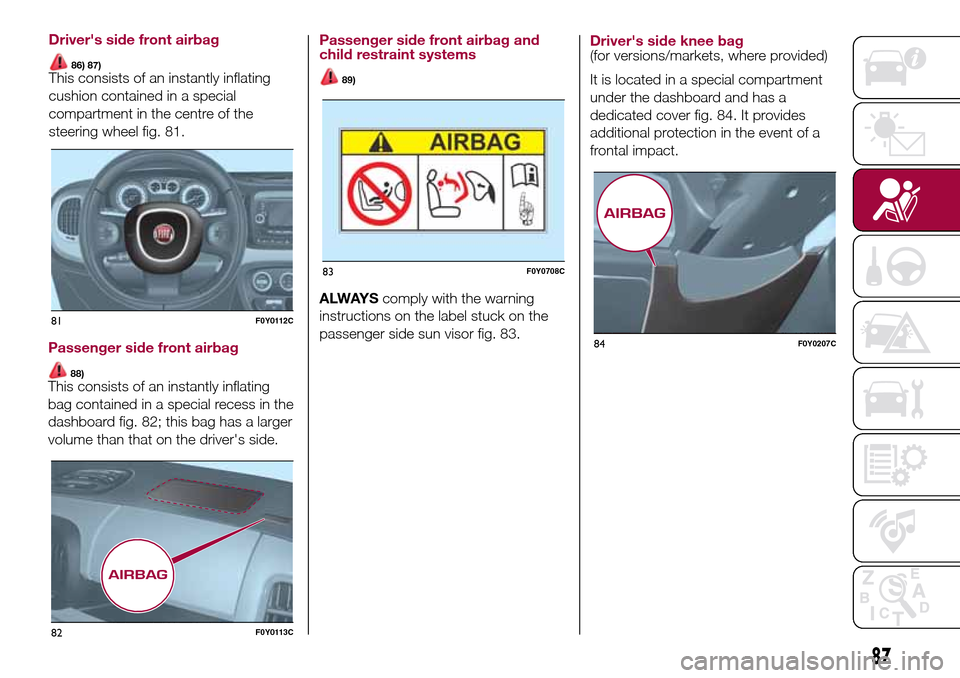
Passenger side front airbag
88)This consists of an instantly inflating
bag contained in a special recess in the
dashboard fig. 82; this bag has a larger
volume than that on the driver's side.
Passenger side front airbag and
child restraint systems
89)
ALWAYScomply with the warning
instructions on the label stuck on the
passenger side sun visor fig. 83.
Driver's side knee bag(for versions/markets, where provided)
It is located in a special compartment
under the dashboard and has a
dedicated cover fig. 84. It provides
additional protection in the event of a
frontal impact.
81F0Y0112C
82F0Y0113C
83F0Y0708C
84F0Y0207C
87
Driver's side front airbag
86) 87)This consists of an instantly inflating
cushion contained in a special
compartment in the centre of the
steering wheel fig. 81.
Page 92 of 240
SIDE BAGS
To help increase occupants protection
in the event of certain side impact
collisions, the car is equipped with
seat-mounted side bags (for
versions/markets, where provided) and
window bag.
Side bags(for versions/markets, where provided)
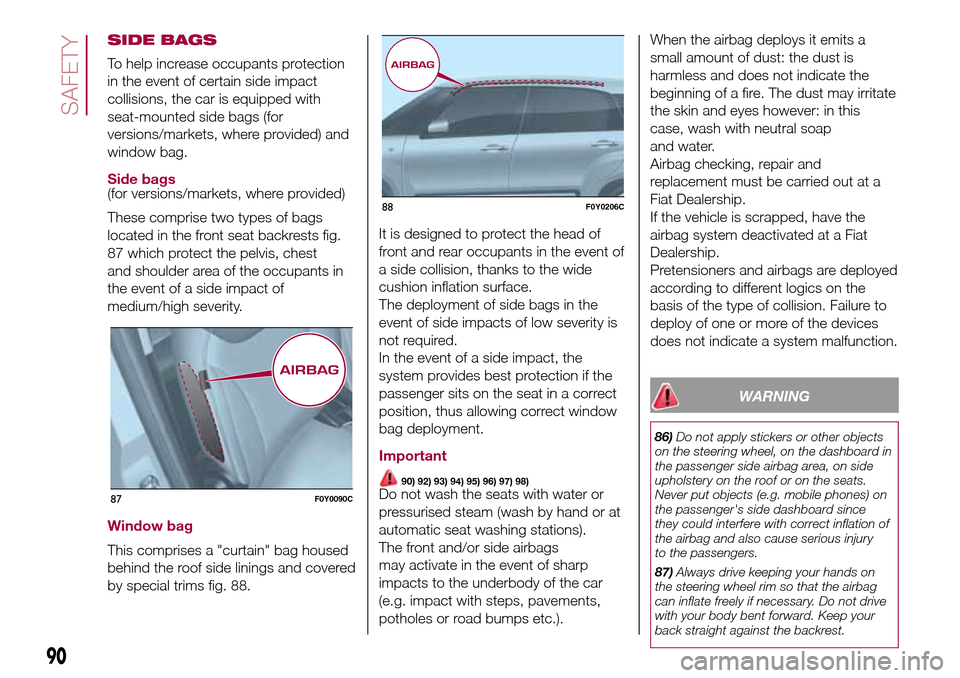
These comprise two types of bags
located in the front seat backrests fig.
87 which protect the pelvis, chest
and shoulder area of the occupants in
the event of a side impact of
medium/high severity.
Window bag
This comprises a "curtain" bag housed
behind the roof side linings and covered
by special trims fig. 88.It is designed to protect the head of
front and rear occupants in the event of
a side collision, thanks to the wide
cushion inflation surface.
The deployment of side bags in the
event of side impacts of low severity is
not required.
In the event of a side impact, the
system provides best protection if the
passenger sits on the seat in a correct
position, thus allowing correct window
bag deployment.
Important
90) 92) 93) 94) 95) 96) 97) 98)Do not wash the seats with water or
pressurised steam (wash by hand or at
automatic seat washing stations).
The front and/or side airbags
may activate in the event of sharp
impacts to the underbody of the car
(e.g. impact with steps, pavements,
potholes or road bumps etc.).When the airbag deploys it emits a
small amount of dust: the dust is
harmless and does not indicate the
beginning of a fire. The dust may irritate
the skin and eyes however: in this
case, wash with neutral soap
and water.
Airbag checking, repair and
replacement must be carried out at a
Fiat Dealership.
If the vehicle is scrapped, have the
airbag system deactivated at a Fiat
Dealership.
Pretensioners and airbags are deployed
according to different logics on the
basis of the type of collision. Failure to
deploy of one or more of the devices
does not indicate a system malfunction.
WARNING
86)Do not apply stickers or other objects
on the steering wheel, on the dashboard in
the passenger side airbag area, on side
upholstery on the roof or on the seats.
Never put objects (e.g. mobile phones) on
the passenger's side dashboard since
they could interfere with correct inflation of
the airbag and also cause serious injury
to the passengers.
87)Always drive keeping your hands on
the steering wheel rim so that the airbag
can inflate freely if necessary. Do not drive
with your body bent forward. Keep your
back straight against the backrest.
87F0Y0090C
88F0Y0206C
90
SAFETY
Page 96 of 240
WARNING
99)It is dangerous to run the engine in
enclosed areas. The engine burns oxygen
and releases carbon dioxide, carbon
monoxide and other toxic gases.
100)Remember that the brake servo and
power steering are not operational until the
engine has been started, therefore you
need to apply much more force than usual
to the brake pedal and steering wheel.
101)If the engine fails to start with a gear
engaged, the potentially dangerous
situation due to the fact that the gearbox is
automatically placed in neutral will be
signalled by an acoustic signal.
WARNING
51)Warning lightflashing for 60
seconds after starting or during prolonged
cranking of the engine indicates a fault
with the glow plug heating system. You
can use the vehicle as usual if the engine
starts but you should contact a Fiat
Dealership as soon as possible.
52)It is advisable not to demand maximum
performance from your vehicle (e.g.
excessive acceleration, long distances at
maximum rpm, excessively intense braking,
etc.) when it is first used.
53)When the engine is off, do not leave
the key turned to MAR to prevent
unnecessary electrical consumption from
draining the battery.54)Never jump start the engine by
pushing, towing or coasting downhill.
These actions could cause the fuel to flow
into the catalytic converter and damage
it beyond repair.
55)Revving up before stopping the engine
is useless, it causes unnecessary fuel
consumption and can damage the engine,
in particular engines equipped with
turbocharger.
HANDBRAKE
102) 103)
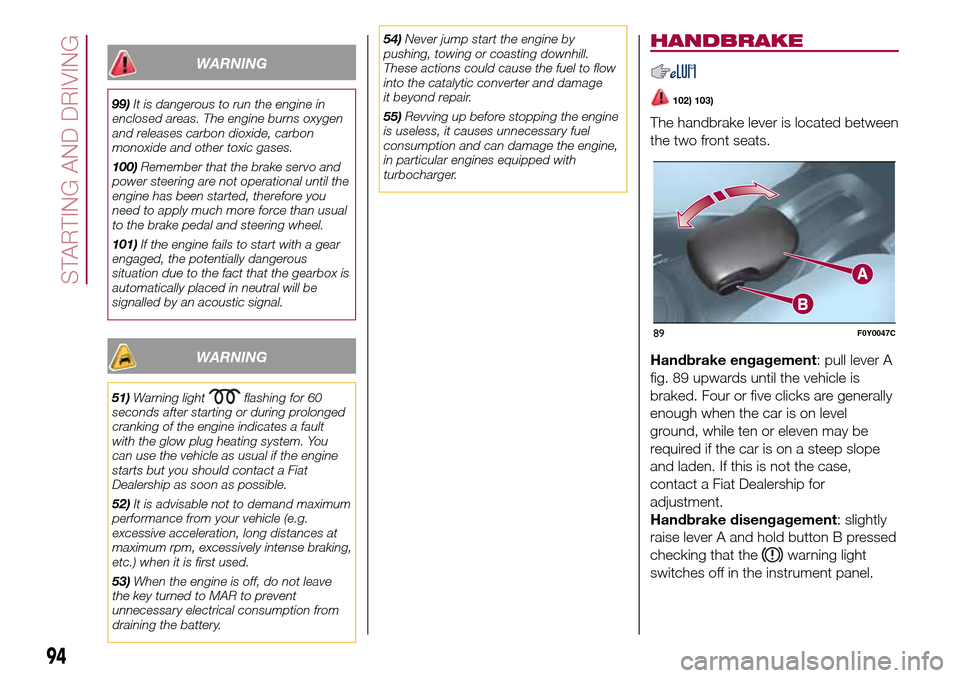
The handbrake lever is located between
the two front seats.
Handbrake engagement: pull lever A
fig. 89 upwards until the vehicle is
braked. Four or five clicks are generally
enough when the car is on level
ground, while ten or eleven may be
required if the car is on a steep slope
and laden. If this is not the case,
contact a Fiat Dealership for
adjustment.
Handbrake disengagement: slightly
raise lever A and hold button B pressed
checking that the
warning light
switches off in the instrument panel.
89F0Y0047C
94
STARTING AND DRIVING
Page 99 of 240
❒release the brake pedal and press
the accelerator pedal;
❒in driving conditions, push the gear
lever towards (+) to engage the next
gear up or towards (–) to engage the
next gear down.
AUTOMATIC LOGIC
(AUTO)
Proceed as follows:
❒press the brake pedal and start the
engine;
❒if AUTO is not displayed, move the
gear lever A fig. 91 to A/M to select
AUTOMATIC mode;
❒push the gear lever towards (+) to
engage first gear (if starting from N or
R, simply place the lever in the middle
position), or R to engage reverse;
❒release the brake pedal and press
the accelerator pedal: the gear most
suited to the vehicle speed will be
engaged.
AUTO-ECO OPERATION
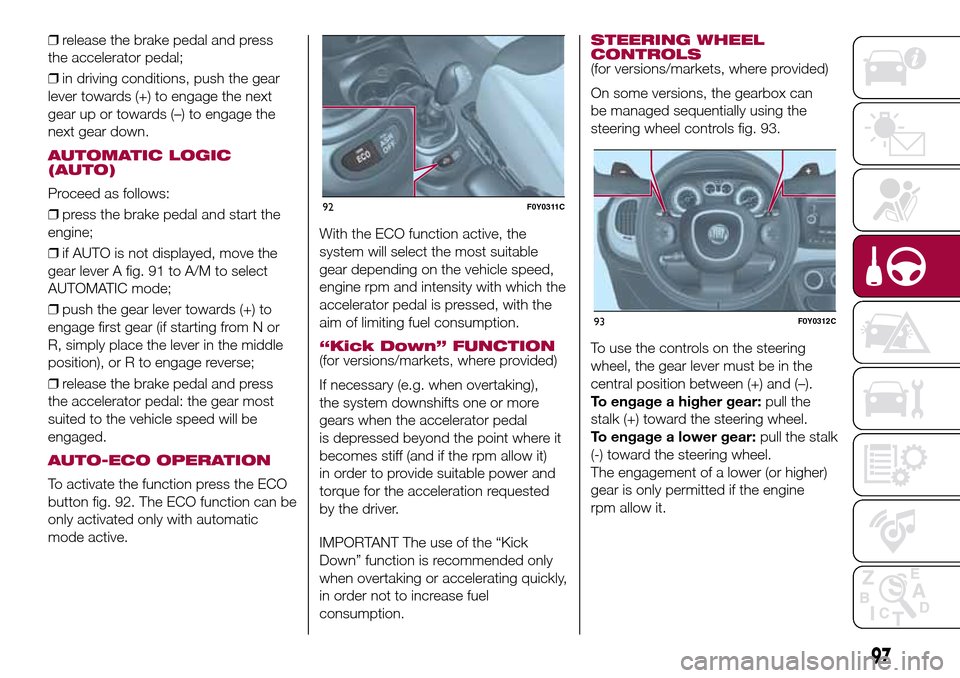
To activate the function press the ECO
button fig. 92. The ECO function can be
only activated only with automatic
mode active.With the ECO function active, the
system will select the most suitable
gear depending on the vehicle speed,
engine rpm and intensity with which the
accelerator pedal is pressed, with the
aim of limiting fuel consumption.
“Kick Down” FUNCTION(for versions/markets, where provided)
If necessary (e.g. when overtaking),
the system downshifts one or more
gears when the accelerator pedal
is depressed beyond the point where it
becomes stiff (and if the rpm allow it)
in order to provide suitable power and
torque for the acceleration requested
by the driver.
IMPORTANT The use of the “Kick
Down” function is recommended only
when overtaking or accelerating quickly,
in order not to increase fuel
consumption.
STEERING WHEEL
CONTROLS
(for versions/markets, where provided)
On some versions, the gearbox can
be managed sequentially using the
steering wheel controls fig. 93.
To use the controls on the steering
wheel, the gear lever must be in the
central position between (+) and (–).
To engage a higher gear:pull the
stalk (+) toward the steering wheel.
To engage a lower gear:pull the stalk
(-) toward the steering wheel.
The engagement of a lower (or higher)
gear is only permitted if the engine
rpm allow it.
92F0Y0311C
93F0Y0312C
97
Page 115 of 240
120)Vehicle handling is modified with the
space-saver wheel fitted. Avoid violent
acceleration and braking, abrupt steering
and fast cornering. The overall duration
of the space-saver wheel is about 3000
km, after which the relevant tyre must be
replaced with another one of the same
type. Never install a standard tyre on a rim
that is designed for use with a space-saver
wheel. Have the wheel repaired and refitted
as soon as possible. Using two or more
space-saver wheels at the same time
is forbidden. Do not grease the threads of
the stud bolts before fitting them: they
might slip out when driving.
121)The jack shall only be used for raising
the car model it has been supplied with.
Never use the jack for other purposes,
such as raising other car models. Never
use the jack for repair operations under the
vehicle. Incorrect positioning of the jack
may cause the vehicle to fall. Do not use
the jack for loads higher than the one
shown on its label. The space-saver wheel
cannot be fitted with snow chains. If a
front (drive) tyre is punctured and chains
are needed, use a standard wheel from the
rear axle and install the space-saver wheel
on the rear axle. This way, with two
standard front driving wheels, you can
install the snow chains on them.
122)Incorrect hub cap assembly may
cause it to come off when the vehicle is
moving. Never tamper with the inflation
valve. Never introduce tools of any kind
between rim and tyre. Check tyre and
space-saver wheel pressures regularly,
complying with the values given in the
"Technical specifications" chapter.123)At the end of the operation of
raising/locking the spare wheel, the ignition
key must be extracted, taking care not to
turn it in the wrong direction to facilitate the
extraction of the key itself, to prevent the
attachment device from being released and
the wheel assembly not being securely
retained.
WARNING
63)Contact a Fiat Dealership as soon as
possible to have the correct tightening
of the wheel stud bolts checked.
"Fix&Go Automatic"
kit
124) 125) 126) 127) 128) 129) 130) 131)
64)3)
DESCRIPTION
The "Fix&Go Automatic" kit is located in
the luggage compartment, inside a
dedicated container. Inside the
container there are also a screwdriver,
the tow ring and the funnel for
refuelling, in the event of an emergency.
To access the kit, open the tailgate,
remove the load platform and lift the
carpet.
LPG versions: a tool box secured to
the luggage compartment carpet with
dedicated fastenings contains the kit.
The kit includes:
❒a bottle A fig. 115 containing sealing
fluid and fitted with: filling tube B and
adhesive label C with the wording
“max. 80 km/h” to be placed in a
clearly visible position (e.g. on
the dashboard) after repairing the tyre;
❒a compressor D including a pressure
gauge and connections, found in the
compartment;
113
Page 133 of 240
146)Whilst towing, remember that the
assistance of the brake servo and the
electric power steering is not available,
therefore greater force needs to be exerted
on the brake pedal and more effort is
required on the steering wheel. Do not use
flexible cables when towing and avoid
jerky movements. Make sure not to
damage parts in contact with the car while
towing. When towing the car, you must
comply with all specific traffic regulations,
both in terms of the towing device and
behaviour on the road. Do not start the
engine while being towed.
131
147)The front and rear tow hooks should
be used only for emergencies on the road.
The car may be towed for short distances
when a dedicated device is used in
compliance with the Highway Code (rigid
bar), and in order to move the vehicle
on the road in preparation for towing or
transport via a tow truck (on the Trekking
versions do NOT use the rear tow hook for
transport on a tow truck: use the front
tow hook). Tow hooks MUST NOT be used
to tow vehicles off the road or where there
are obstacles and/or for towing operations
using ropes or other non-rigid devices.
Respecting the above conditions, towing
must take place with two vehicles (one
towing, the other towed) aligned as much
as possible along the same centre line.WARNING
144)Before starting towing operations,
turn the ignition key to MAR and then
to STOP, without extracting it. The steering
column will automatically lock when the
key is removed, making it impossible
to turn the wheels.
145)Before tightening the ring, clean the
threaded housing thoroughly. Make sure
that the tow ring is fully fastened in the
housing before towing the vehicle.
Page 153 of 240
ENGINE OIL
150)70) 71)4)
Check that the oil level is between the
MIN and MAX references on the
dipstick A. If the oil level is near or even
under the MIN mark, add oil using the
filler B to reach the MAX mark. Take out
the engine oil dipstick A, clean it with
a lint-free cloth and reinsert it. Extract
the engine oil dipstick again and check
that the level is between the MIN and
MAX marks on the dipstick. On 0.9
TwinAir Turbo 105 HP versions,
unscrew the cap, clean the dipstick
with a lint-free cloth, reinsert the
dipstick and screw the cap back on.
Unscrew the cap again and check that
the engine oil level is between the
MIN and MAX marks on the dipstick.
Engine oil consumption: the
maximum engine oil consumption is
usually 400 grams every 1000 km.
During the initial period of use the
engine oil consumption conditions
should be considered as having
stabilised after the first 5000 - 6000 k m .
ENGINE COOLANT
151)72)If the level is too low, unscrew the cap
of reservoir C and add the fluid
described in the "Technical
Specifications" chapter.
WINDSCREEN/REAR
WINDOW WASHER FLUID
152) 153)
If the level is too low, lift reservoir cap D
and add the fluid described in the
"Technical Specifications" chapter.
IMPORTANT The headlight washer
system will not operate when the fluid
level is low, even though the
windscreen/rear window washer
continues to operate. On some
versions there is a reference notch on
the dipstick: ONLY the windscreen/rear
window washer operates with the
level below this reference.
BRAKE FLUID
154) 155)73)
Check that the fluid is at the max. level.
If the fluid level in the reservoir is too
low, undo reservoir cap E and add the
fluid described in the "Technical
Specifications" chapter.
DUALOGIC GEARBOX
CONTROL OIL
5)The gearbox control oil level should only
be checked at a Fiat Dealership.
BATTERY
156) 157) 158) 159)6)
The battery does not require the
electrolyte to be topped up with distilled
water. A periodic check carried out at
a Fiat Dealership is, however, necessary
to check efficiency.
IMPORTANT After the battery is
disconnected, the steering must be
initialised. The
warning light on the
instrument panel switches on to
indicate this. To carry out this
procedure turn the steering wheel all
the way from one end to the other
or drive in a straight line for about a
hundred metres.
IMPORTANT If the charge level remains
under 50% for a long time, the battery
is damaged by sulphation, reducing
its capacity and efficiency at start-up.
151