2016 FIAT 500L LIVING warning
[x] Cancel search: warningPage 116 of 240
❒instruction booklet to be used for
prompt and correct use of the kit and
then to be handed to the personnel
charged with handling the treated tyre;
❒a pair of protective gloves located
in the side compartment of the
compressor;
❒adapters for inflating different
elements.
IMPORTANT The sealing fluid is
effective with external temperatures of
between –20°C and +50°C. The sealing
fluid has an expiry date.
INFLATION PROCEDURE
Proceed as follows:
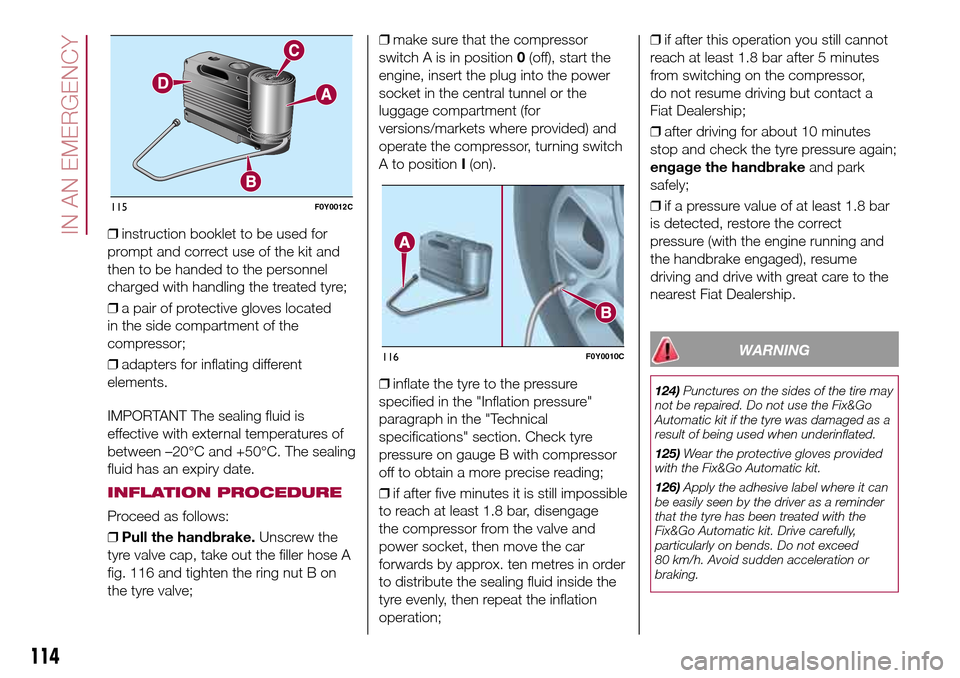
❒Pull the handbrake.Unscrew the
tyre valve cap, take out the filler hose A
fig. 116 and tighten the ring nut B on
the tyre valve;❒make sure that the compressor
switch A is in position0(off), start the
engine, insert the plug into the power
socket in the central tunnel or the
luggage compartment (for
versions/markets where provided) and
operate the compressor, turning switch
A to positionI(on).
❒inflate the tyre to the pressure
specified in the "Inflation pressure"
paragraph in the "Technical
specifications" section. Check tyre
pressure on gauge B with compressor
off to obtain a more precise reading;
❒if after five minutes it is still impossible
to reach at least 1.8 bar, disengage
the compressor from the valve and
power socket, then move the car
forwards by approx. ten metres in order
to distribute the sealing fluid inside the
tyre evenly, then repeat the inflation
operation;❒if after this operation you still cannot
reach at least 1.8 bar after 5 minutes
from switching on the compressor,
do not resume driving but contact a
Fiat Dealership;
❒after driving for about 10 minutes
stop and check the tyre pressure again;
engage the handbrakeand park
safely;
❒if a pressure value of at least 1.8 bar
is detected, restore the correct
pressure (with the engine running and
the handbrake engaged), resume
driving and drive with great care to the
nearest Fiat Dealership.
WARNING
124)Punctures on the sides of the tire may
not be repaired. Do not use the Fix&Go
Automatic kit if the tyre was damaged as a
result of being used when underinflated.
125)Wear the protective gloves provided
with the Fix&Go Automatic kit.
126)Apply the adhesive label where it can
be easily seen by the driver as a reminder
that the tyre has been treated with the
Fix&Go Automatic kit. Drive carefully,
particularly on bends. Do not exceed
80 km/h. Avoid sudden acceleration or
braking.
115F0Y0012C
116F0Y0010C
114
IN AN EMERGENCY
Page 117 of 240
127)If the pressure has fallen below 1.8
bar, do not drive any further: the Fix&Go
Automatic kit cannot guarantee proper
hold because the tyre is too damaged.
Contact a Fiat Dealership.
128)You must always indicate that the tyre
was repaired using the Fix&Go Automatic
kit. Give the booklet to the technicians who
will be handling the tyre that was treated
using the Fix&Go Automatic kit.
129)Repairs are not possible in the case of
damage to the wheel rim (bad groove
distortion causing air loss). Do not remove
foreign bodies (screws or nails) from the
tyre.
130)Never operate the compressor for
longer than 20 consecutive minutes. Risk
of overheating. The Fix&Go Automatic kit is
not suitable for definitive repairs, so the
repaired tyres may only be used
temporarily.
131)The information required by current
regulations, regarding the chemical
substances for the protection of human
health and the environment and on the safe
use of the sealing fluid, are on the
packaging label. Compliance with the
indications on the label is an essential
condition to ensure the safety and
the effectiveness of the product.
Remember to carefully read the label
before use; the user of the product
is responsible for any damages caused by
improper use. The sealing fluid has an
expiry date. Replace the bottle if the
sealant has expired.
WARNING
64)In the event of a puncture caused by
foreign bodies, the kit may be used to
repair tyres showing damage on the tread
or shoulder up to max. 4 mm diameter.
WARNING
3)Dispose of the bottle and the sealant
properly. Dispose of the components
in compliance with national and local
regulations.
REPLACING A BULB
132) 133)65) 66)
GENERAL
INSTRUCTIONS
❒Before changing a bulb check the
contacts for oxidation;
❒burnt bulbs must be replaced by
others of the same type and power;
❒after replacing a headlight bulb,
always check the correct alignment of
the light beam;
❒when a light is not working, check
that the corresponding fuse is intact
before changing a bulb. For the location
of fuses, refer to the paragraph “If a
fuse blows” in this section;
115
Page 124 of 240

WARNING
132)Changes or repairs to the electrical
system carried out incorrectly and without
due consideration for the technical
specifications of the system may lead to
malfunctioning and generate a fire hazard.
133)Halogen bulbs contain pressurised
gas. If they break, glass fragments could fly
everywhere.
WARNING
65)Halogen bulbs must be handled by
holding the metallic part only. Touching the
transparent part of the bulb with your
fingers may reduce the intensity of the
emitted light and even reduce the lifespan
of the bulb. In the event of accidental
contact, wipe the bulb with a cloth
moistened with alcohol and leave it to dry.
66)Where possible, it is advisable to
have bulbs changed at a Fiat Dealership.
Proper operation and direction of the
external lights are essential for driving in
safety and comply with law.
REPLACING FUSES
134) 135) 136) 137) 138) 139)67)
FUSE LOCATION
Fuses are grouped together in three
fuse boxes located in the engine
compartment, under the dashboard
and inside the luggage compartment.
ENGINE COMPARTMENT
FUSE BOX
To reach the fuses, undo the two
screws A fig. 138 and remove the cover
B as shown by the arrow.
IMPORTANT Before removing cover B
fig. 138 press and turn the two bayonet
screws A slowly anticlockwise (using
the flat tip screwdriver provided) until
unlocking them. This is shown by
the screw heads lifting.
136F0Y0030C
137F0Y0031C
138F0Y0071C
122
IN AN EMERGENCY
Page 129 of 240

FUSES LOCATED IN THE LUGGAGE COMPARTMENT FUSE BOXfig. 141
DEVICESFUSE AMPERE
Front seat electric lumbar regulator F1 15
Front seat electrical heater F2 15
Hi-Fi systemF3 20
Electric sun roof blindF5 20
Electric sun roofF6 20
WARNING
134)If the replaced fuse blows again, contact a Fiat Dealership.
135)Never replace a fuse with metal wires or other material.
136)Never replace a fuse with another with a higher amp rating; DANGER OF FIRE.
137)If a general protection fuse (MEGA-FUSE, MIDI-FUSE, MAXI-FUSE) blows, contact a Fiat Dealership.
138)Before replacing a fuse, make sure that the ignition key has been removed and that all the other devices are switched off and/or
deactivated.
139)If a general protection fuse for the safety systems (airbag system, braking system), power unit systems (engine system, gearbox system)
or driving system blows, contact a Fiat Dealership.
WARNING
67)If it is necessary to wash the engine compartment, take care not to directly hit the fuse box and the window wiper motors with the water
jet.
127
Page 131 of 240
If it is often necessary to perform a
jump starting, have the vehicle battery
and the recharging system checked
by a Fiat Dealership.
IMPORTANT Any accessories (e.g.
mobile phones, etc.) connected to the
vehicle power sockets draw current
even if they are not used. These
devices, if left connected too much time
with engine off, may cause the battery
to drain with following reduction of
its life and/or failure to start the engine.
WARNING
140)Do not get too close to the radiator
cooling fan: the electric fan may start;
danger of injury. Scarves, ties and other
loose clothing may be pulled by moving
parts.
141)Remove any metal objects (e.g. rings,
watches, bracelets), that might cause an
accidental electrical contact and cause
serious injury.
142)Batteries contain acid which may burn
skin and eyes. Batteries produce
hydrogen, which is easily flammable and
explosive. Thus keep away flames or
devices which may cause sparks.
WARNING
68)Do not connect the cable to the
negative terminal (–) of the flat battery. The
following spark could lead to battery
explosion and cause serious harm. Only
use the specific earth point; do not use any
other exposed metallic part.
FUEL CUT-OFF
SYSTEM
143)This intervenes in the event of an
impact causing:
❒the interruption of the fuel supply with
the engine consequently cutting out
❒the automatic unlocking of the doors
❒the automatic switching on of the
interior lights
❒the switching on of the hazard
warning lights.
On some versions, the intervention of
the system is indicated by a message
shown on the display.
IMPORTANT Carefully check the car for
fuel leaks, for instance in the engine
compartment, under the car or near the
tank area. After a collision, turn the
ignition key to STOP to prevent the
battery from running down.
To restore the correct operation of the
car, proceed as follows:
❒turn the ignition key to the MAR
position;
❒activate the right direction indicator
and then stop it;
❒activate the left direction indicator
and then stop it;
❒activate the right direction indicator
and then stop it;
129
Page 132 of 240
❒activate the left direction indicator
and then stop it;
❒turn the ignition key to the STOP
position and then to MAR.
LPG versions: in the event of an
impact, petrol supply is immediately
cut-off, the LPG safety valves are
closed and the injection is interrupted,
switching off the engine.
Natural Power versions: in the event
of an impact, the power supply is
immediately cut off, causing engine
switching off.
WARNING
143)If, after an impact, you smell fuel or
notice leaks from the fuel system, do
not reactivate the system to avoid the risk
of fire.
TOWING THE
VEHICLE
ATTACHING THE TOW
RING
144) 145) 146) 147)The tow hook, which is supplied with
the car, is housed in the tool box, under
the mat in the luggage compartment.
Front
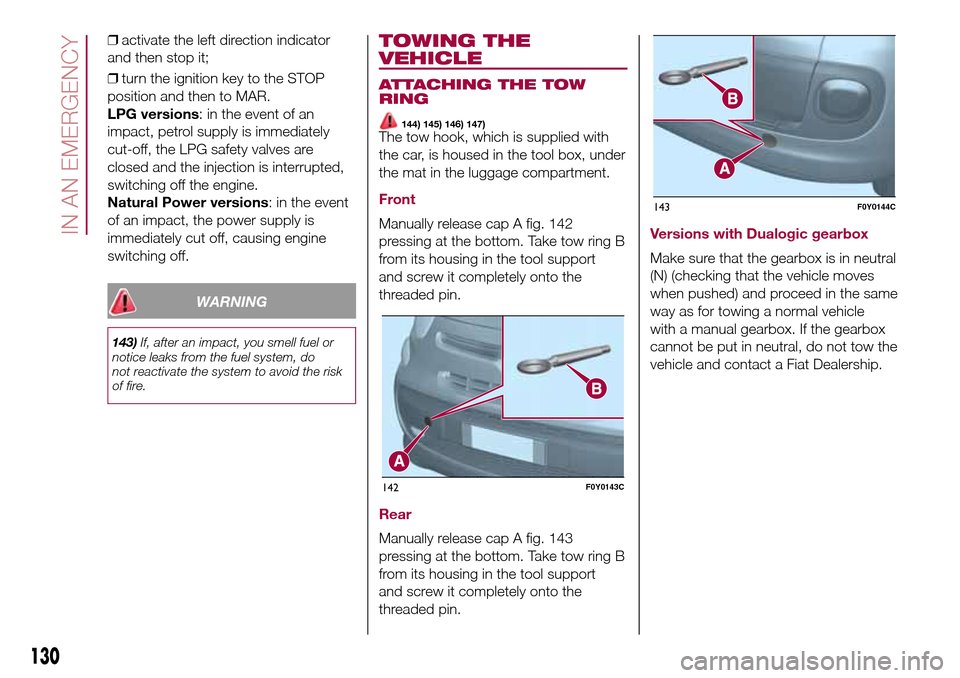
Manually release cap A fig. 142
pressing at the bottom. Take tow ring B
from its housing in the tool support
and screw it completely onto the
threaded pin.
Rear
Manually release cap A fig. 143
pressing at the bottom. Take tow ring B
from its housing in the tool support
and screw it completely onto the
threaded pin.
Versions with Dualogic gearbox
Make sure that the gearbox is in neutral
(N) (checking that the vehicle moves
when pushed) and proceed in the same
way as for towing a normal vehicle
with a manual gearbox. If the gearbox
cannot be put in neutral, do not tow the
vehicle and contact a Fiat Dealership.
142F0Y0143C
143F0Y0144C
130
IN AN EMERGENCY
Page 133 of 240
146)Whilst towing, remember that the
assistance of the brake servo and the
electric power steering is not available,
therefore greater force needs to be exerted
on the brake pedal and more effort is
required on the steering wheel. Do not use
flexible cables when towing and avoid
jerky movements. Make sure not to
damage parts in contact with the car while
towing. When towing the car, you must
comply with all specific traffic regulations,
both in terms of the towing device and
behaviour on the road. Do not start the
engine while being towed.
131
147)The front and rear tow hooks should
be used only for emergencies on the road.
The car may be towed for short distances
when a dedicated device is used in
compliance with the Highway Code (rigid
bar), and in order to move the vehicle
on the road in preparation for towing or
transport via a tow truck (on the Trekking
versions do NOT use the rear tow hook for
transport on a tow truck: use the front
tow hook). Tow hooks MUST NOT be used
to tow vehicles off the road or where there
are obstacles and/or for towing operations
using ropes or other non-rigid devices.
Respecting the above conditions, towing
must take place with two vehicles (one
towing, the other towed) aligned as much
as possible along the same centre line.WARNING
144)Before starting towing operations,
turn the ignition key to MAR and then
to STOP, without extracting it. The steering
column will automatically lock when the
key is removed, making it impossible
to turn the wheels.
145)Before tightening the ring, clean the
threaded housing thoroughly. Make sure
that the tow ring is fully fastened in the
housing before towing the vehicle.
Page 135 of 240
SCHEDULED
SERVICING
Correct servicing is crucial for
guaranteeing a long life for the vehicle
under the best conditions. For this
reason, Fiat has planned a series of
checks and services at fixed distance
intervals and, where provided, at fixed
time intervals, as described in the
Scheduled Servicing Plan.
Before each service, it is always
necessary to carefully follow the
instructions in the Scheduled Servicing
Plan (e.g. periodically check level of
fluids, tyre pressure, etc.).
Scheduled Servicing is offered by all
Fiat Dealerships according to a set time
schedule. If, during each operation, in
addition to the ones scheduled, the
need arises for further replacements or
repairs, these may be carried out with
the owner's explicit agreement only.
If your vehicle is used frequently for
towing, the interval between one
service operation and the next should
be reduced.IMPORTANT Scheduled Servicing
interventions are set out by the
Manufacturer. Failure to have them
carried out may invalidate the warranty.
It is advisable to inform a Fiat
Dealership of any small operating
irregularities without waiting for the next
service.
PERIODIC CHECKS
Every1,000km or before long
journeys, check and if necessary, top
up: engine coolant level; brake fluid
level; screen washer fluid level; tyre
inflation pressure and condition; lighting
system operation (headlights, direction
indicators, hazard warning lights, etc.);
screen washer/wiper system operation
and positioning/wear of windscreen/
rear window wiper blades.
Every3,000km, check and top up if
required: engine oil level.
HEAVY-DUTY USE OF THE
VEHICLE
If the vehicle is used under one of the
following conditions:
❒towing a trailer or caravan;
❒dusty roads;
❒short, repeated journeys (less than
7-8 km) at sub-zero outside
temperatures;❒engine often idling or driving long
distances at low speeds or long periods
of inactivity;
the following checks must be carried
out more often than indicated in the
Scheduled Servicing Plan:
❒check front disc brake pad condition
and wear;
❒check cleanliness of bonnet and
luggage compartment locks,
cleanliness and lubrication of linkage;
❒visually inspect conditions of: engine,
gearbox, transmission, pipes and
hoses (exhaust/fuel system/brakes) and
rubber elements (gaiters/sleeves/
bushes, etc.);
❒check battery charge and battery
fluid level (electrolyte);
❒visually inspect conditions of the
accessory drive belts;
❒check and, if necessary, change
engine oil and replace oil filter;
❒check and, if necessary, replace
pollen filter;
❒check and, if necessary, replace air
cleaner.
133