2016 FIAT 500E steering
[x] Cancel search: steeringPage 103 of 132

In order to move your vehicle to the side of the road the transmission must be in NEU-
TRAL and the 12 Volt system must be functional.To place the transmission into NEU-
TRAL you must turn the ignition OFF and then back to the RUN position (cycle the igni-
tion) then push the NEUTRAL button.
NOTE:
The high voltage battery will remain disabled after an Enhanced Accident Response Event
and must be reset by your authorized dealership.
FREEING A STUCK VEHICLE
If your vehicle becomes stuck in mud, sand or snow, it can often be moved using a rock-
ing motion.Turn the steering wheel right and left to clear the area around the front
wheels.Then shift back and forth between DRIVE and REVERSE while gently pushing the
accelerator.Use the least amount of accelerator pedal pressure that will maintain the
rocking motion, without spinning the wheels.
NOTE:
Push the “ESC Off ” switch, to place the Electronic Stability Control (ESC) system in “Par-
tial Off ” mode, before rocking the vehicle.Refer to “Electronic Brake Control” in “Start-
ing And Operating” on the DVD for further information.Once the vehicle has been
freed, push the “ESC Off ” switch again to restore “ESC On” mode.
CAUTION!
•When “rocking” a stuck vehicle by shifting between DRIVE and REVERSE, do not
spin the wheels faster than 15 mph (24 km/h), or drivetrain damage may result.
•Spinning the wheels too fast may lead to transmission overheating and failure.It
can also damage the tires.Do not spin the wheels above 30 mph (48 km/h) while
in gear.
WARNING!
Fast spinning tires can be dangerous.Forces generated by excessive wheel speeds may
cause damage, or even failure, of the axle and tires.A tire could explode and injure
someone.Do not spin your vehicle's wheels faster than 30 mph (48 km/h) or for lon-
ger than 30 seconds continuously without stopping when you are stuck and do not let
anyone near a spinning wheel, no matter what the speed.
WHAT TO DO IN EMERGENCIES
101
Page 112 of 132

FUSES
WARNING!
•When replacing a blown fuse, always use an appropriate replacement fuse with
the same amp rating as the original fuse.Never replace a fuse with another fuse
of higher amp rating.Never replace a blown fuse with metal wires or any other
material.Failure to use proper fuses may result in serious personal injury, fire
and/or property damage.
•Before replacing a fuse, make sure that the ignition is off and that all the other
services are switched off and/or disengaged.
•If the replaced fuse blows again, contact an authorized dealer.
•If a general protection fuse for safety systems (air bag system, braking system),
power unit systems (engine system, gearbox system) or steering system blows,
contact an authorized dealer.
Interior Fuses
The interior fuse panel is part of the Body Control Module (BCM) and is located on the
driver's side under the instrument panel.
CavityVehicle Fuse
NumberMini Fuse Description
1 F12 7.5 Amp Brown Right Low Beam
2 F32 5 Amp TanFront and Rear Ceiling Lights
Trunk and Door Courtesy Lights
3 F53 5 Amp Tan Instrument Panel Node
4 F38 20 Amp Yellow Central Door Locking
5 F36 10 Amp RedDiagnostic Socket, Climate Con-
trol System, Tire Pressure Moni-
tor, TCU
6 F43 20 Amp Yellow Bi-Directional Washer
7 F48 20 Amp Yellow Passenger Power Window
8 F13 7.5 Amp Brown Left Low Beam
9 F50 7.5 Amp Brown Airbag
10 F51 5 Amp TanClimate Control System, Stop
Light, Exterior Mirrors, Sunroof
Switch
11 F37 5 Amp TanStop Light Switch, Instrument
Panel Node
12 F49 5 Amp TanExterior Mirror, Electric Mirror,
Parking Sensor, Sunroof Switch
MAINTAINING YOUR VEHICLE
110
Page 113 of 132

CavityVehicle Fuse
NumberMini Fuse Description
13 F31 5 Amp TanIgnition, Climate Control, RDU
and EVCU
14 F47 20 Amp Yellow Driver Power Window
The fuse for the heated mirrors is located behind an access panel on the front of the
Instrument Panel.
NOTE:
This fuse is a single fuse attached directly to the wire harness.
Cavity Mini Fuse Description
F90 5 Amp Tan Heated Mirrors
Power Distribution Center #1
The Power Distribution Center #1 is located on the right side of the underhood com-
partment.To access the fuses, remove locking screw and slide cover off.
The ID number of the electrical component corresponding to each fuse can be found on
thebackofthecover.
Cavity Maxi Fuse Mini Fuse Description
F01 60 Amp Blue – Body Control Module (BCM)
F02 20 Amp Yellow – Audio Amplifier
F03 20 Amp Yellow – Ignition Switch
F04 40 Amp Orange – Brake System Module Pump
F05 70 Amp Tan – Electric Power Steering (EPS)
F06 60 Amp Blue – Radiator Fan
F07 40 Amp Orange – Regen Brake Module
F08 40 Amp Orange – HVAC
F09 – 5 Amp TanAir Electric Heater
Charge Indicator
F10 – 10 Amp Red Horn
F11 – 10 Amp RedElectronic Vehicle Control Unit
(EVCU)
F14 – 5 Amp Tan High Beam (Shutter)
F15 – 15 Amp BlueCigar Lighter, AUX Power Out-
let
F16 – 10 Amp RedHumidity Sensor
VPAM
AC Compressor
F18 – 5 Amp TanElectronic Vehicle Control Unit
(EVCU)
F19 – 10 Amp Red HVAC
MAINTAINING YOUR VEHICLE
111
Page 115 of 132

TIRES — GENERAL INFORMATION
Tire Pressures
•Check the inflation pressure of each tire, including the spare tire, at least monthly and
inflate to the recommended pressure for your vehicle.
•The tire pressures recommended for your vehicle are found on the “Tire and Loading
Information” label located on the driver’s side door opening.
NOTE:
Refer to the Owner's Manual on the DVD
for more information regarding tire warn-
ings and instructions.
WARNING!
•Overloading of your tires is dangerous.Overloading can cause tire failure, affect
vehicle handling, and increase your stopping distance.Use tires of the recom-
mended load capacity for your vehicle.Never overload them.
•Improperly inflated tires are dangerous and can cause collisions.Under-inflation is
the leading cause of tire failure and may result in severe cracking, component sepa-
ration, or “blow out”.Over-inflation reduces a tire’s ability to cushion shock.Ob-
jects on the road and chuck holes can cause damage that results in tire failure.
Unequal tire pressures can cause steering problems.You could lose control of your
vehicle.Over-inflated or under-inflated tires can affect vehicle handling and can fail
suddenly, resulting in loss of vehicle control.
Spare Tires — If Equipped
NOTE:
For vehicles equipped with Tire Service Kit instead of a spare tire, please refer to “Tire
Service Kit” in “What To Do In Emergencies” on your DVD for further information.
Tire And Loading Information Label
MAINTAINING YOUR VEHICLE
113
Page 118 of 132

Wheel And Wheel Trim Care
All wheels and wheel trim, especially aluminum and chrome plated wheels, should be
cleaned regularly with a mild soap and water to prevent corrosion.
To remove heavy soil and/or excessive brake dust, use MOPAR Wheel Cleaner or equiva-
lent or select a non-abrasive, non-acidic cleaner.
CAUTION!
Do not use scouring pads, steel wool, a bristle brush, or metal polishes.Do not use
oven cleaner.These products may damage the wheel's protective finish.Avoid automatic
car washes that use acidic solutions or harsh brushes that may damage the wheel's pro-
tective finish.Only MOPAR Wheel Cleaner or equivalent is recommended.
TIRE ROTATION RECOMMENDATIONS
NOTE:
The front and rear wheels are different sizes and cannot be used in place of each other.
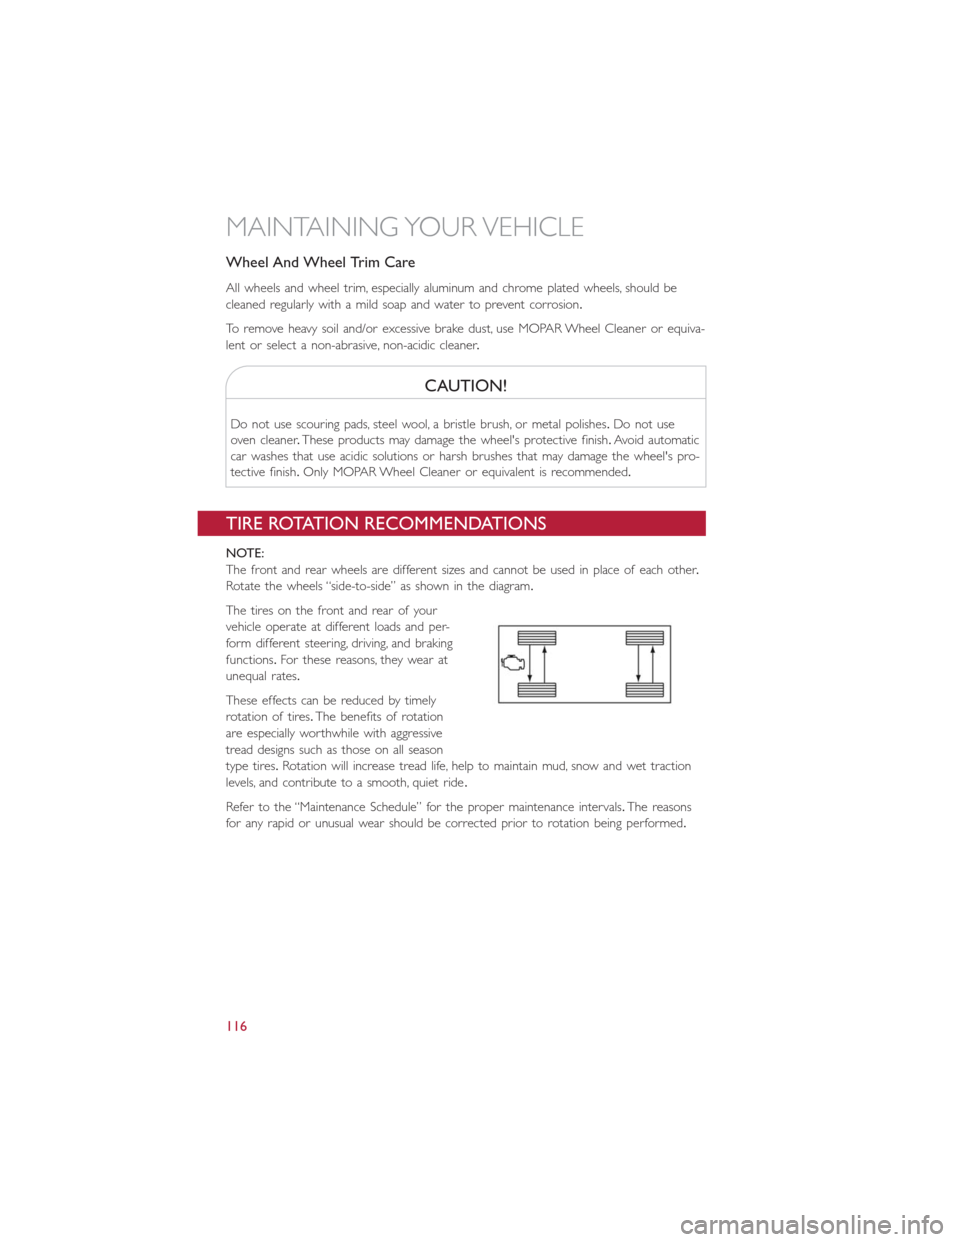
Rotate the wheels “side-to-side” as shown in the diagram.
The tires on the front and rear of your
vehicle operate at different loads and per-
form different steering, driving, and braking
functions.For these reasons, they wear at
unequal rates.
These effects can be reduced by timely
rotation of tires.The benefits of rotation
are especially worthwhile with aggressive
tread designs such as those on all season
type tires.Rotation will increase tread life, help to maintain mud, snow and wet traction
levels, and contribute to a smooth, quiet ride.
Refer to the “Maintenance Schedule” for the proper maintenance intervals.The reasons
for any rapid or unusual wear should be corrected prior to rotation being performed.
MAINTAINING YOUR VEHICLE
116
Page 124 of 132

Extending Driving Range..........39
FAQ....................120
Flashers
Turn Signal...............88
Fluids, Lubricants And Genuine Parts...106
Fog Lights................42, 88
Freeing A Stuck Vehicle...........101
Fuses....................110
General Maintenance............107
Glass Cleaning...............107
Hands-Free Phone (Uconnect).......68
Headlights..................40
Cleaning................107
Passing.................40
Switch..................40
Heated Mirrors...............49
Heated Seats................36
High Beam Indicator.............88
High Voltage Battery.............16
Hood Release...............103
Identifying Your Radio............55
Installing A Child Restraint With ALR....29
Installing Child Restraints Using The LATCH
Lower Anchorages............29
Instrument Cluster
Indicators.................8
Instrument Cluster Warning Lights.....83
Instrument Panel Cover..........107
Instrument Panel Lens Cleaning......107
Interior And Instrument Lights.......6, 7
Interior Appearance Care.........107
Interior Lighting...............41
iPod/USB/MP3 Control
Bluetooth Streaming Audio.......68
Key Fo b...................20
Disarm The Alarm............21
Lane Change Assist
.............41
Lap/Shoulder Belts..............22
LATCH (Lower Anchors And Tether For
CHildren)...............28, 30
Level 1 Charging...............13
Level 2 Charging...............13Liftgate....................20
Light Bulbs.................117
Lights....................40
Air Bag.................26
Fog...................88
High Beam...............40
High Beam Indicator..........88
Park...................40
Passing.................40
Seat Belt Reminder...........84
Security Alarm.............88
Turn Signal...............41
Locks
Key s...................20
Liftgate, Tailgate.............20
Lower Anchors And Tether For CHildren
(LATCH).................28
Lubrication, Body..............107
Maintenance Free Battery.........107
Maintenance, General...........107
Maintenance Procedures..........107
Maintenance Record............109
Maintenance Schedule...........107
Master Cylinder (Brakes)..........107
Mirrors
Heated.................49
MOPAR Accessories............119
Multi-Function Control Lever........40
Outlet
Power..................80
Paint Care.................107
Passing Light
.................40
Phone, Hands-Free (Uconnect).......68
Phone (Pairing)...............69
Phone (Uconnect)..............68
Placard, Tire And Loading Information...113
Power
Door Locks...............21
Outlet (Auxiliary Electrical Outlet)...80
Steering.................84
Sunroof.................50
Programmable Electronic Features.....78
Radio
Presets..................58
INDEX
122
Page 125 of 132

Radio Operation...............58
Radio (Sound Systems)...........58
Recreational Towing.............82
Refrigerant.................107
Remote Keyless Entry (RKE)
Disarm The Alarm............21
Replacement Bulbs.............117
Reporting Safety Defects..........118
Rotation, Tires...............116
Schedule, Maintenance...........107
Seat Belt
Engage The Automatic Locking
Mode..................29
Seat Belt Pretensioner.........22
Seat Belt Maintenance...........107
Seat Belts..................22
Adjustable Shoulder Belt........22
Pretensioners..............22
Reminder................84
Seats.....................33
Adjustment...............33
Heated.................36
Security Alarm................88
Disarm The System...........21
Security Alarm..............21
Selection Of Coolant (Antifreeze).....106
Signals, Turn...............41, 88
Spare Tire............113, 114, 115
Speed Control
Accel/Decel...............46
Resume.................45
Speed Control (Cruise Control)......44
Steering
Tilt Column...............38
Wheel, Tilt...............38
Steering Wheel Audio Controls.......77
Stuck, Freeing................101
Sun Roof
...................50
Supplemental Restraint System - Air Bag..23Text Messaging............59, 73, 75
Tilt Steering Column............38
Tires..................113, 114
Air Pressure..............113
Compact Spare............114
General Information.......113, 114
Pressure Warning Light.........86
Rotation................116
Spare Tire..........113, 114, 115
Tire Service Kit........89, 90, 92, 94, 95
Towing....................82
Disabled Vehicle............100
Recreational...............82
Towing Vehicle Behind A Motorhome....82
Trailer Towing................82
Transmission
Fluid..................106
Turn Signals...............41, 88
Uconnect 5.0..............56, 58
Uconnect (Hands-Free Phone)
Making A Phone Call..........68
Receiving A Call.............68
Uconnect Phone...........68, 72, 73
Uconnect Voice Command.....61, 72, 73
USB Port..................60
Vehicle Security Alarm Disarming......21
Voice Command.............61, 72
Voice Recognition System (VR).....61, 72
Washer
Adding Fluid..............107
Rear...................43
Washing Vehicle..............107
Wheel And Wheel Trim..........107
Wheel And Wheel Trim Care
.....107, 116
Wind Buffeting...............51
Windshield Wiper Blades.........107
Wiper Blade Replacement.........107
Wiper, Rear.................43
INDEX
123