2016 FIAT 500E air
[x] Cancel search: airPage 33 of 132

3.Attach the tether strap hook of the child restraint to the top tether anchorage and
remove slack in the tether strap according to the child restraint manufacturer’s instruc-
tions.
WARNING!
•In a collision, an unrestrained child, even a tiny baby, can become a projectile inside
the vehicle.The force required to hold even an infant on your lap could become
so great that you could not hold the child, no matter how strong you are.The
child and others could be severely injured or killed.Any child riding in your vehicle
should be in a proper restraint for the child's size.
•Never place a rear-facing child restraint in front of an air bag.A deploying Passen-
ger Advanced Front Air Bag can cause death or serious injury to a child 12 years
or younger, including a child in a rear-facing child restraint.
•Only use a rear-facing child restraint in a vehicle with a rear seat.
•Improper installation of a child restraint to the LATCH anchorages can lead to
failure of an infant or child restraint.The child could be severely injured or killed.
Follow the manufacturer’s directions exactly when installing an infant or child re-
straint.
•An incorrectly anchored tether strap could lead to increased head motion and
possible injury to the child.Use only the anchor positions directly behind the child
seat to secure a child restraint top tether strap.
•If your vehicle is equipped with a split rear seat, make sure the tether strap does
not slip into the opening between the seatbacks as you remove slack in the strap.
HEAD RESTRAINTS
Head restraints are designed to reduce the risk of injury by restricting head movement in
the event of a rear-impact.Head restraints should be adjusted so that the top of the
head restraint is located above the top of your ear.
WARNING!
The head restraints for all occupants must be properly adjusted prior to operating the
vehicle or occupying a seat.Head restraints should never be adjusted while the vehicle
is in motion.Driving a vehicle with the head restraints improperly adjusted or removed
could cause serious injury or death in the event of a collision.
GETTING STARTED
31
Page 50 of 132

AUTOMATIC TEMPERATURE CONTROLS (ATC)
Automatic Temperature Controls
1 — Auto Button
2 — A/C Button
3—
Temperature Control Up/Down Buttons
4 — Blower Control Up/Down Buttons
5 — Mix Mode Button
6 — Front Window Defroster Button
7 — Panel Mode Button
8 — Floor Mode Button
9 — Air Recirculation Button
10 — OFF Button
OPERATING YOUR VEHICLE
48
Page 51 of 132

Automatic Operation
1.Push the AUTO button.
2.Select the desired temperature by pushing the temperature control buttons.
NOTE:
The system will maintain the set temperature automatically.
Air Recirculation
•Use recirculation for maximum A/C operation.
•For window defogging, turn the air recirculation button off.
Heated Mirrors
The mirrors are heated to melt frost or ice.This feature is activated when you turn on the
rear window defroster, which is located in the center of the instrument panel, below the radio.
REAR PARK ASSIST
If an object is detected behind the rear bumper while the vehicle is in REVERSE, a chime
will sound.The chime rate will change depending on the distance of the object, getting
faster as the object gets closer to the bumper.The chime will become continuous when
the distance between the vehicle and the obstacle is less than 12 inches (30 cm).
OPERATING YOUR VEHICLE
49
Page 56 of 132

CYBERSECURITY
Your vehicle may be a connected vehicle and may be equipped with both wired and
wireless networks.These networks allow your vehicle to send and receive information.
This information allows systems and features in your vehicle to function properly.
Your vehicle may be equipped with certain security features to reduce the risk of unau-
thorized and unlawful access to vehicle systems and wireless communications.Vehicle soft-
ware technology continues to evolve over time and FCA US LLC, working with its suppli-
ers, evaluates and takes appropriate steps as needed.Similar to a computer or other
devices, your vehicle may require software updates to improve the usability and perfor-
mance of your systems or to reduce the potential risk of unauthorized and unlawful ac-
cess to your vehicle systems.
The risk of unauthorized and unlawful access to your vehicle systems may still exist, even
if the most recent version of vehicle software (such as Uconnect software) is installed.
WARNING!
•It is not possible to know or to predict all of the possible outcomes if your vehi-
cle’s systems are breached.It may be possible that vehicle systems, including safety
related systems, could be impaired or a loss of vehicle control could occur that
may result in an accident involving serious injury or death.
•ONLY insert media (e.g., USB, SD card, or CD) into your vehicle if it came from a
trusted source.Media of unknown origin could possibly contain malicious software,
and if installed in your vehicle, it may increase the possibility for vehicle systems to
be breached.
•As always, if you experience unusual vehicle behavior, take your vehicle to your
nearest authorized dealer immediately.
NOTE:
•FCA or your dealer may contact you directly regarding software updates.
•To help further improve vehicle security and minimize the potential risk of a security
breach, vehicle owners should:
•Routinely check www.driveuconnect.com/software-update to learn about available
Uconnect software updates.
•Only connect and use trusted media devices (e.g.personal mobile phones, USBs,
CDs).
ELECTRONICS
54
Page 61 of 132

SiriusXM Premier Over 160 Channels
Get every channel available on your satellite radio, and enjoy all you want, all in one place.
Hear commercial-free music plus sports, news, talk and entertainment.Get all the pre-
mium programming, including Howard Stern, every NFL game, Oprah Radio, every MLB
and NHL game, every NASCAR race and more.And get 20+ Xtra channels, including
SiriusXM Latino, a selection of channels dedicated to Spanish language programming.
NOTE:
To access SiriusXM Satellite Radio, push the RADIO Button on the faceplate and then the
“SXM” button on the touchscreen.
SiriusXM services require subscriptions, sold separately after the 12-month trial included
with the new vehicle purchase.If you decide to continue your service at the end of your
trial subscription, the plan you choose will automatically renew and bill at then-current
rates until you call SiriusXM at 1-866-635-2349 for U.S. residents and 1-888-539-7474
for Canadian residents to cancel. See SiriusXM Customer Agreement for complete
terms at www.siriusxm.com and www.siriusxm.ca for Canadian residents.All fees and
programming subject to change.Our satellite service is available only to those at least 18
and older in the 48 contiguous USA and D.C.Our Sirius satellite service is also available
in PR (with coverage limitations).Our Internet radio service is available throughout our
satellite service area and in AK and HI.© 2015 Sirius XM Radio Inc.Sirius, XM and all
related marks and logos are trademarks of Sirius XM Radio Inc.
Voice Text Reply (Not Compatible With iPhone)
Once your Uconnect system is paired with a compatible mobile device, the system can
announce a new incoming text message, and read it to your over the vehicle audio sys-
tem.You can reply to the message using Voice Recognition by selecting, or saying, one of
the 18 pre-defined messages.
Here’s how:
1.Push the Uconnect Phone button
and wait for the beep, then say “reply.”
Uconnect will give the following prompt: “Please say the message you would like to
send.”
2.Wait for the beep and say one of the pre-defined messages.(If you are not sure, you
can say “help”).Uconnect will then read the pre-defined messages allowed.
3.As soon as you hear the message you would like to send, you can interrupt the list of
prompts by pushing the Uconnect phone button and saying the phrase.Uconnect will
confirm the message by reading it back to you.
4.Push the Phone button and say “Send.”
ELECTRONICS
59
Page 64 of 132

Get Started
1.VisitUconnectPhone.comto check mobile device and feature compatibility and to
find phone pairing instructions.
2.Reduce background noise.Wind and passenger conversations are examples of noise
that may impact recognition.
3.Speak clearly at a normal pace and volume while facing straight ahead.The micro-
phone is positioned on the rearview mirror and aimed at the driver.
4.Each time you give a Voice Command, you must first press either the VR or Phone
button, wait untilafterthe beep, then say your Voice Command.
5.You can interrupt the help message or system prompts by pressing the VR or Phone
button and saying a Voice Command from current category.
NOTE:
All you need to control your Uconnect system with your voice are the buttons on your
steering wheel.
Uconnect VR/Phone Buttons
1 — Push To Mute
2 — Push To Initiate Or To Answer A Phone Call, Send Or Receive A Text
3 — Push To End Call
4 — Push For Voice Recognition (VR)
ELECTRONICS
62
Page 68 of 132

Phone
Making and answering hands-free phone calls is easy with Uconnect.When the Phone-
book button is illuminated on your touchscreen, your system is ready.
U.S./Canadian residents can visit
•UconnectPhone.com to check mobile device and feature compatibility and to find
phone pairing instructions.
Push the Phone button
.After the beep, say one of the following commands…
•CallJohn Smith
•Dial123-456-7890 and follow the system prompts
•Redial(call previous outgoing phone number)
•Call back(call previous incoming phone number)
TIP
When providing a Voice Command, press the Phone button
and say“Call,”then
pronounce the nameexactlyas it appears in your phone book.When a contact has mul-
tiple phone numbers, you can say“CallJohn Smithwork.”
Uconnect 5.0 Phone
ELECTRONICS
66
Page 70 of 132

UCONNECT PHONE
Uconnect Phone (Bluetooth Hands Free Calling)
The Uconnect Phone feature enables you to place and receive hands-free mobile phone
calls.Drivers can also place mobile phone calls using their voice or by using the buttons
on the touchscreen (see Voice Command section).
The hands-free calling feature is made possible through Bluetooth technology — the
global standard that enables different electronic devices to connect to each other wire-
lessly.
If the Uconnect Phone Button
exists on your steering wheel, you then have the
Uconnect Phone features.
Refer to the “Uconnect 5.0 Voice Recognition Quick Tips” in “Understanding Your Instru-
ment Panel” in the Owner's Manual on the DVD for further details.
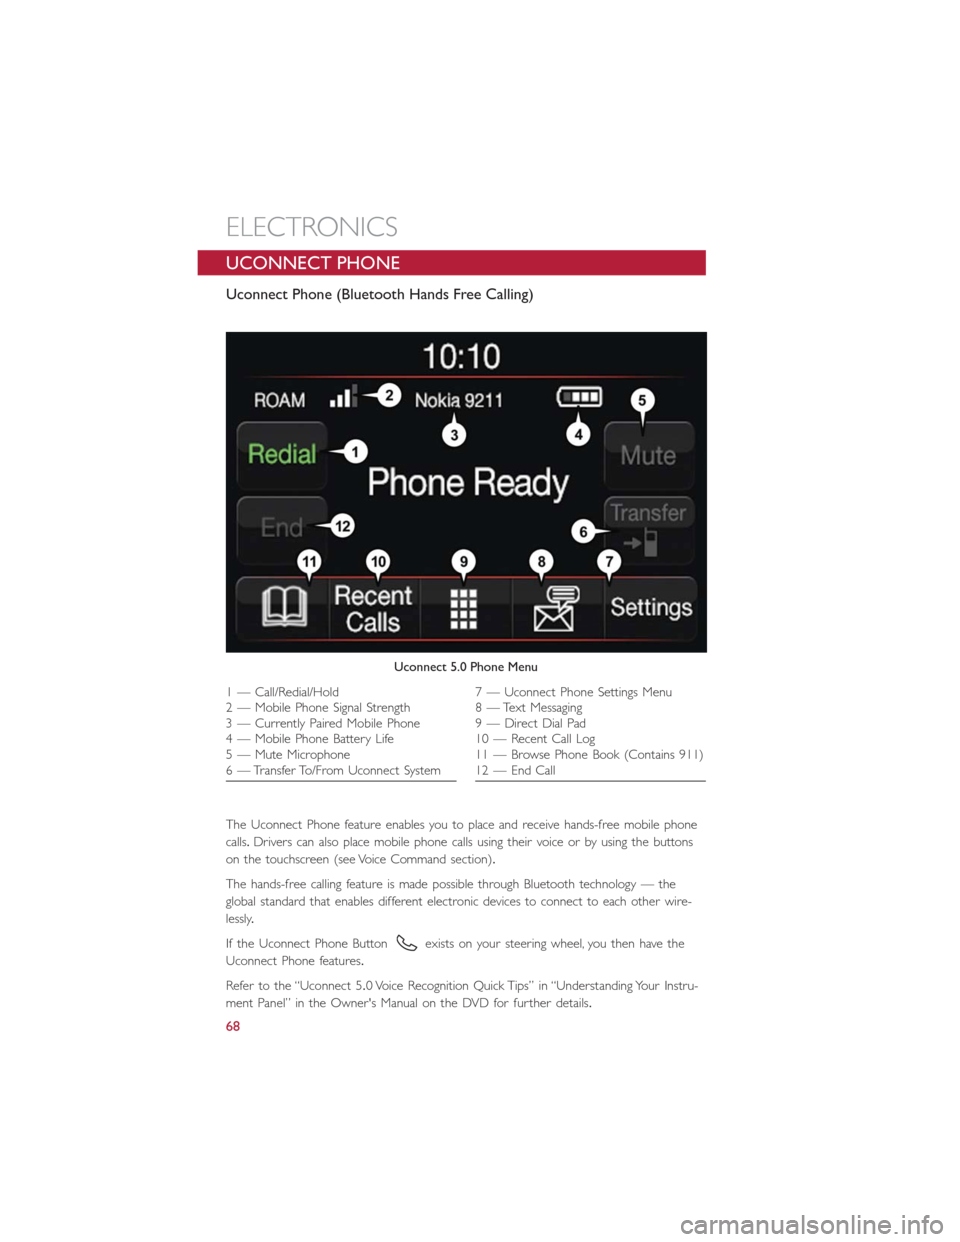
Uconnect 5.0 Phone Menu
1 — Call/Redial/Hold
2 — Mobile Phone Signal Strength
3 — Currently Paired Mobile Phone
4 — Mobile Phone Battery Life
5 — Mute Microphone
6 — Transfer To/From Uconnect System7 — Uconnect Phone Settings Menu
8 — Text Messaging
9 — Direct Dial Pad
10 — Recent Call Log
11 — Browse Phone Book (Contains 911)
12 — End Call
ELECTRONICS
68