Page 222 of 634
displayed for up to 10 seconds when the vehicle is shifted
out of REVERSE unless the forward vehicle speed ex-
ceeds 8 mph (13 km/h), the transmission is shifted into
�PARK�or the vehicle’s ignition is cycled to the OFF
position.
When the Vehicle is shifted out of Reverse (with camera
delay turned OFF) the rear camera mode is exited and the
last touchscreen appears again.
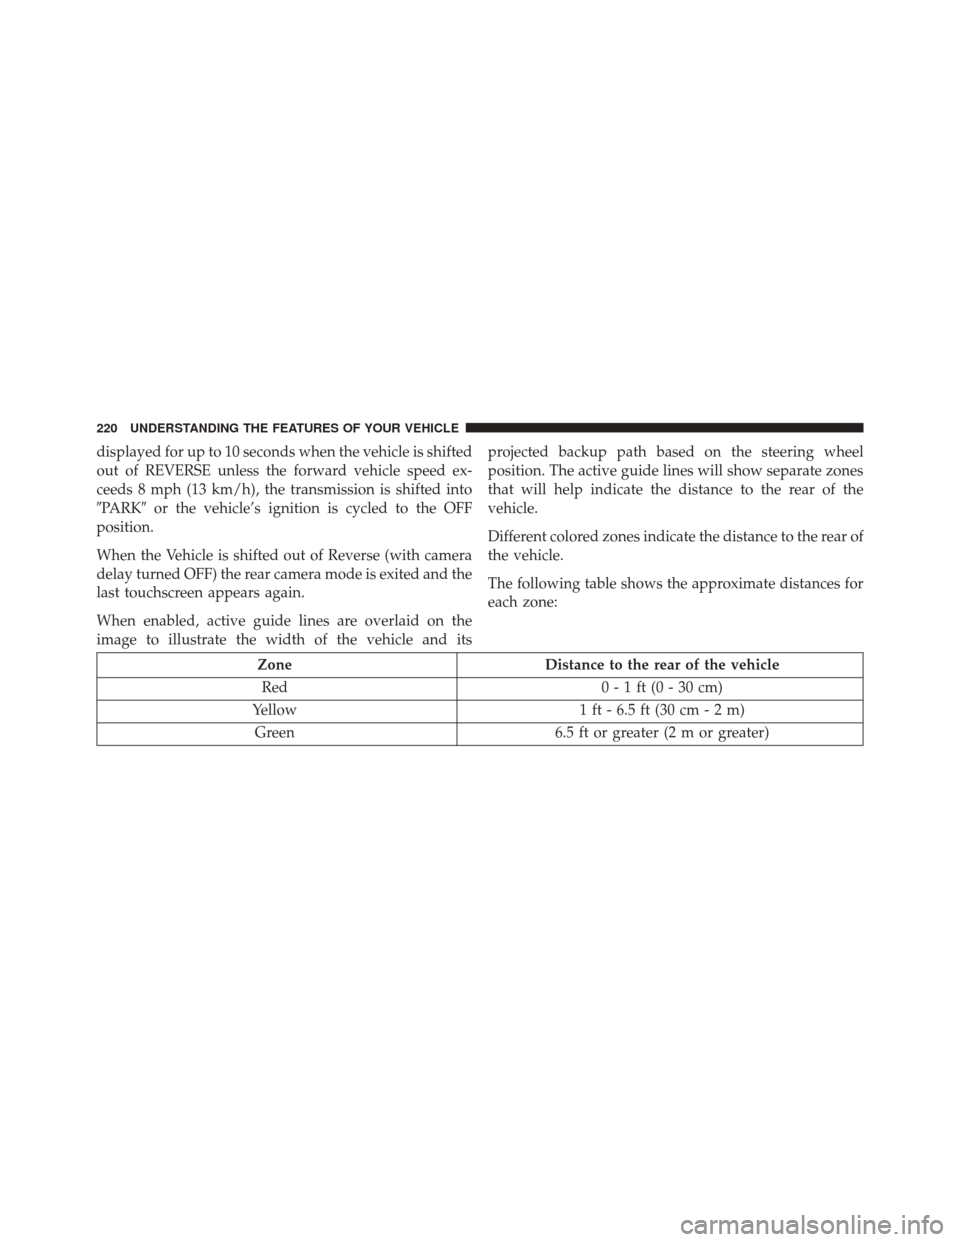
When enabled, active guide lines are overlaid on the
image to illustrate the width of the vehicle and its projected backup path based on the steering wheel
position. The active guide lines will show separate zones
that will help indicate the distance to the rear of the
vehicle.
Different colored zones indicate the distance to the rear of
the vehicle.
The following table shows the approximate distances for
each zone:
Zone
Distance to the rear of the vehicle
Red 0 - 1 ft (0 - 30 cm)
Yellow 1 ft - 6.5 ft (30 cm - 2 m)
Green 6.5 ft or greater (2 m or greater)
220 UNDERSTANDING THE FEATURES OF YOUR VEHICLE
Page 227 of 634

NOTE:HomeLink is disabled when the Vehicle Security
Alarm is active.
Before You Begin Programming HomeLink
Be sure that your vehicle is parked outside of the garage
before you begin programming. For more efficient programming and accurate transmis-
sion of the radio-frequency signal it is recommended that
a new battery be placed in the hand-held transmitter of
the device that is being programmed to the HomeLink
system.
To erase the channels place the ignition in the ON/RUN
position and push and hold the two outside HomeLink
buttons (I and III) for up 20 seconds or until the red
indicator flashes.
NOTE:
•
Erasing all channels should only be performed when
programming HomeLink for the first time. Do not
erase channels when programming additional buttons.
• If you have any problems, or require assistance, please
call toll-free 1-800-355-3515 or, on the Internet at
HomeLink.com for information or assistance.
Overhead Console HomeLink Buttons
3
UNDERSTANDING THE FEATURES OF YOUR VEHICLE 225
Page 228 of 634
Programming A Rolling Code
For programming garage door openers that were manu-
factured after 1995. These garage door openers can be
identified by the “LEARN” or “TRAIN” button located
where the hanging antenna is attached to the garage door
opener. It is NOT the button that is normally used to
open and close the door. The name and color of the
button may vary by manufacturer.1. Place the ignition in the ON/RUN position.
Training The Garage Door Opener
1 — Door Opener
2 — Training Button
226 UNDERSTANDING THE FEATURES OF YOUR VEHICLE
Page 230 of 634

To reprogram a channel that has been previously trained,
follow these steps:
1. Cycle the ignition to the ON/RUN position.
2. Push and hold the de")
Reprogramming A Single HomeLink Button
(Rolling Code)
To reprogram a channel that has been previously trained,
follow these steps:
1. Cycle the ignition to the ON/RUN position.
2. Push and hold the desired HomeLink button until theindicator light begins to flash after 20 seconds. Do not
release the button.
3. Without releasing the button proceed with “Program-
ming A Rolling Code” step 2 and follow all remaining
steps.
Programming A Non-Rolling Code
For programming Garage Door Openers manufactured
before 1995.
1. Place the ignition in the ON/RUN position. 2. Place the hand-held transmitter 1 to 3 inches (3 to
8 cm) away from the HomeLink button you wish to
program while keeping the HomeLink indicator light
in view.
3. Push and hold the Homelink button you want to program while you push and hold the hand-held
transmitter button.
4. Continue to hold both buttons and observe the indi- cator light. The Homelink indicator will flash slowly
and then rapidly after HomeLink has received the
frequency signal from the hand-held transmitter. Re-
lease both buttons after the indicator light changes
from slow to rapid.
5. Push and hold the programmed HomeLink button and observe the indicator light.
• If the indicator light stays on constantly, program-
ming is complete and the garage door/device should
activate when the HomeLink button is pushed.
228 UNDERSTANDING THE FEATURES OF YOUR VEHICLE
Page 231 of 634

To reprogram a channe")
•To program the two remaining HomeLink buttons,
repeat each step for each remaining button. DO NOT
erase the channels.
Reprogramming A Single HomeLink Button
(Non-Rolling Code)
To reprogram a channel that has been previously trained,
follow these steps:
1. Cycle the ignition to the ON/RUN position.
2. Push and hold the desired HomeLink button until the indicator light begins to flash after 20 seconds. Do not
release the button.
3. Without releasing the button proceed with “Program-
ming A Non-Rolling Code” step 2 and follow all
remaining steps.
Canadian/Gate Operator Programming
For programming transmitters in Canada/United States
that require the transmitter signals to “time-out” after
several seconds of transmission.
Canadian radio frequency laws require transmitter sig-
nals to time-out (or quit) after several seconds of trans-
mission – which may not be long enough for HomeLink
to pick up the signal during programming. Similar to this
Canadian law, some U.S. gate operators are designed to
time-out in the same manner.
It may be helpful to unplug the device during the cycling
process to prevent possible overheating of the garage
door or gate motor.
1. Cycle the ignition to the ON/RUN position.
3
UNDERSTANDING THE FEATURES OF YOUR VEHICLE 229
Page 232 of 634
 away from the HomeLink button you wish to
program while keeping the HomeLink indicator light
in view.
3. Continue to push and hold the HomeL")
2. Place the hand-held transmitter 1 to 3 inches (3 to8 cm) away from the HomeLink button you wish to
program while keeping the HomeLink indicator light
in view.
3. Continue to push and hold the HomeLink button, while you push and release (“cycle”) your hand-held
transmitter every two seconds until HomeLink has
successfully accepted the frequency signal. The indi-
cator light will flash slowly and then rapidly when
fully trained.
4. Watch for the HomeLink indicator to change flash rates. When it changes, it is programmed. It may take
up to 30 seconds or longer in rare cases. The garage
door may open and close while you are programming.
5. Push and hold the programmed HomeLink button and observe the indicator light. NOTE:
•If the indicator light stays on constantly, program-
ming is complete and the garage door/device should
activate when the HomeLink button is pushed.
• To program the two remaining HomeLink buttons,
repeat each step for each remaining button. DO NOT
erase the channels.
If you unplugged the garage door opener/device for
programming, plug it back in at this time.
Reprogramming A Single HomeLink Button
(Canadian/Gate Operator)
To reprogram a channel that has been previously trained,
follow these steps:
1. Cycle the ignition to the ON/RUN position.
230 UNDERSTANDING THE FEATURES OF YOUR VEHICLE
Page 235 of 634

POWER SUNROOF — IF EQUIPPED
The power sunroof switch is located between the sun
visors on the overhead console.
WARNING!
•Never leave children unattended in a vehicle, or with
access to an unlocked vehicle. Never leave the Key
Fob in or near the vehicle, or in a location accessible
to children. Do not leave the ignition of a vehicle
equipped with Keyless Enter-N-Go in the ACC or
ON/RUN mode. Occupants, particularly unattended
children, can become entrapped by the power sun-
roof while operating the power sunroof switch. Such
entrapment may result in serious injury or death.
• In a collision, there is a greater risk of being thrown
from a vehicle with an open sunroof. You could
also be seriously injured or killed. Always fasten
your seat belt properly and make sure all passen-
gers are also properly secured.
• Do not allow small children to operate the sunroof.
Never allow your fingers, other body parts, or any
object, to project through the sunroof opening.
Injury may result.
Power Sunroof Switch
3
UNDERSTANDING THE FEATURES OF YOUR VEHICLE 233
Page 238 of 634

Ignition Off Operation
NOTE:
•The power sunroof switch can remain active in Acces-
sory Delay for up to approximately ten minutes after
the vehicles ignition is placed to the Off position.
Opening either front door will cancel this feature.
• This feature is programmable using the Uconnect
System. Refer to “Uconnect Settings” in “Understand-
ing Your Instrument Panel” for further information.
Relearn Procedure
For vehicles equipped with a sunroof, there is a relearn
procedure that allows you to calibrate the sunroof when
the “Auto Up” feature stops working. To reset the
sunroof, follow these steps:
1. Set the ignition to the ACC ON/RUN position.
2. Ensure that the sunroof is in the Fully Closed position. 3. Press and hold the Close switch. The sunroof will hit
the hard stop and move to the Vent position after 10
seconds.
4. Release the Close switch, then press and hold the Close switch again within 5 seconds to begin the
teaching process. The sunroof will complete one full
cycle and return to the Fully Closed position.
NOTE: If the Close switch is released anytime during the
teach cycle, the procedure will need to be repeated
starting from the first step.
5. Once the sunroof has stopped in the Fully Closed position, release the Close switch. The sunroof is now
reset and ready to use.
ELECTRICAL POWER OUTLETS
Your vehicle is equipped with one 12 Volt (13 Amp)
power outlet on the instrument panel and one 12 Volt (10
Amp) power outlet in the center console that can be used
236 UNDERSTANDING THE FEATURES OF YOUR VEHICLE