Page 222 of 634
displayed for up to 10 seconds when the vehicle is shifted
out of REVERSE unless the forward vehicle speed ex-
ceeds 8 mph (13 km/h), the transmission is shifted into
�PARK�or the vehicle’s ignition is cycled to the OFF
position.
When the Vehicle is shifted out of Reverse (with camera
delay turned OFF) the rear camera mode is exited and the
last touchscreen appears again.
When enabled, active guide lines are overlaid on the
image to illustrate the width of the vehicle and its projected backup path based on the steering wheel
position. The active guide lines will show separate zones
that will help indicate the distance to the rear of the
vehicle.
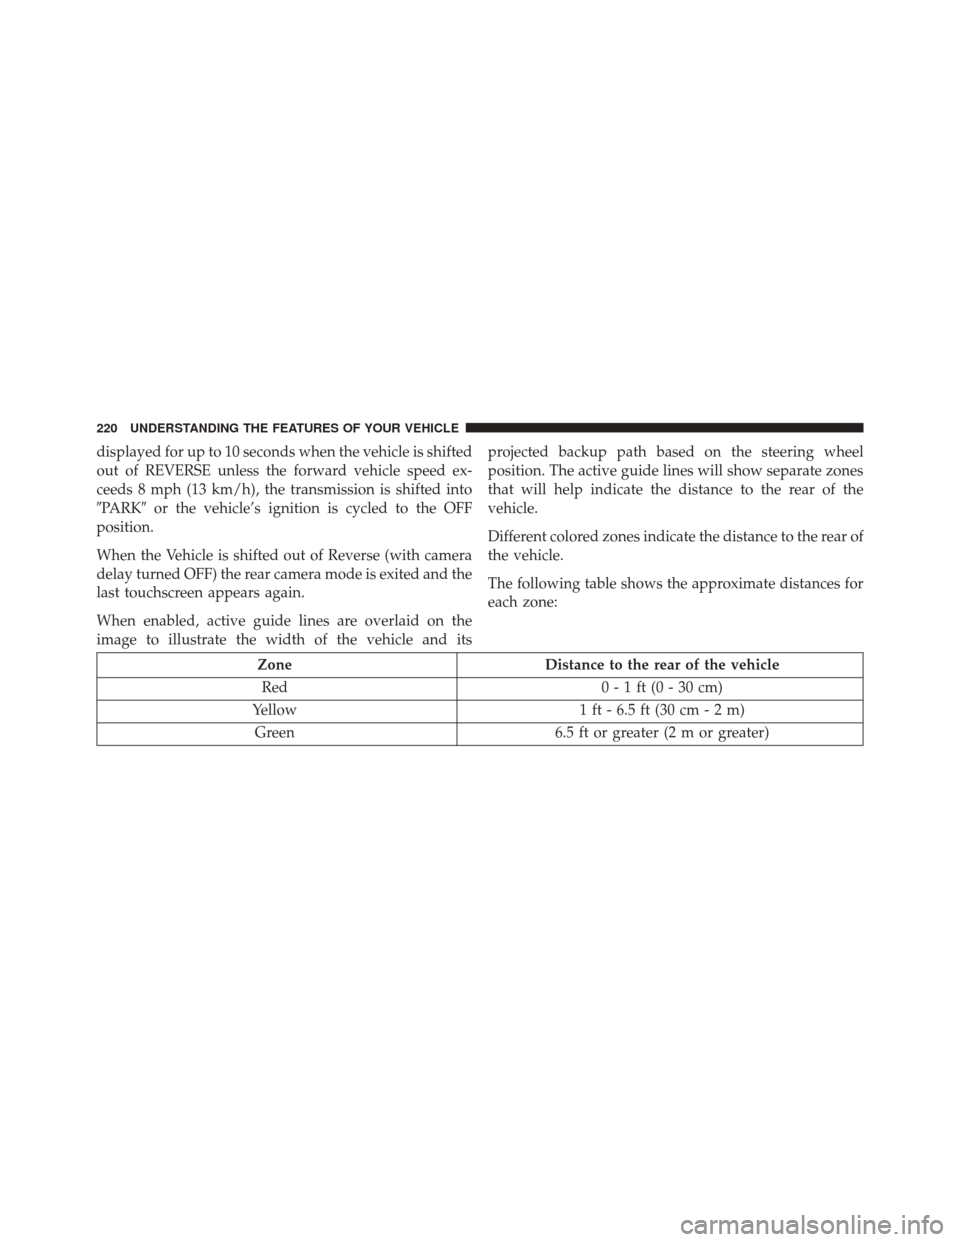
Different colored zones indicate the distance to the rear of
the vehicle.
The following table shows the approximate distances for
each zone:
Zone
Distance to the rear of the vehicle
Red 0 - 1 ft (0 - 30 cm)
Yellow 1 ft - 6.5 ft (30 cm - 2 m)
Green 6.5 ft or greater (2 m or greater)
220 UNDERSTANDING THE FEATURES OF YOUR VEHICLE
Page 229 of 634
 away from the HomeLink button you wish to
program while keeping the HomeLink indicator light
in view.
3. Push and hold the HomeLink button y")
2. Place the hand-held transmitter 1 to 3 inches (3 to 8cm) away from the HomeLink button you wish to
program while keeping the HomeLink indicator light
in view.
3. Push and hold the HomeLink button you want to program while you push and hold the hand-held
transmitter button.
4. Continue to hold both buttons and observe the indi- cator light. The HomeLink indicator will flash slowly
and then rapidly after HomeLink has received the
frequency signal from the hand-held transmitter. Re-
lease both buttons after the indicator light changes
from slow to rapid.
5. At the garage door opener motor (in the garage), locate the “LEARN” or “TRAINING” button. This can
usually be found where the hanging antenna wire is
attached to the garage door opener/device motor. Firmly push and release the “LEARN” or “TRAIN-
ING” button. On some garage door openers/devices
there may be a light that blinks when the garage door
opener/device is in the LEARN/TRAIN mode.
NOTE: You have 30 seconds in which to initiate the next
step after the LEARN button has been pushed.
6. Return to the vehicle and push the programmed HomeLink button twice (holding the button for two
seconds each time). If the garage door opener/device
activates, programming is complete.
NOTE: If the garage door opener/device does not acti-
vate, push the button a third time (for two seconds) to
complete the training.
To program the remaining two HomeLink buttons, repeat
each step for each remaining button. DO NOT erase the
channels.
3
UNDERSTANDING THE FEATURES OF YOUR VEHICLE 227
Page 235 of 634

POWER SUNROOF — IF EQUIPPED
The power sunroof switch is located between the sun
visors on the overhead console.
WARNING!
•Never leave children unattended in a vehicle, or with
access to an unlocked vehicle. Never leave the Key
Fob in or near the vehicle, or in a location accessible
to children. Do not leave the ignition of a vehicle
equipped with Keyless Enter-N-Go in the ACC or
ON/RUN mode. Occupants, particularly unattended
children, can become entrapped by the power sun-
roof while operating the power sunroof switch. Such
entrapment may result in serious injury or death.
• In a collision, there is a greater risk of being thrown
from a vehicle with an open sunroof. You could
also be seriously injured or killed. Always fasten
your seat belt properly and make sure all passen-
gers are also properly secured.
• Do not allow small children to operate the sunroof.
Never allow your fingers, other body parts, or any
object, to project through the sunroof opening.
Injury may result.
Power Sunroof Switch
3
UNDERSTANDING THE FEATURES OF YOUR VEHICLE 233
Page 236 of 634

Opening Sunroof — Express
Push the switch rearward and release it within one-half
second. The sunroof and sunshade will open automati-
cally from any position. The sunroof and sunshade will
open fully and stop automatically. This is called “Express
Open.” During Express Open operation, any other actua-
tion of the sunroof switch will stop the sunroof.
Opening Sunroof — Manual Mode
To open the sunroof, push and hold the switch rearward
to full open. Any release of the switch will stop the
movement. The sunroof and sunshade will remain in a
partially opened condition until the sunroof switch is
pushed again.
Closing Sunroof — Express
Push the switch forward and release it within one-half
second and the sunroof will close automatically from anyposition. The sunroof will close fully and stop automati-
cally. This is called “Express Close.” During Express
Close operation, any other actuation of the switch will
stop the sunroof.
Closing Sunroof — Manual Mode
To close the sunroof, push and hold the switch in the
forward position. Any release of the switch will stop the
movement and the sunroof will remain in a partially
closed condition until the sunroof switch is pushed again.
Pinch Protect Feature
This feature will detect an obstruction in the opening of
the sunroof during Express Close operation. If an ob-
struction in the path of the sunroof is detected, the
sunroof will automatically retract. Remove the obstruc-
tion if this occurs.
234 UNDERSTANDING THE FEATURES OF YOUR VEHICLE
Page 237 of 634

NOTE:If three consecutive sunroof close attempts result
in Pinch Protect reversals, Pinch Protect will disable and
the sunroof must be closed in Manual Mode.
Venting Sunroof — Express
Push and release the Vent button within one half second
and the sunroof will open to the vent position. This is
called “Express Vent”, and it will occur regardless of
sunroof position. During Express Vent operation, any
other actuation of the switch will stop the sunroof.
Sunshade Operation
The sunshade can be opened manually. However, the
sunshade will open automatically as the sunroof opens.
NOTE: The sunshade cannot be closed if the sunroof is
open.
Wind Buffeting
Wind buffeting can be described as the perception of
pressure on the ears or a helicopter-type sound in the
ears. Your vehicle may exhibit wind buffeting with the
windows down, or the sunroof (if equipped) in certain
open or partially open positions. This is a normal occur-
rence and can be minimized. If the buffeting occurs with
the rear windows open, then open the front and rear
windows together to minimize the buffeting. If the
buffeting occurs with the sunroof open, then adjust the
sunroof opening to minimize the buffeting or open any
window.
Sunroof Maintenance
Use only a non-abrasive cleaner and a soft cloth to clean
the glass panel.
3
UNDERSTANDING THE FEATURES OF YOUR VEHICLE 235
Page 250 of 634

▫SRT PERFORMANCE PAGES ............325
▫ SRT Drive Modes .....................337
▫ RACE OPTIONS ..................... .350
▫ VALET MODE ...................... .354
▫ ECO Mode ......................... .357
� UCONNECT RADIOS — IF EQUIPPED ......357
� AUX/USB/MP3 CONTROL ...............358
� STEERING WHEEL AUDIO CONTROLS — IF
EQUIPPED .......................... .359
▫ Radio Operation ..................... .360
� RADIO OPERATION AND MOBILE DEVICES . .360
▫ Regulatory And Safety Information .........360
� CLIMATE CONTROLS ...................362 ▫
Dual Zone Automatic Climate Controls With
Touchscreen ........................ .362
▫ Climate Control Functions ...............368
▫ Automatic Temperature Control (ATC) ......369
▫ Operating Tips ...................... .371
� PERSONALIZED MENU BAR ..............374
� UCONNECT VOICE RECOGNITION QUICK
TIPS ............................... .374
▫ Introducing Uconnect ...................374
▫ Get Started ......................... .375
▫ Basic Voice Commands ..................377
▫ Radio ............................. .378
▫ Media ............................. .379
▫ Phone ............................. .380
248 UNDERSTANDING YOUR INSTRUMENT PANEL
Page 293 of 634

5. Push and release theUPorDOWNarrow
button to exit the submenu screen.
NOTE: If the indicator message illuminates when you
start the vehicle, the oil change indicator system did not
reset. If necessary, repeat this procedure.
Secondary Method Of Resetting Engine Oil Life
1. Without pushing the brake pedal, push the ENGINE START/STOP button and place the ignition to the
ON/RUN position (do not start the engine).
2. Fully push the accelerator pedal, slowly, three times within 10 seconds.
3. Without pushing the brake pedal, push the ENGINE START/STOP button once to return the ignition to the
OFF/LOCK position. NOTE:
If the indicator message illuminates when you
start the vehicle, the oil change indicator system did not
reset. If necessary, repeat this procedure.
Performance Shift Indicator (PSI) – If Equipped
The Performance Shift Indicator (PSI) is enabled on
vehicles with manual transmission, or when a vehicle
with automatic transmission is in manual shift mode. The
PSI provides the driver with a visual indication within
the DID display when the driver configured gear shift
point has been reached and the driver is still accelerating.
This indication notifies the driver to change gear corre-
sponding to the configured RPMs in the head unit. When
the shift up indicator is shown on the display, the PSI is
advising the driver to engage a higher gear.
The PSI indicator in the DID display remains illuminated
until the driver changes gear, or the driving conditions
return to a situation where changing gear is not required,
corresponding to the configured RPMs in the head unit.4
UNDERSTANDING YOUR INSTRUMENT PANEL 291
Page 309 of 634

Buttons On The Faceplate
Buttons on the faceplate are located below the Uconnect
system in the center of the instrument panel. In addition,
there is a Scroll/Enter control knob located on the right
side. Turn the control knob to scroll through menus and
change settings (i.e., 30, 60, 90), push the center of the
control knob one or more times to select or change a
setting (i.e., ON, OFF).
Your Uconnect system may also have a Screen Off and
Back buttons on the faceplate.
Push the Screen Off button on the faceplate to turn off the
Uconnect screen. Push the Screen Off button on the
faceplate a second time to turn the screen on.
Push the Back button on the faceplate to exit out of a
Menu or certain option on the Uconnect system.
Buttons On The Touchscreen
Buttons on the touchscreen are accessible on the
Uconnect touchscreen.
Customer Programmable Features — Uconnect
8.4 Settings
Press the “Apps” button, then press the “Settings”
button on the touchscreen to display the menu setting
screen. In this mode the Uconnect system allows you
to access programmable features that may be
equipped such as Display, Units, Voice, Clock, Safety
& Driving Assistance, Lights, Doors & Locks, Auto-On
Comfort, Engine Off Options, Audio, Phone/
Bluetooth, SiriusXM Setup, Restore Settings, Clear
Personal Data and System Information.
NOTE:
• Only one touchscreen area may be selected at a time.
4
UNDERSTANDING YOUR INSTRUMENT PANEL 307