Page 65 of 254

JauneNoir Noir texte
1.61
ENG_UD39239_4
Éclairages et signalisations extérieures (H79 - H79 Ph2 - Dacia) ENG_NU_1079-6_H79Ph2_Dacia_1
eSwitching off the lightsFrom the main beam head-
lights position, pull the stalk 1 towards
you, then turn the end of the stalk 1
until the
e symbol appears by the
mark 2.
From the dipped beam headlights posi-
tion, turn the end of the stalk 1 until the
e symbol appears by the mark 2.
EXTERIOR LIGHTING AND SIGNALS (1/2)
šSide lights
Turn the end of stalk 1 until the
symbol is opposite mark 2.
kDipped beam
headlights
Turn the end of stalk 1 until the symbol
is opposite mark 2.
An indicator light on the instrument
panel will come on.
áMain beam headlightsWith the dipped beam head-
lights lit, push stalk 1. This indicator
light on the instrument panel comes on.
To return to the dipped headlight posi-
tion, pull the stalk 1 towards you again.
Before driving at night, check that the electrical equipment is operating
correctly and adjust the headlight beams (if your vehicle is not carrying its
normal load). As a general precaution, check that the lights are not obs-
cured (by dirt, mud, snow or objects being transported).
112
Page 66 of 254

JauneNoir Noir texte
1.62
ENG_UD39239_4
Éclairages et signalisations extérieures (H79 - H79 Ph2 - Dacia) ENG_NU_1079-6_H79Ph2_Dacia_1
EXTERIOR LIGHTING AND SIGNALS (2/2)
gFront fog lights
Turn the centre ring 3 of
the stalk until the symbol is opposite
mark 2.
The fog lights only light up if the exterior
lights have been switched on. An indi-
cator light on the instrument panel then
lights up.
Do not forget to switch off the fog lights
when they are no longer needed, to
avoid inconveniencing other road
users.
hRear fog lights
Turn the centre ring 3 on
the stalk until the symbol faces mark 2.
The fog lights only light up if the exterior
lights have been switched on. An indi-
cator light on the instrument panel then
lights up.
Remember to switch off the these
lights when they are no longer requi-
red to avoid inconveniencing other road
users.
eTurning off the fog
lights
Turn the centre ring 3 of the stalk until
the symbol is opposite mark 2.
The corresponding indicator light goes
out on the instrument panel.
The front and rear fog lights switch off
when the exterior lights are switched
off.23
Daytime running lights
function
(front lights only)
These lights are automatically lit during
daylight hours. They are deactivated
when the main and dipped beams are
lit.
Lights-on warning buzzer
If the lights are on after the engine is
switched off, a warning beep sounds
when the driver’s door is opened to
warn you that the lights are still on.
Page 67 of 254
JauneNoir Noir texte
1.63
ENG_UD39240_3
Réglage de la hauteur des faisceaux (H79 - H79 Ph2 - Dacia) ENG_NU_1079-6_H79Ph2_Dacia_1
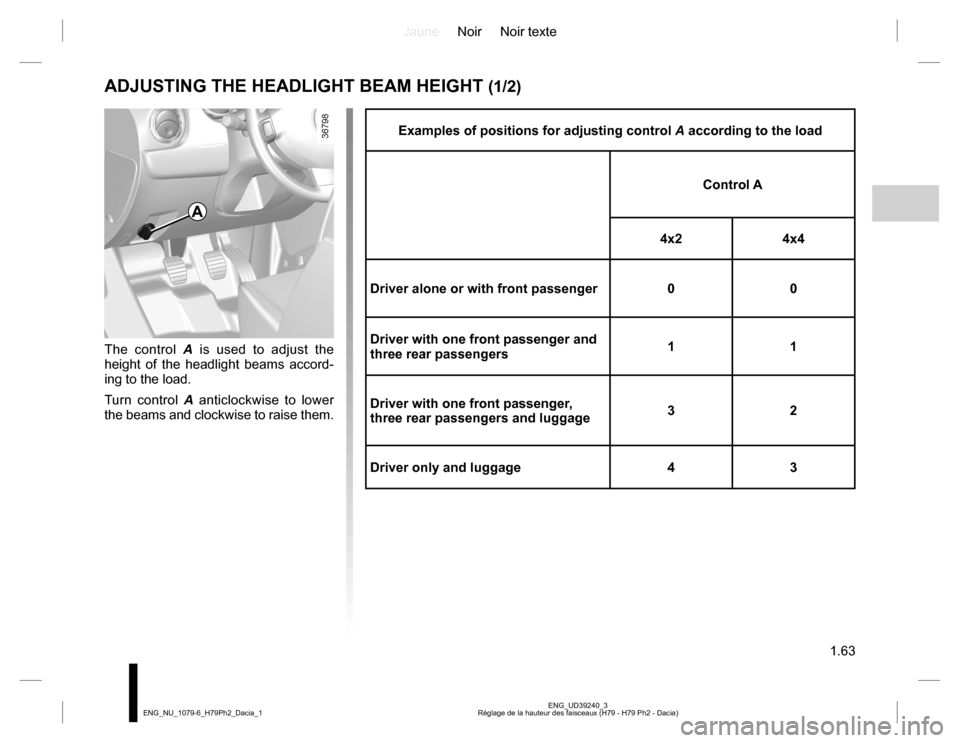
Examples of positions for adjusting control A according to the load
Control A
4x2 4x4
Driver alone or with front passenger 0 0
Driver with one front passenger and
three rear passengers11
Driver with one front passenger,
three rear passengers and luggage32
Driver only and luggage 4 3
The control A is used to adjust the
height of the headlight beams accord-
ing to the load.
Turn control A anticlockwise to lower
the beams and clockwise to raise them.
ADJUSTING THE HEADLIGHT BEAM HEIGHT (1/2)
A
Page 68 of 254
JauneNoir Noir texte
1.64
ENG_UD39240_3
Réglage de la hauteur des faisceaux (H79 - H79 Ph2 - Dacia) ENG_NU_1079-6_H79Ph2_Dacia_1
ADJUSTING THE HEADLIGHT BEAM HEIGHT (2/2)
Temporary adjustment
Open the bonnet and identify the mark-
ing B next to one of the front headlight
projectors.
For each headlight, using a screw-
driver, turn the screw 1 by a quarter
turn towards the - symbol to lower the
beams.
Return to the starting point once your
trip is over: turn the screw 1 by a quar-
ter turn towards the + symbol to raise
the beams.
When driving on the left in a left-
hand drive vehicle (or vice versa),
you must adjust your lights tempo-
rarily during your stay.
1
B
Page 69 of 254

JauneNoir Noir texte
1.65
ENG_UD32133_1
Essuie-vitre /Lave-vitre/Dégivrage (H79 - Dacia) ENG_NU_1079-6_H79Ph2_Dacia_1
WINDSCREEN WASH, WIPE (1/2)
nWindscreen wiper
With the ignition on, move
stalk 1 around the steering wheel:
A Park.
B Intermittent wiping.
The wipers will pause for several
seconds between sweeps.
C Normal wiping speed.
D Fast wiping speed.
sWindscreen wiper
With the ignition on, pull stalk 1
towards you.
A brief pull will trigger a single sweep
of the wipers, in addition to the wind-
screen washer.
A longer pull will trigger three sweeps
of the wipers, in addition to the wind-
screen washer.
In frosty weather, make sure that
the wiper blades are not stuck by ice
(risk of motor overheating).
Keep an eye on the condition of the
blades. They should be replaced as
soon as they become less efficient.
This will occur approximately once
a year. Clean your windscreen reg-
ularly.
If you switch off the ignition before
switching off the windscreen wiper
(position A) the blades will stop at
random on the windscreen.
After switching the ignition back on,
simply move stalk 1 to position A to
place them in the park position.
Before touching the wind-
screen (washing the vehi-
cle, de-icing, cleaning the
windscreen, etc.) move
stalk 1 to position A (park). Risk of
injury and/or damage.When working in the engine
compartment, ensure that
the windscreen wiper stalk
is in position A (park). Risk
of injury.
1
A
B
C
D
Page 70 of 254
JauneNoir Noir texte
1.66
ENG_UD32133_1
Essuie-vitre /Lave-vitre/Dégivrage (H79 - Dacia) ENG_NU_1079-6_H79Ph2_Dacia_1
WINDSCREEN WASH, WIPE (2/2)
YRear screen wiper
With the ignition on, turn the
end of stalk 1 to align the symbol with
mark 2.
Before using the rear wiper, check
that no object is obstructing the
travel of the blade.
In frosty weather, make sure that
the wiper blades are not stuck by ice
(to avoid the risk of the motor over-
heating).
Keep an eye on the condition of the
blades. They should be replaced as
soon as they become less efficient.
This will occur approximately once
a year. Clean your windscreen reg-
ularly.
pRear screen washer/
wiper
With the ignition on, turn the end of
stalk 1 to align the symbol with mark 2.
When the stalk is released, it returns to
the rear wipe position.
Before touching the wind-
screen (washing the vehi-
cle, de-icing, cleaning the
windscreen, etc.) move
stalk 1 to position A (park). Risk of
injury and/or damage.
1
2
Page 71 of 254

JauneNoir Noir texte
1.67
ENG_UD38492_3
Réservoir carburant (H79 - Dacia) ENG_NU_1079-6_H79Ph2_Dacia_1
FUEL TANK (1/6)
Petrol and diesel versions
Usable capacity of the fuel tank:
50 litres approximately.
Depending on the vehicle, to open the
fuel filler flap A, place your finger in
opening B and pull.
To close, push the fuel filler flap A by
hand as far as it will go. Depending
on the vehicle, the cap 1 is unlocked
using the ignition key. If not, it will be
connected to the vehicle by a strip of
plastic. For details on filling the fuel
tank, please refer to the information on
“Filling with fuel”.
Fuel filler cap: this is spe-
cific to the vehicle type. If
you have to replace it, make
sure the new cap is of the
same type. Contact an approved
dealer.
Never place the cap near a source
of heat or flame.
Do not wash the filler area with a
high-pressure washer.
A
3
C
B
There is a cap holder 3 on the fuel filler
flap for holding the cap when the tank is
being filled.
Depending on the vehicle, lift lever 2 to
unlock the fuel filler flap A. Open it, then
unscrew fuel filler cap 1.
1
2
Page 72 of 254

JauneNoir Noir texte
1.68
ENG_UD38492_3
Réservoir carburant (H79 - Dacia) ENG_NU_1079-6_H79Ph2_Dacia_1
FUEL TANK (2/6)
Vehicles running on ethanol-based
fuel
Always use unleaded petrol or fuel
containing a maximum of 85 percent
ethanol (E85).
In very cold conditions, it may be very
difficult or even impossible to start the
engine.
Note: you may notice an increase in
fuel consumption with this type of fuel.
When the fuel is changed the engine
must adjust, which may cause minor in-
conveniences for a few minutes (longer
starting times, cutting out, etc.).Fuel grade
Always use a high-grade fuel that
complies with the legislation in force
in each country. It must conform to the
specifications given on label C inside
the fuel filler flap.
Refer to the “Engine specifications”
table in Section 6.
Petrol version
It is essential to use unleaded petrol.
The octane rating (RON) must conform
to the specifications given on the label
inside fuel filler flap C.
Diesel versions
It is essential to use diesel fuel that con-
forms to the specifications given on the
label inside fuel flap C.
Do not mix even small
amounts of petrol (un-
leaded or E85) with diesel.
Do not use ethanol-based
fuel if your vehicle is not compatible
with this fuel.
Do not add additive to the fuel other-
wise you risk damaging the engine.