Page 373 of 595
371
7
28
27
26
29
30
Jumpy_en_Chap10b_NAC-1_ed01-2016
Level 1Level 2 Level 3 Comments
Navigation Select the orientation of the map; north up,
vehicle direction up or perspective.
Navigation
TOMTOM TR AFFIC On connection of the system to a network,
"TOMTOM TR AFFIC" is displayed instead of
"TMC", for use of all of the options available, in
real time.
Navigation Weather
Select the options.
The map display the route chosen, depending on
options.
Stations
Car park
Tr a f f i c
Danger area
Map color
Select the display mode for the map.
POI on map Commercial
Select the POIs available.
Geographic
Leisure
Public
Travel
Confirm
Save the options.
View map Modify citySelect or change a city.
Zoom out.
Zoom in.
.
Audio and Telematics
Page 399 of 595

397
1
10
3
Jumpy_en_Chap10b_NAC-1_ed01-2016
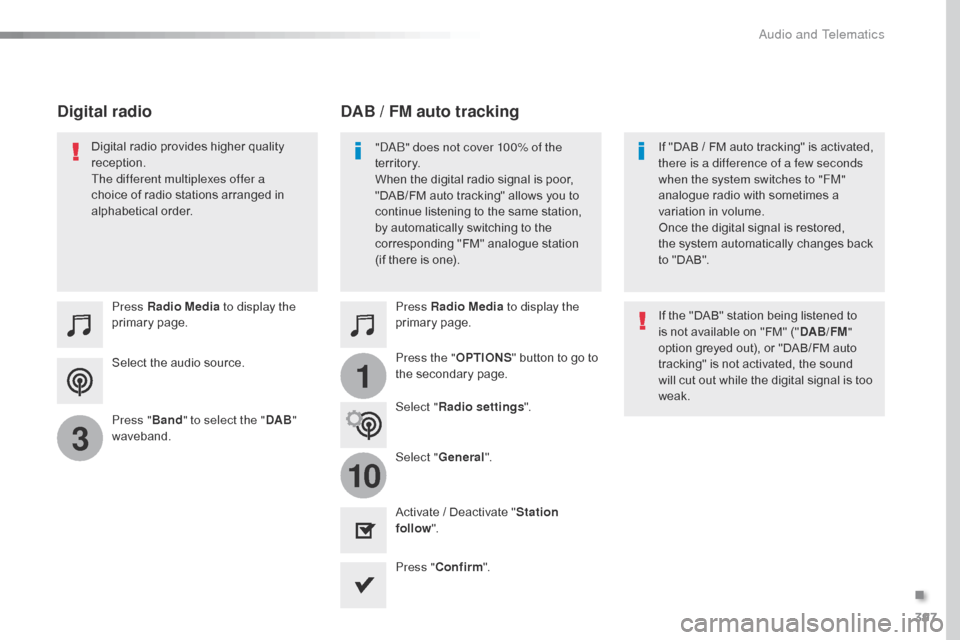
Select the audio source. Press Radio Media to display the
primary page.
Press " Band" to select the " DAB"
waveband. Press Radio Media
to display the
primary page.
Press the " OPTIONS" button to go to
the secondary page.
DAB / FM auto tracking
Digital radio
"DAB" does not cover 100% of the
te r r i to r y.
When the digital radio signal is poor,
"DAB/FM auto tracking" allows you to
continue listening to the same station,
by automatically switching to the
corresponding "FM" analogue station
(if there is one). If "DAB
/ FM auto tracking" is activated,
there is a difference of a few seconds
when the system switches to "FM"
analogue radio with sometimes a
variation in volume.
Once the digital signal is restored,
the system automatically changes back
to "DAB".
Digital radio provides higher quality
reception.
The different multiplexes offer a
choice of radio stations arranged in
alphabetical order.
If the "DAB" station being listened to
is not available on "FM" ("DAB/FM"
option greyed out), or "DAB/FM auto
tracking" is not activated, the sound
will cut out while the digital signal is too
weak.
Select " Radio settings ".
Select " General".
Activate / Deactivate " Station
follow ".
Press " Confirm ".
.
Audio and Telematics
Page 422 of 595

420
111
10
11
12
8
91
Jumpy_en_Chap10b_NAC-1_ed01-2016
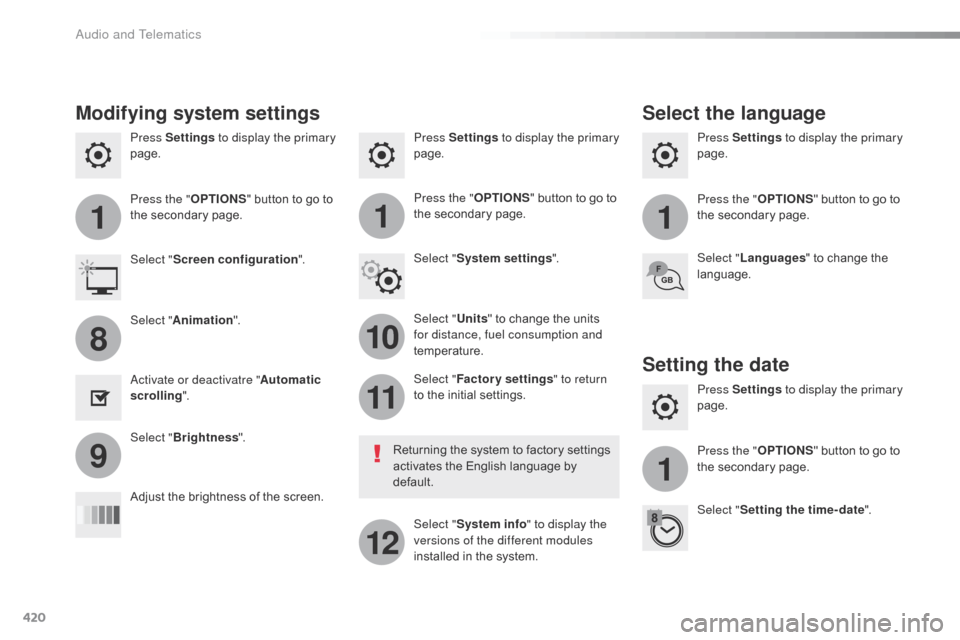
Press Settings to display the primary
page. Press Settings
to display the primary
page.
Press Settings
to display the primary
page.
Press the "OPTIONS" button to go to
the secondary page. Press the "
OPTIONS" button to go to
the secondary page.
Press the "
OPTIONS" button to go to
the secondary page.
Select "System settings ".
Select " Screen configuration ".
Select "Units" to change the units
for distance, fuel consumption and
temperature. Select "
Languages " to change the
language.
Activate or deactivatre " Automatic
scrolling ".
Adjust the brightness of the screen. Select "
Factory settings " to return
to the initial settings.
Select " System info " to display the
versions of the different modules
installed in the system.
Modifying system settings
Returning the system to factory settings
activates the English language by
default.
Select "
Animation ".
Select " Brightness ".
Select the language
Press Settings to display the primary
page.
Press the " OPTIONS" button to go to
the secondary page.
Select " Setting the time- date ".
Setting the date
Audio and Telematics
Page 423 of 595
421
1
17
18
Jumpy_en_Chap10b_NAC-1_ed01-2016
Press Settings to display the primary
page.
Press the " OPTIONS" button to go to
the secondary page.
Select "
Date".
Select "Time".
Select "
Setting the time- date ".
Adjustment of the time and date is only
available if synchronisation with GPS is
deactivated.
The change between winter and
summer time is done by changing the
time zone. The system does not automatically
manage the change between winter
and summer time (depending on
c ountr y).
Setting the time
Press this button to define the date.
Press this button to adjust the time
using the virtual keypad.
Press "
Confirm ". Press "
Confirm ".
Press " Confirm ".
Press this button to define the time
zone.
Select the display format of the date.
Select the display format for the
time
(12h / 24h).
Activate or deactivate
synchronisation with GPS (UTC).
.
Audio and Telematics
Page 431 of 595
429
Jumpy_en_Chap10c_RCC-1_ed01-2016
CITROËN Connect Radio
Connectivity - Multimedia audio - Bluetooth® telephone
Contents
First steps
4 30
Steering mounted controls
4
32
Menus
4
33
Connectivity
4
34
Radio Media
4
44
Telephone
4
56
Settings
4
68
Frequently asked questions
4
78
The system is protected in such a way that it will only operate in
your vehicle.
The link below gives access to OSS (Open Source Software)
codes for the system.
http://www.psa-peugeot-citroen.com/oss As a safety measure and because it requires sustained attention
by the driver, the pairing of a Bluetooth mobile telephone with
the Bluetooth hands-free system of your audio system must be
done with the vehicle stationary
and the ignition on.
The display of the energy economy mode message signals that
a change to standby is imminent. For more information on the
Energy economy mode refer to the corresponding section.
.
Audio and Telematics
Page 434 of 595
432
Jumpy_en_Chap10c_RCC-1_ed01-2016
Steering mounted controls
Media (short press): change the
multimedia source.
Telephone (short press): call.
Call in progress (short press):
access to telephone menu.
Telephone (long press): reject an
incoming call, end call, access to
telephone menu. Decrease volume.
Voice commands
:
Long press, smartphone voice
commands via the system.
Mute/ Restore the sound.Radio
(rotate): automatic search for
the previous / next station.
Media (rotate): previous / next track,
move in a list.
Short press : Confirm a selection.
Other than selection, access to
presets.
Radio : display the list of stations.
Media : display the list of tracks.
Radio, press and hold : update the
list of stations received.
Increase volume.
Audio and Telematics
Page 455 of 595

453
1
10
3
Jumpy_en_Chap10c_RCC-1_ed01-2016
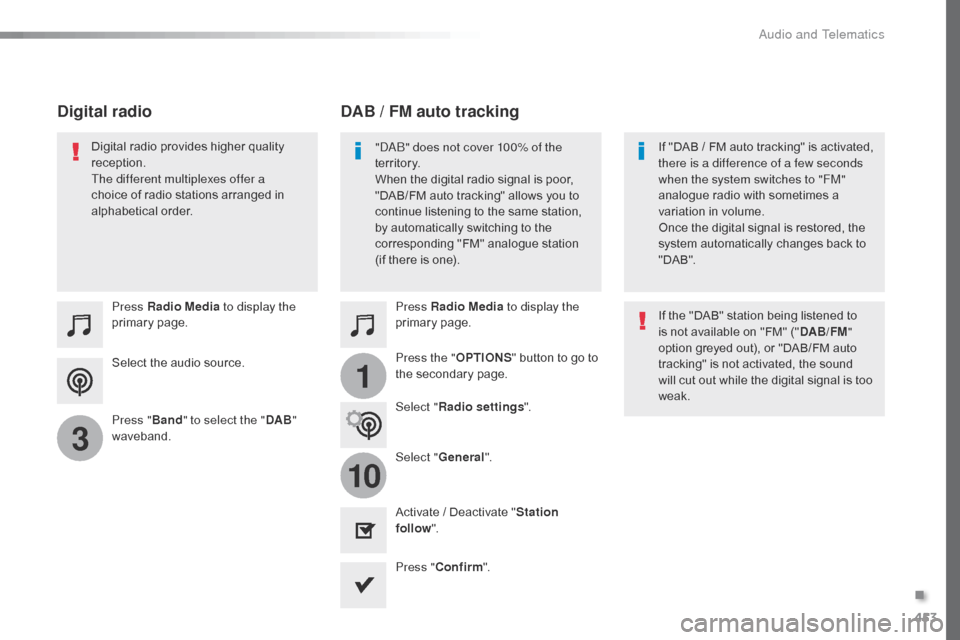
Select the audio source. Press Radio Media to display the
primary page.
Press " Band" to select the " DAB"
waveband. Press Radio Media
to display the
primary page.
Press the " OPTIONS" button to go to
the secondary page.
DAB / FM auto tracking
Digital radio
"DAB" does not cover 100% of the
te r r i to r y.
When the digital radio signal is poor,
"DAB/FM auto tracking" allows you to
continue listening to the same station,
by automatically switching to the
corresponding "FM" analogue station
(if there is one). If "DAB
/ FM auto tracking" is activated,
there is a difference of a few seconds
when the system switches to "FM"
analogue radio with sometimes a
variation in volume.
Once the digital signal is restored, the
system automatically changes back to
" DA B ".
Digital radio provides higher quality
reception.
The different multiplexes offer a
choice of radio stations arranged in
alphabetical order.
If the "DAB" station being listened to
is not available on "FM" ("DAB/FM"
option greyed out), or "DAB/FM auto
tracking" is not activated, the sound
will cut out while the digital signal is too
weak.
Select " Radio settings ".
Select " General".
Activate / Deactivate " Station
follow ".
Press " Confirm ".
.
Audio and Telematics
Page 478 of 595

476
111
10
11
12
8
91
Jumpy_en_Chap10c_RCC-1_ed01-2016
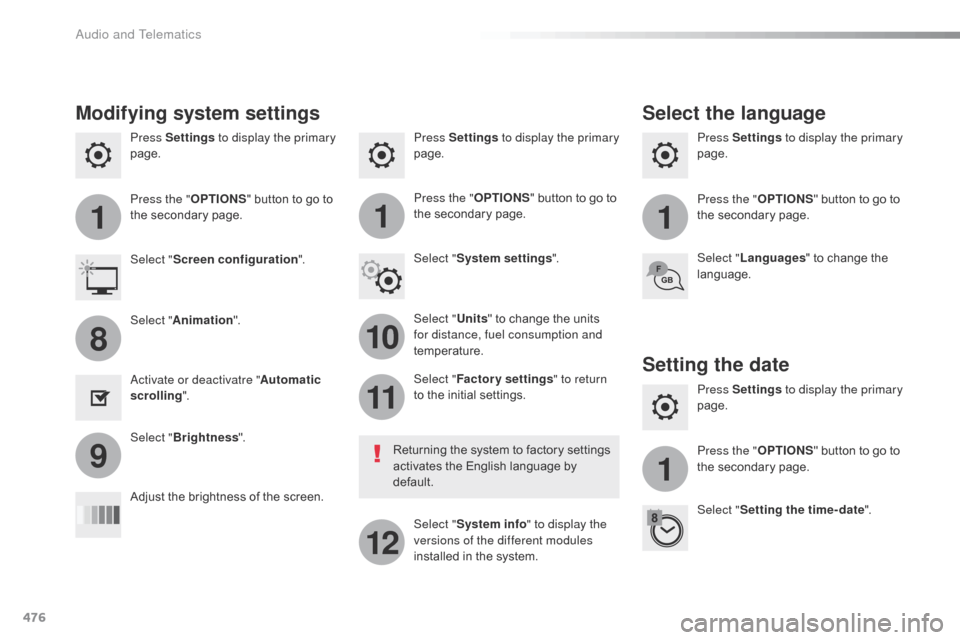
Press Settings to display the primary
page. Press Settings
to display the primary
page.
Press Settings
to display the primary
page.
Press the "OPTIONS" button to go to
the secondary page. Press the "
OPTIONS" button to go to
the secondary page.
Press the "
OPTIONS" button to go to
the secondary page.
Select "System settings ".
Select " Screen configuration ".
Select "Units" to change the units
for distance, fuel consumption and
temperature. Select "
Languages " to change the
language.
Activate or deactivatre " Automatic
scrolling ".
Adjust the brightness of the screen. Select "
Factory settings " to return
to the initial settings.
Select " System info " to display the
versions of the different modules
installed in the system.
Modifying system settings
Returning the system to factory settings
activates the English language by
default.
Select "
Animation ".
Select " Brightness ".
Select the language
Press Settings to display the primary
page.
Press the " OPTIONS" button to go to
the secondary page.
Select " Setting the time- date ".
Setting the date
Audio and Telematics