Page 194 of 400

Sit in a normal upright position.
Wear a correctly adjusted seat belt.
Do not leave anything between the
occupants and the airbags (a child, pet,
object...), nor fix or attach anything close to
the inflation trajectory of the airbags; this
could cause injuries during their deployment.
Never modify the original definition of your
vehicle, particularly in the area directly
around the airbags.
After an accident or if the vehicle has been
stolen or broken into, have the airbag
systems checked.
All work on the airbag system must be
carried out by a CITROËN dealer or a
qualified workshop.
Even if all of the precautions mentioned
are observed, a risk of injury or of minor
burns to the head, chest or arms when an
airbag is deployed cannot be ruled out. The
bag inflates almost instantly (within a few
milliseconds) then deflates within the same
time discharging the hot gas via openings
provided for this purpose.Lateral airbags
Use only approved covers on the seats,
compatible with the deployment the lateral
airbags. For information on the range of seat
covers suitable for your vehicle, you can
contact a CITROËN dealer.
For more information on accessories, refer
to the corresponding section.
Do not fix or attach anything to the seat
backs (clothing...). This could cause injury
to the chest or arms if the lateral airbag is
deployed.
Do not sit with the upper part of the body any
nearer to the door than necessary.
Front airbags
Do not drive holding the steering wheel by its
spokes or resting your hands on the centre
part of the wheel.
Passengers must not place their feet on the
dashboard.
Do not smoke as deployment of the airbags
can cause burns or the risk of injury from a
cigarette or pipe.
Never remove or pierce the steering wheel or
hit it violently.
Do not fit or attach anything to the steering
wheel or dashboard, this could cause injuries
with deployment of the airbags.
Advice
curtain airbags
Do not fix or attach anything to the roof. This
could cause injury to the head if the curtain
airbag is deployed.
If fitted on your vehicle, do not remove the
grab handles installed on the roof, they play
a part in securing the curtain airbags.
For the airbags to be fully effective, observe the safety recommendations below:
Page 198 of 400

This kit is installed in the storage box, under the
boot floor. This kit consists of a compressor and a sealant
cartridge.
It allows the temporary repair of a tyre.
You are then able to go to the nearest garage.
It is designed to repair most punctures which
could affect the tyre, located on the tyre tread
or shoulder.
Its compressor can be used to check and
adjust the pressure of the tyre.
Temporary puncture repair kit
Access to the kit
List of tools*
All of these tools are specific to your vehicle
and can vary according to equipment.
Do not use them for other purposes.
1.
1
2 V compressor.
C
ontains a sealant cartridge for the
temporary repair of a tyre and can also be
used for adjusting tyre pressures.
2.
Ch
ock.
F
or blocking the wheels of the vehicle.
3.
W
heel bolt cap removal tool.
F
or removing the wheel bolt head
protectors on alloy wheels.
4.
W
heel finisher remover.
F
or removing the wheel finishers on alloy
wheels.
5.
R
emovable towing eye.
* Depending on country of sale. For more information on towing the vehicle,
refer to the corresponding section.
Page 204 of 400
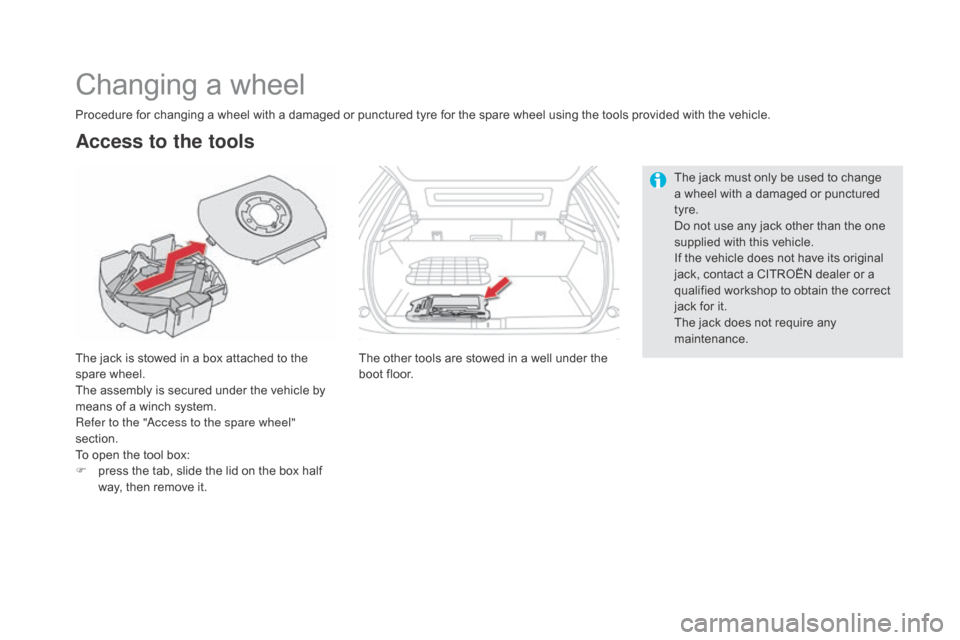
Changing a wheel
The jack is stowed in a box attached to the
spare wheel.
The assembly is secured under the vehicle by
means of a winch system.
Refer to the "Access to the spare wheel"
section.
To open the tool box:
F
p
ress the tab, slide the lid on the box half
way, then remove it.
Access to the tools
Procedure for changing a wheel with a damaged or punctured tyre for the spare wheel using the tools provided with the vehicle.
The other tools are stowed in a well under the
boot floor. The jack must only be used to change
a wheel with a damaged or punctured
tyre.
Do not use any jack other than the one
supplied with this vehicle.
If the vehicle does not have its original
jack, contact a CITROËN dealer or a
qualified workshop to obtain the correct
jack for it.
The jack does not require any
maintenance.
Page 205 of 400

203
List of tools*
Access to the spare wheel
The spare wheel is supported by a winch
carrier system underneath the vehicle.
Tyre under-inflation detection
The spare wheel is not fitted with a
sensor. The punctured wheel must be
repaired by a CITROËN dealer or a
qualified workshop.
1.
W
heelbrace.
F
or removing the wheel trim and removing
the wheel bolts.
2.
J
ack with integral handle.
F
or raising the vehicle.
3.
W
heel bolt cover removal tool.
F
or removing the bolt head protectors on
alloy wheels.
4.
W
heel trim remover.
F
or removing the alloy wheel finishers.
5.
S
ocket for the security bolts (located in the
glove box).
F
or adapting the wheelbrace to the special
"security" bolts.
6.
Ch
ock.
F
or blocking the vehicle's wheels.
7. W
heelbrace extension. F
or slackening/tightening the spare wheel
carrier nut.
8.
R
emovable towing eye.
* Depending on country of sale. For more information on towing the vehicle,
refer to the corresponding section.
All of these tools are specific to your
vehicle and can vary according to
equipment.
Do not use them for any other
purposes.
Practical information
Page 208 of 400
Removing a wheel
Parking the vehicle
Immobilise the vehicle where it does not
block traffic: the ground must be level,
stable and not slippery.
Apply the parking brake unless it has
been programmed to automatic mode,
switch off the ignition and engage first
gear* to block the wheels.
Check that the braking warning lamp
and the P warning lamp in the parking
brake control lever come on.
If necessary, place a chock against
the wheel opposite the wheel to be
changed.
The occupants must get out of the
vehicle and wait where they are safe.List of operations
F Depending on equipment, remove the protective cover from from each of bolts using the tool 3 or remove the wheel trim using tool 4 .
F
F
it the security socket 5 on the wheelbrace 1 to slacken the security bolt (if fitted).
F
S
lacken the other bolts (no more than a 1/4 turn) using the wheelbrace 1 o n l y.
* Position P for an automatic gearbox.
Never go underneath a vehicle raised
using a jack; use an axle stand.
Page 216 of 400
Front foglamps
F Remove the deflector under the body.
F D isconnect the bulb connector.
F
T
urn the bulb a quarter of a turn, withdraw
and change it.
To refit, carry out these operations in reverse
o r d e r.
To replace these bulbs you may also contact a
CITROËN dealer or a qualified workshop.
direction indicators
Faster flashing of a direction indicator
warning lamp (left or right) indicates a
failed bulb on that side.
The direction indicator bulb is located below
the front lamp.
F
T
urn the bulb holder a quarter turn and pull
it out.
F
R
emove the bulb and change it. For reassembly, carry out these operations in
reverse order.
You can also contact a CITROËN dealer or a
qualified workshop for the replacement of these
bulbs.
Page 218 of 400
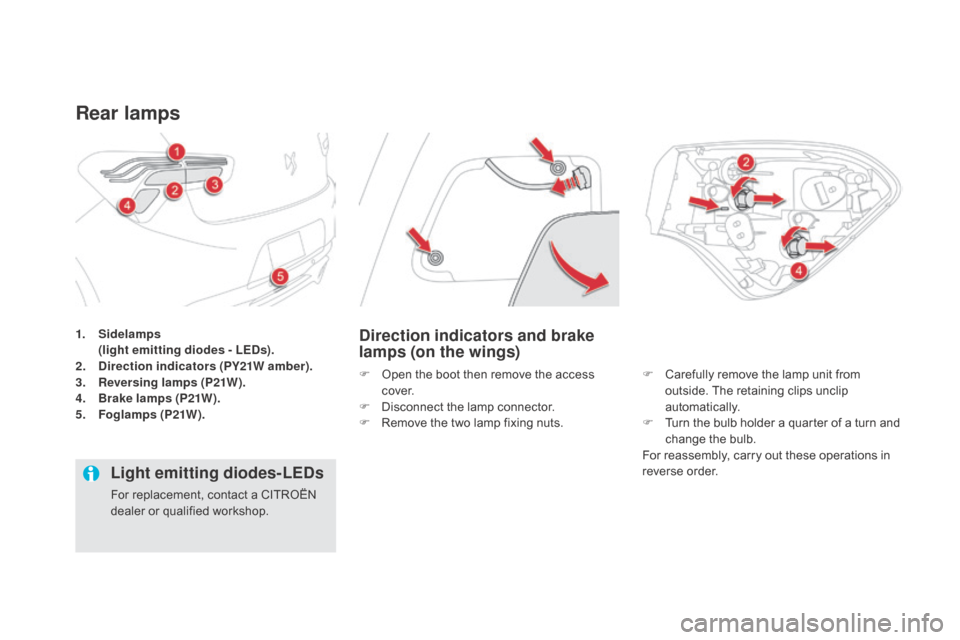
1. Sidelamps (light emitting diodes - LEds ).
2.
d
i
rection indicators (PY21W amber).
3.
R
eversing lamps (P21W).
4.
B
rake lamps (P21W).
5.
F
oglamps (P21W).
Rear lamps
direction indicators and brake
lamps (on the wings)
F Open the boot then remove the access c ove r.
F
D
isconnect the lamp connector.
F
R
emove the two lamp fixing nuts. F
C arefully remove the lamp unit from
outside. The retaining clips unclip
automatically.
F
T
urn the bulb holder a quarter of a turn and
change the bulb.
For reassembly, carry out these operations in
reverse order.
Light emitting diodes-LEds
For replacement, contact a CITROËN
dealer or qualified workshop.
Page 219 of 400
217
Reversing lamp (tailgate)
F Carefully remove the lamp from the outside. The retaining clips unclip
automatically.
F
T
urn the bulb holder a quarter of a turn and
replace the bulb.
For reassembly, carry out these operations in
reverse order.
Foglamp
F Open the tailgate.
F U nclip the skirt of the lamp.
F
R
emove the access cover and the lamp
fixing nut. Access is by passing a hand under the bumper.
F
T urn the bulb holder a quarter of a turn and
pull it out.
F
C
hange the bulb.
To refit, carry out these operations in reverse
o r d e r.
You can also contact a CITROËN dealer or a
qualified workshop for the replacement of these
bulbs.
Practical information