2016 Citroen DS3 RHD sensor
[x] Cancel search: sensorPage 11 of 380

9
Under-inflation detection
This sytem automatically checks the tyre pressures when driving and warns you in
t
he event of an under-inflated tyre.
15 4
203
Temporary puncture repair kit
This kit is a complete system consisting o f a compressor and sealant cartridge, for
t
he temporary repair of a tyre.
Exterior
132
Parking sensors
This system provides a warning when manoeuvring by detecting obstacles near
t
he vehicle. 13 4
Reversing camera
This system is activated automatically when r
everse gear is engaged, providing an image in
t
he display screen.
Over view
Page 45 of 380

43
Radio- Cd
With the Audio system switched on, once the "Radio- CD" menu has been selected you can
a
ctivate or deactivate the functions associated
w
ith use of the radio (RDS, REG), or the CD
(
introscan, shuffle, CD repeat).
For
more information on the "Radio- CD"
a
pplication, refer to the "Audio system" section.
Vehicle configuration
Once the " Vehicle Configuration" menu has been selected, you can activate or deactivate
t
he following equipment:
-
w
iper linked with reverse gear (refer to the
"
Visibility"
s
ection),
-
g
uide-me-home lighting (refer to the
"
Visibility"
s
ection),
-
p
arking sensors (refer to the "Driving"
s
ection).
Options
Once the "Options" menu has been selected, you can start diagnostics of the status of the
e
quipment (active, not active, faulty).
This menu is also used to reinitialise the tyre under-inflation detection system (refer to the
"
Safety"
s
ection).
Monitoring
Page 49 of 380

47
"Personalisation-
Configuration" menu
Once this menu has been selected, you can gain access to the following functions:
-
d
efine the vehicle parameters,
-
d
isplay configuration,
-
c
hoice of language.
Define the vehicle parameters
Once this menu has been selected, you can activate or deactivate the following equipment:
-
w
iper linked to reverse gear (refer to the
"
Visibility"
s
ection),
-
g
uide-me-home lighting and duration (refer
t
o the " Visibility" section), Example:
setting of the duration of the guide-
me-home
l
ighting
F
P
ress the "
5" or " 6" buttons, then the
"OK" button to select the menu required.F
P
ress the "
5" or " 6" buttons, then the
"OK"
button to select the "Guide-me-home
h
eadlamps"
l
ine.
F
P
ress the "
7" or " 8" buttons to set the
value required (15, 30 or 60 seconds), then
p
ress the "OK"
button to confirm.
F
P
ress the "5" or " 6" buttons, then the
"OK" button to select the "OK"
box and
c
onfirm or press the "Back" button to
cancel.
This menu is also used to reinitialise the tyre u nder-inflation detection system (refer to the
"
Safety"
s
ection).
-
p
arking sensors (refer the "Driving"
s
ection),
-
a
utomatic emergency braking (refer to the
"
Active City Brake" section).
Monitoring
Page 51 of 380

49
Touch screen tablet
This system gives access to:
- m enus for adjusting settings for vehicle
f
unctions and systems,
-
a
udio and display configuration menus,
-
a
udio system and telephone controls and
t
he display of associated information,
-
t
he display of alert messages,
-
t
he display of ambient temperature (a blue
s
now flake appears if there is a risk of ice),
-
t
he trip computer.
And,
depending on equipment, it allows:
-
t
he display of the visual parking sensors
i
nformation,
-
a
ccess to the controls for the navigation
s
ystem and Internet services, and the
d
isplay of associated information. After
a few moments with no action on
t
he secondary page, the primary page
i
s displayed automatically.
As
a safety measure, some functions
c
an only be viewed when stationary.
T
heir display is interrupted as soon as
t
he vehicle moves off.general operation
Recommendations
It is necessary to press firmly, particularly for "flick" gestures (scrolling through lists, moving
t
he
m
ap...).
A
light wipe is not enough.
The
screen does not recognise pressing with
m
ore than one finger.
This
technology allows use at all temperatures
a
nd when wearing gloves.
Do
not use pointed objects on the touch screen
t
ablet.
Do
not touch the touch screen tablet with wet
han
ds.
Uses a soft clean cloth to clean the touch
screen
t
ablet.
Principles
Press the " MEn U" button for access to the
different menus, then press the virtual buttons
i
n the touch screen tablet.
Each
menu is displayed over one or two pages
(
primary page and secondary page).
Use the " O
PTIO
nS"
button to go to the
s
econdary
pag
e.
Use this button for access to
additional
information and to the
s
ettings for certain functions.
Use
this button to confirm.
Use this button to return to the
primary
page or to quit.
Monitoring
Page 53 of 380

51
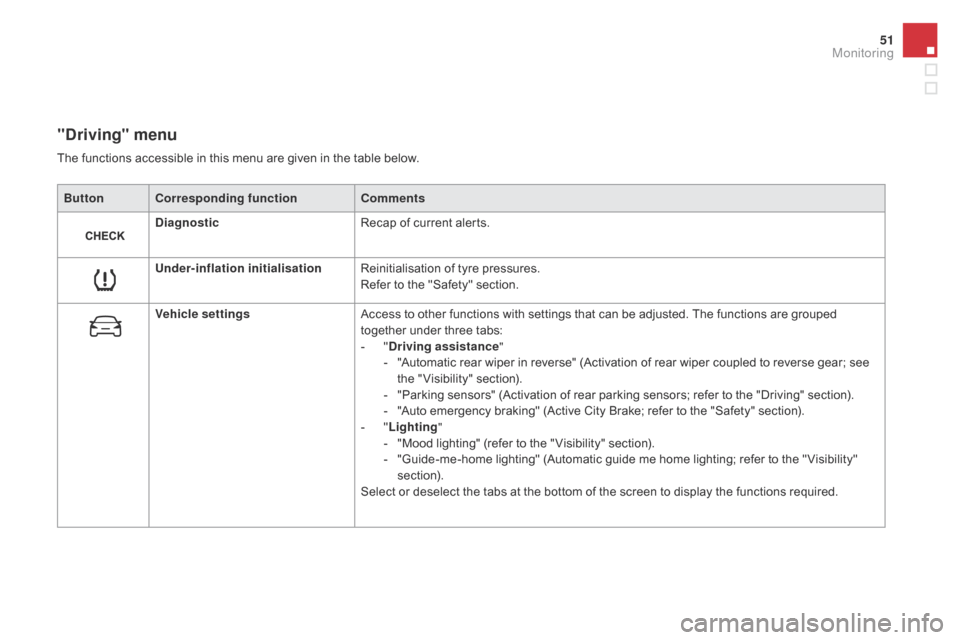
"driving" menu
ButtonCorresponding function Comments
di
agnostic Recap
of current alerts.
Under-inflation initialisation Reinitialisation
of tyre pressures.
Refer
to the "Safety" section.
Vehicle settings Access
to other functions with settings that can be adjusted. The functions are grouped
t
ogether under three tabs:
-
"dr
iving assistance"
-
"
Automatic rear wiper in reverse" (Activation of rear wiper coupled to reverse gear; see
t
he " Visibility" section).
-
"
Parking sensors" (Activation of rear parking sensors; refer to the "Driving" section).
-
"
Auto emergency braking" (Active City Brake; refer to the "Safety" section).
-
"L
ighting"
-
"
Mood lighting" (refer to the " Visibility" section).
-
"
Guide-me-home lighting" (Automatic guide me home lighting; refer to the " Visibility"
s
ection).
Select
or deselect the tabs at the bottom of the screen to display the functions required.
The
functions accessible in this menu are given in the table below.
Monitoring
Page 86 of 380

Rear view mirror
Manual day/night model
Adjustment
F Adjust the mirror so that the glass is d
irected correctly in the "day" position.
day / night position
F Pull the lever to change to the "night" anti-
dazzle position.
F
P
ush the lever to change to the normal
"
day" position. By
means of a sensor, which measures the
l
ight from the rear of the vehicle, this system
a
utomatically and progressively changes
b
etween the day and night uses.
Automatic day/night model
In order to ensure optimum visibility d
uring your manoeuvres, the mirror
l
ightens automatically when reverse
g
ear
i
s
enga
ged.
Equipped
with
an
anti-dazzle
system,
which
d
arkens
the
mirror
glass
and
reduces
the
n
uisance
to
the
driver
caused
by
the
sun,
h
eadlamps
from
other
vehicles...
As
a
safety
measure,
the
mirrors
s
hould
be
adjusted
to
reduce
the
blind
s
pots.
Page 88 of 380

Recommendations for ventilation and air conditioning
If after an extended stop in sunshine, the interior temperature is very
h
igh, first ventilate the passenger
c
ompartment for a few moments.
Put
the air flow control at a setting high
e
nough to quickly change the air in the
p
assenger
c
ompartment.
The
air conditioning system does not
c
ontain chlorine and does not present
a
ny danger to the ozone layer.
In
order
for
these
systems
to
be
fully
effective,
follow
the
operation
and
maintenance
g
uidelines belo
w:
F
T
o
obtain
an
even
air
distribution,
take
care
not
to
obstruct
the
exterior
air
intake
grilles
l
ocated
at
the
base
of
the
windscreen,
the
nozzles,
the
vents
and
the
air
outlets,
as
well
a
s
the
air
extractor
located
in
the
boot.
F
D
o
not
cover
the
sunshine
sensor,
located
on
the
dashboard;
this
is
used
for
regulation
o
f
the
air
conditioning
system.
F
O
perate
the
air
conditioning
system
for
at
least
5
to
10
minutes,
once
or
twice
a
month
t
o
keep
it
in
per fect
working
order.
F
E
nsure
that
the
passenger
compartment
filter
is
in
good
condition
and
have
the
filter
e
lements
replaced
regularly.
W
e
recommend
the
use
of
a
combined
passenger
compartment
filter.
Thanks
to
its
s
pecial
active
additive,
it
contributes
to
the
purification
of
the
air
breathed
by
the
o
ccupants
and
the
cleanliness
of
the
passenger
compartment
(reduction
of
allergic
s
ymptoms,
bad
odours
and
greasy
deposits).
F
T
o
ensure
correct
operation
of
the
air
conditioning
system,
you
are
also
advised
to
have
i
t
checked
regularly
as
recommended
in
the
maintenance
and
warranty
guide.
F
I
f
the
system
does
not
produce
cold
air,
switch
it
off
and
contact
a
CITROËN
dealer
or
a
qualified
workshop.
When
towing
the
maximum
load
on
a
steep
gradient
in
high
temperatures,
switching
off
the
a
ir
conditioning
increases
the
available
engine
power
and
so
improves
the
towing
ability. The
condensation created by the air
c
onditioning results in a discharge
o
f water under the vehicle which is
p
er fectly normal.
Page 123 of 380

121
F Select position d for automatic c hanging o
f the six gears.
The
gearbox then operates in auto-adaptive
m
ode, without any intervention on the part
o
f the driver. It continuously selects the most
s
uitable gear according to the style of driving,
t
he profile of the road and the load in the
v
ehicle.
For
maximum acceleration without touching
t
he selector, press the accelerator pedal down
f
ully (kick down). The gearbox changes down
a
utomatically or maintains the gear selected
u
ntil the maximum engine speed is reached.
On
braking, the gearbox changes down
a
utomatically to provide efficient engine
b
raking.
If you release the accelerator sharply, the
gearbox
will not change to a higher gear for
s
afety reasons.
Automatic operation
Never select position n while the
v ehicle is moving.
Never select positions P or R unless
the
vehicle is completely stationary.
Reverse
When selecting reverse R with the ignition on, t
he rear parking sensors are activated.
For
more information, refer to the "Rear parking
sen
sors"
se
ction.
Creep function (moving without
using the accelerator)
This function provides great flexibility in manoeuvring the vehicle at low speed (when
p
arking, in traffic jams, …).
With
the engine at idle, parking brake released
a
nd position d
,
M or R
s
elected,
t
he vehicle
moves
as soon as you take your foot off
t
he brake pedal (even without pressing the
a
ccelerator).
For
your safety, this function will be activated
o
nly if you press the brake pedal when
c
hanging from for ward drive to reverse.
It
is deactivated on opening the driver's door.
Closing
the door then pressing the brake or
a
ccelerator pedal, reactivates the function.
driving