2016 Citroen C5 tyre pressure
[x] Cancel search: tyre pressurePage 185 of 366

183
C5_en_Chap08_information_ed01-2015
F Remove the compressor and unclip and
store the cartridge in a sealed bag to avoid
staining your vehicle with traces of fluid.
F Drive immediately for approximately
two miles (three kilometres), at reduced
speed (between 15 and 35 mph [20 and
60 km/h]), to plug the puncture.
F Stop to check the repair and the pressure. F
Connect the compressor pipe directly to
the valve of the repaired wheel.
F
Switch on the compressor by moving
the switch A to position "1" until the tyre
pressure reaches 2.0 bars.
If this pressure has not been reached
after approximately five to ten minutes,
the tyre cannot be repaired; contact a
CITR oËn dealer to have your vehicle
repaired.
8
Practical information
Page 186 of 366

184
C5_en_Chap08_information_ed01-2015
F Connect the compressor's electric plug to
the vehicle's 12 V socket again.
F Start the vehicle again and leave the
engine running. F
Adjust the pressure using the compressor
(to inflate: switch A in position "1" ;
to deflate: switch A in position "0" and
press button B ), in accordance with the
vehicle's tyre pressure label (located on
the door aperture on the left-hand side),
then remember to check that the leak has
been plugged correctly (no further loss of
pressure after several miles [kilometres]).
F Remove the compressor, then store the
whole kit.
F Drive at reduced speed (50 mph
[80 km/h] max) limiting the distance
travelled to approximately 120 miles
(200 km).
F Visit a CITROËN dealer or a qualified
workshop as soon as possible to have the
tyre repaired or replaced by a technician. Take care as sealant cartridge contains
ethylene-glycol. This product is harmful
if swallowed and causes irritation to the
eyes. Keep it out of reach of children.
The expiry date of the sealant is
indicated on the base of the cartridge.
The cartridge is designed for a single
use; even if only partly used, it must be
replaced.
After use, do not discard the cartridge
into the environment, take it to a
CITR
oËn dealer or an authorised
waste disposal site.
Do not forget to obtain a new cartridge,
available from CITROËN dealers or a
qualified workshop.
If the vehicle is fitted with tyre under-
inflation detection, the tyre under-
inflation warning lamp will remain on
after the wheel has been repaired until
the system is reinitialised by a CITROËN
dealer or a qualified workshop.
Practical information
Page 189 of 366

187
C5_en_Chap08_information_ed01-2015
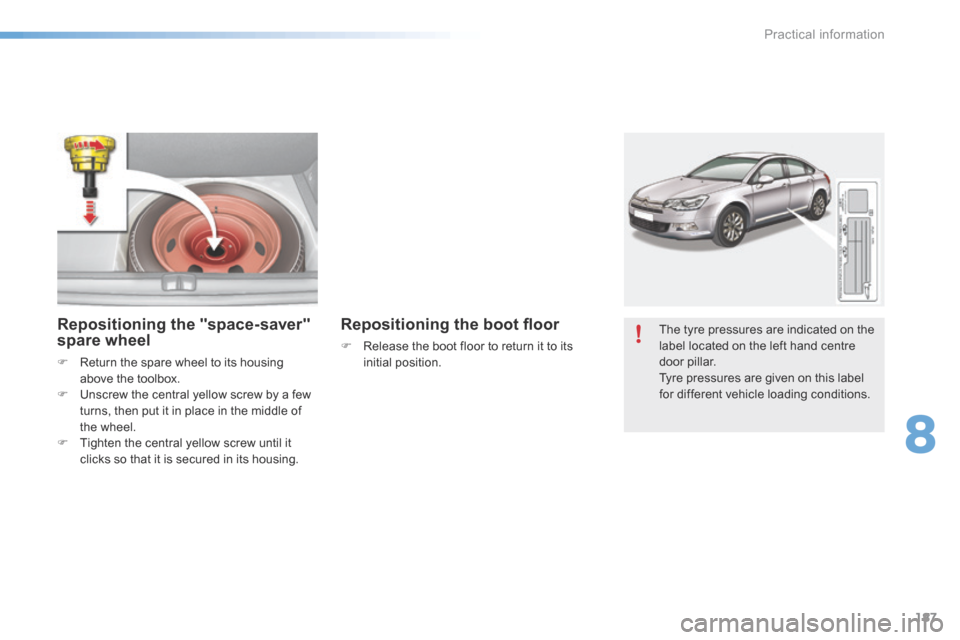
The tyre pressures are indicated on the
label located on the left hand centre
door pillar.
Tyre pressures are given on this label
for different vehicle loading conditions.Repositioning the "space-saver"
spare wheel
F Return the spare wheel to its housing
above the toolbox.
F Unscrew the central yellow screw by a few
turns, then put it in place in the middle of
the wheel.
F Tighten the central yellow screw until it
clicks so that it is secured in its housing.
Repositioning the boot floor
F Release the boot floor to return it to its
initial position.
8
Practical information
Page 193 of 366

191
C5_en_Chap08_information_ed01-2015
If your vehicle is fitted with a spare
wheel of a different size to those on the
vehicle, you must not exceed 50 mph
(80 km/h) whilst using the spare wheel.
The wheel bolts are specific to the type
of wheel.
If the type of wheel is changed,
check with your CITROËN dealer or a
qualified workshop that the wheel bolts
are compatible with the new wheels.
Take care to note down the code
number engraved on the head of the
security bolt socket. This will enable
you to obtain a replacement security
bolt socket from your dealer.
F
Tighten the security bolt using
wheelbrace 1 and security bolt socket
(depending on equipment).
F Tighten the other bolts using just the
wheelbrace 1 .
F Refit the protectors on the bolts.
F Stow the tools in the carrier box.
F Return the suspension to the normal
position.
F Check that the tyre pressure is correct and
have the balancing checked.Tyre under-inflation detection
The space-saver type or steel spare
wheel does not have a sensor.
The punctured wheel must be repaired
by a CITROËN dealer or a qualified
workshop.
8
Practical information
Page 219 of 366

217
C5_en_Chap08_information_ed01-2015
Blanking cover
When towing, you must remove the blanking
cover in the front bumper as well as the bonnet
seal if fitted.
Contact a CITROËN dealer or a qualified
workshop for this.
Ty r e s
F Check the tyre pressures of the towing
vehicle and of the trailer, observing the
recommended pressures.
Lighting
F Check the electrical lighting and signalling
on the trailer.
The rear parking sensors will be
deactivated automatically if a genuine
CITROËN towbar is used.
Braking
Towing a trailer increases the braking distance.
To avoid overheating of the brakes on a long
mountain type of descent, the use of engine
braking is recommended.
8
Practical information
Page 252 of 366

250
C5_en_Chap10_caracteristique_ed01-2015
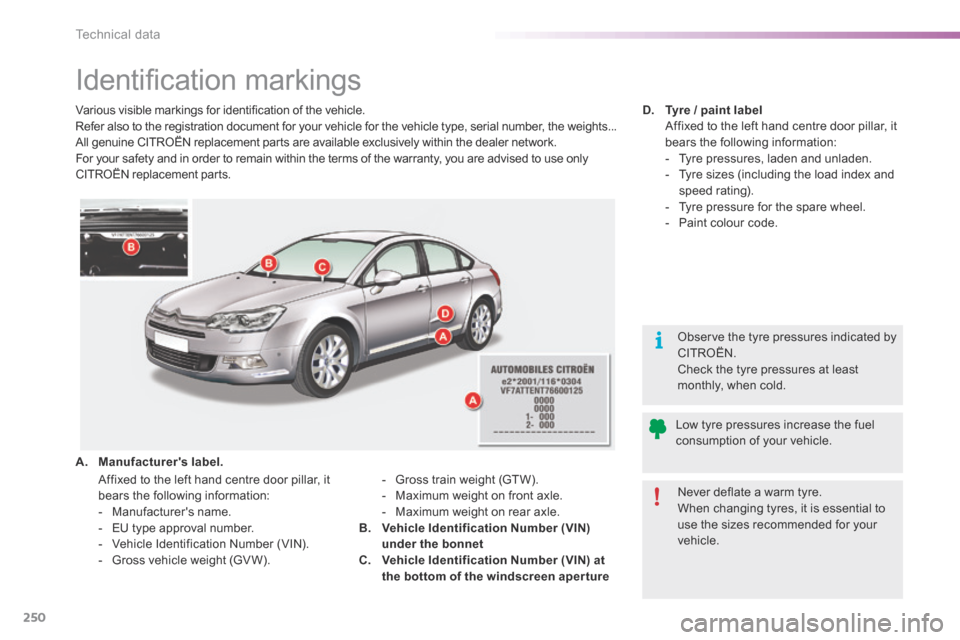
Identification markings
Various visible markings for identification of the vehicle.
Refer also to the registration document for your vehicle for the vehicle type, serial number, the weights...
All genuine CITROËN replacement parts are available exclusively within the dealer network.
For your safety and in order to remain within the terms of the warranty, you are advised to use only
CITROËN replacement parts.D.
Tyre / paint label
Affixed to the left hand centre door pillar, it
bears the following information:
- Tyre pressures, laden and unladen.
- Tyre sizes (including the load index and
speed rating).
- Tyre pressure for the spare wheel.
- Paint colour code.
o bserve the tyre pressures indicated by
CITROËN.
Check the tyre pressures at least
monthly, when cold.
A. Manufacturer's label.
- Gross train weight (GTW).
- Maximum weight on front axle.
- Maximum weight on rear axle.
B. Vehicle Identification Number (VIN)
under the bonnet
C. Vehicle Identification Number (VIN) at
the bottom of the windscreen aper ture Never deflate a warm tyre.
When changing tyres, it is essential to
use the sizes recommended for your
vehicle.
Low tyre pressures increase the fuel
consumption of your vehicle.
Affixed to the left hand centre door pillar, it
bears the following information:
- Manufacturer's name.
- EU type approval number.
- Vehicle Identification Number (VIN).
- Gross vehicle weight (GV W).
Technical data
Page 338 of 366

336
C5_en_Chap12_index-alpha_ed01-2015
Mat .................................................................. 87
Menu ................... 258, 260, 264, 272, 274, 276,
286, 288, 290, 300, 302
Menu, main ............................................. 15, 318
Menus (audio) ........................................ 272-277
Menus (Touch screen tablet) ................253, 257
Mirror, rear view .............................................. 70
Mirrors, door .................................................... 69
Misfuel prevention ......................................... 178
Mountings, Isofix ........................................... 172
MP3 CD ......................................................... 322Opening the fuel filler flap
.............................17 7
Opening the panoramic sunroof blind ............62
Opening the sunroof ....................................... 61
Pads, brake ................................................... 233
Paint colour code .......................................... 250
Panoramic glass sunroof ................................62
Parking brake ................................ 100, 101, 233
Parking brake, electric ..................................101
Parking sensors, front ...................................131
Parking sensors, rear .................................... 131
Parking space sensors .................................129
Petrol ............................................................. 179
Plates, identification ...................................... 250
Player, a pple
® ....................................... 284, 323
Player, MP3 CD ..................................... 321, 322
Player, US b ........................................... 282, 320
Port, US b ........................................ 88, 282, 320
Pressures, tyres ............................................ 250
Priming the fuel system ................................180
Protecting
children ........................................ 156, 162-176
Puncture ........................................................ 181
P
R
Radio ..................................................... 278, 318
Radio, digital (Digital Audio Broadcasting - DAB) ...........................280, 281
R dS ....................................................... 279, 319
Reading lamps, rear ........................................ 83
Recharging the battery .........................210, 212
Recirculation, air ....................................... 78, 81
Regeneration of the particle filter .................232
Reinitialising the electric windows ..................53
Reinitialising the remote control .....................48
Reinitialising the sunroof ................................61
Reminder, key in ignition .................................99
Reminder, lighting on .................................... 13 9
Remote control .................................... 45, 46, 49
Removing a wheel ........................................ 188
Removing the mat ........................................... 87
Replacing bulbs ..................................... 193 -203
Replacing fuses .................................... 204-209
Replacing the air filter ...................................231
Replacing the oil filter ...................................231
Replacing the passenger
compartment filter ...................................... 231
Reservoir, headlamp wash ...........................230
Reservoir, screenwash ................................. 230
Resetting the service indicator .......................23
Resetting the trip recorder ..............................25
Reset trip .................................................... 17, 18
Rev counter ..................................................... 14
Reversing camera ......................................... 13 3
Reversing lamp ..................................... 197, 19 9
Risk areas (update) ....................................... 269
Roof bars ....................................................... 218
Roof, opening .................................................. 61
Running out of fuel (Diesel) ..........................180
Navigation
.............................................. 25 8 -271
Net, high load retaining ...................................94
Number plate lamps ...................................... 201
Oil change ..................................................... 227
Oil consumption ............................................ 227
OIl, engine ..................................................... 227
Opening the bonnet ...................................... 224
Opening the boot ............................................ 45
Opening the doors .................................... 45, 55
N
O
alphabetical index
Page 349 of 366

8
Practical information
1
Temporary puncture repair kit
All versions * , except BlueHDi
Diesel
BlueHDi Diesel versions
*
Depending on the country of sale.
Access to the kit
This kit is installed in the storage box, under the
boot floor.
This kit consists of a compressor and a sealant
cartridge.
It allows the temporary repair
of a tyre.
You are then able to go to the nearest garage.
It is designed to repair most punctures
which could affect the tyre, located on
the tyre tread or shoulder.
Its compressor can be used to check
and adjust the pressure of the tyre.