2016 Citroen C4 PICASSO wheel bolts
[x] Cancel search: wheel boltsPage 268 of 527

266
C4-Picasso-II_en_Chap07_info-pratiques_ed01-2016
Accessories
A wide range of accessories and genuine parts is available from the CITROËN dealer network.
T hese accessories and parts are all suitable for your vehicle and benefit from CITROËN's recommendation and warranty.
"Comfort"
Door deflectors, sun blind, insulated module,
coat hanger fixed to head restraint, mobile
r
eading lamp, mirror for caravan, front and rear
par
king
s
ensors,
p
rogrammable
a
dditional
h
eating, smoker's kit, solar film for rear door
w
indows, portable scented air freshener...
"Transport systems"
Boot carpet, boot liner, boot net, boot
spacers, transverse roof bars, ski carrier, roof
b
oxes, towbars, towbar wiring harnesses,
b
icycle carriers for towbar and roof bars,
towbars
with fixed and detachable towball,
s
eparation net, sliding carrier, boot organiser
(
Grand C4 Picasso)...
If
a towbar and wiring harness are fitted
o
utside the CITROËN dealer network, the
i
nstallation must be done strictly in line with the
manufacturer's
r
ecommendations.
If your vehicle has a detachable towball, it is
recommended that the ball be removed when
not
towing.
"Styling"
Gear lever knobs, aluminium foot rest, alloy wheels, door sill finishers, interior mirror
shells...
"Security and safety"
Anti-intrusion alarm, vehicle tracking system, c hild seats and booster cushions, breathalyser,
first
aid kit, fire extinguisher, warning triangle,
h
igh visibility vest, wheel security bolts, snow
c
hains, non-slip covers, winter tyres, foglamp
k
it, security film for front door windows, dog
g
uard, pet seat belt...
"Protection"
Mats*, seat covers compatible with lateral
airbags, mud flaps, door protective mouldings,
b
umper protection strips, vehicle cover, boot
sill protector, door sill protectors, seat and boot
protective
covers for pets...
The
rear bodywork has been designed to avoid
s
p r ay.
*
T
o avoid any risk of jamming the pedals:
-
e
nsure that mats are correctly positioned
and secured,
-
n
ever fit one mat on top of another.
Practical information
Page 293 of 527

291
C4-Picasso-II_en_Chap08_en-cas-panne_ed01-2016
Spare wheel
The tools are installed in the boot under the
f l o o r.
Remove the boot carpet for access to them.
Access to the tools
List of tools*
Procedure for changing a wheel with a punctured tyre for the spare wheel using the tools provided with the vehicle.
A ll of these tools are specific to your
vehicle
and can vary according to the level
o
f equipment. Do not use them for other
p
urposes.
1.
W
heelbrace.
F
or removing the wheel trim and removing
t
he wheel bolts.
2.
C
hock for immobilising the vehicle (except
v
ersions with manual gearbox).
3.
J
ack with integral handle.
F
or raising the vehicle.
4.
W
heel bolt cover remover.
F
or removing the wheel bolt covers on alloy
w
heels.
5.
S
ocket for the security bolts (located in the
g
love box).
F
or adapting the wheelbrace to the special
"s
ecurity"
b
olts.
*
According to equipment.
8
In the event of a breakdown
Page 295 of 527

293
C4-Picasso-II_en_Chap08_en-cas-panne_ed01-2016
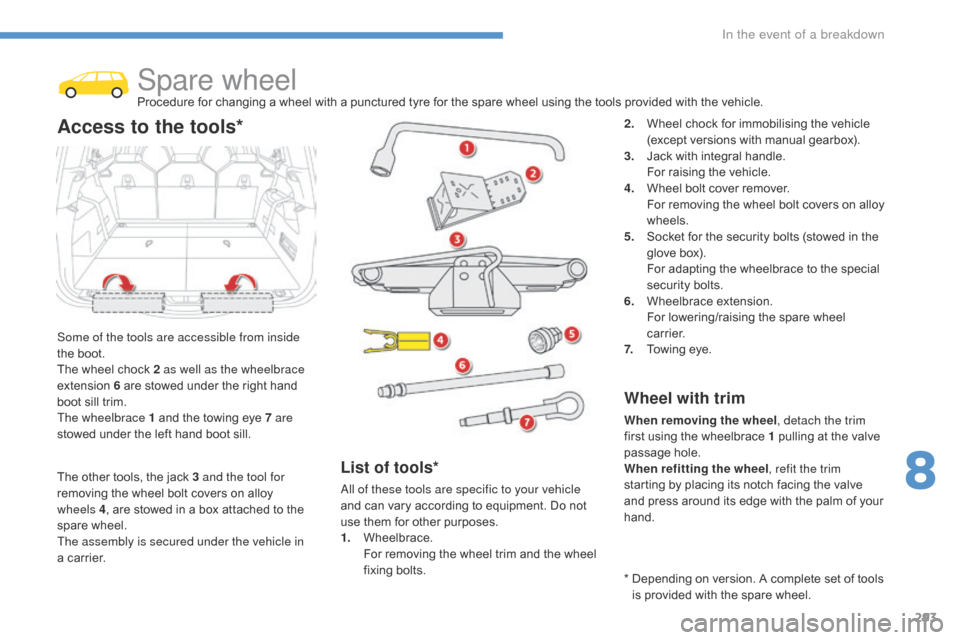
Spare wheelProcedure for changing a wheel with a punctured tyre for the spare wheel using the tools provided with the vehicle.
S
ome of the tools are accessible from inside
the
boot.
The
wheel
chock 2 as well as the wheelbrace
extension
6
are stowed under the right hand
b
oot
sill
trim.
The wheelbrace 1
and the towing eye 7 are
stowed
under
the left hand boot sill.
Access to the tools*2. Wheel chock for immobilising the vehicle (
except versions with manual gearbox).
3.
J
ack with integral handle.
F
or raising the vehicle.
4.
W
heel bolt cover remover.
F
or removing the wheel bolt covers on alloy
w
heels.
5.
S
ocket for the security bolts (stowed in the
g
love box).
F
or adapting the wheelbrace to the special
s
ecurity bolts.
6.
W
heelbrace
e
xtension.
F
or lowering/raising the spare wheel
c
a r r i e r.
7.
T
owing eye.
Wheel with trim
When removing the wheel , detach the trim
first using the wheelbrace 1 pulling at the valve
p
assage hole.
When refitting the wheel , refit the trim
starting
by placing its notch facing the valve
a
nd press around its edge with the palm of your
han
d.
List of tools*
All of these tools are specific to your vehicle
and can vary according to equipment. Do not
u
se them for other purposes.
1.
W
heelbrace.
F
or removing the wheel trim and the wheel
f
ixing
bol
ts. *
D
epending on version. A complete set of tools
i
s provided with the spare wheel.
The
other
tools,
the
jack
3 and the tool for
removing
the
wheel
bolt
covers
on
alloy
w
heels
4 ,
are
stowed
in
a
box
attached
to
the
spar
e
w
heel.
The assembly is secured under the vehicle in
a
carrier.
8
In the event of a breakdown
Page 299 of 527

297
C4-Picasso-II_en_Chap08_en-cas-panne_ed01-2016
Removing a wheel
Parking the vehicle
Immobilise the vehicle where it does not
block traffic: the ground must be level,
s
table and not slippery.
Apply
the parking brake unless it has
b
een programmed to automatic mode,
s
witch off the ignition and engage first
g
ear* to block the wheels.
Check
that the braking warning lamp
a
nd the P warning lamp in the parking
b
rake control lever come on.
For
greater safety, place the chock 2
against
the wheel opposite to the one
b
eing
c
hanged.
The
occupants must get out of the
v
ehicle and wait where they are safe.
Never
go underneath a vehicle
s
upported by a jack; use an axle stand.
List of operations
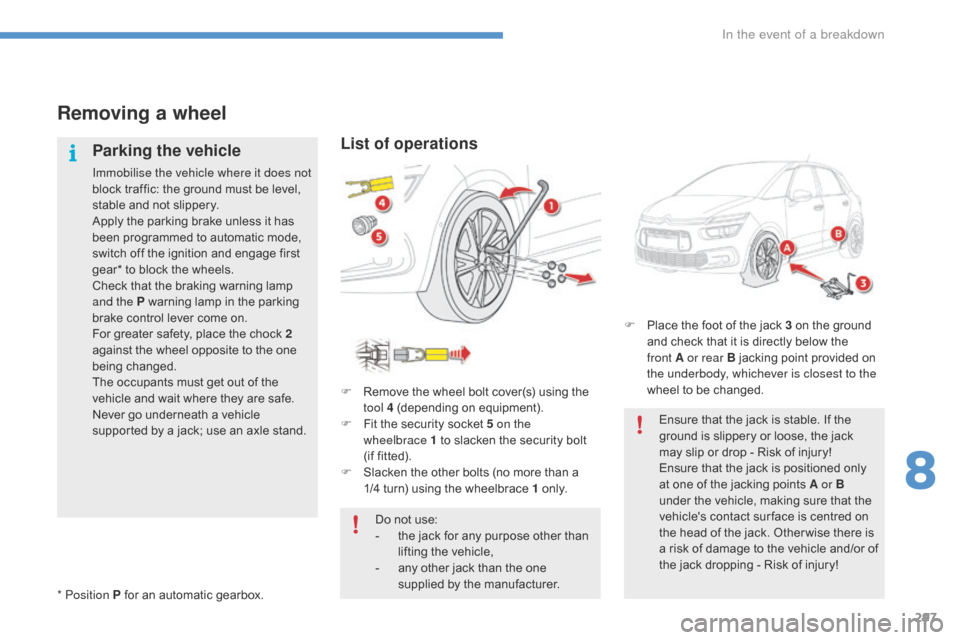
F Remove the wheel bolt cover(s) using the t
ool 4 (depending on equipment).
F
F
it the security socket 5 on the
wheelbrace
1 to slacken the security bolt
(
if fitted).
F
S
lacken the other bolts (no more than a
1
/4 turn) using the wheelbrace 1
o
n l y.
* Position P
for
an
automatic
gearbox. Do
not use:
-
t
he jack for any purpose other than
l
ifting the vehicle,
-
a
ny other jack than the one
s
upplied by the manufacturer.F
P
lace the foot of the jack 3 on the ground
a
nd check that it is directly below the
f
ront A or rear B jacking point provided on
t
he underbody, whichever is closest to the
wheel to be changed.
Ensure that the jack is stable. If the
g
round is slippery or loose, the jack
m
ay slip or drop - Risk of injury!
Ensure
that the jack is positioned only
a
t one of the jacking points A or B
under
the vehicle, making sure that the
v
ehicle's contact sur face is centred on
t
he head of the jack. Other wise there is
a
risk of damage to the vehicle and/or of
t
he jack dropping - Risk of injury!
8
In the event of a breakdown
Page 300 of 527

298
C4-Picasso-II_en_Chap08_en-cas-panne_ed01-2016
F Extend the jack 3 until its head comes into contact with the jacking point A or B used; the v
ehicle's contact sur face A or B must engage with the central part of the head of the jack
F
R
aise the vehicle until there is sufficient space between the wheel and the ground to admit the
s
pare (not punctured) wheel easily. F
R emove the bolts and store them in a clean
place.
F
R
emove the wheel.
In the event of a breakdown
Page 301 of 527

299
C4-Picasso-II_en_Chap08_en-cas-panne_ed01-2016
Fitting a wheel
F Lower the vehicle fully.
F F old the jack 3 and detach it.
List of operations
F Put the wheel in place on the hub.
F S crew in the bolts fully by hand.
F
P
re-tighten the security bolt using the
w
heelbrace 1 fitted with the security
socket 5
(depending on equipment).
F
P
re-tighten the other bolts using the
w
heelbrace 1
o
n l y.
The
jack
must
only
be
used
to
change
a
w
heel
with
a
damaged
tyre.
The
jack
does
not
require
any
m
aintenance.
The
jack
conforms
to
European
l
egislation,
such
as
defined
in
the
M
achinery
Directive
2006/42/CE.
8
In the event of a breakdown
Page 302 of 527

300
C4-Picasso-II_en_Chap08_en-cas-panne_ed01-2016
Fitting the "space-saver"
spare wheel
If your vehicle is fitted with alloy wheels,
when tightening the bolts on fitting, it
i
s normal to notice that the washers
do not come into contact with the
"space-saver"
spare wheel. The wheel
i
s secured by the conical sur face of
each
bolt.
After changing a wheel
To correctly store the punctured wheel
in the boot ( not in the location for the
space-saver wheel ), first remove the
central
cover.
When
using the "space-saver" type
s
pare wheel, do not exceed 50 mph
(
80 km/h).
Have
the tightening of the bolts and the
p
ressure of the spare wheel checked
b
y a CITROËN dealer or a qualified
workshop
without delay.
Have the punctured wheel repaired
and refitted to the vehicle as soon as
possible.
F
T
ighten
the
security
bolt
using
the
w
heelbrace 1 fitted with the security
socket 5
(depending
on
equipment).
F
T
ighten
the
other
bolts
using
the
w
heelbrace 1
o
n l y.
F
R
efit
the
wheel
bolt
cover(s)
(depending
on
e
quipment).
F
S
tow
the
tools
in
the
box. The
tyre inflation pressures are given on this lab
el.
In the event of a breakdown