2016 Citroen C3 PICASSO distance recorder
[x] Cancel search: distance recorderPage 4 of 292

.
.
C3Picasso_en_Chap00a_sommaire_ed01-2015
Child seats 94
Deactivating the passenger's front airbag
9
7
Isofix child seats
1
03
Child lock
1
07
Child safety
Instrument panel 1 0
Indicator and warning lamps
1
1
Indicators
2
2
Distance recorders
2
6
MonitoringOverview
Screen without audio equipment 2
7
Screen with audio equipment
2
9
Trip computer
4
0
Multifunction screens
Ventilation 43
Rear screen demist/defrost
4
5
Heating
46
Manual air conditioning
4
6
Dual-zone digital air conditioning
4
8
Scented air freshener
5
1
Front seats
5
2
Rear seats
5
5
Mirrors
57
Steering wheel adjustment
5
8
Comfort
Remote control key 59
Window controls
6
2
Doors
64
Boot
67
Panoramic sunroof
6
8
Fuel tank
6
9
Misfuel prevention (Diesel)
7
1
Access
Lighting controls 72
LED daytime running lamps
7
6
Cornering lighting
7
7
Headlamp adjustment
7
8
Wiper controls
7
9
Courtesy lamps
8
2
Boot lamp
8
3
Visibility
Front fittings 84
Rear fittings
8
8
Boot fittings
9
1
Fittings
Eco-driving
Contents
Page 12 of 292

10
C3Picasso_en_Chap01_controle-de-marche_ed01-2015
Petrol - Diesel instrument panel
Panel grouping together the digital indicator, the multifunction screen and the vehicle operation
indicator and warning lamps.
1.
R
ev counter.
I
ndicates the speed of rotation of the
engine (x 1000 rpm).
2.
R
ev counter zone indicating that you must
change up a gear.
3.
S
peed limiter
or
C
ruise control.
(
mph or km/h)
4.
E
lectric child lock indicator lamp.
I
ndicates, for a few seconds, the activation
of the electric child lock (deactivation of the
rear windows and doors).
Translucent digital instrument panel
This screen groups together the warning and
information messages.
Multifunction screen
Indicator lamps display zone
This zone groups together the vehicle
operation indicator lamps.
Display zero reset button
This permits resetting of the function selected
to zero (trip distance recorder or service
indicator).
Instrument panel lighting button
This adjusts the brightness of the lighting of the
instruments and controls.
5.
F
uel
gauge .
I
ndicates the quantity of fuel remaining in
the tank.
6.
S
peedometer
.
I
ndicates the current speed of the moving
vehicle (mph or km/h).
7.
T
rip distance recorder.
(
miles or km)
8. S
ervice indicator.
(
miles or km) then,
D
istance recorder.
(
miles or km)
9.
E
ngine oil level indicator. For more information, refer to the
paragraph relating to the button or
function and its associated display.
Monitoring
Page 24 of 292

22
C3Picasso_en_Chap01_controle-de-marche_ed01-2015
Service indicator
5 seconds after the ignition is switched on,
the spanner goes off; the distance recorder
resumes its normal operation. The screen then
indicates the total distance.
Between 600 miles (1 000 km)
and 1 800 miles (3 000 km) remain
before the next service is due
For 5 seconds after the ignition is switched on, the
spanner symbolising the service operations comes
on. The distance recorder display line indicates the
distance remaining before the next service is due.
Example: 1 700 miles (2 800 km) remain before
the next service is due.
For 5 seconds after the ignition is switched on, the
screen indicates:
Less than 600 miles (1 000 km)
remain before the next service is due
Example: 560 miles (900 km) remain before
the next service is due.
For 5 seconds after the ignition is switched on,
the screen indicates:
5 seconds after the ignition is switched on,
the distance recorder resumes its normal
operation. The spanner remains on to
indicate that a service must be carried out
soon.
More than 1 800 miles (3 000 km)
remain before the next service is due
When the ignition is switched on, no service
information appears in the screen.
The point at which the next service is due is
calculated from the last indicator zero reset,
depending on the distance travelled and the
time elapsed since the last service. System which informs the driver when the
next service is due, in accordance with the
manufacturer's servicing schedule. For BlueHDi Diesel versions, the
degree of deterioration of the engine oil
is also taken into account (depending
on the country of sale).
Indicators
Monitoring
Page 25 of 292

23
C3Picasso_en_Chap01_controle-de-marche_ed01-2015
The distance remaining may be
weighted by the time factor, depending
on the driving conditions.
Therefore, the spanner may also come
on if you have exceeded the period
since the last service, indicated in the
manufacturer's service schedule.
For BlueHDi Diesel versions, the
spanner may also be brought on earlier
than expected, depending on the
degree of deterioration of the engine oil
(depending on the country of sale).
The rate of deterioration of the engine
oil depends on the driving conditions in
which the vehicle is used.
Service overdue
5 seconds after the ignition is switched on,
the distance recorder resumes its normal
operation. The spanner remains on.For BlueHDi Diesel versions, this alert
may also be accompanied by the fixed
illumination of the service warning lamp
when the ignition is on.
For 5 seconds after the ignition is switched on,
the spanner flashes to indicate that the service
must be carried out as soon as possible.
Example: the service is overdue by 180 miles
(3 0 0 k m).
For 5 seconds after the ignition is switched on,
the screen indicates:
1
Monitoring
Page 26 of 292

24
C3Picasso_en_Chap01_controle-de-marche_ed01-2015
Resetting the service indicator
After each service, the service indicator must
be reset to zero.
If you have carried out the service on your
vehicle yourself:
F
s
witch off the ignition,
F
p
ress and hold the trip distance recorder
zero reset button,
F
s
witch on the ignition; the distance recorder
display begins a countdown,
F
w
hen the display indicates "=0" , release
the button; the spanner disappears.
Retrieving the service
information
You can access the service information at any
time.
F
P
ress the trip distance recorder zero reset
button.
T
he service information is displayed for a
few seconds, then disappears. If you have to disconnect the battery
following this operation, lock the vehicle
and wait at least five minutes for the
reset to be registered.
Monitoring
Page 28 of 292

26
C3Picasso_en_Chap01_controle-de-marche_ed01-2015
Distance recordersLighting dimmer
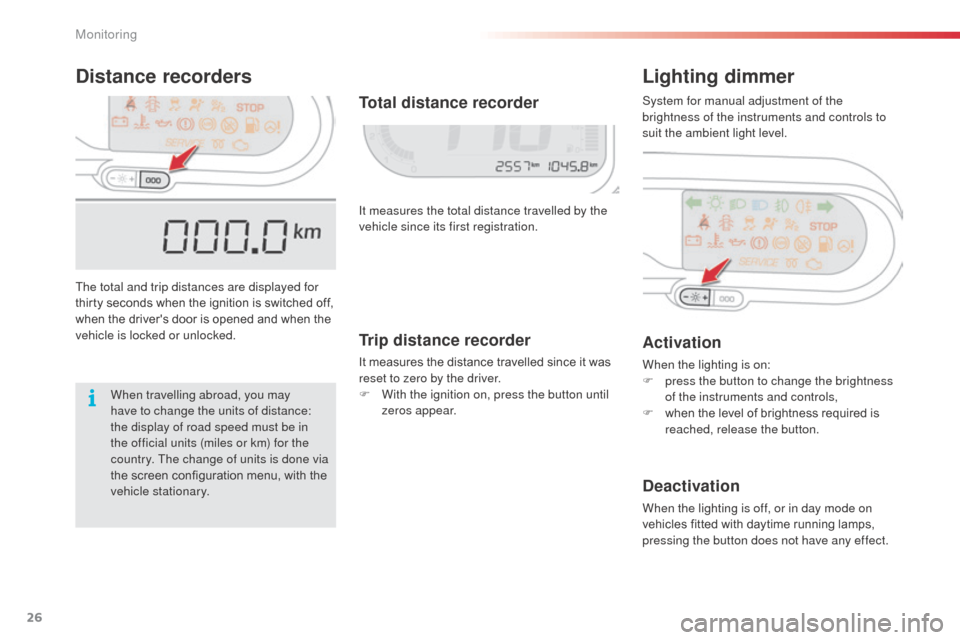
The total and trip distances are displayed for
thirty seconds when the ignition is switched off,
when the driver's door is opened and when the
vehicle is locked or unlocked.It measures the total distance travelled by the
vehicle since its first registration.
Activation
When the lighting is on:
F
p ress the button to change the brightness
of the instruments and controls,
F
w
hen the level of brightness required is
reached, release the button.
Deactivation
When the lighting is off, or in day mode on
vehicles fitted with daytime running lamps,
pressing the button does not have any effect.
Total distance recorder
When travelling abroad, you may
have to change the units of distance:
the display of road speed must be in
the official units (miles or km) for the
country. The change of units is done via
the screen configuration menu, with the
vehicle stationary. System for manual adjustment of the
brightness of the instruments and controls to
suit the ambient light level.
Trip distance recorder
It measures the distance travelled since it was
reset to zero by the driver.
F
W
ith the ignition on, press the button until
zeros appear.
Monitoring
Page 136 of 292

134
C3Picasso_en_Chap09_conduite_ed01-2015
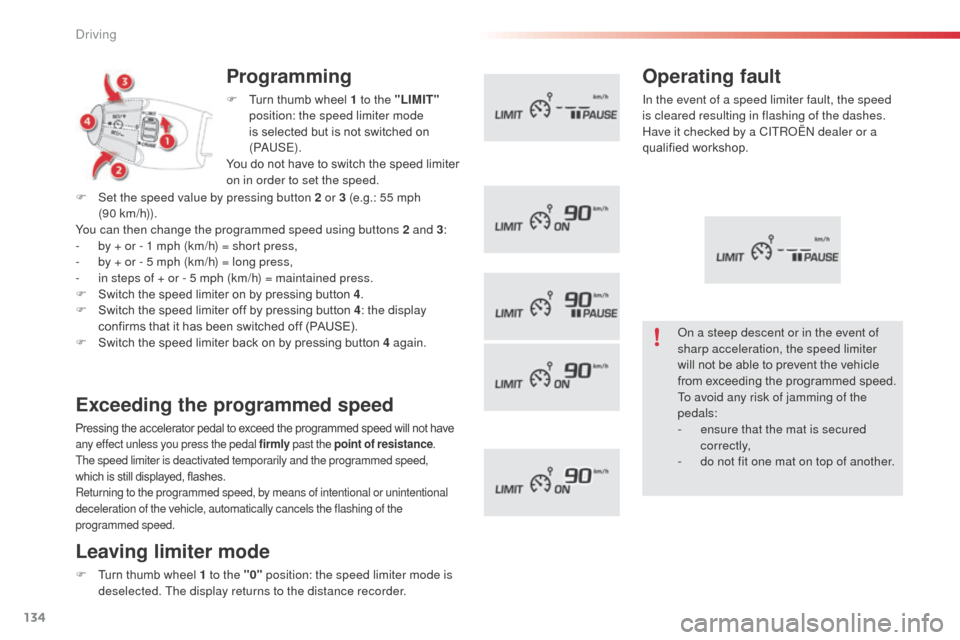
Programming
F Turn thumb wheel 1 to the "LIMIT"
position: the speed limiter mode
is selected but is not switched on
(PAUS E).
You do not have to switch the speed limiter
on in order to set the speed.
Exceeding the programmed speed
Pressing the accelerator pedal to exceed the programmed speed will not have
any effect unless you press the pedal firmly past the point of resistance.
The speed limiter is deactivated temporarily and the programmed speed,
which is still displayed, flashes.
Returning to the programmed speed, by means of intentional or unintentional
deceleration of the vehicle, automatically cancels the flashing of the
programmed speed.
Leaving limiter mode
F Turn thumb wheel 1 to the "0" position: the speed limiter mode is
deselected. The display returns to the distance recorder.
Operating fault
In the event of a speed limiter fault, the speed
is cleared resulting in flashing of the dashes.
Have it checked by a CITROËN dealer or a
qualified workshop.
F
S
et the speed value by pressing button 2 or 3 (e.g.: 55 mph
(90
km/h)).
You can then change the programmed speed using buttons 2 and 3 :
-
b
y + or - 1 mph (km/h) = short press,
-
b
y + or - 5 mph (km/h) = long press,
-
i
n steps of + or - 5 mph (km/h) = maintained press.
F
S
witch the speed limiter on by pressing button 4 .
F
S
witch the speed limiter off by pressing button 4 : the display
confirms that it has been switched off (PAUSE).
F
S
witch the speed limiter back on by pressing button 4 again. On a steep descent or in the event of
sharp acceleration, the speed limiter
will not be able to prevent the vehicle
from exceeding the programmed speed.
To avoid any risk of jamming of the
pedals:
-
e
nsure that the mat is secured
c o r r e c t l y,
-
d
o not fit one mat on top of another.
Driving
Page 138 of 292

136
C3Picasso_en_Chap09_conduite_ed01-2015
Programming
F Turn dial 1 to the "CRUISE" position:
the cruise control mode is selected
but is not switched on (PAUSE).
Exceeding the programmed speed
Intentional or unintentional exceeding of the programmed speed results in
flashing of this speed in the screen.
Return to the programmed speed, by means of intentional or unintentional
deceleration of the vehicle, automatically cancels the flashing of the speed.
Return to normal driving
F Turn dial 1 to the "0" position: the cruise control mode is
deselected. The display returns to the distance recorder.
Operating fault
In the event of a cruise control malfunction,
the speed is cleared resulting in flashing of the
dashes.
Have it checked by a CITROËN dealer or a
qualified workshop.
F
S
et the programmed speed by
accelerating to the required speed,
then press button 2 or 3 (e.g.: 70 mph
(110 km/h)).
F
S
witch off the cruise control by pressing button 4 :
this is confirmed in the screen (PAUSE).
F
S
witch the cruise control back on by pressing button 4 again.
You can then change the programmed speed using buttons 2 and 3
:
-
b
y + or - 1 mph (km/h) = short press,
-
b
y + or - 5 mph (km/h) = long press,
-
i
n steps of + or - 5 mph (km/h) = maintained press. When the cruise control is switched on,
be careful if you maintain the pressure
on one of the programmed speed
changing buttons: this may result in a
very rapid change in the speed of your
vehicle.
Do not use the cruise control on
slippery roads or in heavy traffic.
On a steep descent, the cruise control
will not be able to prevent the vehicle
from exceeding the programmed speed.
To avoid any risk of jamming of the
pedals:
-
e
nsure that the mat is secured
c o r r e c t l y,
-
n
ever fit one mat on top of another.
Driving