2016 CHRYSLER TOWN AND COUNTRY mileage
[x] Cancel search: mileagePage 322 of 727
1. Tachometer•This gauge measures engine revolutions per minute
(RPM x 1000). Before the pointer reaches the red area,
ease up on the accelerator to prevent engine damage.
2. Odometer Display/Electronic Vehicle Information Center (EVIC) — If Equipped
Odometer Display / Trip Odometer Display The odom-
eter display shows the total distance the vehicle has been
driven.
U.S. Federal regulations require that upon transfer of
vehicle ownership, the seller certify to the purchaser the
correct mileage that the vehicle has been driven. If your
odometer needs to be repaired or serviced, the repair
technician should leave the odometer reading the same
as it was before the repair or service. If s/he cannot do so,
then the odometer must be set at zero, and a sticker must
be placed in the door jamb stating what the mileage was
before the repair or service. It is a good idea for you to make a record of the odometer reading before the repair/
service, so that you can be sure that it is properly reset, or
that the door jamb sticker is accurate if the odometer
must be reset at zero.
This also displays Trip A and Trip B, DTE, MPG or
L/100km, OAT (Outside Air Temperature) information to
Base Cluster, use STEP and RESET button (on steering
wheel) to access or reset the display.
Message Display Area
When the appropriate conditions exist, the following
odometer messages will display:
door
............................. Door Ajar
gATE .......................... Liftgate Ajar
LoW tirE ....................LowTirePr essure
320 UNDERSTANDING YOUR INSTRUMENT PANEL
Page 327 of 727
1. Tachometer•This gauge measures engine revolutions per minute
(RPM x 1000). Before the pointer reaches the red area,
ease up on the accelerator to prevent engine damage.
2. Electronic Vehicle Information Center (EVIC) — If Equipped / Odometer Display / Trip Odometer Dis-
play
Electronic Vehicle Information Center (EVIC) — If
Equipped
The Electronic Vehicle Information Center (EVIC) fea-
tures a driver-interactive display that is located in the
instrument cluster. Refer to “Electronic Vehicle Informa-
tion Center (EVIC)” in this section for further informa-
tion.
Odometer Display / Trip Odometer Display The odom-
eter display shows the total distance the vehicle has been
driven. U.S. Federal regulations require that upon transfer of
vehicle ownership, the seller certify to the purchaser the
correct mileage that the vehicle has been driven. If your
odometer needs to be repaired or serviced, the repair
technician should leave the odometer reading the same
as it was before the repair or service. If s/he cannot do so,
then the odometer must be set at zero, and a sticker must
be placed in the door jamb stating what the mileage was
before the repair or service. It is a good idea for you to
make a record of the odometer reading before the repair/
service, so that you can be sure that it is properly reset, or
that the door jamb sticker is accurate if the odometer
must be reset at zero.
This also displays Trip A and Trip B, DTE, MPG or
L/100km, OAT (Outside Air Temperature) information to
Base Cluster, use STEP and RESET button (on steering
wheel) to access or reset the display.
4
UNDERSTANDING YOUR INSTRUMENT PANEL 325
Page 365 of 727
NOTE:Significant changes in driving style or vehicle
loading will greatly affect the actual drivable distance of
the vehicle, regardless of the DTE displayed value.
When the DTE value is less than 30 miles (48 km)
estimated driving distance, the DTE display will change
to a “LOW FUEL” message. This display will continue
until the vehicle runs out of fuel. Adding a significant
amount of fuel to the vehicle will turn off the “LOW
FUEL” message and a new DTE value will display.
Current Fuel Economy (MPG or L/100 km)
This display shows the instantaneous MPG or L/100 km
in bar graph form while driving. This will monitor the
gas mileage in real-time as you drive and can be used to
modify driving habits in order to increase fuel economy.
Vehicle Speed
Push and release the UP or DOWN button until “Vehicle
Speed” displays highlighted in the EVIC and push the RIGHT arrow button. Push and release the RIGHT arrow
button to display the current speed in mph or km/h.
Pushing the RIGHT arrow button a second time will
toggle the unit of measure between mph or km/h.
NOTE:
Changing the unit of measure in the Vehicle
Speed menu will not change the unit of measure in the
EVIC.
Trip Info
Push and release the UP or DOWN button until “Trip
Info” is highlighted in the EVIC and push the RIGHT
button. Push and release the UP/DOWN buttons to
highlight one of the following functions if you want to
reset it:
Trip A
• Shows the total distance traveled for Trip A since the
last reset.
4
UNDERSTANDING YOUR INSTRUMENT PANEL 363
Page 657 of 727
the coolant expansion bottle. If engine coolant (anti-
freeze) needs to be added, the contents of the coolant
expansion bottle must also be protected against freez-
ing.
• If frequent engine coolant (antifreeze) additions are
required, the cooling system should be pressure tested
for leaks.
• Maintain engine coolant (antifreeze) concentration at a
minimum of 50% OAT coolant (conforming to
MS.90032) and distilled water for proper corrosion
protection of your engine which contains aluminum
components.
• Make sure that the coolant expansion bottle overflow
hoses are not kinked or obstructed.
• Keep the front of the radiator clean. If your vehicle is
equipped with air conditioning, keep the front of the
condenser clean. •
Do not change the thermostat for Summer or Winter
operation. If replacement is ever necessary, install
ONLY the correct type thermostat. Other designs may
result in unsatisfactory engine coolant (antifreeze)
performance, poor gas mileage, and increased emis-
sions.
Brake System
In order to assure brake system performance, all brake
system components should be inspected periodically.
Refer to the “Maintenance Schedule” for the proper
maintenance intervals.
WARNING!
Riding the brakes can lead to brake failure and
possibly a collision. Driving with your foot resting or
riding on the brake pedal can result in abnormally
(Continued)
7
MAINTAINING YOUR VEHICLE 655
Page 690 of 727
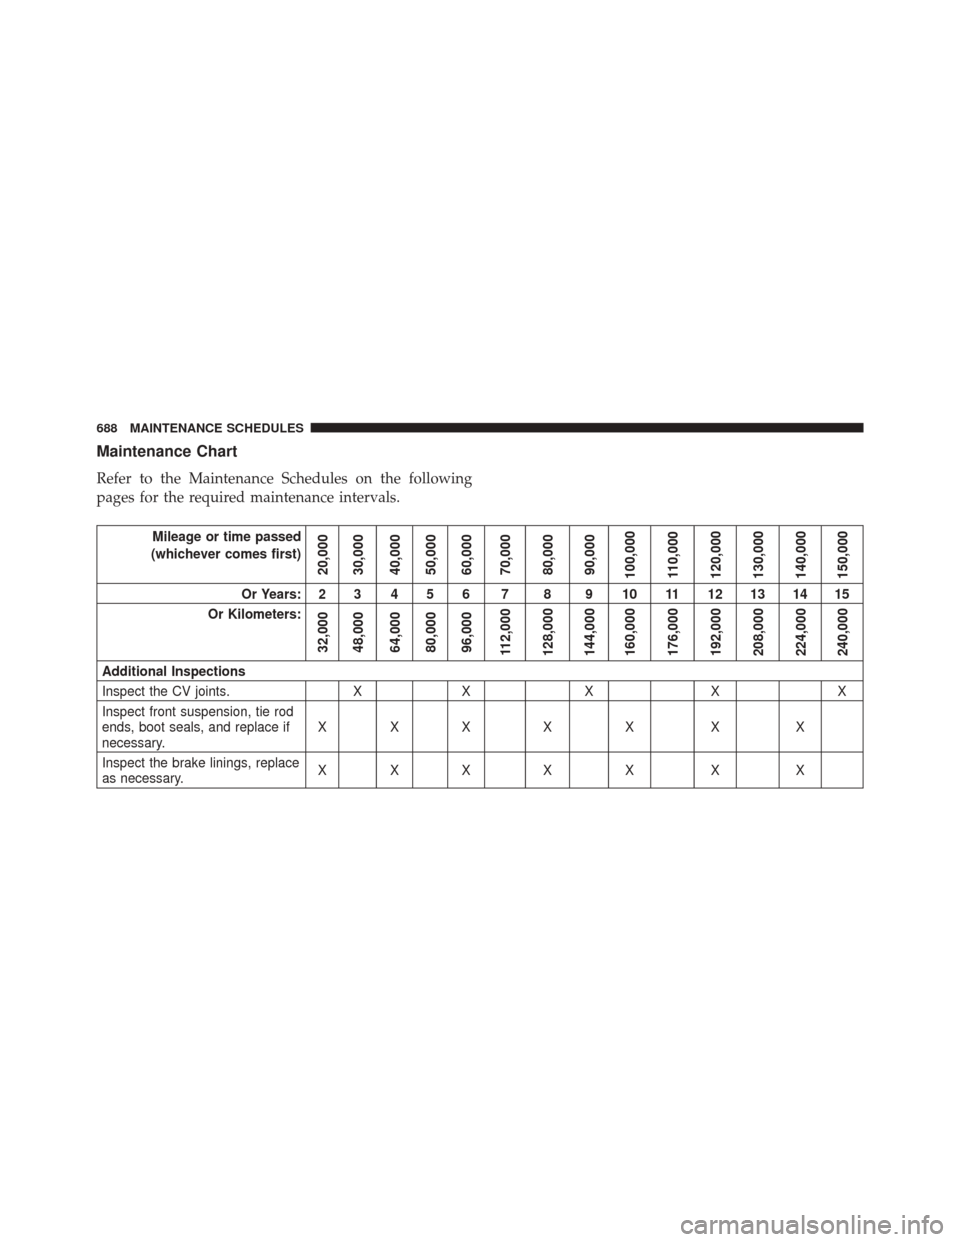
Maintenance Chart
Refer to the Maintenance Schedules on the following
pages for the required maintenance intervals.
Mileage or time passed
(whichever comes first)
20,000
30,000
40,000
50,000
60,000
70,000
80,000
90,000
100,000
110,000
120,000
130,000
140,000
150,000
Or Years: 2 3 4 5 6 7 8 9 10 11 12 13 14 15
Or Kilometers:
32,000
48,000
64,000
80,000
96,000
112,000
128,000
144,000
160,000
176,000
192,000
208,000
224,000
240,000
Additional Inspections
Inspect the CV joints. XX X X X
Inspect front suspension, tie rod
ends, boot seals, and replace if
necessary. XXX X X X X
Inspect the brake linings, replace
as necessary. XXX X X X X
688 MAINTENANCE SCHEDULES
Page 691 of 727
Mileage or time passed
(whichever comes first)
20,000
30,000
40,000
50,000
60,000
70,000
80,000
90,000
100,000
110,000
120,000
130,000
140,000
150,000
Or Years: 2 3 4 5 6 7 8 9 10 11 12 13 14 15
Or Kilometers:
32,000
48,000
64,000
80,000
96,000
112,000
128,000
144,000
160,000
176,000
192,000
208,000
224,000
240,000
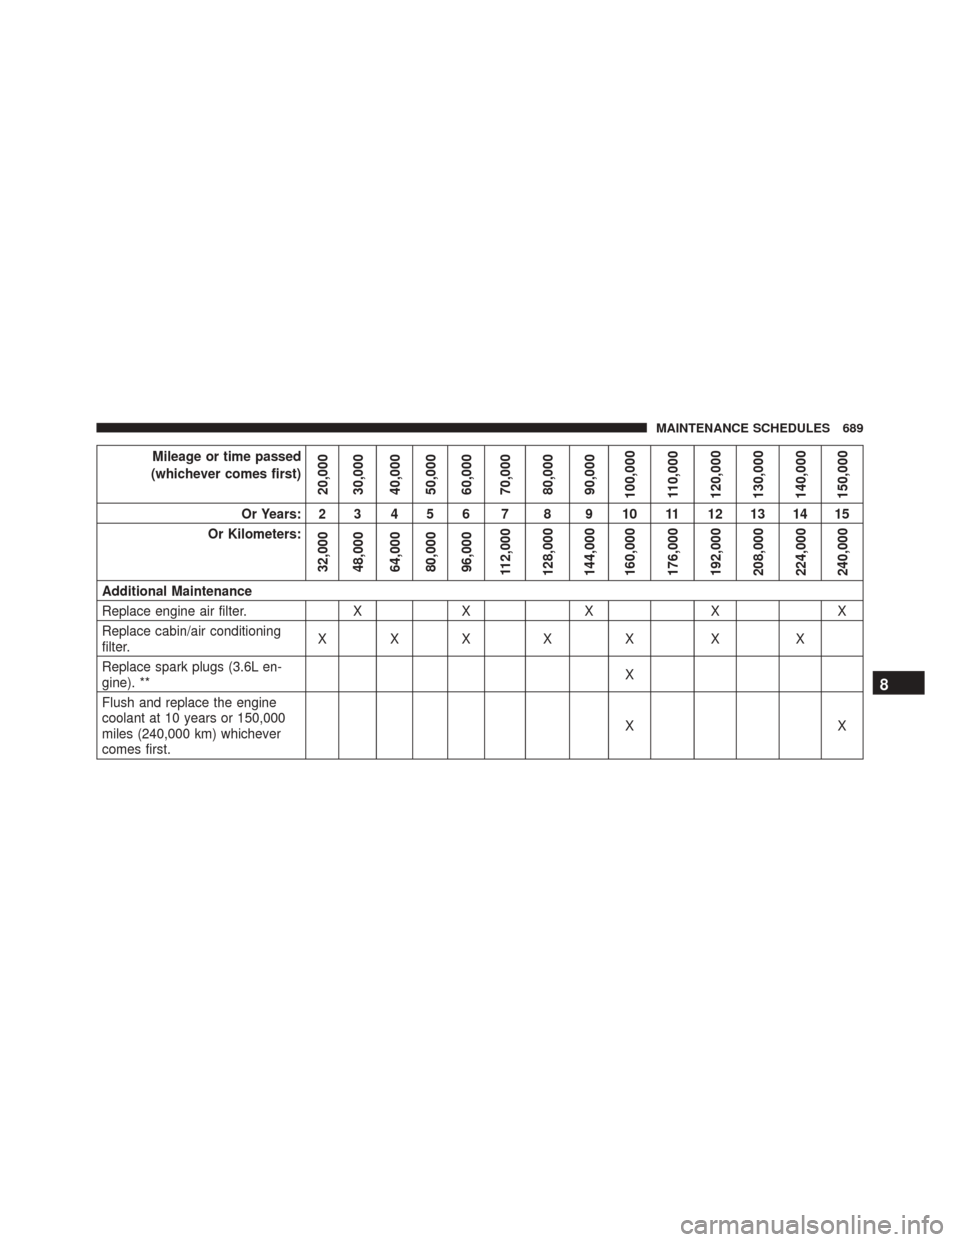
Additional Maintenance
Replace engine air filter. XX X X X
Replace cabin/air conditioning
filter. XXX X X X X
Replace spark plugs (3.6L en-
gine). ** X
Flush and replace the engine
coolant at 10 years or 150,000
miles (240,000 km) whichever
comes first. XX
8
MAINTENANCE SCHEDULES 689
Page 692 of 727
Mileage or time passed
(whichever comes first)
20,000
30,000
40,000
50,000
60,000
70,000
80,000
90,000
100,000
110,000
120,000
130,000
140,000
150,000
Or Years: 2 3 4 5 6 7 8 9 10 11 12 13 14 15
Or Kilometers:
32,000
48,000
64,000
80,000
96,000
112,000
128,000
144,000
160,000
176,000
192,000
208,000
224,000
240,000
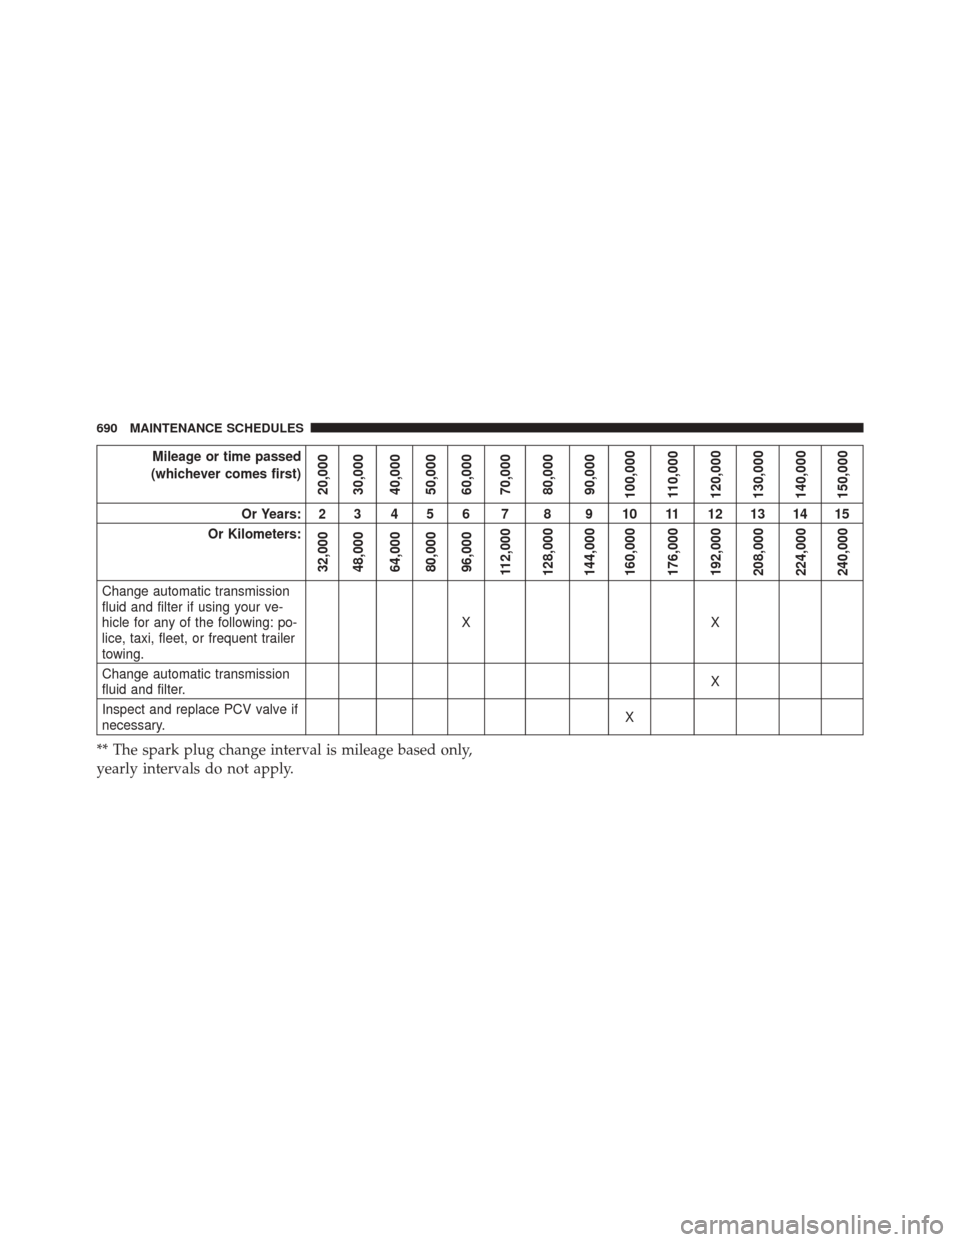
Change automatic transmission
fluid and filter if using your ve-
hicle for any of the following: po-
lice, taxi, fleet, or frequent trailer
towing. XX
Change automatic transmission
fluid and filter. X
Inspect and replace PCV valve if
necessary. X
** The spark plug change interval is mileage based only,
yearly intervals do not apply.
690 MAINTENANCE SCHEDULES
Page 698 of 727
facilities, factory-trained technicians, special tools, and
the latest information to ensure the vehicle is fixed
correctly and in a timely manner.
This is why you should always talk to an authorized
dealer service manager first. Most matters can be re-
solved with this process.
•If for some reason you are still not satisfied, talk to the
general manager or owner of the authorized dealer.
They want to know if you need assistance.
• If an authorized dealer is unable to resolve the con-
cern, you may contact the manufacturer’s customer
center.
Any communication to the manufacturer’s customer cen-
ter should include the following information:
• Owner’s name and address
• Owner’s telephone number (home and office) •
Authorized dealer name
• Vehicle Identification Number (VIN)
• Vehicle delivery date and mileage
FCA US LLC Customer Center
P.O. Box 21–8004
Auburn Hills, MI 48321–8004
Phone: (800) 247-9753
FCA Canada Inc. Customer Center
P.O. Box 1621
Windsor, Ontario N9A 4H6
Phone: (800) 465-2001 English / (800) 387-9983 French
696 IF YOU NEED CONSUMER ASSISTANCE